HC-X1 Camcorder - Usage Guide
How to Activate The Manual Focus Mode
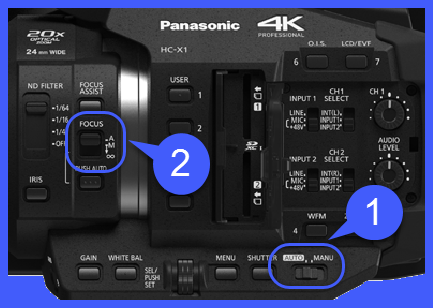
- Slide the [AUTO..MANU] switch to [MANU]
- Set the [FOCUS - A / M / ∞] switch to [M] to enable Manual Focus.
How to Adjust the EVF Brightness and Colour Density
- Press [MENU].
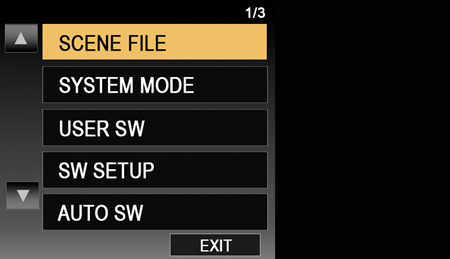
- Press [▼] to select [DISP SETUP].
- Touch [EVF SETTING].
- Touch [COLOR], [BRIGHTNESS] or [CONTRAST].
- Touch [◄] or [►] to adjust.
- Touch [RETURN].
- Touch [EXIT] to exit the menu setting.
- The default settings are as follows:
- [COLOR]: "0"
- [BRIGHTNESS]: "0"
- [CONTRAST]: "0"
- The default settings are as follows:
How to Adjust the LCD Brightness and Colour Density
[LCD SET]
- Press [MENU]
- Press [▼] to select [DISP SETUP]
- Touch [LCD SET]
- Touch [COLOR] / [BRIGHTNESS] / [CONTRAST]
- Touch [◄] or [►] to adjust.
- Touch [RETURN]
- Touch [EXIT] to exit the menu setting.
- Default settings are as follows:
- [COLOR]: "0"
- [BRIGHTNESS]: "0"
- [CONTRAST]: "0"
- Default settings are as follows:
How to Change the Display Mode for the Date / Time
[DATE/TIME]
It is possible to change the date and time display mode.
- Press [MENU].
- Press [▼] to select [DISP SETUP].
- Touch [DATE/TIME].
- Next / Previous page can be displayed by touching [▲] or [▼].
- Touch [OFF], [TIME], [DATE] or [DATE & TIME]. Off is set as default.
- Touch [RETURN].
- Touch [EXIT] to exit the menu setting.
How to Change the Recording Format
[REC FORMAT]
Switch the picture quality of motion pictures to be recorded with this unit.
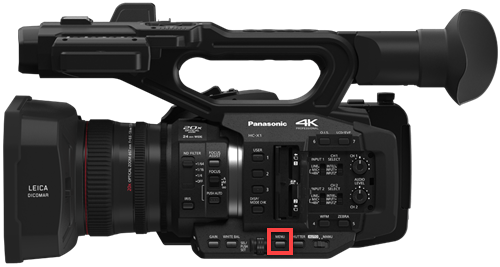
- Press [MENU]
- On the screen, Touch [SYSTEM
MODE].
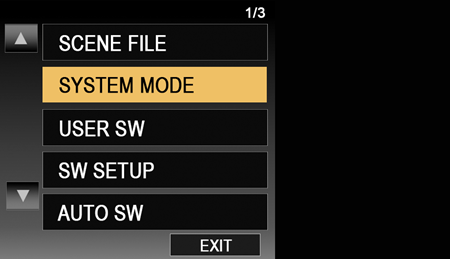
- Touch [REC FORMAT].
- Next (Previous) page can be displayed by touching the arrow up ▲ or down ▼ buttons.
- Touch the desired mode.
- Touch [RETURN]
- Touch [EXIT] to exit the menu setting.
Depending on the settings of [SYSTEM FREQ] and [REC MODE], the available [REC FORMAT] settings differ.
Refer to the Operating Manual for specific information on recording formats and recording functions and format settings.How to Change the Units of Zoom Values on the Display
[ZOOM DISPLAY]
This changes the units of zoom values.
- Press [MENU].
- Press [▼] to select [DISP SETUP].
- Touch [ZOOM DISPLAY].
- Next / Previous page can be displayed by touching [▲] or [▼].
- Touch [NUMBER], [mm]
or [OFF]. Number as default.
- Number: A value between 0 and 99 is displayed
- mm: All values are displayed in millimeter.
- Off: No value is displayed.
- Touch [RETURN].
- Touch [EXIT] to exit the menu setting.
How to Check the Used Space and Remaining Recording Time
- Press [MENU].
- Press [▼] to select [OTHER FUNCTION].
- Touch [MEDIA STATUS].
- Next / Previous page can be displayed by touching [▼ / ▲].
- The used space and remaining recordable time of the SD card can be checked.
- Touch [RETURN].
- Touch [EXIT] to exit the menu setting.
- Touching [CHANGE MEDIA] switches the unit between the display for the SD card 1 and the display for the SD card 2.
- Only in Recording Mode, remaining recordable time for the selected recording format is displayed.
- The SD card requires some space to store information and manage system files, so the actual usable space is slightly less than the indicated value.
How to Format the SD Card / External Media Device
The SD card or the external media device can be formatted.
- Press [MENU].
- Using the touch screen, press [▼] to select [OTHER FUNCTION].
- Touch [FORMAT MEDIA].
- Next / Previous page can be displayed by touching [▲ / ▼].
- Touch the SD card or the external media device that you want to format.
- Touch [YES].
- Touch [RETURN].
- Touch [EXIT] to exit the menu setting.
- Please be aware that if a medium is formatted, then all the data recorded on the medium will be erased and cannot be restored. Back up important data on a PC etc.
How to Select Recording Counter Operation
[REC COUNTER]
Selects the operation of the Recording Counter during recording.
- Press [MENU].
- Press [▼] to select [DISP SETUP].
- Touch [REC COUNTER].
- Next / Previous page can be displayed by touching [▲] or [▼].
- Touch [TOTAL] or [SCENE]. Scene as default.
- Touch [RETURN].
- Touch [EXIT] to exit the menu setting.
How to select the SD Card Slot to Which Pictures are Recorded
- Press [MENU].
- Press [▼] to select [OTHER FUNCTION].
- Touch [PICTURE MEDIA SELECT ].
- Next (Previous) page can be displayed by touching [▼ / ▲].
- Touch [SD CARD 1], or [SD CARD 2] (SD Card 1 is default).
- Touch [RETURN].
- Touch [EXIT] to exit the menu setting.
- This function is selectable in Playback Mode only.
How to Set the Peak Frequency for the EVF/LCD Detail
Sets the peaking frequency for [EVF / LCD DETAIL].
- Press [MENU].
- Press [▼] to select [DISP SETUP].
- Touch [EVF / LCD PEAK FREQ.]
- Next (Previous) page can be displayed by touching [▲ / ▼].
- Touch [HIGH] or [LOW]. (Low is default)
- Touch [RETURN].
- Touch [EXIT] to exit the menu setting.
How to Switch the Mirror Function of the LCD Monitor When Using Self Shoot
[SELF SHOOT]
Switches the mirror function of the LCD monitor when recording yourself. The image on the LCD monitor is displayed mirrored horizontally during recording of yourself when it is set to [MIRROR].
- Press [MENU].
- Press [▼] to select [DISP SETUP].
- Touch [SELF SHOOT].
- Next / Previous page can be displayed by touching [▼ / ▲].
- Touch [NORMAL] or [MIRROR] (Default).
- Touch [RETURN].
- Touch [EXIT] to exit the menu setting.
How to Turn On / Off the OSD for the Audio Level Meter
[AUDIO LEVEL METER]
Select to display the audio level meter.
- Press [MENU].
- Press [▼] to select [DISP SETUP].
- Touch [AUDIO LEVEL METER].
- Next / Previous page can be displayed by touching [▲] or [▼].
- Touch [OFF] or [ON]. On is set as default.
- Touch [RETURN].
- Touch [EXIT] to exit the menu setting.
Note: To set in playback mode: Touch the play mode select icon, and set this unit to motion picture playback mode.
How to Turn On / Off the OSD for the EVF / LCD Detail
Setting this item to [ON] helps you achieve focus easier by emphasizing the outlines of an image displayed on the LCD monitor and viewfinder.
- Press [MENU].
- Press [▼] to select [DISP SETUP].
- Touch [EVF / LCD DETAIL],
- Next / Previous page can be display by touching [▲ / ▼].
- Touch [OFF] or [ON] (OFF is the default).
- Touch [RETURN].
- Touch [EXIT] to exit the menu setting.
How to Turn On / Off the OSD for the Level Gauge
[LEVEL GAUGE]
This function displays the horizontal/vertical tilt of the unit with the electronic level.
- Press [MENU].
- Press [▼] to select [DISP SETUP].
- Touch [LEVEL GAUGE].
- Next / Previous page can be displayed by touching [▲] or [▼].
- Touch [OFF] or [ON]. Off is set as default.
- Touch [RETURN].
- Touch [EXIT] to exit the menu setting.