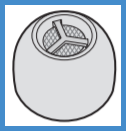
How do I clean my earbuds? - Technics and Panasonic Earphones
Regular cleaning is necessary to continue using the earpieces
comfortably.
Earwax and other foreign matter attached to the holes of the
earpieces can change the acoustic characteristics, such as
making the sound smaller, and also be the cause of malfunctions
Select a model from the list below for specific Cleaning instructions. If your model is not listed Refer to your models Operating Manual for specific procedure.
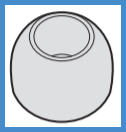
Models EAH-AZ40 and EAH-AZ60
Regular Cleaning
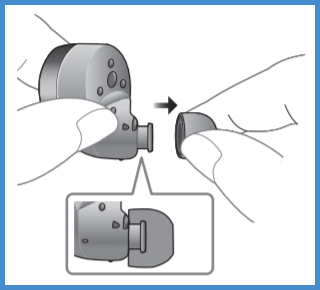
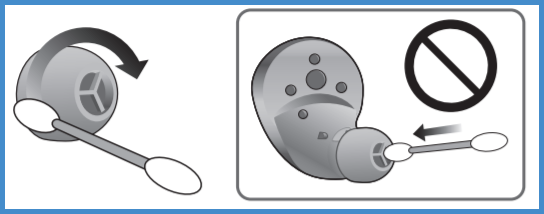
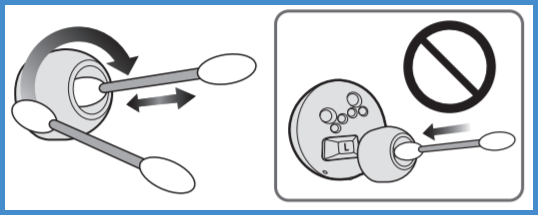
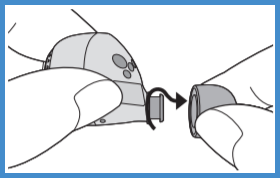
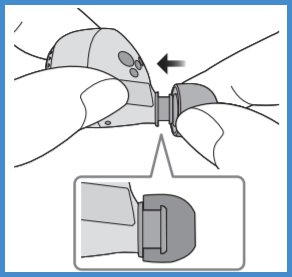
- Remove the earpieces. Grip the earpieces and twist
gently as you pull off. If you clean the earpieces while
they are attached to the earphones, you may damage the
protective mesh on the earphones.
- Use cotton swabs, etc., to gently wipe the outside of
the earpieces to remove foreign matter.
- Regularly use a diluted neutral detergent to hand wash the earpieces, and wipe off moisture well after washing.
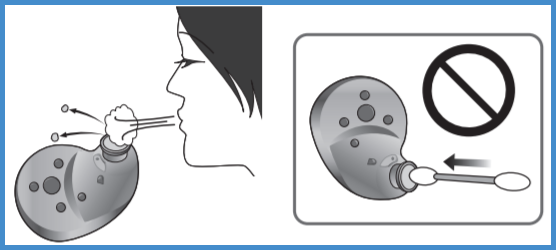
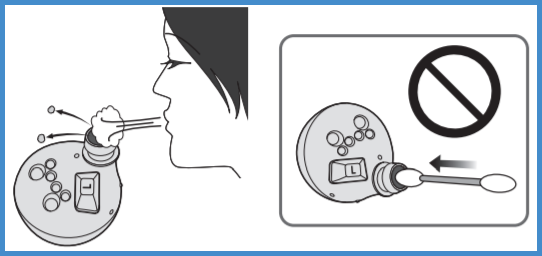
- Remove earwax, foreign matter, etc., that has attached
to the protective mesh of the earphones by blowing on it,
etc.
- If hair styling product or make-up gets onto the
earphones, wipe off immediately with a soft dry
cloth.
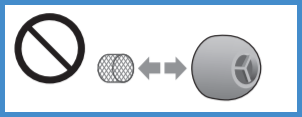
(Do not touch the protective mesh as this can have an effect on audio characteristics.) - You may block the protective mesh if you try to remove with a cotton swab, etc., which can lead to malfunctions.
- If hair styling product or make-up gets onto the
earphones, wipe off immediately with a soft dry
cloth.
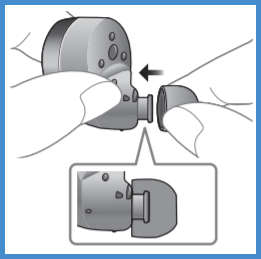
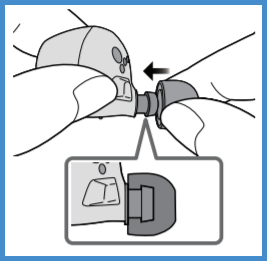
- Attach the earpieces. Make sure the earpieces are
fitted firmly onto the earphones and confirm that they are
not at an angle.
- Store the earphones in the charging cradle to protect them from foreign matter, etc., getting on them.
When the earpieces are very dirty
- Wash the earpieces with the tips of your fingers. Using
a diluted neutral detergent in warm water is effective.
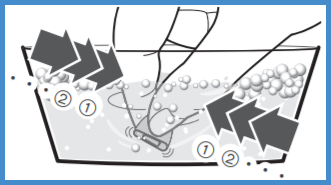
- Do not remove the sponges from the earpieces.
- Do not remove the sponges from the earpieces.
- Rinse well with clean water after washing.

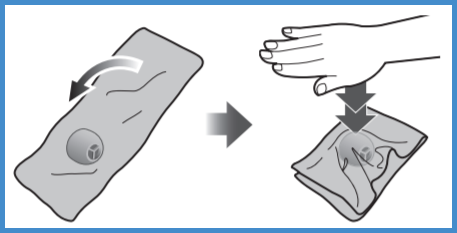
- Put in between a soft, dry cloth, press firmly 3 to 5
times to ensure the moisture is eliminated. After washing
the earpieces, eliminate the moisture and dry
thoroughly.
Cleaning Video
Model EAH-AZ60M2
- Remove the earpieces. Hold the earpiece and pullout while twisting slightly.
Note: If you clean the earpieces while they are attached to the earphones, you may damage the protective mesh of the earphones.
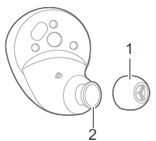
- Earpiece
- Protective Mesh
- Wash the earpieces using a diluted neutral detergent or in warm water.
- Do not remove the sponges from the earpieces.
- Do not remove the sponges from the earpieces.
- Rinse well with clean water after washing.
-
Wrap the earpieces with a soft, dry cloth and press firmly about 3 to 5 times to remove the moisture. Dry them thoroughly.
-
Remove earwax, foreign matter, etc., that has attached to the protective mesh of the earphones by blowing on it.
Do not use cotton swab or dab with soft cloth to remove foreign material from the earphone mesh as it will clog the mesh.
-
Attach the earpieces firmly and make sure they are not attached slanted.
Model EAH-AZ70
Regular Cleaning for type A earpieces (without a sponge)
- Remove the earpieces. Grip the earpieces and twist
gently as you pull off. If you clean the earpieces while
they are attached to the earphones, you may damage the
protective mesh on the earphones.

- Use cotton swabs, etc., to gently wipe the inside and
outside of the earpieces to remove foreign matter.
- Regularly use a diluted neutral detergent to hand wash the earpieces, and wipe off moisture well after washing.
- Remove earwax, foreign matter, etc., that has attached
to the protective mesh of the earphones by blowing on it,
etc.
- If hair styling product or make-up gets onto the
earphones, wipe off immediately with a soft dry
cloth.
(Do not touch the protective mesh as this can have an effect on audio characteristics.) - You may block the protective mesh if you try to remove with a cotton swab, etc., which can lead to malfunctions.
- If hair styling product or make-up gets onto the
earphones, wipe off immediately with a soft dry
cloth.
- Attach the earpieces. Make sure the earpieces are
fitted firmly onto the earphones and confirm that they are
not at an angle.
- Store the earphones in the charging cradle to protect them from foreign matter, etc., getting on them.
Regular Cleaning for type B earpieces (with a sponge)
- Remove the earpieces. Grip the earpieces and twist
gently as you pull off. If you clean the earpieces while
they are attached to the earphones, you may damage the
protective mesh on the earphones.
- Use cotton swabs, etc., to gently wipe the outside of
the earpieces to remove foreign matter.

- Regularly use a diluted neutral detergent to hand wash the earpieces, and wipe off moisture well after washing.
- Remove earwax, foreign matter, etc., that has attached
to the protective mesh of the earphones by blowing on it,
etc.
- If hair styling product or make-up gets onto the
earphones, wipe off immediately with a soft dry
cloth.
(Do not touch the protective mesh as this can have an effect on audio characteristics.) - You may block the protective mesh if you try to remove with a cotton swab, etc., which can lead to malfunctions.
- If hair styling product or make-up gets onto the
earphones, wipe off immediately with a soft dry
cloth.
- Attach the earpieces. Make sure the earpieces are
fitted firmly onto the earphones and confirm that they are
not at an angle.
- Store the earphones in the charging cradle to protect them from foreign matter, etc., getting on them.
When the earpieces are very dirty
- Wash the earpieces with the tips of your fingers. Using
a diluted neutral detergent in warm water is effective.
- Do not remove the sponges from the earpieces.
- Do not remove the sponges from the earpieces.
- Rinse well with clean water after washing.
- Put in between a soft, dry cloth, press firmly 3 to 5
times to ensure the moisture is eliminated. After washing
the earpieces, eliminate the moisture and dry
thoroughly.
Models EAH-AZ80
Models RZ-S300 and RZS500
After you use your earbuds, please check that the earbuds are clean. If you find that dust or earwax is preventing you from hearing the earbud speakers properly, remove the earpeices from the earbuds and clean them.
- Remove the earpieces. Grip the earpieces and twist
gently as you pull off. If you clean the earpieces while
they are attached to the earphones, you may damage the
protective mesh on the earphones.
- Use cotton swabs, etc., to gently wipe the outside of
the earpieces to remove foreign matter.
- Remove earwax, foreign matter, etc., that has attached
to the protective mesh of the earphones by blowing on it,
etc.
- If hair styling product or make-up gets onto the
earphones, wipe off immediately with a soft dry
cloth.
(Do not touch the protective mesh as this can have an effect on audio characteristics.) - You may block the protective mesh if you try to remove with a cotton swab, etc., which can lead to malfunctions.
- If hair styling product or make-up gets onto the
earphones, wipe off immediately with a soft dry
cloth.
- Attach the earpieces. Make sure the earpieces are
fitted firmly onto the earphones and confirm that they are
not at an angle.
- Store the earphones in the charging cradle to protect them from foreign matter, etc., getting on them.