How to adjust the brightness of the monitor or viewfinder on a Panasonic Camcorder.
To adjust the monitor or viewfinder brightness on a Panasonic camcorder, please follow these steps:
- Turn on your Panasonic camcorder and activate the monitor or viewfinder by opening the LCD screen.
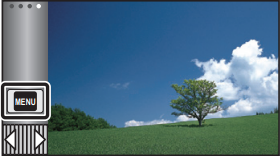
- Look for a dedicated [MENU] button or Touch Screen [MENU].
- Press or Touch [MENU] to access the camera settings.
- Use the navigation buttons or touch screen, the [SETTINGS] pr [DISPLAY] Menu.
- Use the navigation buttons or touch screen, the [LCD] or [EVF] Settings.
- Select a LCD / EVF Settings option.
- Once you have selected the brightness adjustment option, you may need to use the arrow buttons to adjust the brightness level.
- Adjust the brightness level to your desired preference.
- After setting the desired brightness level, save the changes by pressing the [ENTER] or [EXIT] on your camcorder.
- Exit the display settings menu by pressing the corresponding button or using the designated exit or return button on your camcorder.
The exact steps and terminology may vary slightly depending on the specific Panasonic camcorder model you are using. For detailed instructions tailored to your device, refer to your camcorder's manual.
For more information on how to adjust the brightness of the monitor or viewfinder select your model from the list below.
If your model is not listed below, click here to access our Operating Manual lookup to find more information
For models HC-V110. HC-V160
Power LCD
This makes it easier to view the LCD monitor in bright places including outdoors.
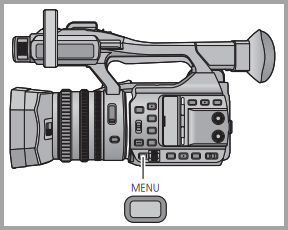
- Press the MENU button.

- Press the arrow up ▲, down ▼ left ◄ or right ► to select
 Setup.
 - Press the [ENTER] button.
- Press the arrow up ▲ or down ▼ to select [POWER LCD].
- Press the [ENTER] button.
- Press the arrow up ▲ or down ▼ to choose a brightness.
- +2 - Brightest.
- +1 - Brighter.
- 0 - Normal.
- -1 - Darker.
- Press the ENTER button to confirm the setting.
Note - Some subjects may look different from their actual appearance, but the recorded picture will not be affected.
LCD Set
It adjusts brightness and color density on the LCD monitor.
- Press the MENU button.
- Press the arrow up ▲, down ▼ left ◄ or right ► to select Setup.
- Press the [ENTER] button.
- Press the arrow up ▲ or down ▼ to select [LCD SET].
- Press the [ENTER] button.
- Press the arrow up ▲ or down ▼ to choose an option.
- BRIGHTNESS - Brightness of the LCD monitor.
- COLOR - Color level of the LCD monitor.
- Press the arrow left ◄ or right ► to adjust the setting.
- Press the ENTER button to confirm the setting.
Note - Some subjects may look different from their actual appearance, but the recorded picture will not be affected.
Click here to view more information on brightness for model HC-V110
Click here to view more information on brightness for model HC-V160
For model HC-V180
Power LCD
This makes it easier to view the LCD monitor in bright places including outdoors.
- Touch the ◄ (left side) or ► (right side) of on the Touch Menu to display [MENU].
- Touch MENU.
- Touch SETUP.
- Touch the arrow up ▲ or down ▼ to find [POWER LCD].
- Touch [POWER LCD] to enter the setting.
- Touch a brightness option.
- +1 - Brighter.
- 0 - Normal.
- -1 - Darker.
- Touch EXIT to exit the menu setting.
Note - Some subjects may look different from their actual appearance, but the recorded picture will not be affected.
LCD Set
It adjusts brightness and color density on the LCD monitor.
- Touch the ◄ (left side) or ► (right side) of on the Touch Menu to display [MENU].
- Touch MENU.
- Touch SETUP.
- Touch the arrow up ▲ or down ▼ to find [LCD SET].
- Touch [LCD SET] to enter the setting.
- Touch a brightness option.
- BRIGHTNESS - Brightness of the LCD monitor.
- COLOR - Color level of the LCD monitor.
- Touch the arrow left ◄ or right ► to adjust the setting.
- Touch [ENTER] to confirm the setting.
- Touch EXIT to exit the menu setting.
Note - Some subjects may look different from their actual appearance, but the recorded picture will not be affected.
Click here to view more information on brightness for model HC-V180
For model HC-V210
Click here to view more information on brightness for model HC-V210
For model HC-V270
Click here to view more information on brightness for model HC-V270
For model HC-V380
Click here to view more information on brightness for model HC-V380
For models HC-V500, HC-V510, HC-V520
Click here to view more information on brightness for model HC-V500.
Click here to view more information on brightness for model HC-V510 and HC-V520.
For model HC-V550
Click here to view more information on brightness for model HC-V550
For models HC-V700, HC-V720
Power LCD
This makes it easier to view the LCD monitor in bright places including outdoors.
- Touch the ◄ (left side) or ► (right side) of on the Touch Menu to display [MENU].
- Touch MENU.
- Touch SETUP.
- Touch the arrow up ▲ or down ▼ to find [POWER LCD].
- Touch [POWER LCD] to enter the setting.
- Touch a brightness option.
- +2 - Brightest.
- +1 - Brighter.
- 0 - Normal.
- -1 - Darker.
- A - Automatic Adjustment.
- Touch EXIT to exit the menu setting.
Note - Some subjects may look different from their actual appearance, but the recorded picture will not be affected.
Click here to view more information on brightness for model HC-V700
Click here to view more information on brightness for model HC-V720
For model HC-V750
Click here to view more information on brightness for model HC-V750
For model HC-V770, HC-V785
Click here to view more information on brightness for model HC-V770
Click here to view more information on brightness for model HC-V785
For model HC-V800
Click here to view more information on brightness for model HC-V800
For model HC-VX1
Click here to view more information on brightness for model HC-VX1
For model HC-VX870
Click here to view more information on brightness for model HC-VX870
For model HC-VX981
Click here to view more information on brightness for model HC-VX981
For model HC-VXF1
Click here to view more information on brightness for model HC-VXF1
For model HC-W570, HC-W580
Click here to view more information on brightness for model HC-W570
Click here to view more information on brightness for model HC-W580
For model HC-W850
Click here to view more information on brightness for model HC-W850
For model HC-WX970
Click here to view more information on brightness for model HC-WX970
For model HC-WXF1
Click here to view more information on brightness for model HC-WXF1
For model HC-WXF991K
Click here to view more information on brightness for model HC-WXF991K
For model HC-X1000
Power LCD
This makes it easier to view the LCD monitor in bright places including outdoors.
- Press the MENU button.
- Touch the arrow up ▲ or down ▼ to find [DISP SETUP].
- Touch [DISP SETUP] to enter the setting.
- Touch the arrow up ▲ or down ▼ to find [POWER LCD].
- Touch [POWER LCD] to enter the setting.
- Touch a brightness option.
- +1 - Brighter.
- 0 - Normal.
- -1 - Darker.
- Touch EXIT to exit the menu setting.
Note - Some subjects may look different from their actual appearance, but the recorded picture will not be affected.
LCD Set
It adjusts brightness and color density on the LCD monitor.
- Press the MENU button.
- Touch the arrow up ▲ or down ▼ to find [DISP SETUP].
- Touch [DISP SETUP] to enter the setting.
- Touch the arrow up ▲ or down ▼ to find [LCD SET].
- Touch [LCD SET] to enter the setting.
- Touch a brightness option.
- BRIGHTNESS - Brightness of the LCD monitor.
- COLOR - Color level of the LCD monitor.
- CONTRAST - Contrast of the LCD monitor.
- Touch the arrow left ◄ or right ► to adjust the setting.
- Touch [ENTER] to confirm the setting.
- Touch EXIT to exit the menu setting.
Note - Some subjects may look different from their actual appearance, but the recorded picture will not be affected.
Viewfinder adjustment
Brightness of the viewfinder can be switched.
- Press the MENU button.
- Touch the arrow up ▲ or down ▼ to find [DISP SETUP].
- Touch [DISP SETUP] to enter the setting.
- Touch the arrow up ▲ or down ▼ to find [EVF SET].
- Touch [EVF SET] to enter the setting.
- Touch a brightness option.
- BRIGHT
- NORMAL
- DARK
- Touch EXIT to exit the menu setting.
Click here to view more information on brightness for model HC-X1000