Applicable Modes
Photo Styles
You can select effects to match the type of image you wish to
record. It is possible to adjust the items such as color or
picture quality of the effect to your desire.
Press [
MENU] → [
 REC
REC]
→ [
Photo Style]
Photo Styles
| [Standard] |
This is the standard setting. |
| [Vivid] |
Brilliant effect with low contrast. |
| [Natural] |
Soft effect with low contrast. |
| [Monochrome] |
Monochrome effect with no color shades. |
| [L. Monochrome] |
Black-and-white effect with rich gradation and crisp
black accents. |
| [Scenery] |
An effect appropriate for sceneries with vivid blue skies
and greens. |
| [Portrait] |
An effect appropriate for portraits with a healthy and
beautiful skin tone. |
| [Custom 1] |
Use the setting registered in advance. |
| [Custom 2] |
| [Custom 3] |
| [Custom 4] |
| [Cinelike D] |
Gives priority to the dynamic range by using a gamma
curve designed to create film-like images. Suited for
editing. |
| [Cinelike V] |
Gives priority to the contrast by using a gamma curve
designed to create film-like images. |
| [Like709] |
Allows you to minimize white saturation by applying a
gamma curve correction equivalent to
Rec.709 *2 to compress overexposed
portions (Knee). |
| [V-Log L] |
A gamma curve effect designed for post production
editing. it allows you to add rich gradation to images
during post production editing.
|
| *1 These can be set only in Creative
Video Mode. |
| *2 Rec.709 is an abbreviation of “ITU-R
Recommendation BT.709”, a standard for high-definition
broadcasting |
In Intelligent Auto Plus Mode
- Only [Standard] or
[Monochrome] can be set.
- The setting will be reset to [Standard]
when the camera is switched to another Recording Mode or this
unit is turned off.
- Picture quality cannot be adjusted.
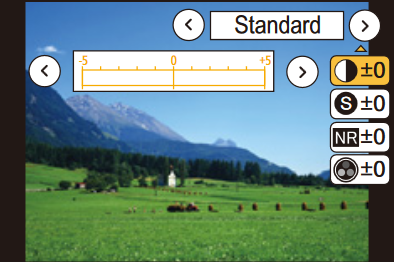
Adjusting Picture Qaulity
- Press [MENU] → [REC]
→ [Photo Style]
- Press ◄/► to select the type of Photo Style.
- Press ▲/▼ to select the items, and then press ◄/► to
adjust.
- Press [DISP.] to register the current
settings to [CUSTOM 1] / [CUSTOM
2] / [CUSTOM 3] / [CUSTOM
4]
- Press [MENU/SET].
 *screenshots may vary
Picture Qaulity Settings
| Photo Style |
Adjustment Value |
Description |
| Contrast |
[+] |
Increases the difference between the brightness and the
darkness in the picture |
| [-] |
Decreases the difference between the brightness and the
darkness in the picture |
| Sharpness |
[+] |
The picture is sharply defined |
| [-] |
The picture is softly focused |
| Noise Reduction |
[+] |
The noise reduction effect is enhanced. Picture
resolution may deteriorate slightly. |
| [-] |
The noise reduction effect is reduced. You can obtain
pictures with higher resolution. |
| Saturation |
[+] |
The colors in the picture become vivid. |
| [-] |
The colors in the picture become natural. |
| Color Tone |
[+] |
Adds a blue-ish tone |
| [-] |
Adds a yellow-ish tone |
| Filter Effect |
Yellow |
Enhances the contrast of a subject (Effect: Weak). The
blue sky can be recorded clearly. |
| Orange |
Enhances the contrast of a subject (Effect: Medium). The
blue sky can be recorded in a darker blue. |
| Red |
Enhances the contrast of a subject (Effect: Strong). The
blue sky can be recorded in a much darker blue. |
| Green |
The skin and lips of people appear in natural tones.
Green leaves appear brighter and more enhanced. |
| Off |
There will be no filter effect applied. |
Note
- [Color Tone] is displayed only when
[Monochrome] or [L.
Monochrome is selected. In other cases,
[Saturation] will be displayed.
- [Filter Effect] is displayed only when
[Monochrome] or [L.
Monochrome] is selected. In other cases,
[Hue] will be displayed.
- [Contrast] cannot be adjusted when
[Like709] is set.
- [Contrast] / [Saturation]
/ [Tint] cannot be adjusted when
[V-Log L] is set.
- If you adjust the picture quality, [+] is
displayed beside the Photo Style icon on the screen.
- You can select the Knee Mode setting when
[Like709] is set.