How to adjust the Picture Quality settings on a LUMIX camera.
Picture quality cannot be adjusted in the Intelligent Auto Plus Mode.
- Press [MENU] → [
 REC]
→ [Photo Style]
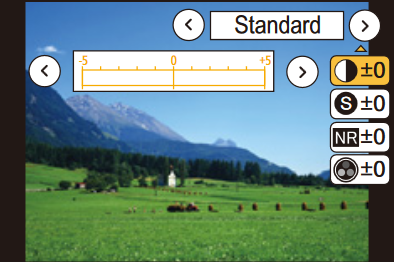
 - Press ◄/► to select the type of Photo Style.
- Press ▲/▼ to select the items, and then press ◄/► to
adjust.
- Press [DISP.] to register the current settings to [CUSTOM]
- Press [MENU/SET].
| Photo Style | Adjustment Value | Description |
|---|---|---|
| Contrast | [+] | Increases the difference between the brightness and the darkness in the picture |
| [-] | Decreases the difference between the brightness and the darkness in the picture | |
| Sharpness | [+] | The picture is sharply defined |
| [-] | The picture is softly focused | |
| Noise Reduction | [+] | The noise reduction effect is enhanced. Picture resolution may deteriorate slightly. |
| [-] | The noise reduction effect is reduced. You can obtain pictures with higher resolution. | |
| Saturation | [+] | The colors in the picture become vivid. |
| [-] | The colors in the picture become natural. | |
| Color Tone | [+] | Adds a blue-ish tone |
| [-] | Adds a yellow-ish tone | |
| Filter Effect | Yellow | Enhances the contrast of a subject (Effect: Weak). The blue sky can be recorded clearly. |
| Orange | Enhances the contrast of a subject (Effect: Medium). The blue sky can be recorded in a darker blue. | |
| Red | Enhances the contrast of a subject (Effect: Strong). The blue sky can be recorded in a much darker blue. | |
| Green | The skin and lips of people appear in natural tones. Green leaves appear brighter and more enhanced. | |
| Off | There will be no filter effect applied. |
Note
- [Color Tone] is displayed only when [Monochrome] or (DC-ZS200, DMC-GX85 & DC-GX850)[L. Monochrome is selected. In other cases, [Saturation] will be displayed.
- [Filter Effect] is displayed only when [Monochrome] or (DC-ZS200, DMC-GX85 & DC-GX850)[L. Monochrome] is selected.

