How to charge the battery on a Lumix Camera
When charging follow the specified charging instructions for your model and always use the dedicated battery, charger and / or supplied cables.
It has been found that counterfeit battery packs which look very similar to the genuine Panasonic are made available to purchase in some markets. Some of these battery packs are not adequately protected with internal protection to meet the requirements of appropriate safety standards. There is a possibility that these battery packs may lead to fire or explosion. Please be advised that we are not liable for any accident or failure occurring as a result of use of a counterfeit battery pack. To ensure that safe products are used, we would recommend that a genuine Panasonic battery pack is used.
Select the model number of your camera from the list below to view model specific charging instructions.
If your
model is not listed Refer to
your models Operating Manual.
DC-FZ1000M2
Original battery DMW-BLC12PP
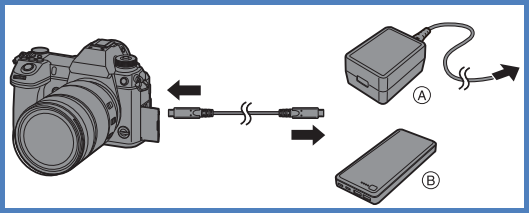
- Always use the dedicated AC adaptor (supplied), USB connection cable (supplied), and battery for this camera..
- Always charge before first use. (battery shipped uncharged)
- We recommend charging in a location where the ambient temperature is between 10 °C and 30 °C (50 °F to 86 °F) (same for the battery temperature)
- Make sure that the camera is turned off.
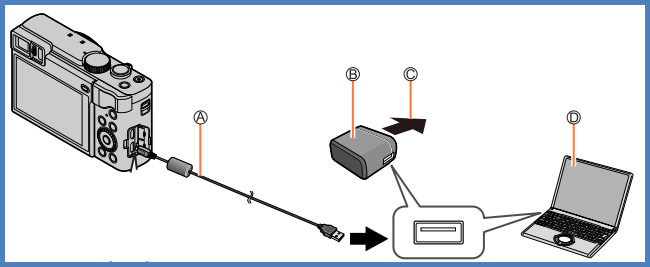
The battery can be charged from an AC outlet or through a PC.
Charging diagram
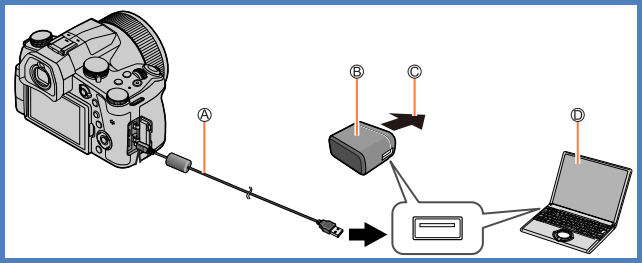
- A - USB connection cable (supplied)
- B - AC adaptor (supplied)
- C - To the electrical outlet
- D - Computer
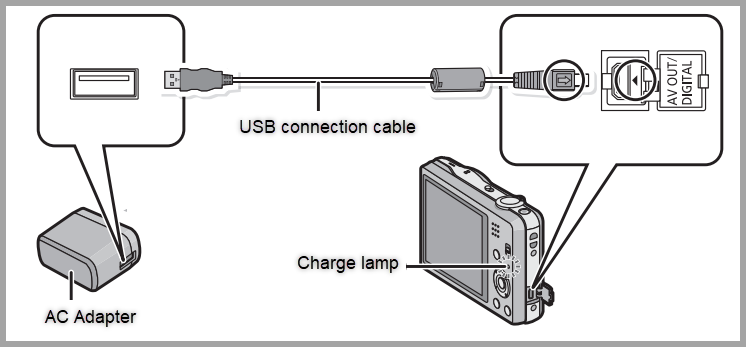
Charging the battery from a Power Outlet.
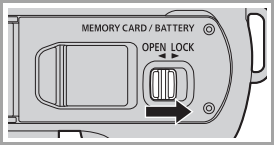
- Insert the battery into the camera. Slide the release lever to the [OPEN] position and open the card / battery door.
- Close the card / battery door and then slide the release lever to the [LOCK] position.
- Connect the AC adaptor (supplied) and this camera with the USB connection cable (supplied).
- Insert the AC adaptor (supplied) into the power outlet.
Charging the battery from a Computer
- Insert the battery into the camera. Slide the release lever to the [OPEN] position and open the card / battery door.
- Close the card / battery door and then slide the release lever to the [LOCK] position.
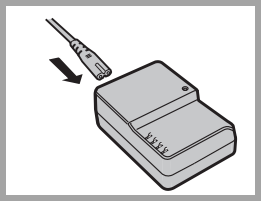
- Connect the computer and this camera with the USB connection cable (supplied).
Notes:
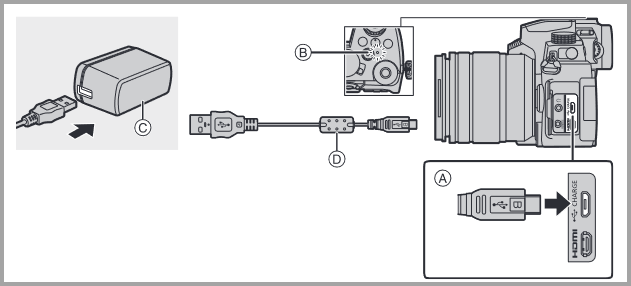
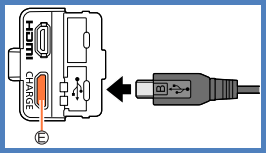
- The [USB / CHARGE] socket is located at the bottom when the camera is in an upright position.
- Always check the direction of the socket, and hold the plug straight to insert or remove it. (If the cable is inserted in the wrong direction, the socket could become deformed and cause faulty operation.) Also, do not insert into the wrong socket. Doing so may cause damage to this unit.
- If the computer enters sleep mode during charging, charging may be stopped.
- If a notebook computer that is not connected to an electrical outlet is connected to the camera, the battery of the notebook computer will be depleted. Do not leave the camera and notebook connected for a long period of time.
- Always connect the USB connection cable to the USB connector on your computer. Do not connect the USB connection cable to the USB connector of the monitor, keyboard, printer, or USB hub.
- Remove the battery after use. (The battery will be exhausted if left for a long period of time after being charged.)
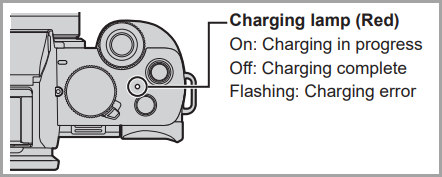
Charging lamp indications
Charging lamp (Red)
- On: Charging in progress.
- Off: Charging complete. After charging stops, disconnect the camera from the electrical outlet or your computer.
- Flashing: Charging error.
Charging time Details
Charging Time: Approx. 180 min.
- The charging time indicated above is the time required for charging in case when the battery is completely used up. The time required for charging differs depending on conditions of battery usage. Charging takes longer in cases when temperatures are either high or low and when the battery has not been used for a long period of time.
- The time required for charging through the computer varies depending on the power supply capacity of the computer.
For more information on the charging of the battery for DC-FZ1000M2 Refer to the Basic OI Manual
DC-FZ80
Original battery is DMW-BMB9PP
- Always use the dedicated AC adaptor (supplied), USB connection cable (supplied), and battery for this camera..
- Always charge before first use. (battery shipped uncharged)
- We recommend charging in a location where the ambient temperature is between 10 °C and 30 °C (50 °F to 86 °F) (same for the battery temperature)
- Make sure that the camera is turned off.
The battery can be charged from an AC outlet or through a PC.
Charging diagram
- A - USB connection cable (supplied)
- B - AC adaptor (supplied)
- C - To the electrical outlet
- D - Computer
Charging the battery from a Power Outlet.
- Insert the battery into the camera. Slide the release lever to the [OPEN] position and open the card / battery door.
- Close the card / battery door and then slide the release lever to the [LOCK] position.
- Connect the AC adaptor (supplied) and this camera with the USB connection cable (supplied).
- Insert the AC adaptor (supplied) into the power outlet.
Charging the battery from a Computer
- Insert the battery into the camera. Slide the release lever to the [OPEN] position and open the card / battery door.
- Close the card / battery door and then slide the release lever to the [LOCK] position.
- Connect the computer and this camera with the USB connection cable (supplied).
Notes:
- The [USB / CHARGE] socket is located at the bottom when the camera is in an upright position.
- Always check the direction of the socket, and hold the plug straight to insert or remove it. (If the cable is inserted in the wrong direction, the socket could become deformed and cause faulty operation.) Also, do not insert into the wrong socket. Doing so may cause damage to this unit.
- If the computer enters sleep mode during charging, charging may be stopped.
- If a notebook computer that is not connected to an electrical outlet is connected to the camera, the battery of the notebook computer will be depleted. Do not leave the camera and notebook connected for a long period of time.
- Always connect the USB connection cable to the USB connector on your computer. Do not connect the USB connection cable to the USB connector of the monitor, keyboard, printer, or USB hub.
- Remove the battery after use. (The battery will be exhausted if left for a long period of time after being charged.)
Charging lamp indications
Charging lamp (Red)
- On: Charging in progress.
- Off: Charging complete. After charging stops, disconnect the camera from the electrical outlet or your computer.
- Flashing: Charging error.
Charging time Details
Charging Time: Approx. 170 min.
- The charging time indicated above is the time required for charging in case when the battery is completely used up. The time required for charging differs depending on conditions of battery usage. Charging takes longer in cases when temperatures are either high or low and when the battery has not been used for a long period of time.
- The time required for charging through the computer varies depending on the power supply capacity of the computer.
For more information on the charging of the battery for DC-FZ80 Refer to the Basic OI Manual
DC-FZ80DK
Use an AC adaptor (supplied/optional/commercially available) and USB connection cable (supplied/commercially available) to charge the battery.
- Depending on the country or area where the camera was purchased, the AC adaptor or USB connection cable may not be supplied with the camera.
- For charging, we recommend using the supplied AC adaptor or the AC adaptor (DMW-AC11: optional).
- Always charge before first use! (battery shipped uncharged)
- Charge the battery while it is in the camera.
Inserting the battery
To charge the battery, insert it into the camera.
- Slide the release lever to the [OPEN] position and open the card/battery door
- Insert the battery all the way
- Insert the battery all the way firmly and check that it is locked by lever.
- Close the card/battery door
and then slide the release
lever to the [LOCK] position
- Make sure to insert the battery in the correct orientation.
To remove the battery
Move the lever in the card/battery compartment in the direction of the arrow.
Charging the battery
We recommend charging in a location where the ambient temperature is between 10 °C and 30 °C (50 °F to 86 °F) (same for the battery temperature).
- The battery can be charged from an outlet or through a PC utilizing the provided USB connection cable.
- When charging the camera, connect the USB connection cable to the [USB/
CHARGE] socket.
- [USB/CHARGE] socket is located at the bottom when the camera is in an upright position.
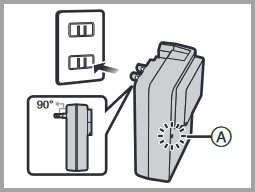
- Check the direction of the terminals and plug in/out straight holding onto the plug. (Inserting these at an angle may cause deformation or malfunction)
Notes:
- Always use genuine Panasonic batteries.
- If you use other batteries, we cannot guarantee the quality of this product.
- To remove the battery, turn the camera off and wait until the LUMIX indicator on the screen goes off. (Failure to wait may cause the camera to malfunction and may damage the card or recorded data.)
- Remove battery from camera after use.
- Keep the battery in a plastic bag, making sure that it is kept away from metallic objects (such as clips) when carrying or storing it.
For more information on charging the battery for DC-FZ80DK, refer to Page 19 of the Advanced Operating Instructions
DCG9
You can charge the battery either using the supplied charger, or in the camera body. If you turn on the camera, you can also power it from a power outlet.
- The battery that can be used with this unit is DMW-BLF19PP. (As of April 2017)
- The battery is not charged when the camera is shipped. Charge the battery before use.
- The indicated charging times are for when the battery has been discharged completely.
- The charging time may vary depending on how the battery has been used.
- The charging time for the battery in hot/cold environments or a battery that has not been used for a long time may be longer than normal.
- Use the charger indoors.
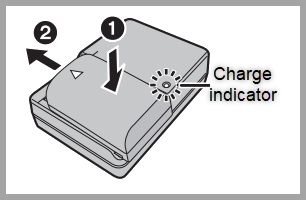
Charge the battery using the battery charger
| Battery in charger | Charge time |
|---|---|
| DMW-BLF19PP | Approx. 190 minutes |
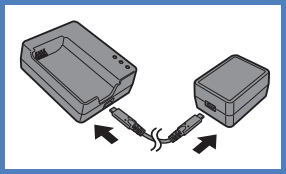
- Use the supplied charger and AC adaptor.
- Connect the charger and the AC adaptor (supplied) with the USB connection cable.
- Check the direction of the terminals and plug in/out straight holding onto the plug. It may result in malfunction by the deforming of the terminal if it is plugged in obliquely or in wrong direction.
- Insert the AC adaptor (supplied) into the power outlet.
- Insert the battery in the correct direction.
- The [CHARGE] indicator lights up and charging begins.

- Do not use any other USB connection cables except the supplied one.
- Do not use any other AC adaptors except the supplied one.
- The AC adaptor (supplied) and USB connection cable (supplied) are for this camera only. Do not use them with other devices.
About the [CHARGE] indicator
- ON: Charging
- OFF: Charging has completed. After charging is complete, disconnect the AC adaptor (supplied) from the power outlet and remove the battery.
When the [CHARGE] indicator flashes
- The battery temperature is too high or too low. It is recommended to charge the battery again in an ambient temperature of between 10°C and 30°C (50°F and 86°F).
- The terminals of the charger or the battery are dirty. In this case, wipe off the dirt with a dry cloth.
Charge the battery using the camera
| Battery in Camera | Charge time |
|---|---|
| DMW-BLF19PP | Approx. 230 minutes |
- Using the camera body and the supplied AC adaptor. The camera is turned off
- Turn off the camera.
- Insert the battery into the camera.
- Connect the USB connection cable (supplied) to the [USB/CHARGE] socket.
- Place the camera in an upright position, and find the terminal at the top.
- Check the direction of the terminals and plug in/out straight holding onto the plug. (It may result in malfunction by the deforming of the terminal if it is plugged in obliquely in wrong direction.
- Do not connect devices to incorrect terminals. Doing so may cause malfunction
- Insert the AC adaptor (supplied) into the power outlet.
- The camera consumes a small amount of power even after it is turned off by setting the camera ON/OFF switch to [OFF]. When leaving the product unused for a long time, disconnect the AC adaptor (supplied) from the power outlet for power savin
- You can also charge the battery by connecting a USB device (PC, etc.) and the camera with the USB connection cable (supplied). In that case, charging may take a while.
- The AC adaptor (supplied) and USB connection cable (supplied) are for this camera only. Do not use them with other devices
About the charging lamp
Lit red: Charging
Off: Charging has completed. When charging is complete, disconnect the camera from the power outlet.
When the charging light flashes
- Reconnect the USB connection cable (supplied) in a location where the ambient temperature (and the temperature of battery) is in a 10 oC to 30 oC (50 oF to 86 oF) range, and try charging again.
- If the USB device (PC etc.) is not capable of supplying sufficient power, charging is notpossible.
For more information on the charging of the battery for DC-G9 Refer to the Basic OI Manual
DCG95
You can charge the battery either using the supplied charger, or in the camera body. If you turn on the camera, you can also power it from a power outlet.
- The battery that can be used with this unit is DMW-BLC12PP. (As of April 2019)
- The battery is not charged when the camera is shipped. Charge the battery before use.
- The indicated charging times are for when the battery has been discharged completely.
- The charging time may vary depending on how the battery has been used.
- The charging time for the battery in hot/cold environments or a battery that has not been used for a long time may be longer than normal.
- Use the charger indoors.
Charge the battery using the battery charger
| Battery in charger | Charge time |
|---|---|
| DMW-BLC12PP | Approx. 175 minutes |
- Use the supplied charger and AC adaptor.
- Connect the charger and the AC adaptor (supplied) with the USB connection cable.
- Check the direction of the terminals and plug in/out straight holding onto the plug. It may result in malfunction by the deforming of the terminal if it is plugged in obliquely or in wrong direction.
- Insert the AC adaptor (supplied) into the power outlet.
- Insert the battery in the correct direction.
- The [CHARGE] indicator lights up and charging begins.
- Do not use any other USB connection cables except the supplied one.
- Do not use any other AC adaptors except the supplied one.
- The AC adaptor (supplied) and USB connection cable (supplied) are for this camera only. Do not use them with other devices.
About the [CHARGE] indicator
- ON: Charging
- OFF: Charging has completed. After charging is complete, disconnect the AC adaptor (supplied) from the power outlet and remove the battery.
When the [CHARGE] indicator flashes
- The battery temperature is too high or too low. It is recommended to charge the battery again in an ambient temperature of between 10°C and 30°C (50°F and 86°F).
- The terminals of the charger or the battery are dirty. In this case, wipe off the dirt with a dry cloth.
Charge the battery using the camera
| Battery in Camera | Charge time |
|---|---|
| DMW-BLC12PP | Approx. 180 minutes |
- Using the camera body and the supplied AC adaptor. The camera is turned off
- Turn off the camera.
- Insert the battery into the camera.
- Connect the USB connection cable (supplied) to the [USB/CHARGE] socket.
- Place the camera in an upright position, and find the terminal at the top.
- Check the direction of the terminals and plug in/out straight holding onto the plug. (It may result in malfunction by the deforming of the terminal if it is plugged in obliquely in wrong direction.
- Do not connect devices to incorrect terminals. Doing so may cause malfunction
- Insert the AC adaptor (supplied) into the power outlet.
- The camera consumes a small amount of power even after it is turned off by setting the camera ON/OFF switch to [OFF]. When leaving the product unused for a long time, disconnect the AC adaptor (supplied) from the power outlet for power savin
- You can also charge the battery by connecting a USB device (PC, etc.) and the camera with the USB connection cable (supplied). In that case, charging may take a while.
- The AC adaptor (supplied) and USB connection cable (supplied) are for this camera only. Do not use them with other devices
About the charging lamp
Lit red: Charging
Off: Charging has completed. When charging is complete, disconnect the camera from the power outlet.
When the charging light flashes
- Reconnect the USB connection cable (supplied) in a location where the ambient temperature (and the temperature of battery) is in a 10 oC to 30 oC (50 oF to 86 oF) range, and try charging again.
- If the USB device (PC etc.) is not capable of supplying sufficient power, charging is notpossible.
For more information on the charging of the battery for DC-G95 Refer to the Basic OI Manual
DC-G100, DC-G100D
You can charge the battery either using the supplied charger, or in the camera body. If you turn on the camera, you can also power it from a power outlet. Please only use the products supplied with the camera for charging.
- Insert the battery in the camera and charge it.
- The battery that can be used with the camera is DMW-BLG10. (As of December 2023)
Always use genuine Panasonic batteries (DMW-BLG10).
If you use other batteries, we cannot guarantee the quality of this product. - The battery is not charged at the time of purchase. Charge the battery before use.
- Check that this unit is turned off.

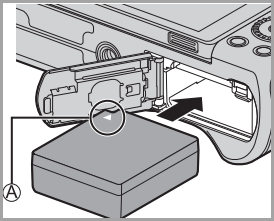
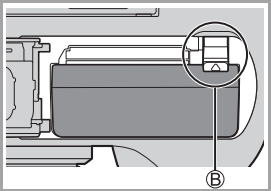
A.Make sure to insert the battery in the correct orientation.
B.Check that the lever is holding the battery in place. - Charging Time Approx. 180 min.
- Using the camera body and the supplied AC adaptor.
The indicated charging time is for when the battery has been discharged completely. - The charging time may vary depending on how the battery has been used.
- The charging time for the battery in hot/cold environments or a battery that has not been used for a long time may be longer than normal.
Charging the battery
- Set the camera on/off switch to [OFF].
- The camera cannot be charged when it is turned on.
- Insert the battery into the camera.
- Connect the camera [USB/CHARGE] socket and the AC adaptor using the USB connection cable.
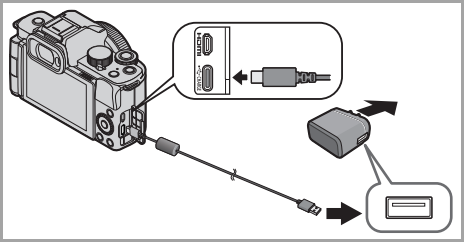
- Check the direction of the terminals and plug in/out straight holding onto the plug. (Inserting these at an angle may cause deformation or malfunction
- Insert the AC adaptor into the electrical outlet.
- The charging lamp blinks red and charging begins.
- You can also charge the battery by connecting a USB device (PC, etc.) and the camera with the USB connection cable. In that case, charging may take a while.
- Do not use any other USB connection cables except the supplied one. This may cause malfunction.
- Do not use any other AC adaptors except the supplied one. This may cause malfunction.
- After charging, disconnect the connection to the power source.
- When the charging lamp is blinking, the battery is not charging properly.
– The temperature of the battery or surroundings is either too high or too low. Try charging at an ambient temperature between 10 °C and 30 °C (50 °F and 86 °F).
– The terminals of the battery are dirty.
Remove the battery and wipe off the dirt with a dry cloth. - Even when the camera on/off switch is set to [OFF] thus turning the camera off, it consumes power.
When the camera will not be used for a long time, remove the power plug from the electrical outlet in order to save power
- The charging lamp blinks red and charging begins.
Notifications Regarding Charging
| Battery Power Indication bars | Remaining Battery level |
|---|---|
 |
75% or Higher |
 |
74% to 50% |
 |
49% to 25% |
 |
24% or below |
 Blinking in red |
Low battery
|
- The battery level indicated on the screen is approximate.
DC-GH5
Battery supplied with camera DMW-BLF19PP
Charging Time: Approx. 220 minutes.
- The indicated charging time is for when the battery has been discharged completely.
- The charging time may vary depending on how the battery has been used.
- The charging time for the battery in hot/cold environments or a battery that has not been used for a long time may be longer than normal.
- Connect the AC Cable to the battery charger.
- Attach the battery paying attention to the direction of the battery. The [CHARGE] indicator lights up and charging begins.
About the charge indicator
ON: Charging
OFF: Charging has completed. Disconnect the charger from the electrical socket and detach the battery after charging is completed.
Flashing:
- The battery temperature is too high or too low. It is recommended to charge the battery again in an ambient temperature of between 10 oC and 30 oC (50 oF and 86 oF).
- The terminals of the charger or the battery are dirty. In this case, wipe them with a dry cloth.
For more information on the charging of the battery for DC-GH5 Refer to the Basic OI Manual
DC-GH6
You can charge the battery either using the supplied charger or keeping it in the camera body, and plugging in the camera to an electrical outlet.
You can also turn on the camera and supply power from an electrical outlet.
- The battery that can be used with the camera is a DMW-BLK22. (As of January 2022)
- You can also use the battery charger DMW-BTC15 with the battery model DMW-BLK22
Optional Battery DMW-BLF19
You can also use DMW-BLF19 (optional), but there are the following limitations.
- The following functions cannot be used:
- [Rec Quality] exceeding a resolution of C4K
- [Rec Quality] with a high frame rate video exceeding a recording framerate of 60.00p
- [Variable Frame Rate] exceeding a frame rate of 60fps
- The battery capacity is low, so this reduces the number of pictures that can be taken and the available recording time.
- There will be 4 remaining battery charge indicators.
We recommend using DMW-BLK22 (supplied / optional).
Note:
The battery is not charged at the time of purchase. Charge the battery before use.
For more information on the charging of the battery for DC-GH6, refer to the Owner's manual
You can charge the battery either using the supplied charger or keeping it in the camera body, and plugging in the camera to an electrical outlet.
You can also turn on the camera and supply power from an electrical outlet.
- The battery that can be used with the camera is a DMW-BLK22. (As of May 2024)
- You can also use the battery charger DMW-BTC15 with the battery model DMW-BLK22
Optional Battery DMW-BLF19
You can also use DMW-BLF19 (optional), but there are the following limitations.
- The following functions cannot be used:
- [Rec Quality] exceeding a resolution of C4K
- [Rec Quality] with a high frame rate video exceeding a recording framerate of 60.00p
- [Variable Frame Rate] exceeding a frame rate of 60fps
- [HDMI RAW Data Output]
- External SSD
- [Streaming]
- The battery capacity is low, so this reduces the number of pictures that can be taken and the available recording time.
- There will be 4 remaining battery charge indicators.
We recommend using DMW-BLK22 (supplied / optional).
Note:
The battery is not charged at the time of purchase. Charge the battery before use.
For more information on the charging of the battery for DC-GH7, refer to the Operating Instructions
Models DC-S1, DC-S1H, DC-S1R
You can charge the battery either using the supplied charger, or in the camera body. If you turn on the camera, you can also charge the battery while the camera is powered from an electrical outlet. Instead of using an electrical outlet, you can also connect the camera using a device that supports USB PD (USB Power Delivery).
- Model(s) DC-S1, DC-S1H, DC-S1R - The battery that can be used with the camera is DMW-BLJ31. (As of January 2019)
- The battery is not charged at the time of purchase. Charge the battery before use.
Charging with the Charger
| Battery/Camera | Charge time |
|---|---|
| DMW-BLJ31 (DC-S1, DC-S1H, DC-S1R) | Approx. 130 minutes |
- Use the supplied charger and AC adaptor.
- The indicated charging time is for when the battery has been discharged completely. The charging time may vary depending on how the battery has been used. The charging time for the battery in hot/cold environments or a battery that has not been used for a long time may be longer than normal.
Note:
- Use the products supplied with the camera for charging.
- Use the charger indoors.
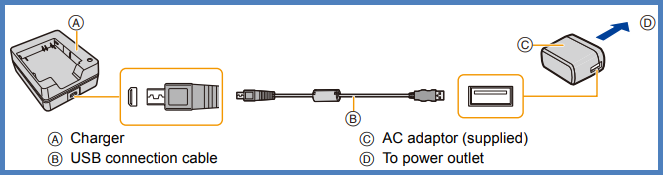
- Connect the charger and the AC adaptor with the USB connection cable (C-C).
- Hold the plugs and insert them straight. (Inserting these at an angle may cause deformation or
malfunction)
- Battery DMW-BLJ31 shown in diagram with it's respective charger (DMW-BTC14)
- Hold the plugs and insert them straight. (Inserting these at an angle may cause deformation or
malfunction)
- Connect the AC cable to the AC adaptor and then insert into the electrical outlet.
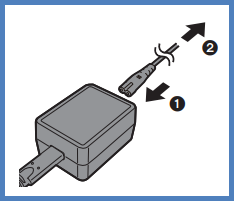
- Adaptor DMW-BTC14 being powered
- Adaptor DMW-BTC14 being powered
- Insert the battery.
- Insert the terminal end of the battery and push.
- The [CHARGE] lamp (A) blinks and charging begins.
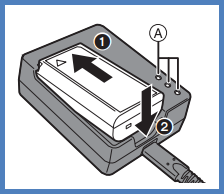
- Battery DMW-BLJ31 being inserted into it's charger (DMW-BTC14)
Note:
- Do not use any other USB connection cables except the supplied USB connection cable (C–C). This may cause malfunction.
- Do not use any other AC adaptors except the supplied one. This may cause malfunction.
- Do not use any other AC cables except the supplied one. This may cause malfunction.
[CHARGE] Lamp
| Charging Status | Charge Lamp |
|---|---|
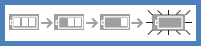
| 0% to 49% |  50% icon blinking. |
| 50% to 79% | 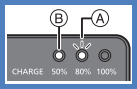 50% icon solid 80% icon blinking. |
| 80% to 99% | 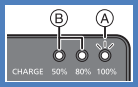 50% and 80% icon solid 100% icon blinking. |
| 100% | 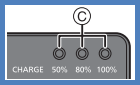 All icons off. |
Note:
- After charging, disconnect the power source connection and remove the battery.
- If the [50%] lamp is blinking quickly, then charging is not occurring.
- The temperature of the battery or surroundings is either too high or too low. Try charging at an ambient temperature between 10 °C and 30 °C (50 °F and 86 °F).
- The terminals of the charger or the battery are dirty. Remove the connection to the power source, and wipe with a dry cloth.
Charging the Battery with the Camera
| Camera | Charge time |
|---|---|
| DC-S1, DC-S1H, DC-S1R | Approx. 140 minutes |
- Using the camera body and the supplied AC adaptor. The camera is turned off.
- The indicated charging time is for when the battery has been discharged completely. The charging time may vary depending on how the battery has been used. The charging time for the battery in hot/cold environments or a battery that has not been used for a long time may be longer than normal.
- Use the products supplied with the camera for charging.
- Turn off the camera.
- Insert the battery into the camera.
- Connect the camera USB port and the AC adaptor using the USB connection cable (C–C).
- Hold the plugs and insert them straight. (Inserting these at an angle may cause deformation or
malfunction)

- Hold the plugs and insert them straight. (Inserting these at an angle may cause deformation or
malfunction)
- Connect the AC cable to the AC adaptor and then insert into the electrical outlet. The battery display on the status LCD will blink, and charging starts.
Note:
- You can also charge the battery by connecting a USB device (PC, etc.) and the camera with the USB connection cable (C–C or A–C). In that case, charging may take a while.
- When using the Battery Grip (DMW-BGS1: optional), the battery within the Battery Grip will also be charged.
- Do not use any other USB connection cables except the supplied USB connection cables (C–C and A–C). This may cause malfunction.
- Do not use any other AC adaptors except the supplied one. This may cause malfunction.
- Do not use any other AC cables except the supplied one. This may cause malfunction.
- Even when the camera on/off switch is set to [OFF] thus turning the camera off, it consumes power. When the camera will not be used for a long time, remove the power plug from the electrical outlet in order to save power.
Status LCD Display (DC-S1, DC-S1R)
| Charging Status | Display |
|---|---|
| Charging |  |
| Charging Complete |  |
| Charging error |  |
Note:
- After charging, disconnect the connection to the power source.
- When an error is displayed, charging is not possible.
- The temperature of the battery or surroundings is either too high or too low. Try charging at an ambient temperature between 10 °C and 30 °C (50 °F and 86 °F).
Charging While Using the Camera
When charging with both the camera body and the supplied AC adaptor, you can charge while the camera is being supplied with power by turning the camera on. You can record while charging. This is also possible by connecting devices that support USB PD (USB Power Delivery) to the camera.
- Insert the battery into the camera.
- Connect using the supplied USB connection cable (C–C).
- Use a device (mobile battery, etc.) with an output of 9 V/3 A (27 W or more) that supports USB PD.
- When the camera is on, charging will take longer than when the camera is off.
Note:
- Even when connecting with devices that support USB PD, you may not be able to charge while using the camera.
- If connecting with devices (PC, etc.) that do not support USB PD and turning the camera on, then this will supply power only.
- If the camera temperature rises under the any of following conditions, charging may stop. If the
temperature rises further,
 will be displayed, and power supply will stop. Wait until the camera cools
down.
will be displayed, and power supply will stop. Wait until the camera cools
down.
- When continuously recording video, etc. while charging/supplying power
- When the ambient temperature is high
- Turn off the camera before connecting or disconnecting the power plug.
- Remaining charge in the battery may decrease depending on usage conditions. When the battery level is depleted, the camera will turn off.
- Depending on the power supply capabilities of the connected devices, charging may not be possible.
DC-S5, DC-S5M2, DC-S5M2X
You can charge the battery either using the supplied charger, or in the camera body. If you turn on the camera, you can also charge the battery while the camera is powered from an electrical outlet. Instead of using an electrical outlet, you can also connect the camera using a device that supports USB PD (USB Power Delivery).
- Model(s) DC-S5, DC-S5M2, DC-S5M2X - The battery that can be used with the camera is DMW-BLK22 (As of September 2020)
- The battery is not charged at the time of purchase. Charge the battery before use.
Charging with the Charger
| Battery/Camera | Charge time |
|---|---|
| DMW-BLK22 (DC-S5, DC-S5M2, DC-S5M2X) | Approx. 230 minutes |
- Use the supplied charger and AC adaptor.
- The indicated charging time is for when the battery has been discharged completely. The charging time may vary depending on how the battery has been used. The charging time for the battery in hot/cold environments or a battery that has not been used for a long time may be longer than normal.
Note:
- Use the products supplied with the camera for charging.
- Use the charger indoors.
- Connect the charger and the AC adaptor with the USB connection cable (C-C).
- Hold the plugs and insert them straight. (Inserting these at an angle may cause deformation or
malfunction)
- Battery DMW-BLJ31 shown in diagram with it's respective charger (DMW-BTC14)
- Hold the plugs and insert them straight. (Inserting these at an angle may cause deformation or
malfunction)
- Connect the AC cable to the AC adaptor and then insert into the electrical outlet.
- Adaptor DMW-BTC14 being powered
- Adaptor DMW-BTC14 being powered
- Insert the battery.
- Insert the terminal end of the battery and push.
- The [CHARGE] lamp (A) blinks and charging begins.
- Battery DMW-BLJ31 being inserted into it's charger (DMW-BTC14)
Note:
- Do not use any other USB connection cables except the supplied USB connection cable (C–C). This may cause malfunction.
- Do not use any other AC adaptors except the supplied one. This may cause malfunction.
- Do not use any other AC cables except the supplied one. This may cause malfunction.
[CHARGE] Lamp
| Charging Status | Charge Lamp |
|---|---|
| 0% to 49% | 50% icon blinking. |
| 50% to 79% | 50% icon solid 80% icon blinking. |
| 80% to 99% | 50% and 80% icon solid 100% icon blinking. |
| 100% | All icons off. |
Note:
- After charging, disconnect the power source connection and remove the battery.
- If the [50%] lamp is blinking quickly, then charging is not occurring.
- The temperature of the battery or surroundings is either too high or too low. Try charging at an ambient temperature between 10 °C and 30 °C (50 °F and 86 °F).
- The terminals of the charger or the battery are dirty. Remove the connection to the power source, and wipe with a dry cloth.
Charging the Battery with the Camera
| Camera | Charge time |
|---|---|
| DC-S5, DC-S5M2, DC-S5M2X | Approx. 240 minutes |
- Using the camera body and the supplied AC adaptor. The camera is turned off.
- The indicated charging time is for when the battery has been discharged completely. The charging time may vary depending on how the battery has been used. The charging time for the battery in hot/cold environments or a battery that has not been used for a long time may be longer than normal.
- Use the products supplied with the camera for charging.
- Turn off the camera.
- Insert the battery into the camera.
- Connect the camera USB port and the AC adaptor using the USB connection cable (C–C).
- Hold the plugs and insert them straight. (Inserting these at an angle may cause deformation or
malfunction)
- Hold the plugs and insert them straight. (Inserting these at an angle may cause deformation or
malfunction)
- Connect the AC cable to the AC adaptor and then insert into the electrical outlet. The battery display on the status LCD will blink, and charging starts.
Note:
- You can also charge the battery by connecting a USB device (PC, etc.) and the camera with the USB connection cable (C–C or A–C). In that case, charging may take a while.
- When using the Battery Grip (DMW-BGS1: optional), the battery within the Battery Grip will also be charged.
- Do not use any other USB connection cables except the supplied USB connection cables (C–C and A–C). This may cause malfunction.
- Do not use any other AC adaptors except the supplied one. This may cause malfunction.
- Do not use any other AC cables except the supplied one. This may cause malfunction.
- Even when the camera on/off switch is set to [OFF] thus turning the camera off, it consumes power. When the camera will not be used for a long time, remove the power plug from the electrical outlet in order to save power.
Charging While Using the Camera
When charging with both the camera body and the supplied AC adaptor, you can charge while the camera is being supplied with power by turning the camera on. You can record while charging. This is also possible by connecting devices that support USB PD (USB Power Delivery) to the camera.
- Insert the battery into the camera.
- Connect using the supplied USB connection cable (C–C).
- Use a device (mobile battery, etc.) with an output of 9 V/3 A (27 W or more) that supports USB PD.
- When the camera is on, charging will take longer than when the camera is off.
Note:
- Even when connecting with devices that support USB PD, you may not be able to charge while using the camera.
- If connecting with devices (PC, etc.) that do not support USB PD and turning the camera on, then this will supply power only.
- If the camera temperature rises under the any of following conditions, charging may stop. If the
temperature rises further, will be displayed, and power supply will stop. Wait until the camera cools
down.
- When continuously recording video, etc. while charging/supplying power
- When the ambient temperature is high
- Turn off the camera before connecting or disconnecting the power plug.
- Remaining charge in the battery may decrease depending on usage conditions. When the battery level is depleted, the camera will turn off.
- Depending on the power supply capabilities of the connected devices, charging may not be possible.
Model DC-S9
- You can charge the battery in the camera body.
- You can also turn on the camera and supply power from an electrical outlet.
- You can also use the Battery Charger (DMW-BTC15: optional).
- The battery that can be used with the camera is DMW-BLK22. (As of May 2024)
- The battery is not charged at the time of purchase. Charge the battery before use.
Inserting a Battery into the Camera for Charging
- Set the camera on/off switch to [OFF].
- Insert the battery into the camera.
- Connect the camera USB port and the AC adaptor using
the USB connection cable.
- Check the direction of the terminals and plug in/out straight holding onto the plug. (Inserting these at an angle may cause deformation or malfunction.)
- Connect the AC adaptor to an electrical outlet.
- The charging light turns red and charging begins.
Notes
- It is recommended to use the Panasonic AC Adaptor (DMW-AC11: optional) or the supplied accessories of the Panasonic Battery Charger (DMW-BTC15: optional) for charging.
- You can charge with the camera body using a commercially available AC adaptor
and a USB connection cable. *Recommended specifications for the commercially available AC adaptor
- Supports 5 V/3 A (15 W) DC output
- USB Type-C terminal
- You can also use an AC adaptor with 5 V/500 mA or better for charging. However, charging time may be longer than with the recommended AC adaptor.
- Operation is not guaranteed with all commercially available devices.
Using the Camera While Supplying It with Power (Supplying Power)
When the battery is inserted into the camera for charging and the camera is turned on, you can record while the camera is being supplied with power.
- It is recommended to use the Panasonic AC Adaptor (DMW-AC11: optional) or the supplied accessories of the Panasonic Battery Charger (DMW-BTC15: optional) for supplying power.
- You can supply power to the camera body using a commercially available AC
adaptor and USB connection cable.
*Recommended specifications for the commercially available AC adaptor
- Supports 5 V/3 A (15 W) DC output
- USB Type-C terminal (*Use a USB connection cable with 15 W output or better for supplying power)
- Operation is not guaranteed with all commercially available devices.
- [
 Battery Charging] is displayed on the screen while power is being supplied.
Notes
- You can also supply power by using a USB connection cable to connect the camera and a USB device (PC, etc.).
- The battery cannot be charged while power is being supplied.
- Turn off the camera before connecting or disconnecting the AC adaptor.
- Remaining charge in the battery may decrease depending on usage conditions. When the battery level is depleted, the camera will turn off.
- Depending on the power supply capabilities of the connected device, it may not be possible to supply power.
- For information about the high temperature display, refer to page 118 in the DC-S9 Operating Instructions
For more information on charging the battery, refer to the DC-S9 Operating Instructions
DC-ZS200
Supplied battery DMW-BLG10PP.
Charging Time: Approx. 190 minutes.
We recommend charging in a location where the ambient temperature is between 10 °C and 30 °C (50 °F to 86 °F) (same for the battery temperature).
- Insert the battery into the camera.
- Make sure that the camera is turned off.
The battery can be charged from an outlet or through a PC. Always use genuine Panasonic batteries. If you use other batteries, we cannot guarantee the quality of the product.
If the battery is unusable, it should be discarded in accordance with the battery recycling laws where you reside.
- This terminal is located at the bottom when the camera is in an upright position.
- Always check the direction of the socket, and hold the plug straight to insert or remove it. (If the cable is inserted in the wrong direction, the socket could become deformed and cause faulty operation.) Also, do not insert into the wrong socket. Doing so may cause damage to this unit.
Charging Lamp Indications
- On: Charging in Progress.
- Off: Charging complete. After charging stops, disconnect the camera from the electrical outlet or your computer.
- When the charging lamp is Flashing: Charging error.
Notes:
- If the computer enters sleep mode during charging, charging may be stopped.
- If a notebook computer that is not connected to an electrical outlet is connected to the camera, the battery of the notebook computer will be depleted. Do not leave the camera and notebook connected for a long period of time.
- Always connect the USB connection cable to the USB connector on your computer. Do not connect the USB connection cable to the USB connector of the monitor, keyboard, printer, or USB hub.
For more information on the charging of the battery for DC-ZS200 Refer to the Basic OI Manual
DC-ZS70
Supplied battery DMW-BLG10PP.
Charging Time: Approx. 190 minutes.
We recommend charging in a location where the ambient temperature is between 10 °C and 30 °C (50 °F to 86 °F) (same for the battery temperature).
- Insert the battery into the camera.
- Make sure that the camera is turned off.
The battery can be charged from an outlet or through a PC. Always use genuine Panasonic batteries. If you use other batteries, we cannot guarantee the quality of the product.
If the battery is unusable, it should be discarded in accordance with the battery recycling laws where you reside.
- This terminal is located at the bottom when the camera is in an upright position.
- Always check the direction of the socket, and hold the plug straight to insert or remove it. (If the cable is inserted in the wrong direction, the socket could become deformed and cause faulty operation.) Also, do not insert into the wrong socket. Doing so may cause damage to this unit.
Charging Lamp Indications
- On: Charging in Progress.
- Off: Charging complete. After charging stops, disconnect the camera from the electrical outlet or your computer.
- When the charging lamp is Flashing: Charging error.
Notes:
- If the computer enters sleep mode during charging, charging may be stopped.
- If a notebook computer that is not connected to an electrical outlet is connected to the camera, the battery of the notebook computer will be depleted. Do not leave the camera and notebook connected for a long period of time.
- Always connect the USB connection cable to the USB connector on your computer. Do not connect the USB connection cable to the USB connector of the monitor, keyboard, printer, or USB hub.
For more information on the charging of the battery for DC-ZS70 Refer to the Basic OI Manual
DC-ZS80
Supplied battery DMW-BLG10PP.
Charging Time: Approx. 190 minutes.
We recommend charging in a location where the ambient temperature is between 10 °C and 30 °C (50 °F to 86 °F) (same for the battery temperature).
- Insert the battery into the camera.
- Make sure that the camera is turned off.
The battery can be charged from an outlet or through a PC. Always use genuine Panasonic batteries. If you use other batteries, we cannot guarantee the quality of the product.
If the battery is unusable, it should be discarded in accordance with the battery recycling laws where you reside.
- This terminal is located at the bottom when the camera is in an upright position.
- Always check the direction of the socket, and hold the plug straight to insert or remove it. (If the cable is inserted in the wrong direction, the socket could become deformed and cause faulty operation.) Also, do not insert into the wrong socket. Doing so may cause damage to this unit.
Charging Lamp Indications
- On: Charging in Progress.
- Off: Charging complete. After charging stops, disconnect the camera from the electrical outlet or your computer.
- When the charging lamp is Flashing: Charging error.
Notes:
- If the computer enters sleep mode during charging, charging may be stopped.
- If a notebook computer that is not connected to an electrical outlet is connected to the camera, the battery of the notebook computer will be depleted. Do not leave the camera and notebook connected for a long period of time.
- Always connect the USB connection cable to the USB connector on your computer. Do not connect the USB connection cable to the USB connector of the monitor, keyboard, printer, or USB hub.
For more information on the charging of the battery for DC-ZS80 Refer to the Basic OI Manual
DMC-G7
The battery that can be used with this unit is DMW-BLC12PP. (as of April 2016)
Charging Time Approx. 140 min.
- The indicated charging time is for when the battery has been discharged completely.
- The charging time may vary depending on how the battery has been used.
- The charging time for the battery in hot/cold environments or a battery that has not been used for a long time may be longer than normal.
Charging the battery
- Attach the battery paying attention to the direction of the battery.

- Connect the charger to the electrical outlet. The [CHARGE] indicator A lights up and charging begins.
About the charge indicator
ON: Charging
OFF: Charging has completed. Disconnect the charger from the electrical socket and detach the battery after charging is completed.
Flashing:
- The battery temperature is too high or too low. It is recommended to charge the battery again in an ambient temperature of between 10 oC and 30 oC (50 oF and 86 oF).
- The terminals of the charger or the battery are dirty. In this case, wipe them with a dry cloth.
For more information on the charging of the battery for DMC-G7 Refer to the Basic OI Manual
DMC-G85
The battery that can be used with this unit is DMW-BLC12PP. (as of April 2016)
Charging Time Approx. 140 min.
- The indicated charging time is for when the battery has been discharged completely.
- The charging time may vary depending on how the battery has been used.
- The charging time for the battery in hot/cold environments or a battery that has not been used for a long time may be longer than normal.
Charging the battery
- Attach the battery paying attention to the direction of the battery.
- Connect the charger to the electrical outlet. The [CHARGE] indicator A lights up and charging begins.
About the charge indicator
ON: Charging
OFF: Charging has completed. Disconnect the charger from the electrical socket and detach the battery after charging is completed.
Flashing:
- The battery temperature is too high or too low. It is recommended to charge the battery again in an ambient temperature of between 10 oC and 30 oC (50 oF and 86 oF).
- The terminals of the charger or the battery are dirty. In this case, wipe them with a dry cloth.
For more information on the charging of the battery for DMC-G85 Refer to the Basic OI Manual
DMC-F3
Charging Time of supplied battery Approx. 100 min.
- The indicated charging time is for when the battery has been discharged completely.
- The charging time may vary depending on how the battery has been used.
- The charging time for the battery in hot/cold environments or a battery that has not been used for a long time may be longer than normal.
Charging the battery
- Attach the battery paying attention to the direction of the battery.
- Connect the charger to the electrical outlet. The [CHARGE] indicator A lights up and charging begins.
About the charge indicator
ON: Charging
OFF: Charging has completed. Disconnect the charger from the electrical socket and detach the battery after charging is completed.
Flashing:
- The battery temperature is too high or too low. It is recommended to charge the battery again in an ambient temperature of between 10 oC and 30 oC (50 oF and 86 oF).
- The terminals of the charger or the battery are dirty. In this case, wipe them with a dry cloth.
For more information on the charging of the battery for DMC-F3 Refer to the Basic OI Manual
DMC-F5
Charging Time: Approx. 120 minutes.
We recommend charging in a location where the ambient temperature is between 10 °C and 30 °C (50 °F to 86 °F) (same for the battery temperature).
- Insert the battery into the camera.
- Make sure that the camera is turned off.
The battery can be charged from an outlet or through a PC. Always use genuine Panasonic batteries. If you use other batteries, we cannot guarantee the quality of the product.
If the battery is unusable, it should be discarded in accordance with the battery recycling laws where you reside.
- This terminal is located at the bottom when the camera is in an upright position.
- Always check the direction of the socket, and hold the plug straight to insert or remove it. (If the cable is inserted in the wrong direction, the socket could become deformed and cause faulty operation.) Also, do not insert into the wrong socket. Doing so may cause damage to this unit.
Charging Lamp Indications
- On: Charging in Progress.
- Off: Charging complete. After charging stops, disconnect the camera from the electrical outlet or your computer.
- When the charging lamp is Flashing: Charging error.
Notes:
- It may not be possible to charge the battery from some computers depending on the computer specifications.
- If the computer enters sleep mode during charging, charging may be stopped.
- If a notebook computer that is not connected to an electrical outlet is connected to the camera, the battery of the notebook computer will be depleted. Do not leave the camera and notebook connected for a long period of time.
- Always connect the USB connection cable to the USB connector on your computer. Do not connect the USB connection cable to the USB connector of the monitor, keyboard, printer, or USB hub.
- The charging times indicated are the times required for charging in the case when the battery is completely used up. The time required for charging differs depending on conditions of battery usage. Charging takes longer in cases when temperatures are either high or low and when the battery has not been used for a long period of time.
- The time required for charging through the computer varies depending on the specifications of the computer.
- Do not use a USB extension cable.
- Do not use any other USB connection cables or AC adaptors except the one supplied or a genuine Panasonic cable. Using other cables may cause a malfunction.
- If there is any trouble related to the electrical outlet (i.e. power failure), charging may not complete properly. Disconnect the USB connection cable (supplied) and reconnect it to the camera.
- If the charging lamp does not light or flashes even when the camera is properly connected to the AC adaptor (supplied) or your computer, charging has been put in pause status because the temperature is not in the appropriate range for charging. This is not a malfunction. Reconnect the USB connection cable (supplied) and retry charging in a place where ambient temperature is 10 °C to 30 °C (50 °F to 86 °F) (temperature conditions also apply to the battery itself).
- The AC adaptor (supplied) and USB connection cable (supplied) are for this camera only. Do not use them with other devices.
- Remove the battery after use (The battery will be exhausted if left for a long period of time after being charged).
- The battery may become warm after using and during and after charging. The camera also becomes warm during use. This is not a malfunction.
For more information on the charging of the battery for DMC-F5 Refer to the Basic OI Manual
DMC-FH10
Charging Time: Approx. 150 minutes.
We recommend charging in a location where the ambient temperature is between 10 °C and 30 °C (50 °F to 86 °F) (same for the battery temperature).
- Insert the battery into the camera.
- Make sure that the camera is turned off.
The battery can be charged from an outlet or through a PC. Always use genuine Panasonic batteries. If you use other batteries, we cannot guarantee the quality of the product.
If the battery is unusable, it should be discarded in accordance with the battery recycling laws where you reside.
- This terminal is located at the bottom when the camera is in an upright position.
- Always check the direction of the socket, and hold the plug straight to insert or remove it. (If the cable is inserted in the wrong direction, the socket could become deformed and cause faulty operation.) Also, do not insert into the wrong socket. Doing so may cause damage to this unit.
Charging Lamp Indications
- On: Charging in Progress.
- Off: Charging complete. After charging stops, disconnect the camera from the electrical outlet or your computer.
- When the charging lamp is Flashing: Charging error.
Notes:
- It may not be possible to charge the battery from some computers depending on the computer specifications.
- If the computer enters sleep mode during charging, charging may be stopped.
- If a notebook computer that is not connected to an electrical outlet is connected to the camera, the battery of the notebook computer will be depleted. Do not leave the camera and notebook connected for a long period of time.
- Always connect the USB connection cable to the USB connector on your computer. Do not connect the USB connection cable to the USB connector of the monitor, keyboard, printer, or USB hub.
- The charging times indicated are the times required for charging in the case when the battery is completely used up. The time required for charging differs depending on conditions of battery usage. Charging takes longer in cases when temperatures are either high or low and when the battery has not been used for a long period of time.
- The time required for charging through the computer varies depending on the specifications of the computer.
- Do not use a USB extension cable.
- Do not use any other USB connection cables or AC adaptors except the one supplied or a genuine Panasonic cable. Using other cables may cause a malfunction.
- If there is any trouble related to the electrical outlet (i.e. power failure), charging may not complete properly. Disconnect the USB connection cable (supplied) and reconnect it to the camera.
- If the charging lamp does not light or flashes even when the camera is properly connected to the AC adaptor (supplied) or your computer, charging has been put in pause status because the temperature is not in the appropriate range for charging. This is not a malfunction. Reconnect the USB connection cable (supplied) and retry charging in a place where ambient temperature is 10 °C to 30 °C (50 °F to 86 °F) (temperature conditions also apply to the battery itself).
- The AC adaptor (supplied) and USB connection cable (supplied) are for this camera only. Do not use them with other devices.
- Remove the battery after use (The battery will be exhausted if left for a long period of time after being charged).
- The battery may become warm after using and during and after charging. The camera also becomes warm during use. This is not a malfunction.
For more information on the charging of the battery for DMC-FH10 Refer to the Basic OI Manual
DMC-FH8
Approx Charging time 180 min.
- Use the dedicated AC adaptor (supplied), USB connection cable (supplied) and battery. Use of cables other than the supplied USB connection cable may cause a malfunction.
- The battery is not charged when the camera is shipped. Charge the battery before use.
- Charge the battery with the AC adaptor (supplied) indoors [10 °C to 30 °C (50 °F to 86 °F)].
- Charge the battery only when it is inserted in the camera
- Turn the unit off.
- Connect the AC adaptor (supplied) and this camera with the USB connection cable.
- Insert the AC adaptor (supplied) into the power outlet.
For more information on the charging of the battery for DMC-FH8 Refer to the Basic OI Manual
DMC-GH4
Battery supplied with camera DMW-BLF19PP
Charging Time: Approx. 220 minutes.
- The indicated charging time is for when the battery has been discharged completely.
- The charging time may vary depending on how the battery has been used.
- The charging time for the battery in hot/cold environments or a battery that has not been used for a long time may be longer than normal.
- Connect the AC Cable to the battery charger.
- Attach the battery paying attention to the direction of the battery. The [CHARGE] indicator lights up and charging begins.
About the charge indicator
ON: Charging
OFF: Charging has completed. Disconnect the charger from the electrical socket and detach the battery after charging is completed.
Flashing:
- The battery temperature is too high or too low. It is recommended to charge the battery again in an ambient temperature of between 10 oC and 30 oC (50 oF and 86 oF).
- The terminals of the charger or the battery are dirty. In this case, wipe them with a dry cloth.
For more information on the charging of the battery for DC-GH4 Refer to the Basic OI Manual
DMC-SZ1
Approx Charging time 180 min.
- Use the dedicated AC adaptor (supplied), USB connection cable (supplied) and battery. Use of cables other than the supplied USB connection cable may cause a malfunction.
- The battery is not charged when the camera is shipped. Charge the battery before use.
- Charge the battery with the AC adaptor (supplied) indoors [10 °C to 30 °C (50 °F to 86 °F)].
- Charge the battery only when it is inserted in the camera
- Turn the unit off.
- Connect the AC adaptor (supplied) and this camera with the USB connection cable.
- Insert the AC adaptor (supplied) into the power outlet.
For more information on the charging of the battery for DMC-SZ1 Refer to the Basic OI Manual
DMC-TS30
- The battery is not charged when the camera is shipped. Charge the battery before use.
- The battery can be recharged even when it still has some power left, but it is not recommended that the battery charge be frequently topped up while the battery is fully charged (Since characteristic swelling may occur).
Battery Indication
The battery indication is displayed on the LCD monitor.
- The indication turns red and blinks if the remaining battery power is low. Recharge the battery or replace it with a fully charged battery.
Charging
Use the dedicated charger, AC adaptor (supplied), USB connection cable (supplied) and battery.
- Charge the battery with the charger indoors.
- Charge the battery in areas with an ambient temperature, between 10°C and 30°C (50°F and 86°F) (same as the battery temperature), is recommended.
- Connect the charger and the AC adaptor (supplied) with the USB connection cable.
- Check the direction of the terminals and plug in/out straight holding onto the plug. It may result in malfunction by the deforming of the terminal if it is plugged in obliquely or in wrong direction.
- Insert the AC adaptor (supplied) into the power outlet.
- Insert the battery in the correct direction.
- The [CHARGE] indicator (E) lights up and charging begins.
About the [CHARGE] indicator
- ON: Charging
- OFF: Charging has completed. After charging is complete, disconnect the AC adaptor (supplied) from the power outlet and remove the battery.
When the [CHARGE] indicator flashes
- The battery temperature is too high or too low. It is recommended to charge the battery again in an ambient temperature of between 10°C and 30°C (50°F and 86°F).
- The terminals of the charger or the battery are dirty. In this case, wipe off the dirt with a dry cloth.
Charging time: Approx. 120 minutes.
The indicated charging time is for when the battery has been discharged completely. The charging time may vary depending on how the battery has been used. The charging time for the battery in hot/cold environments or a battery that has not been used for a long time may be longer than normal.
Notes:
- Do not leave any metal items (such as clips) near the contact areas of the power plug. Otherwise, a fire and/or electric shocks may be caused by short-circuiting or the resulting heat generated.
- The AC adaptor is in the standby condition when the mains plug is connected. The primary circuit is always “live” as long as the mains plug is connected to an electrical outlet.
- Do not use any other USB connection cables except the supplied one. This may cause malfunction.
- Do not use any other AC adaptors except the supplied one. This may cause malfunction.
- Do not use a USB extension cable.
- Do not use the AC adaptor (supplied) and the USB connection cable for other devices. Doing so may cause malfunction.
- The battery becomes warm after using it and during and after charging. The camera also becomes warm during use. This is not a malfunction.
For more information on the charging of the battery for DMC-TS30 Refer to the Basic OI Manual
DMC-TS6
About batteries that you can use with this unit
- Use the dedicated charger and battery.
Charging
- The battery is not charged when the camera is shipped. Charge the battery before use.
- Charge the battery with the charger indoors.
- Charge the battery in areas with an ambient temperature between 10°C and 30°C (50°F and 86°F) (same as the battery temperature) is recommended.
- Connect the AC cable.
- Attach the battery paying attention to the direction of the battery.
- The [CHARGE] indicator lights up and charging begins.
About the [CHARGE] indicator
- On: Charging.
- Off: Charging has completed. (Disconnect the charger from the electrical socket and detach
the battery after charging is completed.)
- When the charge indicator flashes.
- The battery temperature is too high or too low. It is recommended to charge the battery again in an ambient temperature between 10°C and 30°C (50°F and 86°F).
- The terminals of the charger or the battery are dirty. In this case, wipe off the dirt with a dry cloth.
Charging Time
Charging Time: Approx. 165 min.
- The indicated charging time is for when the battery has been discharged completely. The charging time may vary depending on how the battery has been used. The charging time for the battery in hot/cold environments or a battery that has not been used for long time may be longer than normal.
Battery Indication
The battery indication is displayed on the LCD monitor.
- The indication turns red and blinks if the remaining battery power is exhausted. Recharge the battery or replace it with a fully charged battery.
Notes:
- Do not leave any metal items (such as clips) near the contact areas of the power plug. Otherwise, a fire and/or electric shocks may be caused by short-circuiting or the resulting heat generated.
- The battery becomes warm after using it and during and after charging. The camera also becomes warm during use. This is not a malfunction.
- The battery can be recharged even when it still has some charge left, but it is not recommended that the battery charge be frequently topped up while the battery is fully charged. (Since characteristic swelling may occur.)
DMC-XS1
Charging Time: Approx. 150 minutes.
We recommend charging in a location where the ambient temperature is between 10 °C and 30 °C (50 °F to 86 °F) (same for the battery temperature).
- Insert the battery into the camera.
- Make sure that the camera is turned off.
The battery can be charged from an outlet or through a PC. Always use genuine Panasonic batteries. If you use other batteries, we cannot guarantee the quality of the product.
If the battery is unusable, it should be discarded in accordance with the battery recycling laws where you reside.
- This terminal is located at the bottom when the camera is in an upright position.
- Always check the direction of the socket, and hold the plug straight to insert or remove it. (If the cable is inserted in the wrong direction, the socket could become deformed and cause faulty operation.) Also, do not insert into the wrong socket. Doing so may cause damage to this unit.
Charging Lamp Indications
- On: Charging in Progress.
- Off: Charging complete. After charging stops, disconnect the camera from the electrical outlet or your computer.
- When the charging lamp is Flashing: Charging error.
Notes:
- It may not be possible to charge the battery from some computers depending on the computer specifications.
- If the computer enters sleep mode during charging, charging may be stopped.
- If a notebook computer that is not connected to an electrical outlet is connected to the camera, the battery of the notebook computer will be depleted. Do not leave the camera and notebook connected for a long period of time.
- Always connect the USB connection cable to the USB connector on your computer. Do not connect the USB connection cable to the USB connector of the monitor, keyboard, printer, or USB hub.
- The charging times indicated are the times required for charging in the case when the battery is completely used up. The time required for charging differs depending on conditions of battery usage. Charging takes longer in cases when temperatures are either high or low and when the battery has not been used for a long period of time.
- The time required for charging through the computer varies depending on the specifications of the computer.
- Do not use a USB extension cable.
- Do not use any other USB connection cables or AC adaptors except the one supplied or a genuine Panasonic cable. Using other cables may cause a malfunction.
- If there is any trouble related to the electrical outlet (i.e. power failure), charging may not complete properly. Disconnect the USB connection cable (supplied) and reconnect it to the camera.
- If the charging lamp does not light or flashes even when the camera is properly connected to the AC adaptor (supplied) or your computer, charging has been put in pause status because the temperature is not in the appropriate range for charging. This is not a malfunction. Reconnect the USB connection cable (supplied) and retry charging in a place where ambient temperature is 10 °C to 30 °C (50 °F to 86 °F) (temperature conditions also apply to the battery itself).
- The AC adaptor (supplied) and USB connection cable (supplied) are for this camera only. Do not use them with other devices.
- Remove the battery after use (The battery will be exhausted if left for a long period of time after being charged).
- The battery may become warm after using and during and after charging. The camera also becomes warm during use. This is not a malfunction.
For more information on the charging of the battery for DMC-XS1 Refer to the Basic OI Manual
DC-ZS100, DMC-ZS60
The battery supplied with the camera DMW-BLG10PP.
Charging Time: Approx. 190 minutes.
We recommend charging in a location where the ambient temperature is between 10 °C and 30 °C (50 °F to 86 °F) (same for the battery temperature).
- Insert the battery into the camera.
- Make sure that the camera is turned off.
The battery can be charged from an outlet or through a PC. Always use genuine Panasonic batteries. If you use other batteries, we cannot guarantee the quality of the product.
If the battery is unusable, it should be discarded in accordance with the battery recycling laws where you reside.
- This terminal is located at the bottom when the camera is in an upright position.
- Always check the direction of the socket, and hold the plug straight to insert or remove it. (If the cable is inserted in the wrong direction, the socket could become deformed and cause faulty operation.) Also, do not insert into the wrong socket. Doing so may cause damage to this unit.
Charging Lamp Indications
- On: Charging in Progress.
- Off: Charging complete. After charging stops, disconnect the camera from the electrical outlet or your computer.
- When the charging lamp is Flashing: Charging error.
Notes:
- If the computer enters sleep mode during charging, charging may be stopped.
- If a notebook computer that is not connected to an electrical outlet is connected to the camera, the battery of the notebook computer will be depleted. Do not leave the camera and notebook connected for a long period of time.
- Always connect the USB connection cable to the USB connector on your computer. Do not connect the USB connection cable to the USB connector of the monitor, keyboard, printer, or USB hub.
For more information on the charging of the battery for DMC-ZS100 and DMC-ZS60, refer to the Basic OI Manual