How to charge the HomeHawk outdoor camera battery.
- This camera has an internal rechargeable battery.
- Remove the camera from the wall before charging.
- Make sure to charge the camera indoors and in a dry location.
- Charge the camera in a location with a temperature between 5 °C and 40 °C (41 °F and 104 °F). The camera cannot charge in locations outside of these temperatures.
Charge the camera for about 7 hours.
Turn the camera off before charging the battery. If the camera is turned on while charging, it may take longer to charge.
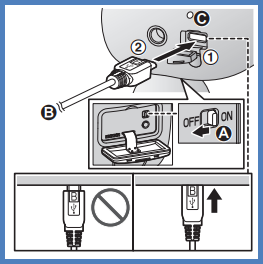
- Open the USB cover.
- Insert the USB cable into the micro-usb connector.

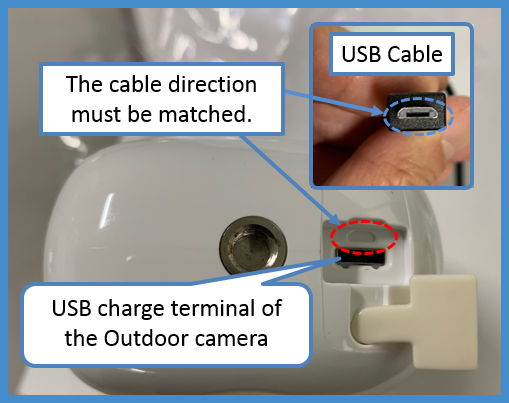
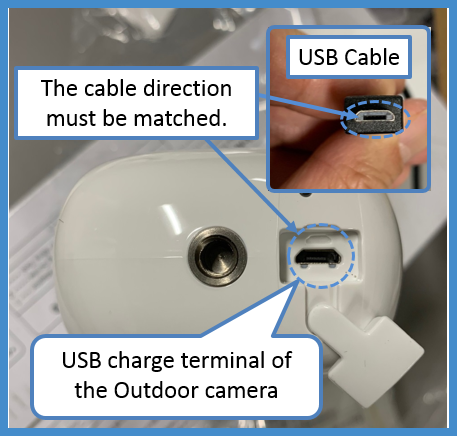
Before inserting the USB cable, make sure to insert the USB cable with the correct direction (Up and down). If you insert the USB cable upside down, the charge terminal can be broken.
Example 1 - Camera with rectangluar USB port

Example 2 - If you have this type of the product, it will be easy to check the up and down direction.

Note:
Check the charging LED indicator continues to blink in red for more than 10 seconds after connecting the USB cable. If the indicator stops blinking and turns off within 10 seconds, perform the following.
- If you are not using the supplied USB cable, use it.
- If the indicator still turns off within 10 seconds, try connecting the USB cable to a different power source (5.0 V, 1.0 A or higher).
Charging LED indicators
You can use the charging LED indicators to confirm the charging status of the camera.
| Indicator | Status |
| Red, lit | Charging is completed |
| Red, blinking slowly | Charging |
| Red, blinking quickly | Charging failure |
This answer applies to models KX-HNC715, KX-HNC710 sold seperately or included with HomeHawk Front door / Outdoor camera systems KX-HN1007, KX-HN7002, KX-HN7003, KX-HN7052
