


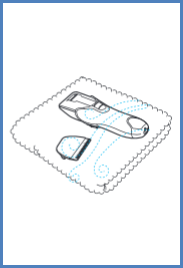
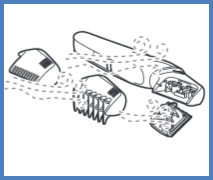
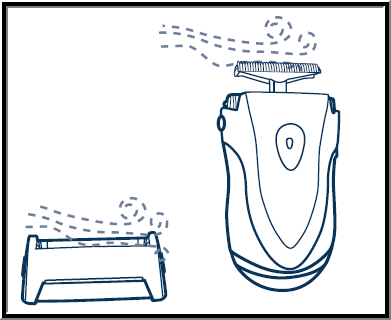
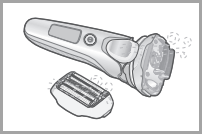
How to clean and apply oil to a shaver, epilator, trimmer or body groomer.
We recommend cleaning the shaver or grooming product after each use.
Some models also reccomend to apply oil after cleaning and use.
Select your model for specific cleaning instructions from the list below. If your model is not listed Refer to your models Operating Manual for specific procedure.
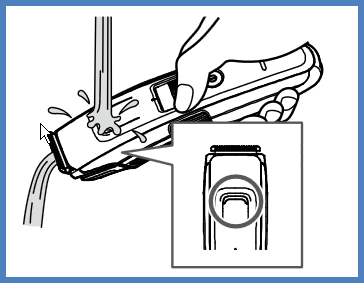
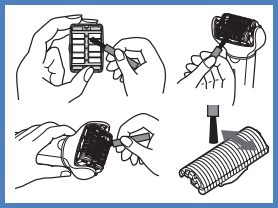
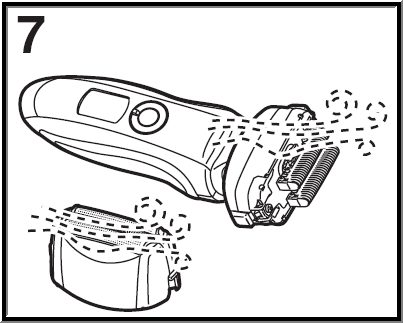
Cleaning steps for Model ER-224
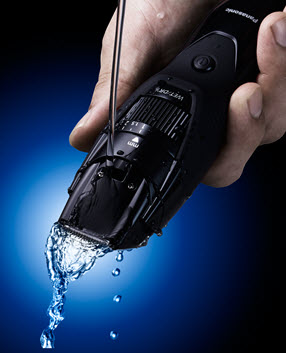
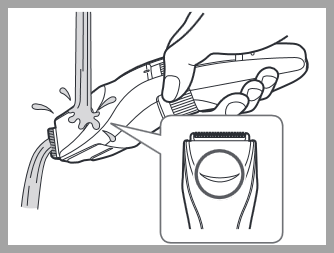
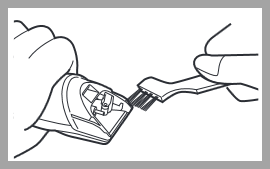
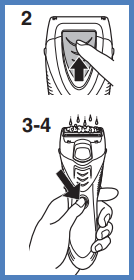
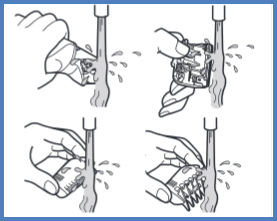
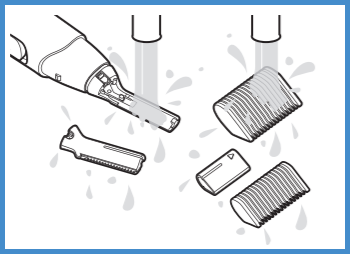
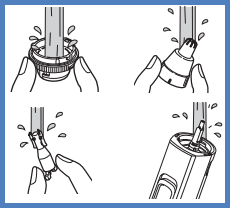
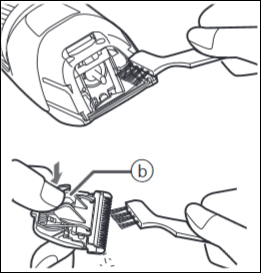
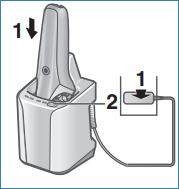
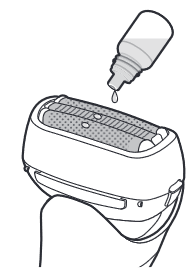
Detach the trimmer from the AC adaptor before cleaning it in water.
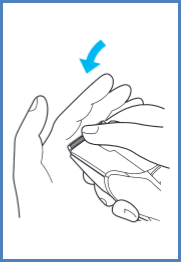
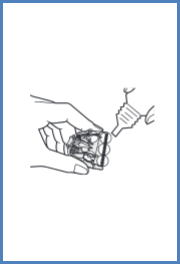
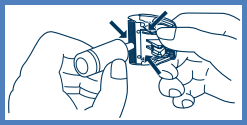
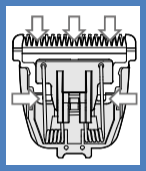
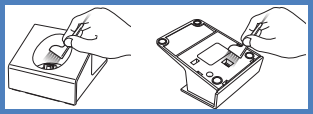
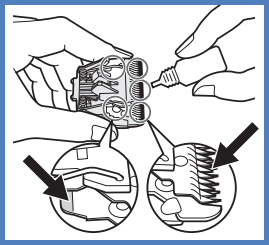
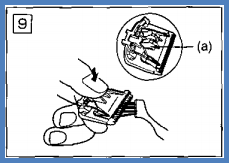
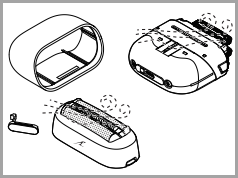
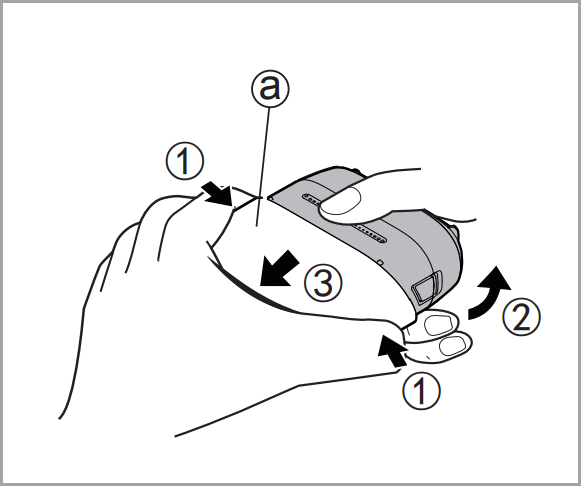
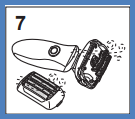
- Hold body of the trimmer with Panasonic mark upwards, place the thumb against the blades, and push them away from the main body.
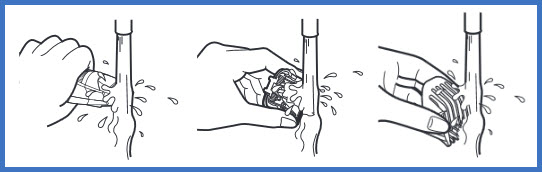
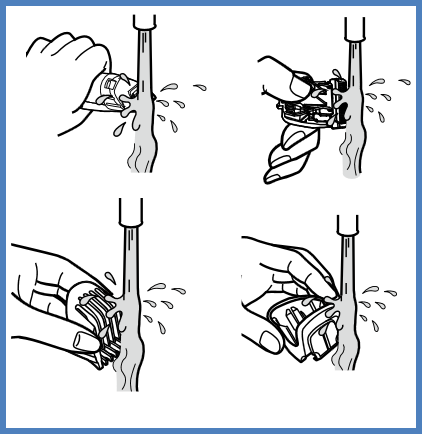
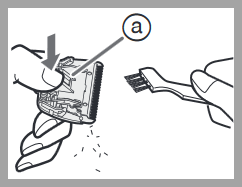
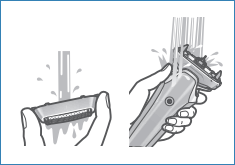
Washing in water
- Rinse off any hairs that are sticking to the blade in running water.
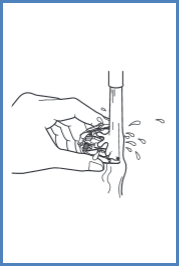
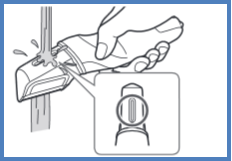
- Rinse out any hairs that are inside the trimmer with running water.
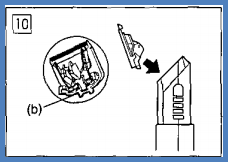
- Shake the trimmer 4-5 times gently, wipe off any water drops from the trimmer and blade, and then place it onto a towel with the Panasonic mark facing downward to let it fully air dry.
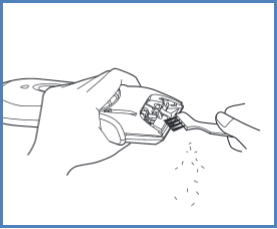
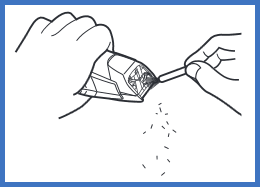
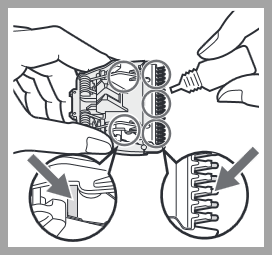
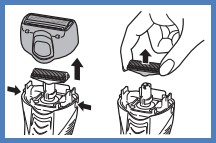
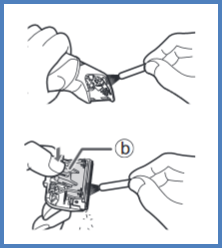
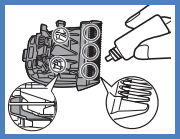
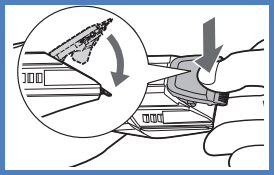
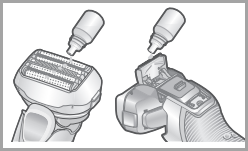
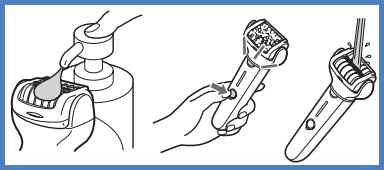
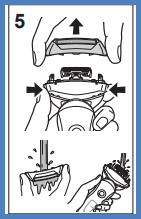
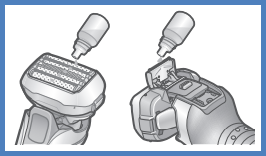
- Apply 5 drops of the oil to the points indicated in the image below
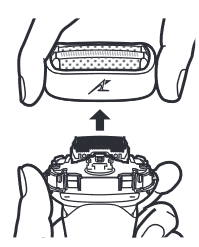
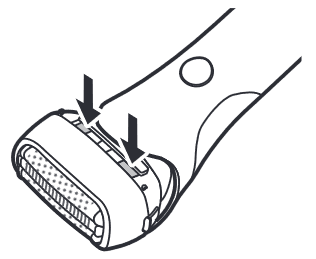
- Remount the blade on the trimmer body.
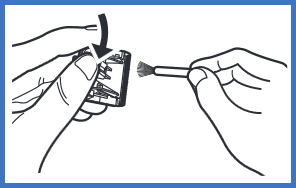
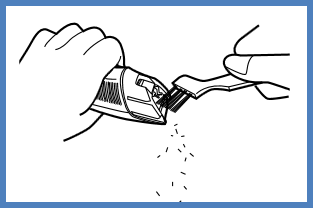
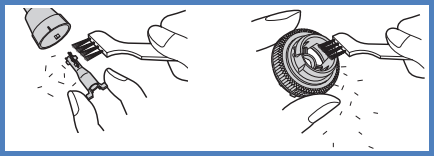
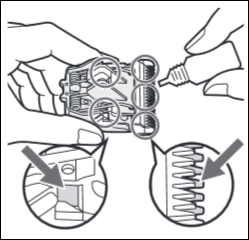
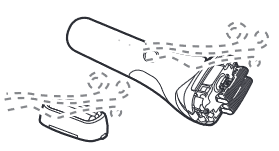
If cleaning with brush
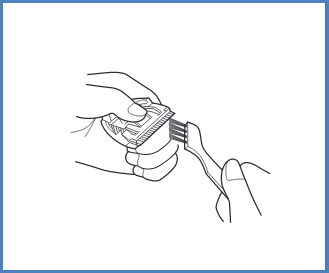
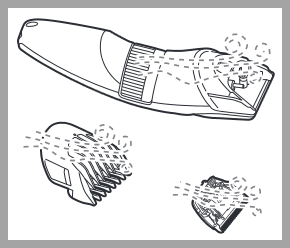
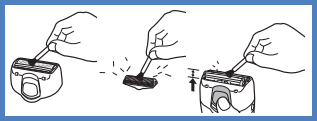
- Remove the blade and brush off the cut hairs from the blade edge.
- Use the cleaning brush to brush off the cut hairs from the trimmer body and from around the blade.
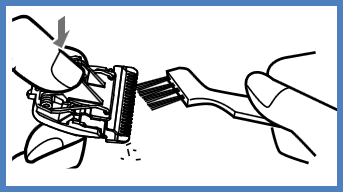
- Brush the cut hairs out from between the stationary blade and the moving blade. Press down on the lever for cleaning in order to raise the moving blade, and brush the cut hairs out from between the blades.
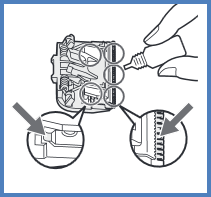
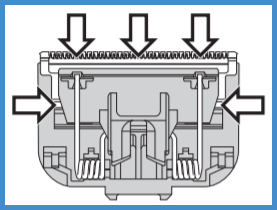
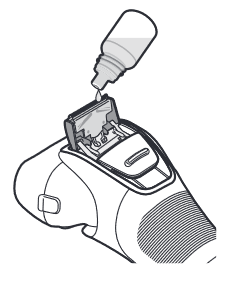
- Apply a few drops of the oil to the points indicated by the arrows.
- Remount the blade on the trimmer body.
Cautions for cleaning.
- Do not take the housing apart as this can affect the watertight construction of the trimmer.
- Wash the trimmer in tap water. Do not use salt water or boiling water. Also, do not use cleaning products that are designed for toilets, bathrooms or kitchen appliances.
- Do not submerge the trimmer in tap water for a long time.
- Clean the housing only with a soft cloth slightly dampened with tap water or soapy tap water.
- Do not use a caustic cleaner such as benzine or bleach.
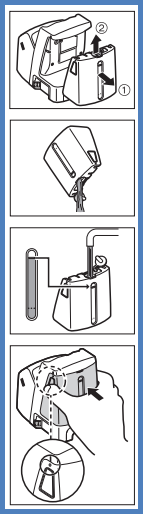
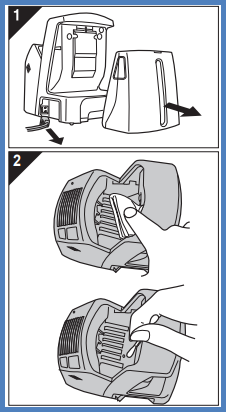
Cleaning steps for Model ER-2403
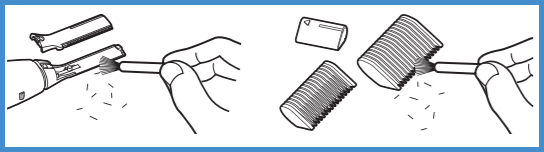
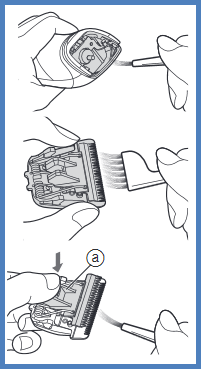
Using the cleaning brush
- Remove the comb attachment.
- Hold the main body, place your thumb against the blades and then push them away from the main body.
- Brush off any hair trimmings from the main body and from around the blade.
- Brush any hair trimmings out from between the stationary blade and the moving blade while pressing down the cleaning lever to raise the moving blade.
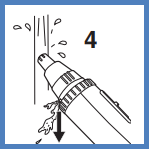
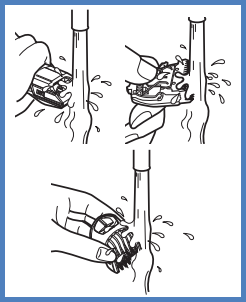
Washing with water
This is the symbol  for a wet trimmer. The symbol means the hand-held part may be used in a bath or shower.
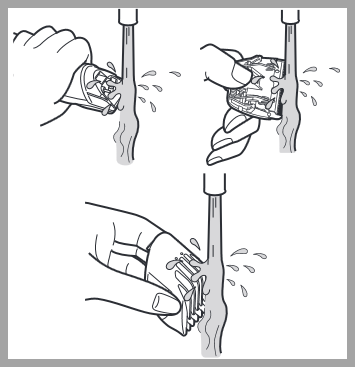
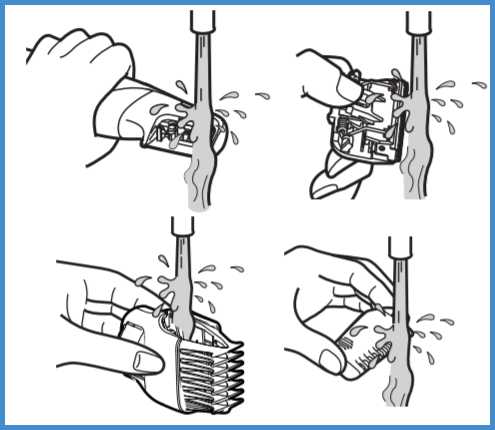
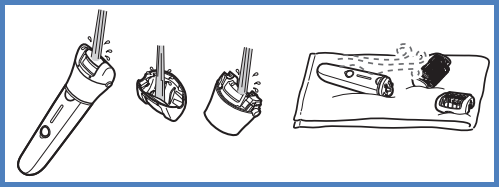
- Remove the blade.
- Rinse off any hair trimmings that are sticking to the blades with running water.
- Rinse out any hair trimmings that are inside the trimmer with running water. The battery cover should not be removed when washing the main body.
- Gently shake the trimmer 4 or 5 times and then wipe off any water drops from the trimmer and the blade.
- Place the trimmer on a towel with the switch on the main body facing downwards to let it dry fully.
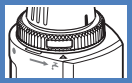
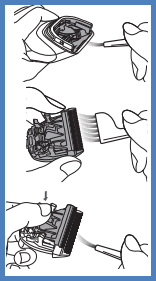
Lubrication
Lubricate the blades before using them or after cleaning them.
- Apply a few drops of the oil to the points indicated by the arrows.
Remounting the blade
- Fit the mounting hook into the blade mounting on the trimmer and then push in until it clicks.
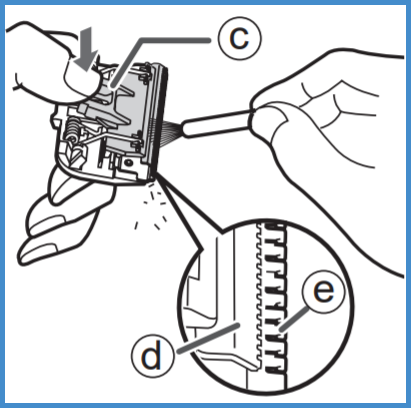
Cleaning steps for Model ER-415
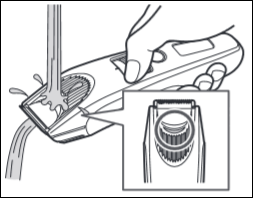
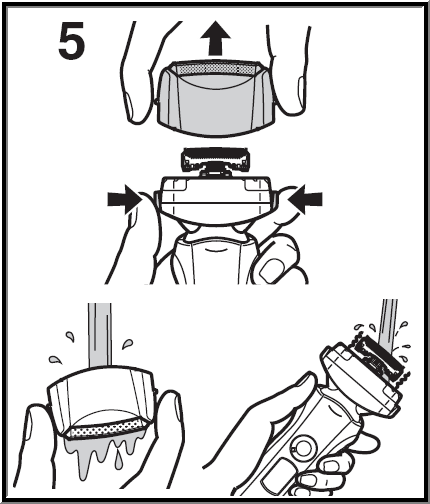
Be sure that the switch is turned off before removing, replacing or cleaning the blades.
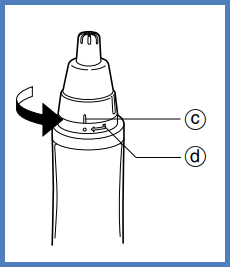
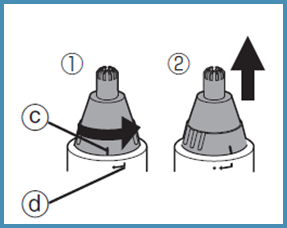
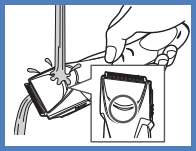
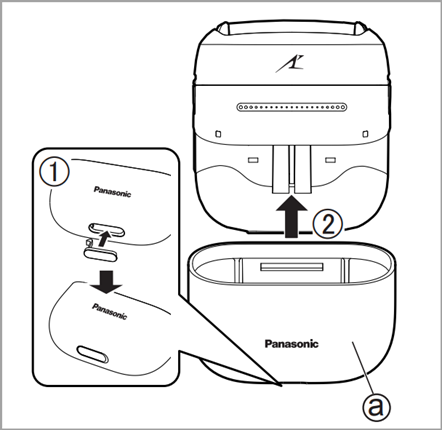
- To remove the outer blade frame, turn it and match the line (c) with (d) as shown in the image below and pull upward.
- Detach the inner blade from the outer blade. Wipe the blades with a tissue gently to remove any cut hairs, dust, etc. If the blades are wiped strongly, they will be deformed or damaged.
- The entire trimmer can be washed in water, however do not use boiled water.
- Put the inner blade back into the outer blade. To attach the outer blade frame to the unit, match the mark (c) with (d), as shown in the image above and turn clockwise until it clicks in.
Cleaning steps for Model ER-430
- Be sure that the switch is turned off before removing, replacing or cleaning the blades.
- To remove the outer blade frame, turn it and match the line "c" with "d" as shown in the image below and pull upward.
- Detach the inner blade from the outer blade. Wipe the blades with a tissue to remove any cut hairs, dust, etc.
- To remove the filter, turn it and match the line "d" with "e" as shown in the image below.

- Once the filter is removed and dusted put the filter back on.
- Shake off the hair clippings.
- The entire unit can be washed in water however DO NOT use boiled water.
- After cleaning, replace the filter, the inner blade and the outer blade. If used once a week for approx. 1 min. at a time, the life of the blades is approx. 3 years.
Cleaning steps for Model ER-GB370
- Clean the trimmer and the blade after each use. If not cleaned, the motion will become poor and the sharpness will worsen.
- Make sure that the trimmer is turned off.
- Remove the attachment and blade.
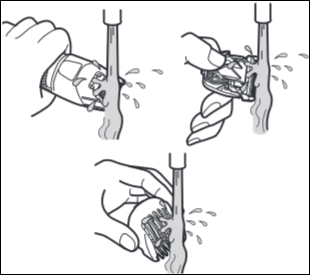
Cleaning With water
Do not wash the main unit with water. Doing so may cause malfunction if put in water.
Blade and the attachment
- Clean the blade and the attachments with running water. Rinse with water and shake up and down several times to remove the water.
- Wipe off the water with a towel and let it dry naturally.
- Apply the oil to the blade after drying.
With the Brush
- Brush off any hair trimmings from the main body and from around the blade.
- Brush off the hair trimmings from the blade edge.
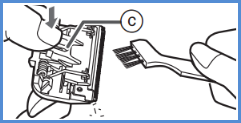
- Brush any hair trimmings out from between the stationary blade and the moving blade while pressing down the cleaning lever (c) in image below to raise the moving blade.
- Apply the oil to the blade.
Cleaning steps for Models ER-GB40, ER-GB42
It is recommended to clean after each use.
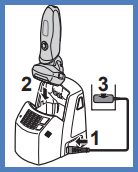
Remove the trimmer from the AC adaptor.
To remove light dirt
- Remove the comb attachment and turn the trimmer on.
- Run water down the water inlet at the front of the main body, rinse thoroughly for approximately 20 seconds, and then turn the trimmer off. For model ER-GB40, run water down the water inlet at the back of the main body.
 Model shown: ER-GB42.
 - Rinse with water and shake up and down several times to remove the water.
- Be careful not to hit the main body on the sink or any other object while draining the water. Failure to do so may cause malfunction.
- Wipe off the water with a towel and let it dry naturally. It will dry faster with the blade removed.
- Apply the oil to the blade after drying. Apply a drop of oil to each point indicated by the arrows in the image below.

- Attach the comb attachment and blade to the trimmer.
To remove heavy dirt
- Remove the comb attachment and blade.
- Clean the trimmer, the blade and the comb attachments with running water.
- Rinse with water and shake up and down several times to remove the water.
- Be careful not to hit the main body on the sink or any other object while draining the water. Failure to do so may cause malfunction.
- Wipe off the water with a towel and let it dry naturally. It will dry faster with the blade removed.
- Apply the oil to the blade after drying. Apply a drop of oil to each point indicated by the arrows in the image below.
- Attach the comb attachment and blade to the trimmer.
Cleaning with a brush
- Remove the trimmer from the AC adaptor. Make sure that the trimmer is turned off.
- Remove the comb attachment and blade.
- Brush off any hair trimmings from the main body and from around the blade.
- Brush any hair trimmings out from between the stationary blade and the moving blade while pressing down the cleaning lever to raise the moving blade.
- Apply the oil to the blade. Apply a drop of oil to each point indicated by the arrows in the image below.
- Attach the comb attachment and blade to the trimmer.
Cleaning steps for Models ER-GB60, ER-GB70, ER-GB80
It is recommended to clean after each use.
Model shown in this video is for ER-GB80 and may apply to other models. For more information refer to your Operating Instructions .
Remove the trimmer from the AC adaptor.
To remove light dirt
- Remove the comb attachment and turn the trimmer on.
- Run water down the water inlet at the front of the main body, rinse thoroughly for approximately 20 seconds, and then turn the trimmer off. For model ER-GB40, run water down the water inlet at the back of the main body. Model shown: ER-GB42.
- Rinse with water and shake up and down several times to remove the water.
- Be careful not to hit the main body on the sink or any other object while draining the water. Failure to do so may cause malfunction.
- Wipe off the water with a towel and let it dry naturally. It will dry faster with the blade removed.
- Apply the oil to the blade after drying. Apply a drop of oil to each point indicated by the arrows in the image below.
- Attach the comb attachment and blade to the trimmer.
To remove heavy dirt
- Remove the comb attachment and blade.
- Clean the trimmer, the blade and the comb attachments with running water.
- Rinse with water and shake up and down several times to remove the water.
- Be careful not to hit the main body on the sink or any other object while draining the water. Failure to do so may cause malfunction.
- Wipe off the water with a towel and let it dry naturally. It will dry faster with the blade removed.
- Apply the oil to the blade after drying. Apply a drop of oil to each point indicated by the arrows in the image below.
- Attach the comb attachment and blade to the trimmer.
Cleaning with a brush
- Remove the trimmer from the AC adaptor. Make sure that the trimmer is turned off.
- Remove the comb attachment and blade.
- Brush off any hair trimmings from the main body and from around the blade.
- Brush any hair trimmings out from between the stationary blade and the moving blade while pressing down the cleaning lever to raise the moving blade.
- Apply the oil to the blade. Apply a drop of oil to each point indicated by the arrows in the image below.
- Attach the comb attachment and blade to the trimmer.
Cleaning steps for Model ER-GB96
Cleaning the trimmer
- Clean the main body, blade and the attachment after each use. (If not cleaned, the motion will become poor and the sharpness will worsen.)
- Turn the appliance off.
- Remove the main body from the AC adaptor.
Cleaning with water
To remove light dirt
- Remove the attachment and turn the appliance on.
- Run water down the inlet at the front of the main body, rinse thoroughly for approximately 20 seconds, and then turn the appliance off.
To remove heavy dirt
- Remove the attachment and blade.
- Clean the appliance, the blade and the attachments with running water.
After cleaning with water
- Wipe off the water with a towel and let it dry naturally. It will dry faster with the blade removed.
- Apply the oil to the blade after drying.
- Attach the attachment and blade to the trimmer.
Note :
- Be careful not to hit the main body on the sink or any other object while draining the water. Failure to do so may cause malfunction.
- Rinse with water and shake up and down several times to remove the water.
Cleaning with the brush
- Remove the attachment and blade.
- Brush off any hair trimmings from the main body and from around the blade.
- Brush any hair trimmings out from between the stationary blade and the moving blade while pressing down the cleaning lever to raise the moving blade.
- Apply the oil to the blade.
- Apply the attachment and blade to the trimmer.
Applying the Oil
Apply oil to the blade before and after each use.
- Remove blade. Refer to "How to remove blade".
- Apply a drop of oil to each indicated point.
- Attach the blade to the main body, turn on the power and allow to run for approximately 5 seconds.
Replacement parts
Replacement blade WER9620 for ER-GB96
Replacement lubrication oil WES003P
- Do not use any blade other than the one dedicated as it may cause defect in performance.
- We recommend Panasonic lubrication oil WES003P.
Cleaning steps for Model ER-GC51, ER-GC71
To clean with water
Clean the clipper and the blade after each use. (If not cleaned, the motion will become poor and the sharpness will worsen.)
Make sure that the clipper is turned off and removed from the AC adaptor.
To remove light dirt
- Remove the comb attachment and turn the clipper on.
- Run water down the water inlet at the front of the main body, rinse thoroughly for approximately 20 seconds, Rinse with water and shake up and down several times to remove the water.
- Turn the clipper off.
- Wipe off the water with a towel and let it air dry naturally. It will dry faster with the blade removed.
- Apply the oil to the blade after drying.
To remove heavy dirt
- Remove the comb attachment and blade.
- Clean the clipper, the blade and the comb attachments with running water. Rinse with water and shake up and down several times to remove the water.
- Wipe off the water with a towel and let it air dry naturally. It will dry faster with the blade removed.
- Apply the oil to the blade after drying.
Cleaning with the Brush
- Remove the blade.
- Brush off any hair trimmings from the main body and from around the blade.
- Brush off the hairs from the blade edge.
- Brush any hair trimmings out from between the stationary blade and the moving blade while pressing down the cleaning lever (a) as shown in the image below, to raise the moving blade.
- Apply the oil to the blade.
Lubrication - How to Apply Oil
Apply the oil to the clipper before and after each use.
Make sure that the clipper is turned off.
- Remove the blade.
- Apply a drop of the oil to each indicated point in the image below.
- Attach the blade to the main body, turn on the power and allow to run for approximately 5 seconds.
Cleaning steps for Model ER-GD50
- Clean the trimmer and the blade after each use. If not cleaned, the motion will become poor and the sharpness will worsen.
- Make sure that the trimmer is turned off.
- Remove the attachment and blade.
Cleaning With water
Do not wash the main unit with water. Doing so may cause malfunction if put in water.
Blade and the attachment
- Clean the blade and the attachments with running water. Rinse with water and shake up and down several times to remove the water.
- Wipe off the water with a towel and let it dry naturally.
- Apply the oil to the blade after drying.
With the Brush
- Brush off any hair trimmings from the main body and from around the blade.
- Brush off the hair trimmings from the blade edge.
- Brush any hair trimmings out from between the stationary blade and the moving blade while pressing down the cleaning lever (c) in image below to raise the moving blade.
- Apply the oil to the blade.
Applying the oil
- Apply the oil to the blade before and after each use.
- Apply a drop of the oil to each indicated point as indicated in the image below.
- Attach the blade to the main body, turn on the power and allow to run for approximately 5 seconds.
Failure to apply the oil may cause the following problems due to rust, wear or burn out.
- The trimmer has become blunt.
- Shorter operating time.
- Louder sound.
Replacement blade - WER9500
Cleaning steps for Model ER-GK40
Cleaning the shaver
- Remove the shaver from the AC adaptor.
- Close the cleaning shutter.
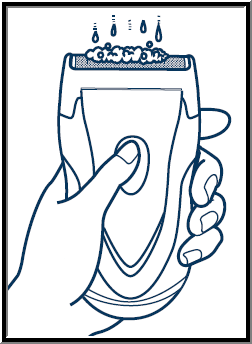
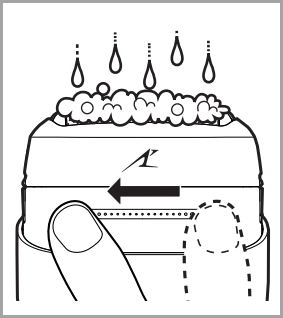
- Apply some hand soap and some water to the outer foil.
- Turn the shaver on.
To remove light dirt
- Follow the steps for cleaning the shaver first.
- Slide the cleaning shutter until it clicks.
- Slide the pop‑up trimmer switch upwards.
- Clean the foil frame with running water.
- Turn the shaver off. Rinse with water and shake up and down several times to remove the water.
- Wipe off any drops of water with a dry cloth.
- Air Dry the foil frame and the shaver completely in a shaded area. The foil frame will dry faster if removed from the main body.
- Attach the foil frame to the shaver.
To remove heavy dirt
- Follow the steps for cleaning the shaver first.
- Turn the shaver off after 10 to 20 seconds.
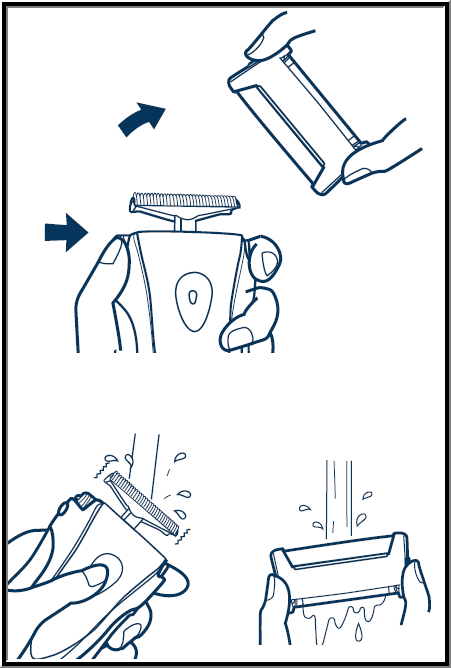
- Press the foil frame release buttons to remove the foil frame.
- Remove the inner blade by grasping it firmly at both ends and pulling straight away from the shaver.
- Clean the shaver, the foil frame (including the pop‑up trimmer) and inner blade with running water.
- Wipe off any drops of water with a dry cloth.
- Air Dry the foil frame and the shaver completely in a shaded area. The foil frame will dry faster if removed from the main body
- Attach the foil frame to the shaver.
Cleaning with the brush
You can also clean the shaver with the cleaning brush.
Cleaning steps for Model ER-GK60
Cleaning the Clipper
Clean the clipper and the blade after each use. (If not cleaned, the motion will become poor and the sharpness will worsen.)
Make sure that the clipper is turned off and removed from the AC adaptor.
To remove light dirt
- Remove the comb attachment and turn the clipper on.
- Run water down the water inlet at the front of the main body, rinse thoroughly for approximately 20 seconds, Rinse with water and shake up and down several times to remove the water.
- Turn the clipper off.
- Wipe off the water with a towel and let it air dry naturally. It will dry faster with the blade removed.
- Apply the oil to the blade after drying.
- Attach the attachment and the blade to the main body.
Note : Be careful not to hit the main body on the sink or any other object while draining the water. Failure to do so may cause malfunction.
To remove heavy dirt
- Remove the comb attachment and blade.
- Clean the clipper, the blade and the comb attachments with running water. Rinse with water and shake up and down several times to remove the water.
- Wipe off the water with a towel and let it air dry naturally. It will dry faster with the blade removed.
- Apply the oil to the blade after drying.
- Attach the attachment and the blade to the main body.
Note : Be careful not to hit the main body on the sink or any other object while draining the water. Failure to do so may cause malfunction.
Cleaning with the Brush
- Remove the blade.
- Brush off any hair trimmings from the main body and from around the blade.
- Brush off the hairs from the blade edge.
- Brush any hair trimmings out from between the stationary blade and the moving blade while pressing down the cleaning lever (b)in the image below to raise the moving blade.
- Apply the oil to the blade.
- Attach the attachment and the blade to the main body.
Note : Be careful not to hit the main body on the sink or any other object while draining the water. Failure to do so may cause malfunction.
How to apply oil
Make sure that the clipper is turned off.
Apply the oil to the blade before and after each use.
- Remove the blade.
- Apply a drop of the oil to each indicated point.
- Attach the blade to the main body, turn on the power and allow to run for approximately 5 seconds.
- Confirm that the blade is properly attached.
Video "How to clean and maintain ER-GK60"
Cleaning steps for Model ER-GK80
- Clean the clipper and the blade after each use. (If not cleaned, the motion will become poor and the sharpness will worsen.)
- Do not use thinner, benzine, alcohol, or other chemicals. Doing so may cause failure, cracking, or discoloration of the main body. Wipe the main body only with a soft cloth slightly dampened with tap water or soapy tap water.
- Make sure that the main body is turned off.
- Remove the main body from the AC adaptor.
To remove light dirt with water
- Remove the attachment and turn the main body on.
- Run water down the water inlet at the back of the main body, rinse thoroughly for approximately 20 seconds, and then turn the main body off.
- Shake up and down several times to remove the water.
- Be careful not to hit the main body on the sink or any other object while draining the water. Failure to do so may cause malfunction.
- Wipe off the water with a towel and let it dry naturally. It will dry faster with the blade removed.
- Apply the oil to the blade after drying.
- Attach the blade and the skin guard attachment to the main body. Be sure to place the skin guard attachment on the main body to protect the blade when storing.
To remove heavy dirt with water
- Remove the attachment and turn the main body on.
- Clean the main body, the blade, and the attachments with running water.
- Shake up and down several times to remove the water.
- Be careful not to hit the main body on the sink or any other object while draining the water. Failure to do so may cause malfunction.
- Wipe off the water with a towel and let it dry naturally. It will dry faster with the blade removed.
- Apply the oil to the blade after drying.
- Attach the blade and the skin guard attachment to the main body. Be sure to place the skin guard attachment on the main body to protect the blade when storing.
To clean with the brush
- Remove the attachment and blade.
- Clean the main body using the brush.
- Clean the blade using the brush. Keep pressing down the cleaning lever ( c ) to raise the moving blade ( d ) when cleaning between the stationary blade ( e ) and the moving blade.
- Apply the oil to the blade.
- Attach the blade and the skin guard attachment to the main body. Be sure to place the skin guard attachment on the main body to protect the blade when storing.
How to apply the oil (lubrication)
Apply the oil to the blade before and after each use.
- Remove the blade.
- Apply a drop of the oil to each indicated point.
- Attach the blade to the main body, turn on the power and allow to run for approximately 5 seconds.
Cleaning steps for Model ER-GM40
Be sure to clean the appliance with the battery cover attached.
Make sure that the main body is turned off.
Wet Cleaning
- Remove the blade and attachments and rinse under running water.
- Cover the drainage outlet of the washbasin to prevent the inner blade from flowing away.
- If you are concerned about the dirt, wash it off with hand soap.
- Shake up and down several times to remove the water.
- Be careful not to hit the main body on the sink or any other object while draining the water. Failure to do so may cause malfunction
- Wipe off the water with a towel and let it dry naturally. It will dry faster with the blade removed.
Dry Cleaning
Brush off any remaining hair trimmings.
Notes
- Do not use thinner, benzine, alcohol or other chemicals. Doing so may cause failure, cracking or discoloration of the main body. Wipe the main body only with a soft cloth slightly dampened with tap water or soapy tap water.
- After cleaning, attach the blade and the protective cap.
- Store the main body in a place with low humidity after use. Failure to do so may cause malfunction due to condensation or rust.
Cleaning steps for Model ER-GN30
There are 3 ways to clean the appliance: “Jet wash cleaning”, “Water wash cleaning”, and “Brush cleaning”. It is recommended to clean at every use.
Water wash cleaning
- Do not use kitchen detergents, bathroom cleaner, or hot water. Doing so may result in malfunction.
- The battery cover should not be taken apart as this can affect the watertight construction of the appliance.
- Wet the outer blade with water, and apply hand soap or cleaning fluid (optional).
- Slide the power switch to the “1” position, and let it foam for approximately 10 seconds.
- Slide the power switch to the “0” position and remove the blade.
- Rinse under running water.
- Wipe off the water with a towel or similar, and let it dry naturally. It will dry faster with the blade removed.
Jet Wash Cleaning
- Wet the outer blade with water, and apply hand soap or cleaning fluid (optional).
- Slide the power switch to the “1” position, and let it foam for approximately 10 seconds.
- Align the wash switch ring to “
 ”. The water outlet as shown as (a) in the image below opens.
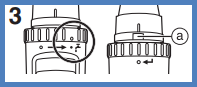
- With the power switch still set to the “1” position, place the tip of the blade into water and rinse thoroughly. Water will jet out from the rear side of the appliance, so point it downward in order to not wet the surroundings.
- Wipe off the water with a towel or similar, and let it dry naturally. It will dry faster with the blade removed.
Brush Cleaning
- Make sure the power switch is in the “0” position.
- Remove the blade, and lightly brush off the trimmings on the inner blade and outer blade using the cleaning brush.
- Attach the blade.
Cleaning steps for Model ER-GN70
Wet cleaning
- Wet the outer blade with water, and apply some hand soap and some water to the outer foil.
- Slide the power switch to the “O” position, and let it foam for approximately 10 seconds.
- Turn off the power.
To clean lightly dirty parts
- Follow wet cleaning steps first.
- Open the water inlet and turn on the power again. If the trimmings box is removed, open the water inlet after attaching the trimmings box.
- Pour water through the water inlet at the up arrow “▲” mark above the add water “ ” mark, rinse well and slide the power switch to the “I” position.
- Wipe off water with a towel or similar item, and let it dry naturally. It will dry faster with the blades and the trimmings box removed.
To clean heavily dirty parts
- Follow wet cleaning steps first.
- Slide the power switch to the “I” position.
- Remove the blades and the trimmings box and rinse under running water. Cover the drainage outlet of washbasin to prevent the inner blade from flowing away.
- Wipe off water with a towel or similar item, and let it dry naturally. It will dry faster with the blades and the trimmings box removed.
Cleaning with the brush
Remove the blades and the trimmings box and lightly brush off the trimmings with the brush.
- Be careful not deform the inner blade.
- Be careful not to damage the filter.
Notes:
- The battery cover should not be removed from the main body as this can affect the watertight construction of the appliance.
- Do not use hot water or any detergents other than hand soap. Doing so may result in malfunction.
- In order to prevent malfunction, be careful not to hit the appliance against a washbasin.
- Do not use thinner, benzine, alcohol or other chemicals to clean the appliance. Doing so may result in malfunction, cracking or discoloring of the parts. Please use a cloth soaked with soapy water to wipe the dirt.
- After cleaning, be sure to attach the blades, the trimmings box and the protective cap.
Cleaning steps for Models ER-GP21, ER-GP30
Clean the clipper and the blade after each use. (If not cleaned, the motion will become poor and the sharpness will worsen.)
- Make sure that the clipper is turned off.
- Brush off any hairs from the clipper and from around the blade.
- Brush off the hairs from the blade edge.
- Brush the hairs out from between the stationary blade and the moving blade while pressing down on the cleaning lever to raise the moving blade.
Lubrication - How to Apply Oil
- Apply the oil to the clipper before and after each use.
- Apply a drop of the oil to each indicated point.
- Attach the blade to the main body, turn on the power and allow to run for approximately 5 seconds. Failure to apply the oil may cause the following problems due to rust, wear or burn out.
- The clipper has become blunt.
- Shorter operating time.
- Louder sound.
Cleaning steps for Model ER-GP80
Clean the clipper and the blade after each use.
- Brush off any hairs from the clipper and from around the blade.
- Brush off the hairs from the blade edge.
- Brush the hairs out from between the stationary blade and the moving blade while pressing down on the cleaning lever to raise the moving blade.
Cleaning the charging stand
Use the cleaning brush to clean hair trimmings and dust in the charging plug or in the hole on the bottom surface.
Applying the oil
Apply the oil to the clipper before and after each use.
Apply a drop of the oil to each indicated point. Failure to apply the oil may cause the following problems due to rust, wear or burn out.
- The clipper has become blunt.
- Shorter operating time.
- Louder sound.
Replacement parts
Replacement blade WER9900.
Cleaning steps for Model ER-GS60
- It is recommended to clean at every use.
- Always wash with water after wet trimming.
To remove light dirt
- Remove the clipper from the AC adaptor.
- Remove the comb attachment and turn the clipper on.
- Run water down the water inlet at the back of the main body, rinse thoroughly for approximately 20 seconds, and then turn the clipper off. Rinse with water and shake up and down several times to remove the water.
- Wipe off the water with a towel and let it dry naturally. It will dry faster with the blade removed.
- Apply the oil to the blade after drying.
- Attach the comb attachment and blade to the clipper.
To remove heavy dirt
- Remove the clipper from the AC adaptor.
- Remove the comb attachment and blade.
- Clean the clipper, the blade and the comb attachments with running water. Rinse with water and shake up and down several times to remove the water.
- Wipe off the water with a towel and let it dry naturally. It will dry faster with the blade removed.
- Apply the oil to the blade after drying.
- Attach the comb attachment and blade to the clipper.
Cleaning with the brush
- Remove the clipper from the AC adaptor. Make sure that the clipper is turned off.
- Remove the comb attachment.
- Hold the main body, place your thumb against the blades and then push them away from the main body.
- Brush off any hair trimmings from the main body and from around the blade.
- Brush any hair trimmings out from between the stationary blade and the moving blade while pressing down the cleaning lever to raise the moving blade.
- Apply the oil to the blade.
- Attach the comb attachment and blade to the clipper.
Lubrication
- Apply the oil to the clipper before and after each use. Apply a drop of the oil to the points indicated by the arrows.
Remounting the blade
- Fit the mounting hook into the blade mounting on the clipper and then push in until you hear a click.
Cleaning steps for Model ER-SB40
- Clean the main body, blade and the attachment after each use. If not cleaned, the motion will become poor and the sharpness will worsen.
- Turn the appliance off.
- Remove the main body from the AC adaptor
Main body, blade and the attachment
To remove light dirt
- Remove the trimmer from the AC adaptor.
- Remove the attachment and turn the appliance on.
- Run water down the water inlet at the front of the main body, rinse thoroughly for approximately 20 seconds, Rinse with water and shake up and down several times to remove the water.
- Turn the unit off.
To remove heavy dirt
- Remove the trimmer from the AC adaptor.
- Clean the main body, the blade and the attachments with running water. Rinse with water and shake up and down several times to remove the water.
- Wipe off the water with a towel and let it dry naturally. It will dry faster with the blade removed.

- Apply the oil to the blade after drying.
- Attach the blade and attachment to the main body.
Cleaning with the brush
Main body and blade
- Remove the blade. Refer to "How to remove blade".
- Brush off any hair trimmings from the main body and from around the blade.
- Brush off the hair trimmings from the blade edge.
- Brush any hair trimmings out from between the stationary blade and the moving blade while pressing down the cleaning lever, marked as (b) in the below image to raise the moving blade.
- Apply the oil to the blade.
- Attach the blade and attachment to the main body.
Lubrication - Applying the oil
Apply the oil to the blade before and after each use.
- Remove the blade.
- Apply a drop of the oil to each of the 5 indicated point on the image below.
- Attach the blade to the main body, turn on the power and allow to run for approximately 5 seconds.
Cleaning steps for Model ER-SC40
- Clean the main body, blade and the attachment after each use. If not cleaned, the motion will become poor and the sharpness will worsen.
- Turn the appliance off.
- Remove the main body from the AC adaptor
Main body, blade and the attachment
To remove light dirt
- Remove the trimmer from the AC adaptor.
- Remove the attachment and turn the appliance on.
- Run water down the water inlet at the front of the main body, rinse thoroughly for approximately 20 seconds, Rinse with water and shake up and down several times to remove the water.
- Turn the unit off.
To remove heavy dirt
- Remove the trimmer from the AC adaptor.
- Remove the attachment and blade.
- Clean the main body, the blade and the attachments with running water. Rinse with water and shake up and down several times to remove the water.
- Wipe off the water with a towel and let it dry naturally. It will dry faster with the blade removed.
- Apply the oil to the blade after drying.
- Attach the blade and attachment to the main body.
Cleaning with the brush
Main body and blade
- Remove the blade.
- Brush off any hair trimmings from the main body and from around the blade.
- Brush off the hair trimmings from the blade edge.
- Brush any hair trimmings out from between the stationary blade and the moving blade while pressing down the cleaning lever, marked as (b) in the below image to raise the moving blade.
- Apply the oil to the blade.
- Attach the blade and attachment to the main body.
Lubrication - Applying the oil
Apply the oil to the blade before and after each use.
- Remove the blade.
- Apply a drop of the oil to each of the 5 indicated point on the image below.
- Attach the blade to the main body, turn on the power and allow to run for approximately 5 seconds.
Cleaning steps for Model ES-2207
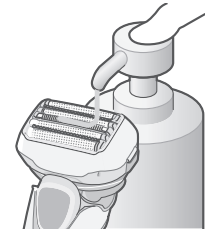
For cleanliness and convenience, we recommend that you clean your shaver with water and a liquid hand soap. Regular cleaning will keep your shaver in good condition while preventing odors or bacteria from developing, and maintain the cutting performance.
To Clean
- With the outer foil in place, apply some hand soap onto the outer foil.
- Turn the shaver on and turn off after few seconds
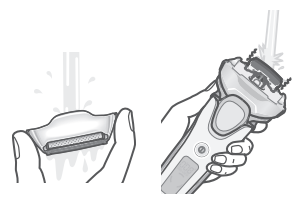
- Press the outer foil frame release buttons to remove the outer foil frame and rinse the inner blade/outer foil under running water or in a basin. Do not use boiling water.
- Close the outer foil frame and dry it gently. After the shaving head is dry, place the protective cap.
Cleaning steps for Model ES-2216
For cleanliness and convenience, we recommend that you clean your shaver with water and a liquid hand soap. Regular cleaning will keep your shaver in good condition while preventing odors or bacteria from developing, and maintain the cutting performance.
To Clean
- With the outer foil in place, apply some hand soap onto the outer foil.
- Turn the shaver on and turn off after few seconds
- Press the outer foil frame release buttons to remove the outer foil frame and rinse the inner blade/outer foil under running water or in a basin. Do not use boiling water.
- Close the outer foil frame and dry it gently. After the shaving head is dry, place the protective cap.
Cleaning steps for Model ES-246
- Remove the grooming combs. Hold the body of trimmer and place the thumb against the blade and push away from the main body.
- Brush hair from the cutting mechanism.
- Push down the cleaning lever (a) to raise the moving blade and clean between the blade.
- To replace the blade, place the guide tabs (b) in the image below in the guide sites and push down until the blade clicks into place.
Cleaning steps for Model ES-3831, ES-3833
- Remove the protective cap.
- Apply some hand soap to the outer foil.
- Turn the shaver on and then pour some water over the outer foil.
- Turn the shaver off after 10-20 seconds.
- Remove the foil frame while pressing the foil frame release button and clean it with running water.
- Wipe off any drops of water with a dry cloth.
- Aid dry the foil frame and the shaver completely.
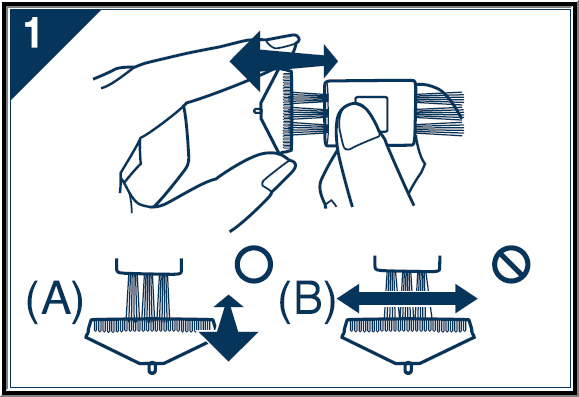
Cleaning with included brushes
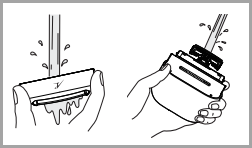
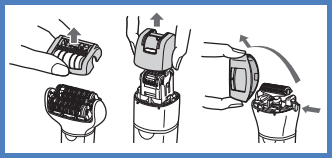
- Clean the inner blade using the short brush using a front and back motion as shown in the below image example A.
- Clean the outer foil, the shaver body and the trimmer using the long brush.
- Do not move the short brush in sideways direction as shown in the below image example B, as it will damage the inner blade and affect its sharpness.
- Do not use the short brush to clean the outer foil.
Cleaning steps for Model ES-8103, ES-8243
We recommend that you clean your shaver with the self-cleaning recharger or the “sonic” vibration turbo-cleaning mode when the faucet symbol appears on the LCD panel.
- Disconnect the power cord from the shaver.
- Apply some hand soap and some water to the outer foil.
- Press the OFF/ON switch for more than 2 seconds to activate the turbo mode for “sonic” vibration cleaning. The vibration indicator
 appears on the LCD panel. After about 20 seconds, it will be automatically turned off, or you can turn it off by pressing the OFF/ON switch.
 - Remove the outer foil section and press the OFF/ON switch for more than 2 seconds to activate the turbo mode for “sonic” vibration cleaning and clean it with running water.

- Wipe off any drops of water with a dry cloth.
- Remove the outer foil section to allow it to air dry completely.
Cleaning steps for Model ES-ALV6HR
Recommend cleaning the shaver after each use.
- Apply some hand soap and some water to the system outer foil.
- Press and hold [
 ] for more than 2 seconds to activate the sonic vibration cleaning mode.
 - Splashing of foam is suppressed.
- The battery capacity lamps blink in order.
- After about 18 seconds, it will be automatically turned off, or you can turn it off by pressing the power switch.

- With the shaver stopped, remove the outer foil section and press and hold [ ] for more than 2 seconds.
- Clean with running water.
- Splashing is reduced by rinsing the shaver in sonic vibration cleaning mode.
- Clean the system outer foil in the areas indicated by the circles.
- After rinsing with water, shake the shaver up and down for a few times to remove excess moisture and then wipe off any drops of water with a dry cloth.
- Splashing is reduced by rinsing the shaver in sonic vibration cleaning mode.
- Dry the outer foil section, the shaver, and the trimmer completely.
- Allow the shaver to dry in the shade, avoid direct sunlight.
- Lubricate the shaver. It will keep the movement of the blades smooth and maintain a comfort shave.
- Apply one drop of oil to each of the system outer foils.
- Raise the trimmer and apply a drop of oil.
- Switch the shaver on, and run it for approximately five seconds.
- Switch off the shaver, and wipe off any excess oil from the system outer foil with a soft cloth.
Notes:
- Do not use any kitechen or bathroom detrgents other than hand soap. Doing so may cause malfunction.
- Be careful not to to hit the main body on the sink or any other object while draining the water. Failure to do so may cause malfunction.
- Do not wipe with thinners, benzine, alcohol etc. Doing so may cause malfunction, cracking or discoloration of the parts. Wipe with diluted soapy water.
Cleaning steps for Model ES-AWL6AG
- Regular cleaning will keep your shaver in a hygienic state and maintain the cutting performance.
- Make sure that the shaver is turned off.
- Do not wipe with alcohol or nail polish remover. Doing so may cause malfunction, cracking of the parts or discoloration.
Wet Cleaning
- Apply some hand soap onto the outer foil.
- Turn the shaver on and turn it off after a few seconds.
- Press the outer foil frame release buttons to remove the outer foil frame.
- Rinse the inner blade and outer foil frame with cold or lukewarm water.
- Do not use hot water.
- Wipe the shaver with a dry cloth and dry them well.

- Clean the hair dust with the cleaning brush.
- Regular cleaning will keep your shaver in a hygienic state and maintain cutting performance.
- Ensure the shaver is turned off before cleaning.
- Avoid using alcohol or nail polish remover, as it may cause malfunction, cracking, or discoloration.
- Apply some hand soap onto the outer foils.

- Turn the shaver on for a few seconds, then turn it off.

- Press the outer foil frame release buttons to remove the outer foil frame.
- Rinse the inner blades and outer foil frame with cold or lukewarm water. (Do not use hot water.)
- Wipe the shaver with a dry cloth and dry it well.

- Use the cleaning brush to remove hair dust.
- Attach the cap.
- Avoid storing the shaver in areas with high temperature or humidity to prevent malfunction.
- Apply a small amount of hand soap and water on the system outer foil.
 Power on this product, leave it run for 10 to 20 seconds, and then power it off.
 - Press the foil frame release buttons, to remove the outer foil section. Refer to Replacing the system outer foil and the inner blades”.
- Clean this product with running water.
- After rinsing with water, wipe off any excess water with a dry cloth.
- Store this product after drying it. a Remove the outer foil section and the shell, thoroughly dry the main body.
- Leave this product dry in the shade, out of direct sunlight.
- After this product is dried completely, install the outer foil section and the shell onto the main body.
- Refer to “Replacing the system outer foil and the inner blades” and the following schematic diagram for the method of installation and removal.
- Perform the following operations after installing the outer foil section onto the main body:
To disassemble the shell:
- Hold the enclosure and forcefully squeeze both sides of the enclosure.
- Hold the gray part in the figure with the other hand and gently pull it upwards.
- Pull the enclosure down.
To install the shell:
- Attach the socket cover onto the hole of the shell.
- Attach the shell onto the main body until a “click” sound is heard while keeping the trademark on the shell on the same side as the power switch.
Lubricate this product.
- To maintain comfortable shaving on a long-term basis, it is recommended to use the included oil. a Apply a drop of oil onto the system outer foil.
- Power on this product and leave it run for approximately 5 seconds.
- Power off this product and wipe off any excess oil from the system outer foil with a soft cloth.
Notes
- Be careful not to hit this product on the sink or any other objects while draining the water. Failure to do so may cause malfunction.
- Do not use any other cleaning agents than hand soap. Doing so may cause malfunction.
- Do not clean this product with thinner, gasoline, alcohol, or other chemicals. Doing so may cause cracking or discoloration of this product. The enclosure can be cleaned with a soft cloth moistened with tap water or soap solution.
Cleaning with the brush
- Clean the system outer foil and the main body using the long brush.
- Clean the inner blades using the short brush by moving it in the direction shown in the right figure (A).
- Do not move the short brush in the (B) direction. Doing so may damage the inner blades and thus affect their sharpness.
- Do not use the short brush to clean the system outer foil.
Cleaning steps for Model ES-ED50, ES-ED70
Take care not to damage the skin protector, the frame, the fast cap and the gentle cap during cleaning.
Dry cleaning
Epilation head/shaver head
- Lift the fast gentle caps, and the frame upward while holding the cap release ribs, the frame release ribs or remove the frame by pushing the frame release button.
- Clean the fast/gentle caps, the epilation head and the shaver head with the cleaning brush.
Wet cleaning
Epilation head/Shaver head
- Wet the discs and blades, and then apply liquid hand soap.
- Turn the switch on and then foam is created.
- Wash the head with water to wash out hair.
- Do not use hot water.
- If soap is not completely washed away, then a white deposit can accumulate and prevent the discs and the blades from moving smoothly.
- Rinse the shaver head with the frame removed.
- Turn the switch off, wipe the appliance with a dry cloth and air dry it well.
Cleaning steps for Model ES-ED90
Take care not to damage the skin protector, the frame, the fast cap and the gentle cap during cleaning.
Dry cleaning
Epilation head/shaver head
- Lift the fast gentle caps, and the frame upward while holding the cap release ribs, the frame release ribs or remove the frame by pushing the frame release button.
- Clean the fast/gentle caps, the epilation head and the shaver head with the cleaning brush.
Wet cleaning
Epilation head/Shaver head
- Wet the discs and blades, and then apply liquid hand soap.
- Turn the switch on and then foam is created.
- Wash the head with water to wash out hair.
- Do not use hot water.
- If soap is not completely washed away, then a white deposit can accumulate and prevent the discs and the blades from moving smoothly.
- Rinse the shaver head with the frame removed.
- Turn the switch off, wipe the appliance with a dry cloth and air dry it well.
Foot Care Head
- Apply liquid hand soap to the central part of the file.
- Pour a small amount of water on the file and turn the switch on.
- Rinse any debris throughly with water or lukewarm water.
- After turning the switch off, remove the frame and rinse inside.
- Wipe with a dry cloth and air dry in a well-ventilated location.
Cleaning steps for Model ES-EL3A
Take care not to damage the skin protector, the frame, the fast cap and the gentle cap during cleaning.
Dry cleaning
Epilation head/shaver head
- Lift the fast gentle caps, and the frame upward while holding the cap release ribs, the frame release ribs or remove the frame by pushing the frame release button.
- Clean the fast/gentle caps, the epilation head and the shaver head with the cleaning brush.
Wet cleaning
Epilation head/Shaver head
- Wet the discs and blades, and then apply liquid hand soap.
- Turn the switch on and then foam is created.
- Wash the head with water to wash out hair.
- Do not use hot water.
- If soap is not completely washed away, then a white deposit can accumulate and prevent the discs and the blades from moving smoothly.
- Rinse the shaver head with the frame removed.
- Turn the switch off, wipe the appliance with a dry cloth and air dry it well.
Cleaning steps for Model ES-EL7A, ES-EL8A, ES-EL9A
Take care not to damage the skin protector, the frame, the fast cap and the gentle cap during cleaning.
Dry cleaning
Epilation head/shaver head
- Lift the fast gentle caps, and the frame upward while holding the cap release ribs, the frame release ribs or remove the frame by pushing the frame release button.
- Clean the fast/gentle caps, the epilation head and the shaver head with the cleaning brush.
Wet cleaning
Epilation head/Shaver head
- Wet the discs and blades, and then apply liquid hand soap.
- Turn the switch on and then foam is created.
- Wash the head with water to wash out hair.
- Do not use hot water.
- If soap is not completely washed away, then a white deposit can accumulate and prevent the discs and the blades from moving smoothly.
- Rinse the shaver head with the frame removed.
- Turn the switch off, wipe the appliance with a dry cloth and air dry it well.
Foot Care Head
- Apply liquid hand soap to the central part of the file.
- Pour a small amount of water on the file and turn the switch on.
- Rinse any debris throughly with water or lukewarm water.
- After turning the switch off, remove the frame and rinse inside.
- Wipe with a dry cloth and air dry in a well-ventilated location.
Cleaning steps for Model ES-EU10, ES-EU20
Take care not to damage the skin protector, the frame, the fast cap and the gentle cap during cleaning.
Dry cleaning
Epilation head/shaver head
- Lift the fast gentle caps, and the frame upward while holding the cap release ribs, the frame release ribs or remove the frame by pushing the frame release button.
- Clean the fast/gentle caps, the epilation head and the shaver head with the cleaning brush.
Wet cleaning
Epilation head/Shaver head
- Wet the discs and blades, and then apply liquid hand soap.
- Turn the switch on and then foam is created.
- Wash the head with water to wash out hair.
- Do not use hot water.
- If soap is not completely washed away, then a white deposit can accumulate and prevent the discs and the blades from moving smoothly.
- Rinse the shaver head with the frame removed.
- Turn the switch off, wipe the appliance with a dry cloth and air dry it well.
Cleaning steps for Model ES-EY30V
- Always clean the heads and caps after use.
- Switch off and unplug the appliance before cleaning.
- Remove Attachments: If there are any detachable parts or accessories, remove them carefully. Take care not to damage the skin protector, frame, or caps for legs/arms and for underarms/bikini-line during cleaning.
- Dry Thoroughly: After cleaning, pat the epilator dry with a clean, dry cloth. Ensure that all parts are completely dry before reassembling or storing to prevent mold or mildew growth.
- Reassemble: Once dry, reattach any removed parts or accessories according to the manufacturer's instructions.
- Store Properly: Store the epilator in a cool, dry place away from direct sunlight and moisture when not in use.
Cleaning steps for Model ES-GA21
- Disconnect the cord from the shaver.
- Apply some hand soap and some water to the outer foil.
- Rotate the lock ring to unlock the ON/OFF switch.
- Press the ON/OFF switch for more than 2 seconds to activate the turbo mode for sonic vibration cleaning. After about 20 seconds, it will be automatically turned off, or you can turn it off by pressing the ON/OFF switch.
- Remove the outer foil section and press the ON/OFF switch for more than 2 seconds to activate the turbo mode for sonic vibration cleaning and clean it with running water.
- Wipe off any drops of water with a dry cloth.
- Air dry the outer foil section and the shaver completely.
- Attach the outer foil section to the shaver.
Cleaning steps for Model ES-LA63
We recommend that you clean your shaver with the self-cleaning recharger or the “sonic” vibration turbo-cleaning mode when the faucet symbol appears on the LCD panel.
- Disconnect the power cord from the shaver.
- Apply some hand soap and some water to the outer foil.
- Slide the switch lock button downwards to unlock the OFF/ON switch.
- Press the OFF/ON switch for more than 2 seconds to activate the turbo mode for “sonic” vibration cleaning. The vibration indicator appears on the LCD panel. After about 20 seconds, it will be automatically turned off, or you can turn it off by pressing the OFF/ON switch.
- Remove the outer foil section and press the OFF/ON switch for more than 2 seconds to activate the turbo mode for “sonic” vibration cleaning and clean it with running water.
- Wipe off any drops of water with a dry cloth.
- Remove the outer foil section to allow it to air dry completely.
- Attach the outer foil section to the shaver.
Cleaning steps for Model ES-LA93
Cleaning using the self-cleaning recharger
Remove the shaver and the appliance plug from the self-cleaning recharger.
- Remove the water tank and then open the water tank cap.
- Wash away the old cleaning liquid and then rinse the water tank.
- Pour tap water into the water tank. Do not let the water rise above the maximum water line. This may cause the cleaning liquid to spill.
- Securely close the water tank cap and then attach the tank.
- Peel off the 2 seals from the new detergent cartridge. Hold the detergent cartridge horizontally. (The detergent may spill if the detergent cartridge is tilted too much.)
- Attach the detergent cartridge.
Replace the HydraClean™ Shaving System Solution Cartridge when the status lamp is illuminated. Use the below chart as a guide.
Replacement time estimates Shaving Cleaning Reusability 1 time/1 day 1 time/day approx. 30 times 1 time/3 days approx. 10 times 1 time/1 week approx. 4 times Precautions for the detergent cartridge
- Keep out of reach of children.
- Only use to clean the blades of electric shavers.
- Carry out emergency measures if the Cleaning agent enters mouth or eyes, and consult a doctor.
Note:
- Replace the detergent cartridge when the status lamp is illuminated.
- The expiration date of the cleaning liquid is 6 months after it is opened. If you do not use the cleaning liquid for more than 6 months, throw away the detergent cartridge and the cleaning liquid.
- Only use self-cleaning recharger detergent for Panasonic shavers.
- Always change the detergent cartridge and the cleaning liquid in the water tank at the same time. Adding water, or changing just the detergent cartridge or the water, will result in deteriorated cleaning functions.
- If you operate the self-cleaning recharger, the concentrated detergent in the detergent cartridge dilutes and the water inside the tank will become a cleaning liquid.
Cleaning the shaver
Use the self-cleaning recharger in temperatures between 15 °C (59 °F) and 35 °C (95 °F).
- Insert the appliance plug into the self-cleaning recharger.
- Remove the protective cap and then gently insert the shaver as shown.
- Plug in the AC adaptor into a household outlet.
- Remove any soap or water on the shaver if it has been washed with hand soap or any other detergent.
- Turn the shaver off before inserting.
- Check that the outer foil is not deformed or damaged when you insert the shaver.
- Wipe off any water droplets on the main body rear terminal.
- Press the SELECT button to select the course.
- The “Charge” course starts when attaching the shaver
- Each time you press the SELECT button, the course changes from “Clean/Dry/Charge” → “Dry/Charge” → “Charge”.
- The courses start approximately 6 seconds after they are selected.
- The course will be aborted if the power is cut off. In this case, perform the course again from the beginning.
- Do not detach the detergent cartridge or the water tank as the cleaning liquid may spill causing a malfunction.
Note:
- When the ambient temperature of the self-cleaning recharger is low (approx. 15 °C (59 °F) or lower), the time it takes to dry the shaver increases.
- The Clean or Dry function may stop under extreme low temperatures (approx. 0 °C (32 °F) or lower). In such a case, the CLEAN and DRY lamps will blink when the “Clean/Dry/Charge” course is selected, or the DRY lamp will blink when the “Dry/ Charge” course is selected.
Cleaning the shaver without the self-cleaning recharger
We recommend that you clean your shaver with the self-cleaning recharger or the sonic vibration cleaning mode when the cleaning symbol
appears on the LCD panel. - Disconnect the power cord from the shaver.
- Apply some hand soap and some water to the outer foil
- Rotate the lock ring to unlock the power switch. (For model ES-LA93, slide the switch lock button downwards to unlock the OFF/ON switch.)
- Press the power switch for more than 2 seconds to activate the sonic vibration cleaning mode.
- The Sonic Vibration[ ] icon appears on the LCD panel.
- After about 20 seconds, it will be automatically turned off, or you can turn it off by pressing the power switch.
- The Sonic Vibration[
- Remove the outer foil section and press the power switch for more than 2 seconds to activate the sonic vibration cleaning mode and clean it with running water.
- Wipe off any drops of water with a dry cloth
- Air Dry the outer foil section and the shaver completely.
- Attach the outer foil section to the shaver.
How to clean the self-cleaning recharger.
Beard trimmings may become attached to the cleaning tray of the self-cleaning recharger. Follow the steps below to remove them.
We recommend doing this each time you change the detergent cartridge.
- Be sure to remove the water tank and the appliance plug from the self-cleaning recharger. Be careful not to spill the cleaning liquid.
- Gently wipe off any beard trimmings attached to the inside of the cleaning tray with a cloth or tissue paper dampened with water.
- Clean the corners and uneven parts of the cleaning tray with a cotton swab dampened with water.
- Clean the corners and uneven parts of the cleaning tray with a cotton swab dampened with water.
Notes:
- Do not pull hard on the rubber blade protector at the bottom of the cleaning tray. The rubber may come off if you pull hard on it. It is only necessary to pull it up slightly.
- Warning - Do not wash or apply water to the adaptor or selfcleaning recharger. Failure to observe this may cause electric shock or result in short circuits.
When the water does not drain from the cleaning tray
Beard trimmings may clog the drain at the bottom of the cleaning tray. In this case, you cannot clean or dry the shaver. Push the beard trimmings down through the drain with a tooth pick etc.
Cleaning steps for Model ES-LF51
- Disconnect the power cord from the shaver.
- Apply some hand soap and some water to the outer foil.
- Rotate the lock ring to unlock the power switch.
- Press the power switch for more than 2 seconds to activate the sonic vibration cleaning mode.
- The battery capacity lamps blink in order.
- After about 20 seconds, it will be automatically turned off, or you can turn it off by pressing the power switch.
- Remove the outer foil section and press the power switch for more than 2 seconds to activate the sonic vibration cleaning mode and clean it with running water.
- Wipe off any drops of water with a dry cloth.
- Air dry the outer foil section and the shaver completely.
- Attach the outer foil section to the shaver.
Cleaning steps for Model ES-LL21, ES-LL41
Cleaning with water
- Turn the shaver off and disconnect the AC adaptor.
- Apply some hand soap and some water to the system outer foil.
- Press the power button for more than 2 seconds to activate the Sonic Vibration cleaning mode.
- Splashing of foam is suppressed.
- The battery capacity lamps blink in order.
- After about 20 seconds, it will be automatically turned off, or you can turn it off by pressing the power switch.
- Remove the outer foil section and clean with running water.
- Splashing is reduced by rinsing the shaver in sonic vibration cleaning mode.
- After rinsing with water, shake the shaver up and down for a few times to remove excess moisture and then wipe off any drops of water with a dry cloth.
- Air Dry the outer foil section, the shaver, and the trimmer completely. Allow the shaver to dry in the shade, avoid direct sunlight.

Lubricate the shaver.
It will keep the movement of the blade smooth and maintain a comfort shave.
- Apply one drop of oil to each of the system outer foils.
- Raise the trimmer and apply a drop of oil.
- Switch the shaver on, and run it for approximately five seconds.
- Switch off the shaver, and wipe off any excess oil from the system outer foil with a soft cloth.
Notes
- Be careful not to hit the main body on the sink or any other object while draining the water. Failure to do so may cause malfunction.
- Do not wipe with thinners, benzine, alcohol etc. Doing so may cause malfunction, or cracking or discoloration of the parts. Wipe with diluted soapy water.
- Do not use any kitchen or bathroom detergents other than hand soap. Doing so may cause malfunction.
Cleaning steps for Model ES-LS8A
- Turn the shaver off and disconnect the AC adaptor.
- Apply some hand soap and some water to the system outer foil.
- Press
 for more than 2 seconds to activate the sonic vibration cleaning mode.
 - Splashing of foam is suppressed.
- The lamps blink alternately.
- After about 20 seconds, it will be automatically turned off, or you can turn it off by pressing the power switch.
- Remove the outer foil section and clean with running water.
- Removing the outer foil section. Press the foil frame release buttons and lift the outer foil section upwards.
- Splashing is reduced by rinsing the shaver in sonic vibration cleaning mode.
- After a few times to remove excess moisture and then wipe off any drops of water with a dry cloth.
- Dry the outer foil section, the shaver, and the trimmer completely.
- Allow the shaver to dry in the shade, avoid direct sunlight.
- Lubricate the shaver. It will keep the movement of the blades smooth and maintain a comfort shave.
Notes
- Apply one drop of oil to each of the system outer foils.
- Raise the trimmer and apply a drop of oil.
- Switch the shaver on, and run it for approximately five seconds.
- Switch off the shaver, and wipe off any excess oil from the system outer foil with a soft cloth.
- Do not use any kitchen or bathroom detergents other than hand soap. Doing so may cause malfunction.
- Be careful not to hit the main body on the sink or any other object while draining the water. Failure to do so may cause malfunction.
- Do not wipe with thinners, benzine, alcohol etc. Doing so may cause malfunction, cracking or discoloration of the parts. Wipe with diluted soapy water. Doing so may cause malfunction, cracking, or discolpuration of the parts. Wipe with diluted soapy water.
Cleaning steps for Model ES-LS9A
- Turn the shaver off and disconnect the AC adaptor.
- Apply some hand soap and some water to the system outer foil.
- Press for more than 2 seconds to activate the sonic vibration cleaning mode.
- Splashing of foam is suppressed.
- The lamps blink alternately.
- After about 20 seconds, it will be automatically turned off, or you can turn it off by pressing the power switch.
- Remove the outer foil section and clean with running water.
- Removing the outer foil section. Press the foil frame release buttons and lift the outer foil section upwards.
- Splashing is reduced by rinsing the shaver in sonic vibration cleaning mode.
- After a few times to remove excess moisture and then wipe off any drops of water with a dry cloth.
- Attach the outer foil section and dry with the self cleaning recharger.
- Insert the shaver into the self-cleaning recharger and plug the adaptor into a household outlet.
- Check that the charge status lamp
 is glowing.
 - Press
 twice. The DRY lamp glows, and the “Dry/Charge” mode will start after approximately 6 seconds.
 - It is possible to change to the “AUTO” mode even after the “Dry/Charge” mode has started. Dry 180 min Charge 0 to 60 min
- Remove the adaptor after the selected mode is completed.
- Lubricate the shaver. It will keep the movement of the blades smooth and maintain a comfort shave.
- Apply one drop of oil to each of the system outer foils.
- Raise the trimmer and apply a drop of oil.
- Switch the shaver on, and run it for approximately five seconds.
- Switch off the shaver, and wipe off any excess oil from the system outer foil with a soft cloth.
Dry in a shade and apply oil.
Notes
- Do not use any kitchen or bathroom detergents other than hand soap. Doing so may cause malfunction.
- Be careful not to hit the main body on the sink or any other object while draining the water. Failure to do so may cause malfunction.
- Do not wipe with thinners, benzine, alcohol etc. Doing so may cause malfunction, cracking or discoloration of the parts. Wipe with diluted soapy water.
- Do not use the self-cleaning recharger while droplets or soap remain on the shaver. Doing so may change the concentration level or composition of the cleaning liquid in the cleaning liquid unit, which may degrade cleaning, sterilization, lubrication and drying performance. This may also cause cleaning liquid to spill from the self-cleaning recharger.
Cleaning steps for Model ES-LT2B
We recommend cleaning the shaver after each use.
Cleaning with water
Turn the shaver off and disconnect the AC adaptor.
- With the cleaning shutter closed, apply some hand soap and some water to the system outer foil.
- Turn the shaver on and make foam for a few seconds.
Cleaning shaver to remove light dirt
Turn the shaver off and disconnect the AC adaptor.
- With the cleaning shutter closed, apply some hand soap and some water to the system outer foil.
- Turn the shaver on and make foam for a few seconds.
- Slide the cleaning shutter until it clicks.
- The water inlets of the shaver head are opened.
- Pour running water into the water inlets and rinse thoroughly, and then turn off.
- Pour running water into both water inlets.
- Rinse with water and shake up and down several times to remove the water, and then close the cleaning shutter.
- Wipe off any drops of water with a dry cloth.
- Dry the outer foil section, the shaver, and the trimmer completely.
-
Allow the shaver to dry in the shade, avoid direct sunlight.
- Lubricate the shaver. It will keep the movement of the blade smooth and maintain a comfort shave.
- Apply one drop of oil to each of the system outer foils.
- Raise the trimmer and apply a drop of oil.
- Switch the shaver on, and run it for approximately five seconds.
- Switch off the shaver, and wipe off any excess oil from the system outer foil with a soft cloth.
Cleaning shaver to remove heavy dirt
Turn the shaver off and disconnect the AC adaptor.
- With the cleaning shutter closed, apply some hand soap and some water to the system outer foil.
- Turn the shaver on and make foam for a few seconds.
- Turn the shaver off and remove the outer foil section.
- Clean the shaver and the outer foil section with running water.
- Rinse with water and shake up and down several times to remove the water.
- Wipe off any drops of water with a dry cloth.
- Dry the outer foil section, the shaver, and the trimmer completely.
- Allow the shaver to dry in the shade, avoid direct sunlight.
- Lubricate the shaver. It will keep the movement of the blade smooth and maintain a comfort shave.
- Apply one drop of oil to each of the system outer foils.
- Raise the trimmer and apply a drop of oil.
- Switch the shaver on, and run it for approximately five seconds.
- Switch off the shaver, and wipe off any excess oil from the system outer foil with a soft cloth.
Notes
- Do not use any kitchen or bathroom detergents other than hand soap. Doing so may cause malfunction.
- Do not wipe with thinners, benzine, alcohol etc. Doing so may cause malfunction, cracking or discoloration of the parts.
- Be careful not to hit the main body on the sink or any other object while draining the water. Failure to do so may cause malfunction.
Cleaning steps for Model ES-SWLT2W
We recommend cleaning the shaver after each use.
Cleaning with Water
- Turn the shaver off and disconnect the AC adaptor.
- With the cleaning shutter closed, apply some hand soap and some water to the system outer foil.
- Turn the shaver on and make foam for a few seconds.
- Wipe off any drops of water with a dry cloth.
- Dry the outer foil section, the shaver, and the trimmer completely.
- Allow the shaver to dry in the shade, avoid direct sunlight.
- Lubricate the shaver. It will keep the movement of the blade smooth and maintain a comfort shave.
- Apply one drop of oil to each of the system outer foils.
- Raise the trimmer and apply a drop of oil.
- Switch the shaver on, and run it for approximately five seconds.
- Switch off the shaver, and wipe off any excess oil from the system outer foil with a soft cloth.
- Apply one drop of oil to each of the system outer foils.
Cleaning with the brush
- Turn the shaver off and disconnect the AC adaptor.
- Remove the outer foil section and the inner blades by pressing the foil frame release buttons and lift the outer foil section upward.
- Do not use any brush other than the supplied one.
Cleaning with the long brush
Clean the foil frame, system outer foil, the main body and the trimmer using the long brush.
Cleaning with the short brush
- Clean the inner blades using the short brush by moving it in direction as illustrated.
- Do not move the short brush perpendicularly against the blades as it will damage the inner blades and affect their sharpnes
Cleaning to remove light dirt
- Turn the shaver off and disconnect the AC adaptor.
- With the cleaning shutter closed, apply some hand soap and some water to the system outer foil.
- Turn the shaver on and make foam for a few seconds.
- Slide the cleaning shutter until it clicks.
- The water inlets of the shaver head are opened.

- The water inlets of the shaver head are opened.
- Pour running water into the water inlets and rinse thoroughly, and then turn off.
- Pour running water into both water inlet.
- Rinse with water and shake up and down several times to remove the water, and then close the cleaning shutter.
- Turn the shaver off and disconnect the AC adaptor.
- With the cleaning shutter closed, apply some hand soap and some water to the system outer foil.
- Turn the shaver on and make foam for a few seconds.
- Turn the shaver off and remove the outer foil section.
- Clean the shaver and the outer foil section with running water.
- Rinse with water and shake up and down several times to remove the water.
- Attach the outer foil section.
- Do not use any kitchen or bathroom detergents other than hand soap. Doing so may cause malfunction.
- Do not wipe with thinners, benzine, alcohol etc. Doing so may cause malfunction, cracking or discoloration of the parts.
- Be careful not to hit the main body on the sink or any other object while draining the water. Failure to do so may cause malfunction.
- Disconnect the power cord from the shaver.
- Apply some hand soap and some water to the outer foil.
- Press the OFF/ON switch for more than 2 seconds to activate the turbo mode for “sonic” vibration cleaning. The battery capacity lamps blink in order.
- Remove the outer foil section and press the OFF/ON switch for more than 2 seconds to activate the turbo mode for “sonic” vibration cleaning and clean it with running water. This will activate the sonic vibration cleaning mode.
- Wipe off any drops of water with a dry cloth.
- Remove the outer foil section to allow it to air dry completely.
- Disconnect the cord from the shaver.
- Apply some hand soap and some water to the outer foil.
- Rotate the lock ring to unlock the power switch.
- Press the power switch for more than 2 seconds to activate the sonic vibration cleaning mode.
- The sonic vibration indicator
 appears on the LCD panel.
 - After about 20 seconds, it will be automatically turned off, or you can turn it off by pressing the power. switch.
- The sonic vibration indicator
- Remove the outer foil section and press the power switch for more than 2 seconds to activate the sonic vibration cleaning mode and clean it with running water.
- Wipe off any drops of water with a dry cloth.
- Air dry the outer foil section and the shaver completely.
- Attach the outer foil section to the shaver.
- Turn the shaver off and disconnect the AC adaptor.
- Apply some hand soap and some water to the system outer foil.
- Press the power button for more than 2 seconds to activate the Sonic Vibration cleaning mode.
- Splashing of foam is suppressed.
- The battery capacity lamps blink in order.
- After about 20 seconds, it will be automatically turned off, or you can turn it off by pressing the power switch.
- Remove the outer foil section and clean with running water.
- Splashing is reduced by rinsing the shaver in sonic vibration cleaning mode.
- After rinsing with water, shake the shaver up and down for a few times to remove excess moisture and then wipe off any drops of water with a dry cloth.
- Air Dry the outer foil section, the shaver, and the trimmer completely. Allow the shaver to dry in the shade, avoid direct sunlight.
- Apply one drop of oil to each of the system outer foils.
- Raise the trimmer and apply a drop of oil.
- Switch the shaver on, and run it for approximately five seconds.
- Switch off the shaver, and wipe off any excess oil from the system outer foil with a soft cloth.
- Be careful not to hit the main body on the sink or any other object while draining the water. Failure to do so may cause malfunction.
- Do not wipe with thinners, benzine, alcohol etc. Doing so may cause malfunction, or cracking or discoloration of the parts. Wipe with diluted soapy water.
- Do not use any kitchen or bathroom detergents other than hand soap. Doing so may cause malfunction.
- Clean the inner blades using the short brush by moving it in direction as illustrated.
- Do not move the short brush perpendicularly against the blades as it will damage the inner blades and affect their sharpness.
- Remove the shaver and the appliance plug from the self-cleaning recharger.
- Place the self-cleaning recharger on a hard, flat surface.
- When the self-cleaning recharger is lifted, or on the soft surface such as carpets, the lock release lever will not fit in the recharger properly. In that case, the cleaning liquid unit cannot be removed.
- Press the cleaning liquid unit removal button and remove the cleaning liquid unit.
- Wash away the old cleaning liquid and beard trimmings and then rinse the cleaning liquid unit.
- After washing, be sure to attach the cleaning liquid filter.
- Pour tap water and detergent into the cleaning liquid unit. Do not let the water rise above the maximum water line. This may cause the cleaning liquid to spill.
- Attach the cleaning liquid unit. Immediately wipe up any cleaning liquid that has been spilt. Be careful not to drop cleaning liquid onto leather products or wooden floors as it may cause discoloration.
- Press the top of the selfcleaning recharger down and securely attach until it clicks.
- The water and detergent will mix after cleaning begins, making cleaning liquid.
- When the cleaning liquid level has dropped, the LOW lamp will glow to indicate the cleaning liquid should be replaced.
- After the LOW lamp glows, you can clean the shaver with the self-cleaning recharger for approximately 7 days.
- Replace the cleaning liquid when the STATUS lamp glows.
- When replaced, the cleaning liquid will last for approximately 30 days if used once per day. (This will differ depending on beard thickness and the ambient temperature.)
- Use the detergent within approximately 6 months after opening the package. When 6 months have passed, discard the cleaning liquid, and then pour new water and detergent into the cleaning liquid unit.
- Replace the water and detergent at the same time. Otherwise the cleaning function may deteriorate.
- Only use self-cleaning recharger detergent for Panasonic shavers.
- Insert the appliance plug into the self-cleaning recharger.
- Remove the protective cap and then attach the shaver.
- Plug in the adaptor into a household outlet.
- Turn the shaver off before attaching.
- Wipe off any water droplets on the main body rear terminals.
- Check that the outer foil is not deformed or damaged when you are attaching the shaver.
- Press the SELECT button to select the mode.
- The “Charge” mode starts when attaching the shaver.
- Each time you press the SELECT button, the mode changes from “Clean/Dry/Charge” → “Dry/Charge” → “Charge”.
- The modes start approximately 6 seconds after they are selected.
- The mode will be aborted if the power is cut off. In this case, perform the mode again from the beginning.
- Do not press the cleaning liquid unit removal button as the cleaning liquid may spill causing a malfunction.
- Remove the adaptor after the selected mode is completed.
- When the ambient temperature of the self-cleaning recharger is low (approx. 15 °C (59 °F) or lower), the time it takes to dry the shaver increases.
- Use the self-cleaning recharger in temperatures between 15 °C (59 °F) and 35 °C (95 °F).
- The Clean or Dry function may stop under extreme low temperatures (approx. 0 °C (32 °F) or lower). In such a case, the STATUS lamp will glow for approximately 5 seconds and the mode will switch to the “Charge” mode without allowing you to select the “Clean/Dry/Charge” mode or the “Dry/Charge” mode.
- Turn the power switch OFF, and disconnect the AC adaptor. Unlock the switch.
- Apply some hand soap and some water to the system outer foil.
- Press the power switch for more than 2 seconds to activate the sonic vibration cleaning mode.
- The battery capacity lamps blink in order.
- After about 20 seconds, it will be automatically turned off.
- Remove the outer foil section and press the power switch for more than 2 seconds to activate the sonic vibration cleaning mode.
- Clean the shaver, the outer foil section, and the trimmer with running water.
- After rinsing with water, shake the shaver up and down for a few times to remove excess moisture. Hitting the vanity, etc., while shaking the shaver may cause malfunction
- Splashing is reduced by rinsing the shaver in sonic vibration cleaning mode.
- Wipe off any drops of water with a dry cloth.
- Dry the outer foil section, the shaver, and the trimmer completely.
- Attach the outer foil section to the shaver.
- Attach the outer foil section to the shaver.
- Dry the shaver with self-cleaning recharger using “Dry/Charge” mode.
- Do not use the self-cleaning recharger while droplets, soap, or shaving gel remain on the shaver. Doing so may change the concentration level or constituent of the cleaning liquid in the cleaning liquid unit, which may degrade cleaning, sterilization, and lubrication performance. This may also cause cleaning liquid to spill from the self-cleaning recharger or prevent the blades from drying sufficiently.
- Be sure to remove the cleaning liquid unit and the appliance plug from the self cleaning recharger.
- Be careful not to spill the cleaning liquid.
- Some cleaning liquid components and skin oil may separate and adhere to the cleaning liquid unit and cleaning liquid filter. This does not indicate a problem.
- Pour water as illustrated while tilting the cleaning liquid unit and shaking it gently.
- You can clean with the cleaning liquid filter removed.
- After washing, be sure to attach the cleaning liquid filter.
- Gently wipe off any beard trimmings attached to the inside of the cleaning tray with a cloth or tissue paper dampened with water.
- Clean the corners and uneven parts of the cleaning tray with a cotton swab dampened with water.
- Beard trimmings may clog the drain at the bottom of the cleaning tray. In this case, you cannot clean or dry the shaver. Push the beard trimmings down through the drain with a toothpick etc.
- Remove the shaver and the appliance plug from the self-cleaning recharger.
- Remove the water tank and then open the water tank cap.
- Wash away the old cleaning liquid and then rinse the water tank.
- Pour tap water into the water tank.
- Do not let the water rise above the maximum water line. This may cause the cleaning liquid to spill.
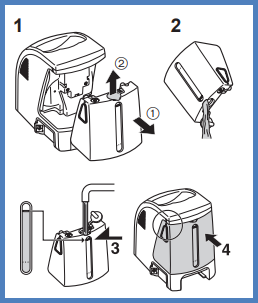
- Securely close the water tank cap and then attach the tank.
- Peel off the 2 seals from the new detergent cartridge. Hold the detergent cartridge horizontally. (The detergent may spill if the detergent cartridge is tilted too much.)
- Attach the detergent cartridge.
- Keep out of reach of children.
- Only use to clean the blades of electric shavers.
- Carry out emergency measures if the cleaning agent enters mouth or eyes, and consult a doctor.
- Replace the detergent cartridge when the status lamp is illuminated.
- The expiration date of the cleaning liquid is 6 months after it is opened. If you do not use the cleaning liquid for more than 6 months, throw away the detergent cartridge and the cleaning liquid.
- Only use self-cleaning recharger detergent for Panasonic shavers.
- Always change the detergent cartridge and the cleaning liquid in the water tank at the same time. Adding water, or changing just the detergent cartridge or the water, will result in deteriorated cleaning functions.
- If you operate the self-cleaning recharger, the concentrated detergent in the detergent cartridge dilutes and the water inside the tank will become a cleaning liquid.
- Insert the appliance plug into the self-cleaning recharger.
- Remove the protective cap and then gently insert the shaver as shown.
- Plug in the AC adaptor into a household outlet.
- Remove any soap or water on the shaver if it has been washed with hand soap or any other detergent.
- Turn the shaver off before inserting.
- Check that the outer foil is not deformed or damaged when you insert the shaver.
- Wipe off any water droplets on the main body rear terminal.
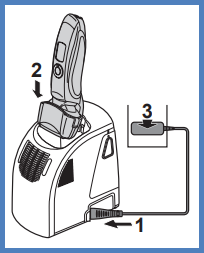
- Press the SELECT button to select the course.
- The “Charge” course starts when attaching the shaver.
- Each time you press the SELECT button, the course changes from “Clean/Dry/Charge” to “Dry/Charge” to “Charge”.
- The courses start approximately 6 seconds after they are selected.
- The course will be aborted if the power is cut off. In this case, perform the course again from the beginning.
- Do not detach the detergent cartridge or the water tank as the cleaning liquid may spill causing a malfunction.
- When the ambient temperature of the self-cleaning recharger is low (approx. 15 °C (59 °F) or lower), the time it takes to dry the shaver increases.
- The Clean or Dry function may stop under extreme low temperatures (approx. 0 °C (32 °F) or lower). In such a case, the CLEAN and DRY lamps will blink when the “Clean/Dry/Charge” course is selected, or the DRY lamp will blink when the “Dry/ Charge” course is selected.
- Disconnect the power cord from the shaver.
- Apply some hand soap and some water to the outer foil.
- Rotate the lock ring to unlock the power switch.
- Press the power switch for more than 2 seconds to activate the sonic vibration cleaning mode.
- The battery capacity lamps blink in order.
- After about 20 seconds, it will be automatically turned off, or you can turn it off by pressing the power switch.
- Remove the outer foil section and press the power switch for more than 2 seconds to activate the sonic vibration cleaning mode and clean it with running water.
- Wipe off any drops of water with a dry cloth.
- Dry the outer foil section and the shaver completely.
- Attach the outer foil section to the shaver.
- Attach the outer foil section to the shaver.
- Dry the shaver with self-cleaning recharger using “Dry/ Charge” course.
- Be sure to remove the water tank and the appliance plug from the self-cleaning recharger. Be careful not to spill the cleaning liquid.
- Gently wipe off any beard trimmings attached to the inside of the cleaning tray with a cloth or tissue paper dampened with water.
- Clean the corners and uneven parts of the cleaning tray with a cotton swab dampened with water.
- Clean the corners and uneven parts of the cleaning tray with a cotton swab dampened with water.
- Do not pull hard on the rubber blade protector at the bottom of the cleaning tray. The rubber may come off if you pull hard on it. It is only necessary to pull it up slightly.
- Warning - Do not wash or apply water to the adaptor or selfcleaning recharger. Failure to observe this may cause electric shock or result in short circuits.
- Turn the shaver off and disconnect the AC adaptor.
- Apply some hand soap and some water to the system outer foil.
- Press the power button for more than 2 seconds to activate the Sonic Vibration cleaning mode.
- Splashing of foam is suppressed.
- The battery capacity lamps blink in order.
- After about 20 seconds, it will be automatically turned off, or you can turn it off by pressing the power switch.
- Remove the outer foil section and clean with running water.
- Splashing is reduced by rinsing the shaver in sonic vibration cleaning mode.
- After rinsing with water, shake the shaver up and down for a few times to remove excess moisture and then wipe off any drops of water with a dry cloth.
- Air Dry the outer foil section, the shaver, and the trimmer completely. Allow the shaver to dry in the shade, avoid direct sunlight.
- Apply one drop of oil to each of the system outer foils.
- Raise the trimmer and apply a drop of oil.
- Switch the shaver on, and run it for approximately five seconds.
- Switch off the shaver, and wipe off any excess oil from the system outer foil with a soft cloth.
- Be careful not to hit the main body on the sink or any other object while draining the water. Failure to do so may cause malfunction.
- Do not wipe with thinners, benzine, alcohol etc. Doing so may cause malfunction, or cracking or discoloration of the parts. Wipe with diluted soapy water.
- Do not use any kitchen or bathroom detergents other than hand soap. Doing so may cause malfunction.
- Clean the inner blades using the short brush by moving it in direction as illustrated.
- Do not move the short brush perpendicularly against the blades as it will damage the inner blades and affect their sharpness.
- Disconnect the cord from the shaver.
- Apply some hand soap and some water to the system outer foil.
- Rotate the lock ring to unlock the power switch.
- Press the power switch for more than 2 seconds to activate the sonic vibration cleaning mode.
- For model ES-LV65, the battery capacity lamps blink in order.
- For model ES-LV61, the sonic vibration icon appears on the LCD panel.
- After about 20 seconds, it will be automatically turned off, or you can turn it off by pressing the power switch.
- Remove the outer foil section and press the power switch for more than 2 seconds to activate the sonic vibration cleaning mode and clean it with running water.
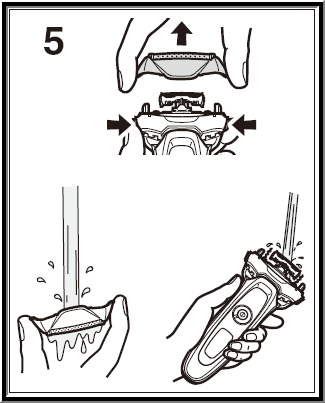
- Wipe off any drops of water with a dry cloth.
- Air dry the outer foil section and the shaver completely.
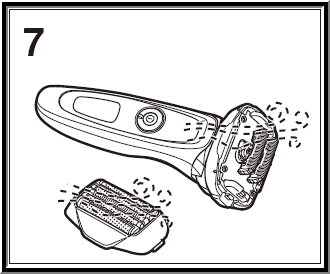
- Attach the outer foil section to the shaver.
- Turn the shaver off and disconnect the AC adaptor.
- Apply some hand soap and some water to the system outer foil.
- Press the power button for more than 2 seconds to activate the Sonic Vibration cleaning mode.
- Splashing of foam is suppressed.
- The battery capacity lamps blink in order.
- After about 20 seconds, it will be automatically turned off, or you can turn it off by pressing the power switch.
- Remove the outer foil section and clean with running water.
- Splashing is reduced by rinsing the shaver in sonic vibration cleaning mode.
- After rinsing with water, shake the shaver up and down for a few times to remove excess moisture and then wipe off any drops of water with a dry cloth.
- Air Dry the outer foil section, the shaver, and the trimmer completely. Allow the shaver to dry in the shade, avoid direct sunlight.
- Apply one drop of oil to each of the system outer foils.
- Raise the trimmer and apply a drop of oil.
- Switch the shaver on, and run it for approximately five seconds.
- Switch off the shaver, and wipe off any excess oil from the system outer foil with a soft cloth.
- Be careful not to hit the main body on the sink or any other object while draining the water. Failure to do so may cause malfunction.
- Do not wipe with thinners, benzine, alcohol etc. Doing so may cause malfunction, or cracking or discoloration of the parts. Wipe with diluted soapy water.
- Do not use any kitchen or bathroom detergents other than hand soap. Doing so may cause malfunction.
- Clean the inner blades using the short brush by moving it in direction as illustrated.
- Do not move the short brush perpendicularly against the blades as it will damage the inner blades and affect their sharpness.
- Remove the water tank and then open the water tank cap.
- Wash away the old cleaning liquid and then rinse the water tank.
- Pour tap water into the water tank. Do not let the water rise above the maximum water line. This may cause the cleaning liquid to spill.
- Securely close the water tank cap and then attach the tank.
- Peel off the 2 seals from the new detergent cartridge. Hold the detergent cartridge horizontally. (The detergent may spill if the detergent cartridge is tilted too much.)
- Attach the detergent cartridge.
- Insert the appliance plug into the self-cleaning recharger.
- Remove the protective cap and then gently insert the shaver as shown.
- Plug in the AC adaptor into a household outlet.
- Remove any soap or water on the shaver if it has been washed with hand soap or any other detergent.
- Turn the shaver off before inserting.
- Check that the outer foil is not deformed or damaged when you insert the shaver.
- Wipe off any water droplets on the main body rear terminal.
- Press the SELECT button to select the course.
- The “Charge” course starts when attaching the shaver
- Each time you press the SELECT button, the course changes from “Clean/Dry/Charge” → “Dry/Charge” → “Charge”.
- The courses start approximately 6 seconds after they are selected.
- The course will be aborted if the power is cut off. In this case, perform the course again from the beginning.
- Do not detach the detergent cartridge or the water tank as the cleaning liquid may spill causing a malfunction.
- When the ambient temperature of the self-cleaning recharger is low (approx. 15 °C (59 °F) or lower), the time it takes to dry the shaver increases.
- The Clean or Dry function may stop under extreme low temperatures (approx. 0 °C (32 °F) or lower). In such a case, the CLEAN and DRY lamps will blink when the “Clean/Dry/Charge” course is selected, or the DRY lamp will blink when the “Dry/ Charge” course is selected.
- Disconnect the power cord from the shaver.
- Apply some hand soap and some water to the outer foil
- Rotate the lock ring to unlock the power switch. (For model ES-LA93, slide the switch lock button downwards to unlock the OFF/ON switch.)
- Press the power switch for more than 2 seconds to activate the sonic vibration cleaning mode.
- The Sonic Vibration[ ] icon appears on the LCD panel.
- After about 20 seconds, it will be automatically turned off, or you can turn it off by pressing the power switch.
- The Sonic Vibration[
- Remove the outer foil section and press the power switch for more than 2 seconds to activate the sonic vibration cleaning mode and clean it with running water.
- Wipe off any drops of water with a dry cloth
- Air Dry the outer foil section and the shaver completely.
- Attach the outer foil section to the shaver.
- Attach the outer foil section to the shaver.
- Dry the shaver with self-cleaning recharger using “Dry/ Charge” course.
- Insert the shaver into the self-cleaning recharger and plug the adaptor into a household outlet. Check that the charge status lamp is glowing.
- Press SELECT.
- The CLEAN lamp and the DRY lamp glow, and the “AUTO” mode will start after approximately 6 seconds.
- It is not possible to change the mode after the “AUTO” mode has started.
- The Clean and Dry indicators light during the Clean, Dry proceses. Clean - 10 min. Dry - 80 min. When the ambient temperature of the self-cleaning recharger is low (approx. 15 °C (59 °F) or lower), the drying process will take up to 170 min.

- Remove the adaptor after the selected mode is completed.
- Do not press the cleaning liquid unit removal button during cleaning as the cleaning liquid may spill causing a malfunction.
- The drying time may increase in an ambient temperature approximately 15 °C (59 °F) or lower. The Clean or Dry function may not operate under extreme low temperatures (approximately 0 °C (32 °F) or lower).
- A lubricant constituent is included in the detergent, so smooth shave is maintained without applying oil.
- Apply some hand soap and some water to the system outer foil.

- Press the Power button for more than 2 seconds to activate the sonic vibration cleaning mode.
- Splashing of foam is suppressed.
- The battery capacity lamps blink in order.
- After about 20 seconds, it will be automatically turned off, or you can turn it off by pressing the power switch.
- Remove the outer foil section and clean with running water.
- Splashing is reduced by rinsing the shaver in sonic vibration cleaning mode.
- After rinsing with water, shake the shaver up and down for a few times to remove excess moisture and then wipe off any drops of water with a dry cloth.
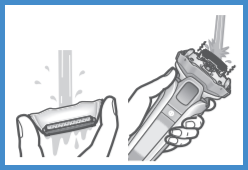
- Attach the outer foil section and dry with the self-cleaning recharger.
- Insert the shaver into the self‑ cleaning recharger and plug the adaptor into a household outlet. Check that the charge status lamp
 is glowing.
 - Press SELECT twice. The DRY lamp glows, and the “Dry/Charge” mode will start after approximately 6 seconds.
- Remove the adaptor after the selected mode is completed.
- Air dry in shade.
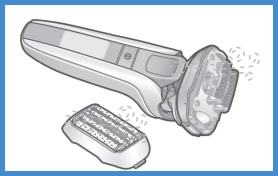
- Be careful not to hit the main body on the sink or any other object while draining the water. Failure to do so may cause malfunction.
- Do not wipe with thinners, benzine, alcohol etc. Doing so may cause malfunction, or cracking or discoloration of the parts. Wipe with diluted soapy water.
- Do not use any kitchen or bathroom detergents other than hand soap. Doing so may cause malfunction.
- Do not use the self-cleaning recharger while droplets or soap remain on the shaver. Doing so may change the concentration level or composition of the cleaning liquid in the cleaning liquid unit, which may degrade cleaning, sterilization, lubrication and drying performance. This may also cause cleaning liquid to spill from the self-cleaning recharger.
- Be sure to remove the cleaning liquid unit and the appliance plug from the self cleaning recharger.
- Be careful not to spill the cleaning liquid.
- Some cleaning liquid components and skin oil may separate and adhere to the cleaning liquid unit and cleaning liquid filter. This does not indicate a problem.
- Pour water as illustrated while tilting the cleaning liquid unit and shaking it gently.
- You can clean with the cleaning liquid filter removed.
- After washing, be sure to attach the cleaning liquid filter.
- Gently wipe off any beard trimmings attached to the inside of the cleaning tray with a cloth or tissue paper dampened with water.
- Clean the corners and uneven parts of the cleaning tray with a cotton swab dampened with water.
- Beard trimmings may clog the drain at the bottom of the cleaning tray. In this case, you cannot clean or dry the shaver. Push the beard trimmings down through the drain with a toothpick etc.
- Insert the shaver into the self-cleaning recharger and plug the adaptor into a household outlet. Check that the charge status lamp is glowing.
- Press SELECT.
- The CLEAN lamp and the DRY lamp glow, and the “AUTO” mode will start after approximately 6 seconds.
- It is not possible to change the mode after the “AUTO” mode has started.
- The Clean and Dry indicators light during the Clean, Dry proceses. Clean - 10 min. Dry - 80 min. When the ambient temperature of the self-cleaning recharger is low (approx. 15 °C (59 °F) or lower), the drying process will take up to 170 min.
- Remove the adaptor after the selected mode is completed.
- Do not press the cleaning liquid unit removal button during cleaning as the cleaning liquid may spill causing a malfunction.
- The drying time may increase in an ambient temperature approximately 15 °C (59 °F) or lower. The Clean or Dry function may not operate under extreme low temperatures (approximately 0 °C (32 °F) or lower).
- A lubricant constituent is included in the detergent, so smooth shave is maintained without applying oil.
- Apply some hand soap and some water to the system outer foil.
- Press the Power button for more than 2 seconds to activate the sonic vibration cleaning mode.
- Splashing of foam is suppressed.
- The battery capacity lamps blink in order.
- After about 20 seconds, it will be automatically turned off, or you can turn it off by pressing the power switch.
- Remove the outer foil section and clean with running water.
- Splashing is reduced by rinsing the shaver in sonic vibration cleaning mode.
- After rinsing with water, shake the shaver up and down for a few times to remove excess moisture and then wipe off any drops of water with a dry cloth.
- Attach the outer foil section and dry with the self-cleaning recharger.
- Insert the shaver into the self‑ cleaning recharger and plug the adaptor into a household outlet. Check that the charge status lamp is glowing.
- Press SELECT twice. The DRY lamp glows, and the “Dry/Charge” mode will start after approximately 6 seconds.
- Remove the adaptor after the selected mode is completed.
- Apply one drop of oil to each of the system outer foils.
- Raise the trimmer and apply a drop of oil.
- Switch the shaver on, and run it for approximately five seconds.
- Switch off the shaver, and wipe off any excess oil from the system outer foil with a soft cloth.
- Air dry in shade.
- Be careful not to hit the main body on the sink or any other object while draining the water. Failure to do so may cause malfunction.
- Do not wipe with thinners, benzine, alcohol etc. Doing so may cause malfunction, or cracking or discoloration of the parts. Wipe with diluted soapy water.
- Do not use any kitchen or bathroom detergents other than hand soap. Doing so may cause malfunction.
- Do not use the self-cleaning recharger while droplets or soap remain on the shaver. Doing so may change the concentration level or composition of the cleaning liquid in the cleaning liquid unit, which may degrade cleaning, sterilization, lubrication and drying performance. This may also cause cleaning liquid to spill from the self-cleaning recharger.
- Clean the outer foil section, system outer foil, the shaver body and the trimmer using the long brush.
- Clean the inner blades using the short brush by moving it in direction as illustrated.
- Do not move the short brush perpendicularly against the blades as it will damage the inner blades and affect their sharpness.
- Remove the shaver and the appliance plug from the self-cleaning recharger.
- Place the self-cleaning recharger on a hard, flat surface.
- When the self-cleaning recharger is lifted, or on the soft surface such as carpets, the lock release lever will not fit in the recharger properly. In that case, the cleaning liquid unit cannot be removed.
- Press the cleaning liquid unit removal button and remove the cleaning liquid unit.
- Wash away the old cleaning liquid and beard trimmings and then rinse the cleaning liquid unit.
- After washing, be sure to attach the cleaning liquid filter.
- Pour tap water and detergent into the cleaning liquid unit. Do not let the water rise above the maximum water line. This may cause the cleaning liquid to spill.
- Attach the cleaning liquid unit. Immediately wipe up any cleaning liquid that has been spilt. Be careful not to drop cleaning liquid onto leather products or wooden floors as it may cause discoloration.
- Press the top of the selfcleaning recharger down and securely attach until it clicks.
- The water and detergent will mix after cleaning begins, making cleaning liquid.
- When the cleaning liquid level has dropped, the LOW lamp will glow to indicate the cleaning liquid should be replaced.
- After the LOW lamp glows, you can clean the shaver with the self-cleaning recharger for approximately 7 days.
- Replace the cleaning liquid when the STATUS lamp glows.
- When replaced, the cleaning liquid will last for approximately 30 days if used once per day. (This will differ depending on beard thickness and the ambient temperature.)
- Use the detergent within approximately 6 months after opening the package. When 6 months have passed, discard the cleaning liquid, and then pour new water and detergent into the cleaning liquid unit.
- Replace the water and detergent at the same time. Otherwise the cleaning function may deteriorate.
- Only use self-cleaning recharger detergent for Panasonic shavers.
- Insert the appliance plug into the self-cleaning recharger.
- Remove the protective cap and then attach the shaver.
- Plug in the adaptor into a household outlet.
- Turn the shaver off before attaching.
- Wipe off any water droplets on the main body rear terminals.
- Check that the outer foil is not deformed or damaged when you are attaching the shaver.
- Press the SELECT button to select the mode.
- The “Charge” mode starts when attaching the shaver.
- Each time you press the SELECT button, the mode changes from “Clean/Dry/Charge” → “Dry/Charge” → “Charge”.
- The modes start approximately 6 seconds after they are selected.
- The mode will be aborted if the power is cut off. In this case, perform the mode again from the beginning.
- Do not press the cleaning liquid unit removal button as the cleaning liquid may spill causing a malfunction.
- When the ambient temperature of the self-cleaning recharger is low (approx. 15 °C (59 °F) or lower), the time it takes to dry the shaver increases.
- Use the self-cleaning recharger in temperatures between 15 °C (59 °F) and 35 °C (95 °F).
- The Clean or Dry function may stop under extreme low temperatures (approx. 0 °C (32 °F) or lower). In such a case, the STATUS lamp will glow for approximately 5 seconds and the mode will switch to the “Charge” mode without allowing you to select the “Clean/Dry/Charge” mode or the “Dry/Charge” mode.
- Disconnect the cord from the shaver.
- Apply some hand soap and some water to the system outer foil.
- Rotate the lock ring to unlock the power switch.
- Press the power switch for more than 2 seconds to activate the sonic vibration cleaning mode.
- The battery capacity lamps blink in order.
- After about 20 seconds, it will be automatically turned off, or you can turn it off by pressing the power switch.
- Remove the outer foil section and press the power switch for more than 2 seconds to activate the sonic vibration cleaning mode and clean it with running water
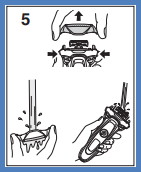
- Wipe off any drops of water with a dry cloth.
- Air Dry the outer foil section and the shaver completely.
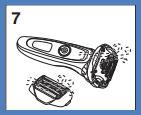
- Attach the outer foil section to the shaver.
- Attach the outer foil section to the shaver.
- Dry the shaver with self-cleaning recharger using “Dry/Charge” mode.
- Be sure to remove the cleaning liquid unit and the appliance plug from the self cleaning recharger.
- Be careful not to spill the cleaning liquid.
- Some cleaning liquid components and skin oil may separate and adhere to the cleaning liquid unit and cleaning liquid filter. This does not indicate a problem.
- Pour water as illustrated while tilting the cleaning liquid unit and shaking it gently.
- You can clean with the cleaning liquid filter removed.
- After washing, be sure to attach the cleaning liquid filter.
- Gently wipe off any beard trimmings attached to the inside of the cleaning tray with a cloth or tissue paper dampened with water.
- Clean the corners and uneven parts of the cleaning tray with a cotton swab dampened with water.
- Beard trimmings may clog the drain at the bottom of the cleaning tray. In this case, you cannot clean or dry the shaver. Push the beard trimmings down through the drain with a toothpick etc.
- Insert the shaver into the self-cleaning recharger and plug the adaptor into a household outlet. Check that the charge status lamp is glowing.
- Press SELECT.
- The CLEAN lamp and the DRY lamp glow, and the “AUTO” mode will start after approximately 6 seconds.
- It is not possible to change the mode after the “AUTO” mode has started.
- The Clean and Dry indicators light during the Clean, Dry proceses. Clean - 10 min. Dry - 80 min. When the ambient temperature of the self-cleaning recharger is low (approx. 15 °C (59 °F) or lower), the drying process will take up to 170 min.
- Remove the adaptor after the selected mode is completed.
- Do not press the cleaning liquid unit removal button during cleaning as the cleaning liquid may spill causing a malfunction.
- The drying time may increase in an ambient temperature approximately 15 °C (59 °F) or lower. The Clean or Dry function may not operate under extreme low temperatures (approximately 0 °C (32 °F) or lower).
- A lubricant constituent is included in the detergent, so smooth shave is maintained without applying oil.
- Apply some hand soap and some water to the system outer foil.
- Press the Power button for more than 2 seconds to activate the sonic vibration cleaning mode.
- Splashing of foam is suppressed.
- The battery capacity lamps blink in order.
- After about 20 seconds, it will be automatically turned off, or you can turn it off by pressing the power switch.
- Remove the outer foil section and clean with running water.
- Splashing is reduced by rinsing the shaver in sonic vibration cleaning mode.
- After rinsing with water, shake the shaver up and down for a few times to remove excess moisture and then wipe off any drops of water with a dry cloth.
- Attach the outer foil section and dry with the self-cleaning recharger.
- Insert the shaver into the self‑ cleaning recharger and plug the adaptor into a household outlet. Check that the charge status lamp is glowing.
- Press SELECT twice. The DRY lamp glows, and the “Dry/Charge” mode will start after approximately 6 seconds.
- Remove the adaptor after the selected mode is completed.
- Apply one drop of oil to each of the system outer foils.
- Raise the trimmer and apply a drop of oil.
- Switch the shaver on, and run it for approximately five seconds.
- Switch off the shaver, and wipe off any excess oil from the system outer foil with a soft cloth.
- Air dry in shade.
- Be careful not to hit the main body on the sink or any other object while draining the water. Failure to do so may cause malfunction.
- Do not wipe with thinners, benzine, alcohol etc. Doing so may cause malfunction, or cracking or discoloration of the parts. Wipe with diluted soapy water.
- Do not use any kitchen or bathroom detergents other than hand soap. Doing so may cause malfunction.
- Do not use the self-cleaning recharger while droplets or soap remain on the shaver. Doing so may change the concentration level or composition of the cleaning liquid in the cleaning liquid unit, which may degrade cleaning, sterilization, lubrication and drying performance. This may also cause cleaning liquid to spill from the self-cleaning recharger.
- Clean the outer foil section, system outer foil, the shaver body and the trimmer using the long brush.
- Clean the inner blades using the short brush by moving it in direction as illustrated.
- Do not move the short brush perpendicularly against the blades as it will damage the inner blades and affect their sharpness.
- Turn the shaver off and disconnect the USB plug.
- Check that the socket cover is closed.

- Check that the socket cover is closed.
- Apply some hand soap and some water to the system outer foil.

- Press
 and make foam for several seconds, then press to stop making foam.
 - Remove the outer foil section.
- Press the foil frame release buttons and lift the outer foil section upwards.
 Attaching the outer foil section Align the foil frame (•) and the main body (•) marks, and securely attach it evenly until it clicks.
- Clean with running water.


- After rinsing with water, shake the shaver up and down for a few times to remove excess moisture and then wipe off any drops of water with a dry cloth.
- Dry the outer foil section and the shaver completely.
- Allow the shaver to dry in the shade, avoid direct sunlight.
- Apply one drop of oil to each of the outer foils.

- Press Turn on the shaver and let it run for about five seconds.

- Turn off the shaver, then wipe off any excess oil with a soft cloth.
- This helps maintain optimal performance.
- Be careful not to hit the main body on the sink or any other object while draining the water. Failure to do so may cause malfunction.
- Do not wipe with thinners, benzine, alcohol etc. Doing so may cause malfunction, cracking or discoloration of the parts. Wipe with diluted soapy water.
- Do not use any kitchen or bathroom detergents other than hand soap. Doing so may cause malfunction.
- Remove the outer foil section and the inner blades.
- Do not use any brush other than the supplied one Cleaning with the short brush.

- Clean the inner blades using the short brush by moving it in direction as illustrated.
- Do not move the short brush perpendicularly against the blades as it will damage the inner blades and affect their sharpness.
- Cleaning with the long brush Clean the foil frame, system outer foil and the main body using the long brush.

- Clean the system outer foil in the areas indicated by the circles every time you use the shaver. Otherwise, abnormal sound may be generated.

- Disconnect the power cord from the shaver.
- Apply some hand soap and some water to the outer foil.
- Rotate the lock ring to unlock the power switch.
- Turn the shaver on.
- Turn the shaver off after 10-20 seconds.
- Remove the outer foil section and turn the shaver on.
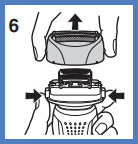
- Clean the shaver and the outer foil section with running water.
- Wipe off any drops of water with a dry cloth.
- Air Dry the outer foil section and the shaver completely.
- Attach the outer foil section to the shaver.
- Do not move the short brush in a left to right direction (B) as it will damage the inner blades and affect their sharpness.
- Do not use the short brush to clean the outer foils.
- Power off the shaver.
- Apply a small amount of hand soap and water on the system outer foil.

- Press the power switch to start the shaver.
- Please the shaver run for 10 to 20 seconds, and then turn it off.
- Press the foil frame release button to remove the outer foil section.
- Clean the shaver with running water.
- After rinsing with water, shake the main body up and down a few times to remove excess water, and then wipe off the water droplets with a dry cloth.
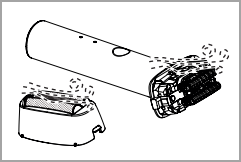
- After rinsing with water, shake the main body up and down a few times to remove excess water, and then wipe off the water droplets with a dry cloth.
- Dry the outer foil section, main body and Type-C socket (charging port) thoroughly by exposure to the air.
- Leave this product dry in the shade, out of direct sunlight.
- After the shaver is dried completely, install the outer foil section back to the main body.
- Be careful not to hit the main body on the sink or any other objects while shaking the shaver to drain the water. Otherwise, malfunction may be caused.
- Do not use any other cleaning agents than hand soap. Doing so may cause malfunction.
- Do not clean this product with thinner, gasoline, alcohol, or other chemicals. Doing so may cause cracking or discoloration of this product. The enclosure can be cleaned with a soft cloth moistened with tap water or soap solution.
- Do not use salt solution or hot water to wash the shaver. Do not soak the shaver in water for a long time.
- Do not move the short bristle end of the cleaning brush in the (B) direction. Doing so may damage the inner blades and thus affect their sharpness.
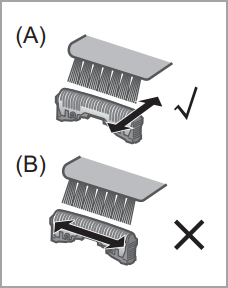
- Do not use the short bristle end of the cleaning brush to clean the system outer foil.
- Remove the shaver from the charging adaptor.
- Apply some hand soap and some water to the outer foil.
- Turn the shaver on.
- Turn the shaver off after 10‑20 seconds.
- Remove the outer foil section and turn the shaver on.
- Clean the shaver and the outer foil section with running water.
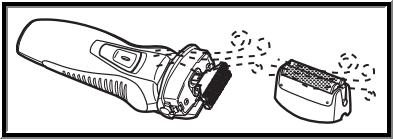
- Wipe off any drops of water with a dry cloth.
- Dry the outer foil section and the shaver completely.
- Attach the outer foil section to the shaver.
- Remove the shaver from the charging adaptor.
- Apply some hand soap and some water to the outer foil.
- Turn the shaver on.
- Turn the shaver off after 10‑20 seconds.
- Remove the outer foil section and turn the shaver on.
- Clean the shaver and the outer foil section with running water.
- Wipe off any drops of water with a dry cloth.
- Dry the outer foil section and the shaver completely.
- Attach the outer foil section to the shaver.
- Disconnect the cord from the shaver.
- Apply some hand soap and some water to the system outer foil.
- Turn the shaver on.
- Turn the shaver off after 10 to 20 seconds.
- Remove the outer foil section.
- Clean the shaver, the outer foil section, the trimmer, and the comb attachment with running water.
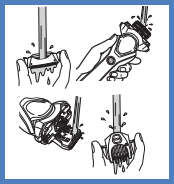
- Wipe off any drops of water with a dry cloth.
- Dry the outer foil section, the shaver, the trimmer, and the comb attachment completely.
- Attach the outer foil section to the shaver.
- Disconnect the cord from the shaver.
- Apply some hand soap and some water to the system outer foil.
- Turn the shaver on.
- Turn the shaver off after 10 to 20 seconds.
- Remove the outer foil section.
- Clean the shaver, the outer foil section, the trimmer, and the comb attachment with running water.
- Wipe off any drops of water with a dry cloth.
- Dry the outer foil section, the shaver, the trimmer, and the comb attachment completely.
- Attach the outer foil section to the shaver.
- Switch off the shaver.
- Apply one drop of oil to each system outer foil.
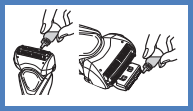
- Raise the trimmer and apply one drop of oil.
- Switch the shaver on, and run it for approx. five seconds.
- Switch off the shaver, and wipe off any excess oil from the system outer foil with a soft cloth.
- Remove the shaver from the charging adaptor.
- Apply some hand soap and some water to the outer foil.
- Turn the shaver on.
- Turn the shaver off after 10‑20 seconds.
- Remove the outer foil section and turn the shaver on.
- Clean the shaver and the outer foil section with running water.
- Wipe off any drops of water with a dry cloth.
- Dry the outer foil section and the shaver completely.
- Attach the outer foil section to the shaver.
- Disconnect the cord from the shaver.
- Apply some hand soap and some water to the system outer foil.
- Turn the shaver on.
- Turn the shaver off after 10 to 20 seconds.
- Remove the outer foil section.
- Clean the shaver, the outer foil section, the trimmer, and the comb attachment with running water.
- Wipe off any drops of water with a dry cloth.
- Dry the outer foil section, the shaver, the trimmer, and the comb attachment completely.
- Attach the outer foil section to the shaver.
- Switch off the shaver.
- Apply one drop of oil to each system outer foil.
- Raise the trimmer and apply one drop of oil.
- Switch the shaver on, and run it for approx. five seconds.
- Switch off the shaver, and wipe off any excess oil from the system outer foil with a soft cloth.
- Remove the shaver and the appliance plug from the self-cleaning recharger.
- Place the self-cleaning recharger on a hard, flat surface.
- When the self-cleaning recharger is lifted, or on the soft surface such as carpets, the lock release lever will not fit in the recharger properly. In that case, the cleaning liquid unit cannot be removed.
- Press the cleaning liquid unit removal button and remove the cleaning liquid unit.
- Wash away the old cleaning liquid and beard trimmings and then rinse the cleaning liquid unit.
- After washing, be sure to attach the cleaning liquid filter.
- Pour tap water and detergent into the cleaning liquid unit. Do not let the water rise above the maximum water line. This may cause the cleaning liquid to spill.
- Attach the cleaning liquid unit. Immediately wipe up any cleaning liquid that has been spilt. Be careful not to drop cleaning liquid onto leather products or wooden floors as it may cause discoloration.
- Press the top of the selfcleaning recharger down and securely attach until it clicks.
- The water and detergent will mix after cleaning begins, making cleaning liquid.
- When the cleaning liquid level has dropped, the LOW lamp will glow to indicate the cleaning liquid should be replaced.
- After the LOW lamp glows, you can clean the shaver with the self-cleaning recharger for approximately 7 days.
- Replace the cleaning liquid when the STATUS lamp glows.
- When replaced, the cleaning liquid will last for approximately 30 days if used once per day. (This will differ depending on beard thickness and the ambient temperature.)
- Use the detergent within approximately 6 months after opening the package. When 6 months have passed, discard the cleaning liquid, and then pour new water and detergent into the cleaning liquid unit.
- Replace the water and detergent at the same time. Otherwise the cleaning function may deteriorate.
- Only use self-cleaning recharger detergent for Panasonic shavers.
- Insert the appliance plug into the self-cleaning recharger.
- Remove the protective cap and then attach the shaver.
- Plug in the adaptor into a household outlet.
- Turn the shaver off before attaching.
- Push down the arm until it clicks.
- Wipe off any water droplets on the main body rear terminals.
- Check that the outer foil is not deformed or damaged when you are attaching the shaver.
- Press the SELECT button to select the mode.
- The “Charge” mode starts when attaching the shaver.
- Each time you press the SELECT button, the mode changes from “Clean/Dry/Charge” → “Dry/Charge” → “Charge”.
- The modes start approximately 6 seconds after they are selected.
- The mode will be aborted if the power is cut off. In this case, perform the mode again from the beginning.
- Do not press the cleaning liquid unit removal button as the cleaning liquid may spill causing a malfunction.
- When the ambient temperature of the self-cleaning recharger is low (approx. 15 °C (59 °F) or lower), the time it takes to dry the shaver increases.
- Use the self-cleaning recharger in temperatures between 15 °C (59 °F) and 35 °C (95 °F).
- The Clean or Dry function may stop under extreme low temperatures (approx. 0 °C (32 °F) or lower). In such a case, the STATUS lamp will glow for approximately 5 seconds and the mode will switch to the “Charge” mode without allowing you to select the “Clean/Dry/Charge” mode or the “Dry/Charge” mode.
- Turn the power switch OFF, and disconnect the AC adaptor. Unlock the switch.
- Apply some hand soap and some water to the system outer foil.
- Press the power switch for more than 2 seconds to activate the sonic vibration cleaning mode.
- The battery capacity lamps blink in order.
- After about 20 seconds, it will be automatically turned off.
- Remove the outer foil section and press the power switch for more than 2 seconds to activate the sonic vibration cleaning mode.
- Clean the shaver, the outer foil section, and the trimmer with running water.
- After rinsing with water, shake the shaver up and down for a few times to remove excess moisture. Hitting the vanity, etc., while shaking the shaver may cause malfunction
- Splashing is reduced by rinsing the shaver in sonic vibration cleaning mode.
- Wipe off any drops of water with a dry cloth.
- Dry the outer foil section, the shaver, and the trimmer completely.
- Attach the outer foil section to the shaver.
- Attach the outer foil section to the shaver.
- Dry the shaver with self-cleaning recharger using “Dry/Charge” mode.
- Remove the shaver from the charging adaptor.
- Apply some hand soap and some water to the outer foil.
- Turn the shaver on.
- Turn the shaver off after 10‑20 seconds.
- Remove the outer foil section and turn the shaver on.
- Clean the shaver and the outer foil section with running water.
- Wipe off any drops of water with a dry cloth.
- Dry the outer foil section and the shaver completely.
- Attach the outer foil section to the shaver.
- Remove the shaver from the AC adaptor.
- Apply some hand soap and some water to the outer foil. Close the cleaning shutter.
- Turn the shaver on.
- Slide the cleaning shutter until it clicks.
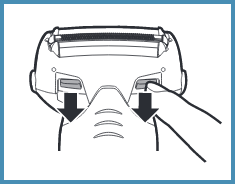
- Clean the outer foil section with running water. Rinse with water and shake up and down several times to remove the water. Be careful not to hit the main body on the sink or any other object while draining the water. Failure to do so may cause malfunction.

- Turn the shaver off.
- Wipe off any drops of water with a dry cloth.
- Air Dry the outer foil section and the shaver completely in a shaded area.
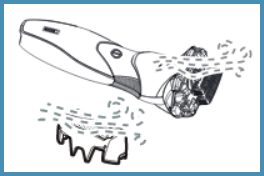
- Attach the outer foil section to the shaver.
- Remove the shaver from the AC adaptor.
- Apply some hand soap and some water to the outer foil. Close the cleaning shutter.
- Turn the shaver on.
- Turn the shaver off after 10-20 seconds.
- Remove the outer foil section and turn the shaver on.
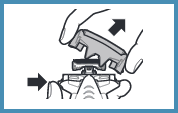
- Clean the shaver and the outer foil section with running water. Rinse with water and shake up and down several times to remove the water. Be careful not to hit the main body on the sink or any other object while draining the water. Failure to do so may cause malfunction.
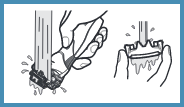
- Wipe off any drops of water with a dry cloth.
- Air Dry the outer foil section and the shaver completely in a shaded area.
- Attach the outer foil section to the shaver.
- Remove the shaver from the AC adapter.
- Apply some hand soap and some water to the outer foil. Close the cleaning shutter.
- Turn the shaver on.
- Slide the cleaning shutter until it clicks.
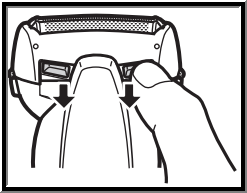
- Clean the outer foil section with running water. Rinse with water and shake up and down several times to remove the water. Be careful not to hit the main body on the sink or any other object while draining the water. Failure to do so may cause malfunction.
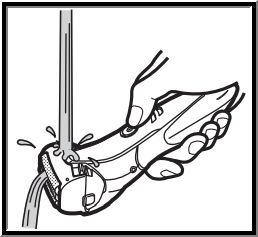
- Turn the shaver off.
- Wipe off any drops of water with a dry cloth.
- Air Dry the outer foil section and the shaver completely in a shaded area. The outer foil section will dry faster if removed from the main body.
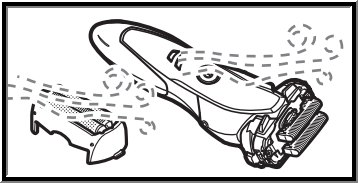
- Attach the outer foil section to the shaver.
- Turn the shaver off after 10 – 20 seconds.
- Remove the outer foil section and turn the shaver on.
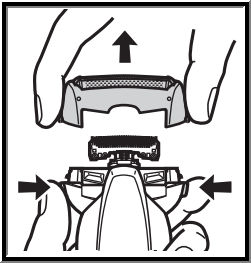
- Clean the shaver and the outer foil section with running water. Rinse with water and shake up and down several times to remove the water. Be careful not to hit the main body on the sink or any other object while draining the water. Failure to do so may cause malfunction.

- Wipe off any drops of water with a dry cloth.
- Air Dry the outer foil section and the shaver completely in a shaded area.
- The outer foil section will dry faster if removed from the main body.
- Attach the outer foil section to the shaver.
- Remove the shaver from the AC adaptor.
- Apply some hand soap and some water to the outer foil. Close the cleaning shutter.
- Turn the shaver on.
- Slide the cleaning shutter until it clicks.
- Clean the outer foil section with running water. Rinse with water and shake up and down several times to remove the water. Be careful not to hit the main body on the sink or any other object while draining the water. Failure to do so may cause malfunction.
- Turn the shaver off.
- Wipe off any drops of water with a dry cloth.
- Air Dry the outer foil section and the shaver completely in a shaded area.
- Attach the outer foil section to the shaver.
- Remove the shaver from the AC adaptor.
- Apply some hand soap and some water to the outer foil. Close the cleaning shutter.
- Turn the shaver on.
- Turn the shaver off after 10-20 seconds.
- Remove the outer foil section and turn the shaver on.
- Clean the shaver and the outer foil section with running water. Rinse with water and shake up and down several times to remove the water. Be careful not to hit the main body on the sink or any other object while draining the water. Failure to do so may cause malfunction.
- Wipe off any drops of water with a dry cloth.
- Air Dry the outer foil section and the shaver completely in a shaded area.
- Attach the outer foil section to the shaver.
- Remove the shaver from the charging stand.
- Apply some hand soap and some water to the outer foil. Close the cleaning shutter.
- Turn the shaver on.
- Slide the cleaning shutter until it clicks.
- Clean the outer foil section with running water. Rinse with water and shake up and down several times to remove the water. Be careful not to hit the main body on the sink or any other object while draining the water. Failure to do so may cause malfunction.
- Turn the shaver off.
- Wipe off any drops of water with a dry cloth.
- Air Dry the outer foil section and the shaver completely in a shaded area. The outer foil section will dry faster if removed from the main body.
- Attach the outer foil section to the shaver.
- Turn the shaver off after 10 – 20 seconds.
- Remove the outer foil section and turn the shaver on.
- Clean the shaver and the outer foil section with running water. Rinse with water and shake up and down several times to remove the water. Be careful not to hit the main body on the sink or any other object while draining the water. Failure to do so may cause malfunction.
- Wipe off any drops of water with a dry cloth.
- Air Dry the outer foil section and the shaver completely in a shaded area.
- The outer foil section will dry faster if removed from the main body.
- Attach the outer foil section to the shaver.
- Turn the shaver off and disconnect the AC adaptor.
- Apply some hand soap and some water to the system outer foil. Close the cleaning shutter.
- Turn the shaver on.
- Slide the cleaning shutter until it clicks.
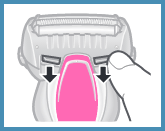
- Clean the outer foil section with running water. Rinse with water and shake up and down several times to remove the water.
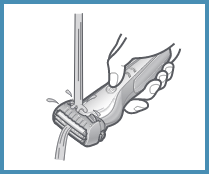
- Turn the shaver off.
- Wipe off any drops of water with a dry cloth.
- Air Dry the outer foil section, the shaver, and the trimmer completely. Allow the shaver to dry in the shade, avoid direct sunlight and then apply oil.
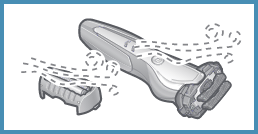
Lubricate the shaver.
It will keep the movement of the blade smooth and maintain a comfort shave.
To remove heavy dirt.
Notes
Cleaning with the brush.
-
- Apply one drop of oil to each of the system outer foils.
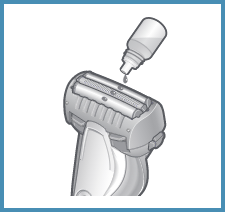
- Raise the trimmer and apply a drop of oil.
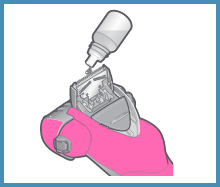
- Switch the shaver on, and run it for approximately five seconds.
- Switch off the shaver, and wipe off any excess oil from the system outer foil with a soft cloth.
- Turn the shaver off after 10 - 20 seconds.
- Remove the outer foil section and turn the shaver on.
- Clean the shaver and the outer foil section with running water. Rinse with water and shake up and down several times to remove the water.
- Wipe off any drops of water with a dry cloth.
- Air Dry the outer foil section, the shaver, and the trimmer completely. Allow the shaver to dry in the shade, avoid direct sunlight and then apply oil.
- Lubricate the shaver. as described previously.
- Do not use any kitchen or bathroom detergents other than hand soap. Doing so may cause malfunction.
- Do not wipe with thinners, benzine, alcohol etc. Doing so may cause malfunction, or cracking or discoloration of the parts. Wipe with diluted soapy water.
- Be careful not to hit the main body on the sink or any other object while draining the water. Failure to do so may cause malfunction.
- Remove the outer foil section and the inner blades.
- Using the long brush, clean the outer foil section, system outer foil, the shaver body and the trimmer using the long brush.
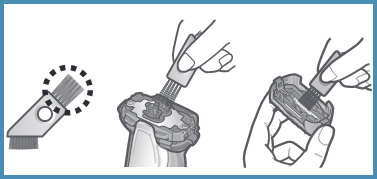
- With the short brush, clean the inner blades using the short brush by moving it in a back and forth direction shown in the image below.
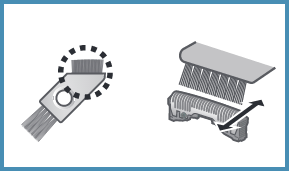
- Do not move the short brush perpendicularly against the blades as it will damage the inner blades and affect their sharpness.
- Apply one drop of oil to each of the system outer foils.
-
- Apply some hand soap onto the outer foils..
- Turn the shaver on and turn off after few seconds
- Press the outer foil frame release buttons to remove the outer foil frame.
- Rinse the inner blades and outer foil frame with cold or lukewarm water. Do not use hot water.
- Wipe the shaver with a dry cloth and dry them well.
- This appliance cannot be washed with water. Clean it up with the brush or dry cloth.
- Be sure to set the power switch to “0” before cleaning.
- Remove the blade and clean it with the brush. It is not possible to disassemble the blade.
- Remove anything which adheres to the blade with a dry cloth.

- Attach the blade.
- Apply some hand soap onto the outer foils..
- Turn the shaver on and turn off after few seconds
- Press the outer foil frame release buttons to remove the outer foil frame.
- Rinse the inner blades and outer foil frame with cold or lukewarm water. Do not use hot water.
- Wipe the shaver with a dry cloth and dry them well.
Dry Cleaning
Cleaning steps for Model ES-AWL8AV
Wet Cleaning
Dry Cleaning
Storing
Cleaning steps for Model ES-CM3A-K, ES-CM3A-V, ES-CM3A-W
Cleaning to remove heavy dirt
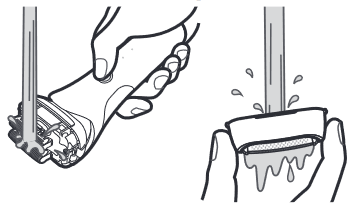
Notes
Cleaning steps for Model ES-LT3N, ES-LT5N
We recommend that you clean your shaver with the self-cleaning recharger or the “sonic” vibration turbo-cleaning mode when the faucet symbol appears on the LCD panel.
Cleaning steps for Model ES-LT41
We recommend that you clean this shaver with the sonic vibration cleaning mode when the clean indicator
 appears on the LCD panel.
 Cleaning steps for Model ES-LT67
Cleaning with water
Lubricate the shaver.
It will keep the movement of the blade smooth and maintain a comfort shave.
Notes
Cleaning with the long brush
Clean the outer foil section, system outer foil, the shaver body and the trimmer using the long brush.
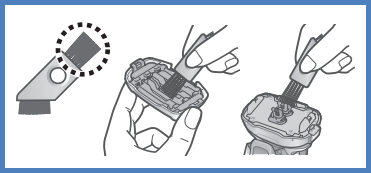
Cleaning with the short brush

Cleaning steps for Model ES-LT7N
Cleaning using the self-cleaning recharger
Preparing the self-cleaning recharger
Notes:
Cleaning the shaver
Remove any soap or water on the shaver if it has been washed with hand soap or any other detergent.
Notes:
Cleaning the shaver without the self-cleaning recharger
Do not use kitchen, bathroom, or toilet detergents. Also, do not wipe with thinners, benzine, alcohol etc. Doing so may result in malfunction.
Drying the shaver with the self-cleaning recharger
Note:
How to clean the self-cleaning recharger.
Beard trimmings may become attached to the cleaning tray of the self-cleaning recharger. Follow the steps below to remove them.
We recommend doing this each time you change the cleaning liquid.
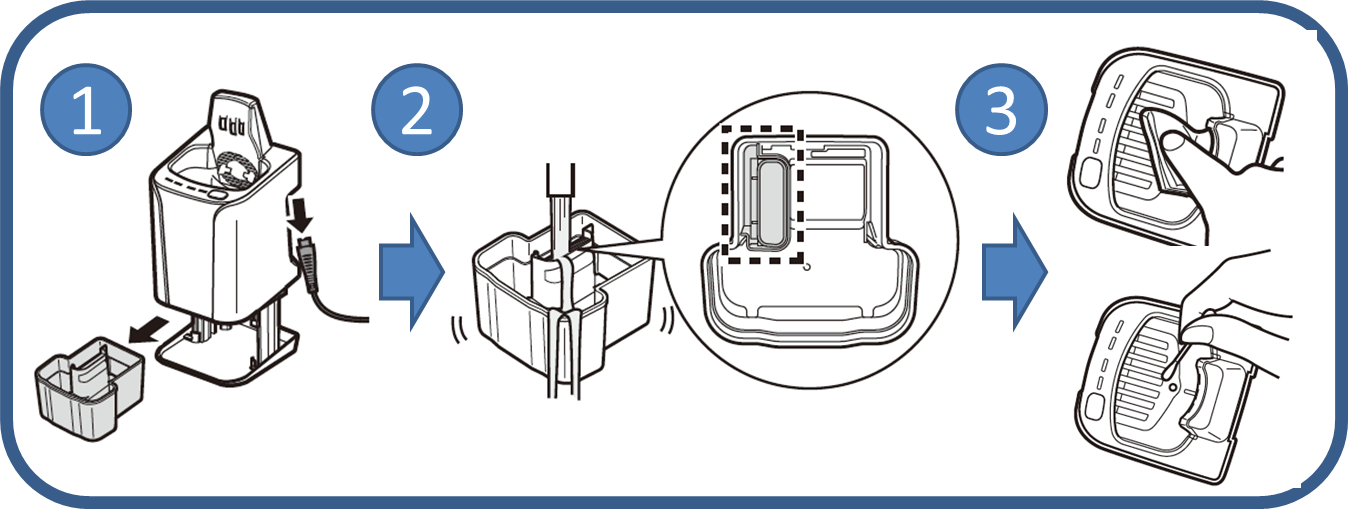
When the water does not drain from the cleaning tray
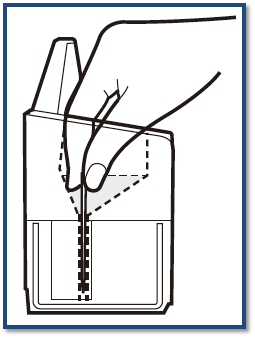
Cleaning steps for Model ES-LT71
Cleaning using the self-cleaning recharger
Remove the shaver and the appliance plug from the self-cleaning recharger.
Precautions for the detergent cartridge
Notes:
Cleaning the shaver
Use the self-cleaning recharger in temperatures between 15 °C (59 °F) and 35 °C (95 °F).
Note:
Cleaning the shaver without the self-cleaning recharger
Drying the shaver with the self-cleaning recharger
How to clean the self-cleaning recharger.
Beard trimmings may become attached to the cleaning tray of the self-cleaning recharger. Follow the steps below to remove them.
We recommend doing this each time you change the detergent cartridge.
Notes:
When the water does not drain from the cleaning tray
Beard trimmings may clog the drain at the bottom of the cleaning tray. In this case, you cannot clean or dry the shaver. Push the beard trimmings down through the drain with a tooth pick etc.
Cleaning steps for Model ES-LV6N
Cleaning with water
Cleaning steps for Model ES-LV6Q
Cleaning with water
Lubricate the shaver.
It will keep the movement of the blade smooth and maintain a comfort shave.
Notes
Cleaning with the long brush
Clean the outer foil section, system outer foil, the shaver body and the trimmer using the long brush.
Cleaning with the short brush
Cleaning steps for Model ES-LV61, ES-LV65
We recommend that you clean your shaver with the sonic vibration cleaning mode when the faucet
icon appears on the lamp display. Cleaning steps for Model ES-LV67
Cleaning with water
Lubricate the shaver.
It will keep the movement of the blade smooth and maintain a comfort shave.
Notes
Cleaning with the long brush
Clean the outer foil section, system outer foil, the shaver body and the trimmer using the long brush.
Cleaning with the short brush
Cleaning steps for Model ES-LV81
Cleaning using the self-cleaning recharger
Remove the shaver and the appliance plug from the self-cleaning recharger.
Cleaning the shaver
Use the self-cleaning recharger in temperatures between 15 °C (59 °F) and 35 °C (95 °F).
Note:
Cleaning the shaver without the self-cleaning recharger
We recommend that you clean your shaver with the self-cleaning recharger or the sonic vibration cleaning mode when the cleaning symbol
appears on the LCD panel. Drying the shaver with the self-cleaning recharger
Cleaning steps for Model ES-LV9N
Clean the shaver with water or with the cleaning brush once per month. The main unit neck section (a), inner blade attachment part (b), trimmer, system outer foil gaps, etc. cannot be cleaned with the self-cleaning recharger.
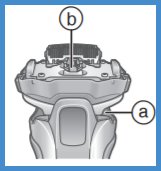
Look of shaver may vary depending on the model. Model shown above is ES-LV9Q.
Note:
Cleaning with water
Turn the shaver off and disconnect the AC adaptor.
Drying the shaver wuthout the self-cleaning recharger
Note
How to clean the self-cleaning recharger.
Beard trimmings may become attached to the cleaning tray of the self-cleaning recharger. Follow the steps below to remove them.
We recommend doing this each time you change the cleaning liquid.
When the water does not drain from the cleaning tray
Cleaning steps for Model ES-LV9Q
Clean the shaver with water or with the cleaning brush once per month. The main unit neck section (a), inner blade attachment part (b), trimmer, system outer foil gaps, etc. cannot be cleaned with the self-cleaning recharger.
Look of shaver may vary depending on the model. Model shown above is ES-LV9Q.
Note:
Cleaning with water
Turn the shaver off and disconnect the AC adaptor.
Lubricate the shaver
It will keep the movement of the blade smooth and maintain a comfort shave.
Drying the shaver wuthout the self-cleaning recharger
Note
Cleaning with the long brush
Cleaning with the short brush
Cleaning steps for Model ES-LV95
Cleaning using the self-cleaning recharger
Preparing the self-cleaning recharger
Notes:
Cleaning the shaver
Remove any soap or water on the shaver if it has been washed with hand soap or any other detergent.
Notes:
Cleaning the shaver without the self-cleaning recharger
We recommend that you clean your shaver with the self-cleaning recharger or the sonic vibration cleaning mode when the faucet symbol [ ] appears on the lamp display.
Drying the shaver with the self-cleaning recharger
How to clean the self-cleaning recharger.
Beard trimmings may become attached to the cleaning tray of the self-cleaning recharger. Follow the steps below to remove them.
We recommend doing this each time you change the cleaning liquid.
When the water does not drain from the cleaning tray
Cleaning steps for Model ES-LV97
Clean the shaver with water or with the cleaning brush once per month. The main unit neck section (a), inner blade attachment part (b), trimmer, system outer foil gaps, etc. cannot be cleaned with the self-cleaning recharger.
Look of shaver may vary depending on the model. Model shown above is ES-LV9Q.
Note:
Cleaning with water
Turn the shaver off and disconnect the AC adaptor.
Lubricate the shaver
It will keep the movement of the blade smooth and maintain a comfort shave.
Drying the shaver wuthout the self-cleaning recharger
Note
Cleaning with the long brush
Cleaning with the short brush
Cleaning steps for Model ES-PV3A-K, ES-PV6A-W
Cleaning with water
Lubricate the Shaver
Notes
Cleaning with the brush
System outer foil
Cleaning steps for Model ES-RF31
Cleaning with the brush
Clean the inner blades using the short brush by moving it in front to back motion as shown in the image below example A.
Clean the system outer foil, the shaver body and the trimmer using the long brush.
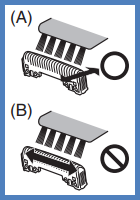
Cleaning steps for Model ES-RM3B-A, ES-RM3B-K
It is recommended to clean the shaver after each use. Check that the socket cover is closed.
Notes
Use the long bristle end of the cleaning brush to clean the system outer foil( a )and the main body ( b )of the shaver. Cleaning with the short bristle end of the cleaning brush
Use the short bristle end of the cleaning brush by moving it in the direction shown in the right figure (A) to clean the inner blades.
Cleaning steps for Model ES-RT17
Cleaning steps for Model ES-RT31, ES-RT33
Cleaning steps for Model ES-RT37
Cleaning steps for Model ES-RT47
Lubrication Oil
To maintain shaving comfort for a long time, it is recommended that the oil provided with the shaver is used.
Cleaning steps for Model ES-RT51, ES-RT53
Cleaning steps for Model ES-RT67S
Cleaning steps for Model ES-RT77S
Lubrication Oil
To maintain shaving comfort for a long time, it is recommended that the oil provided with the shaver is used.
Cleaning steps for Model ES-RT97
Cleaning using the self-cleaning recharger
Preparing the self-cleaning recharger
Notes:
Cleaning the shaver
Remove any soap or water on the shaver if it has been washed with hand soap or any other detergent.
Notes:
Cleaning the shaver without the self-cleaning recharger
Do not use kitchen, bathroom, or toilet detergents. Also, do not wipe with thinners, benzine, alcohol etc. Doing so may result in malfunction.
Drying the shaver with the self-cleaning recharger
Cleaning steps for Model ES-RW30
Cleaning steps for Model ES-SL33
Cleaning the shaver to remove light dirt.
Cleaning the shaver to remove heavy dirt.
Cleaning steps for Model ES-SL41
To remove light dirt.
To remove heavy dirt.
Cleaning steps for Model ES-SL83
Cleaning the shaver to remove light dirt.
Cleaning the shaver to remove heavy dirt.
Cleaning steps for Model ES-ST25
To remove light dirt.
To remove heavy dirt.
Cleaning steps for Model ES-ST2N
To remove light dirt.
Cleaning steps for Models ES-WL60, ES-WL80
Dry Cleaning
Clean the hair dust with the supplied cleaning brush
Cleaning steps for Model ES-WR50
Cleaning steps for Models ES-WWL6A, ES-WWL8A
Dry Cleaning
Clean the hair dust with the supplied cleaning brush