How to insert cards. - LUMIX S-Series
You can use an XQD card and SD card with the models DC-S1 and DC-S1R. For model DC-S1H and DC-S5, you can use an SD (512MB to 2GB), SDHC (4GB to 32GB), and SDXC (48GB ro 128GB) cards.
Inserting the Card
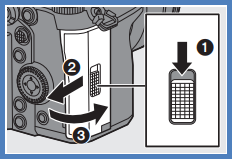
- Open the card door. Slide the card door in the direction of
the arrow while pushing down the card door lock lever.

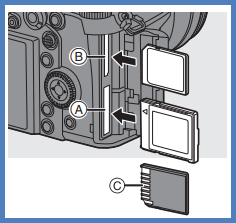
- Insert the cards.
- (A) Card slot 1: XQD card
- (B) Card slot 2: SD card
- Match the orientation of the cards as shown in the figure and then insert them firmly until they click.
- Do not touch the SD card connection contacts (C).

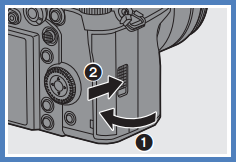
- Close the card door.
- Close the card door and slide it firmly in the direction of the arrow until it clicks.
- The cards are displayed on the status LCD.

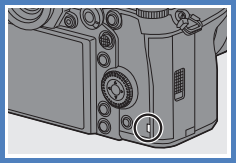
Card Access Indications
The card access lamp lights while the card is being accessed.

Removing a card
- Open the card door. Check that the card access lamp is off and then open the card door.
- Push the card until it clicks and then pull the card out
straight.
- The card may be hot just after the camera has been used. Be careful when removing.
Note: Do not perform the following operations during access. The camera may operate incorrectly or the card and recorded images may be damaged.
- Turn off the camera.
- Remove the battery or card or disconnect the power plug.
- Subject the camera to vibration, impacts, or static electricity.
