How to replace the battery. - Shaving and Grooming
If the operating instructions for a model contains a procedure for removing the built in storage battery, please note that this is for the recycling/disposal of the storage battery and is not intended as an explanation of disassembly for repair. If the user replaces the battery, a breakdown could result and safety cannot be ensured.
Note: Some models operate on a AA(LR6) Alkaline or AAA (LR03) dry-cell batteries. This type of battery is user replaceable.
Select a model from the list below for more information on the battery. If a model is not listed,
Refer to the models Operating Manual for specific battery information.ER-224S
The battery in this model can not be replaced.
For environmental purpose we recommend that the battery be removed before disposal.
Please refer to the models operating manual for correct disposal procedure. Operating Manual.
ER-2403
The batteries in this model can be replaced.
- Slide the switch on the main body downwards to turn off the trimmer.
- Remove the battery cover and insert two AAA (LR03) dry-cell batteries as illustrated.
- Reattach the battery cover.

- Old and new batteries should not be mixed.
- Remove the batteries when not using the trimmer for a long time.
ER-415
The batteries in this model can be replaced.
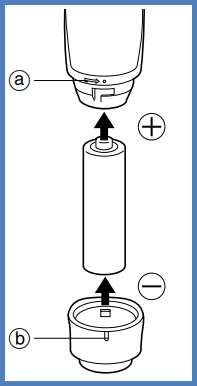
- Turn the battery cover counter clockwise and match the line (a) with (b) as shown in the image below. Pull to remove.
- Insert one AA(LR6) Alkaline battery.
- Mount the battery with polarity as shown.
- To replace the battery cover, reverse the above procedure.
ER-430
The batteries in this model can be replaced.
- Turn the battery cover counter clockwise and match the line a with b as shown in the image below and pull to remove.
- Insert one AA (LR6) battery.
- To replace the battery cover, reverse the above procedure.

ER-GB370
ER-GB40
The batteries in this model can be replaced.
- Rotate the battery cover counter clockwise and pull to remove.
- Before inserting the battery wipe off the mail body carefully to prevent water droplets from getting inside.
- Insert one AA (LR6) battery. Check the polarity of the battery + (positive) and - (negative) are correct and install it.
- To replace the battery cover, reverse the above procedure.
ER-GB42
Models ER-GB60, ER-GB70, ER-GB80
ER-GB96
Models ER-GC51
Models ER-GC63H
Models ER-GC71
ER-GD50, ER-GD60
ER-GK40, ER-GK60, ER-GK80
ER-GM40
The battery in this model can be replaced.
This model operates on 1 LR6 (AA alkaline battery).
Installing the battery
- Turn the unit off.
- Remove the battery cover. Turn the battery cover clockwise until the battery cover is removed.
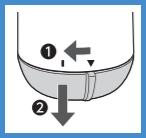
- Check the polarity (+ and -) and install the battery. Thoroughly wipe the main body to prevent water droplets from getting inside when installing the battery.

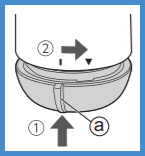
- Attach the battery cover. Align the marks on the battery holder (A) and the main body and insert the battery cover. Rotate the battery cover counter clockwise until the mark on the cover is aligned with the down arrow mark on the main body.
Notes
- You can use the appliance for approximately 180 minutes with one Panasonic LR6 (AA alkaline battery). (when dry use in a room temperature of 20 °C (68 °F).)
- The use time will differ depending on the frequency and method of use.
- Be sure to use LR6 (AA alkaline battery).
ER-GN25
The battery in this model can be replaced.
- Remove the protective cap.
- Left rotate the battery cover, to align the marks.
- Remove the battery cover.
- Insert one AAA (LR03) battery. Check the polarity of the battery + (positive) and - (negative) are correct and install it.
- Replace the battery cover then rotate right to secure.
ER-GN30
The battery in this model can be replaced.
- Make sure the power switch is in the “0” position.
- Rotate the battery cover in the direction of the arrow, and align the marks.
- Pull to remove the battery cover.
- Insert the battery.
- Be careful to insert the battery with + and - correctly oriented.
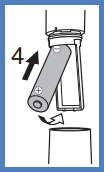
- Be careful to insert the battery with + and - correctly oriented.
- Align the marks and insert the main body into the battery cover.
- Rotate the battery cover in the direction of the arrow.
- Use only AA LR6 alkaline battery.
- You can use the appliance for approximately 1 year with the Panasonic AA LR6 alkaline battery. (When using once a week, 90 seconds at a time (including washing operation))
- Please dispose of used battery appropriately.
ER-GN70
The battery in this model can be replaced.
- Make sure that the power is off.
- Pull the battery cover straight to remove it.
- Check the polarity of the alkaline batteries (+ and -) and install them.
- Insert the battery cover straight.
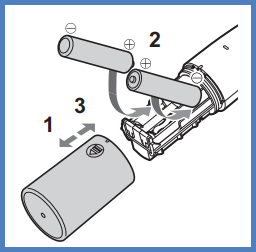
You can use the appliance for approximately 6 months with two Panasonic LR03 (AAA Alkaline Batteries). (When using dry in an environment at a 20 °C (68 °F) room temperature, once a week, and 90 seconds at a time.)
- When insert the alkaline batteries, wipe off the main body carefully to prevent water droplets from getting inside.
- Confirm nothing adheres to the terminals (+ and -) of the alkaline batteries.
- Be sure to use LR03 (AAA Alkaline Batteries). If any batteries other than the specified ones are used, the power and the number of times of use will be different.
- Panasonic alkaline batteries are recommended.
- When replacing alkaline batteries, replace both of them with new ones.
ER-GP21, ER-GP30, ER-GP80
ER-GS60
ER-SB40
ER-SC40
ES-2207, ES-2216
ES-246
The batteries in this model can be replaced.
- Remove the battery cover by pressing down and pushing the battery cover in the direction of the arrow.
- Insert 2 AA batteries, make sure to match the positive (+) and negative (-) polarities as indicated on the battery compartment.
- Replace the cover.
- Two AA batteries will last appropriately one month when used for a 5 minute shave twice a week.
- When the trimmer begins losing power, replace the batteries.
Models ES-3831, ES-3833
The batteries in this model can be replaced.
When the blade speed decreases, this indicates that the batteries should be replaced with new ones.
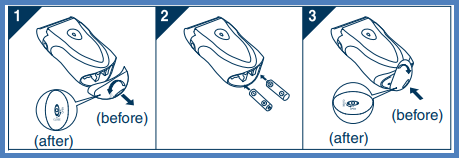
- Bottom of the shaver, turn the battery cover release dial to “open” position then remove the battery cover.
- Remove the old batteries.
- Insert two new AA alkaline batteries.
- Reattach the battery cover and turn the battery cover release dial to “close” position.
Notes:
- Turn the shaver off before replacing batteries.
- Before replacing the batteries, wipe the shaver free of moisture to prevent the inside from getting wet.
- Do not use a new battery together with an old one.
- Do not use rechargeable batteries. Doing so may result in the leakage of battery and the malfunction.
- Please make sure that the old batteries are disposed of at an officially assigned location, if there is one in your country.
- If the shaver will not be used for a long time, please remove the batteries.
Models ES-8103, ES-8243
ES-ALV6HR
Models ES-ED50
Models ES-ED64
Models ES-ED70
Models ES-ED90
Models ES-EL3A, ES-EL7A, ES-EL8A, ES-EL9A
Models ES-EU10, ES-EU20
Models ES-EY30V
ES-GA21
Models ES-LA63, ES-LA93
ES-LS9A
The life of the battery is 3 years. The battery in this shaver is not intended to be replaced by consumers.
Removing the built-in rechargeable battery
ATTENTION:
A lithium ion battery that is recyclable powers the product you have purchased. Please call 1-800-8-BATTERY for information on how to recycle this battery.
Remove the built-in rechargeable battery before disposing of the shaver. The battery is to be disposed of safely.
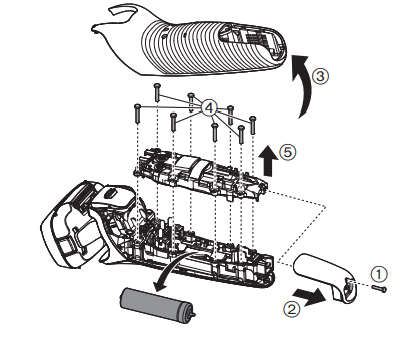
This figure must only be used when disposing of the shaver, and must not be used to repair it. If you dismantle the
shaver yourself, it will no longer be waterproof, which may cause it to malfunction.
- Remove the shaver from the AC adaptor.
- Press the power switch to turn on the power and then keep the power on until the battery is completely discharged.
- Perform steps 1 to 5 and lift the battery, and then remove it.
- Take care not to short circuit the positive and
negative terminals of the removed battery, and insulate the
terminals by applying tape to them.
Models ES-LL21, ES-LL41
ES-LF51
ES-LT2B
ES-LT3N
ES-LT41
ES-LT5N
ES-LT67
ES-LT7N
Models ES-LV6N, ES-LV6Q, ES-LV65, ES-LV67
Models ES-LV95, ES-LV97, ES-LV9N, ES-LV9Q
Models ES-PV6A-W
- Remove the shaver from the USB plug.
- Press the power switch to turn on the power and keep it on until the battery is completely discharged.
- Perform the following steps to remove the battery:
- Use a flathead screwdriver as shown in the diagram.
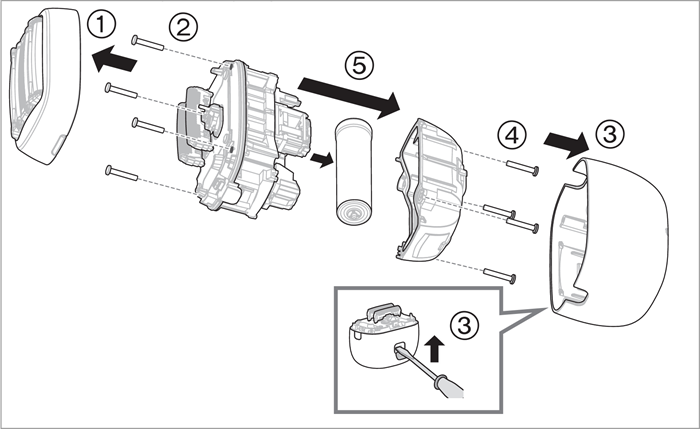
- Carefully lift the battery out.
- Take care not to short-circuit the positive and negative terminals of the removed battery.
- Insulate the terminals by applying tape to them to ensure safe disposal.
- Use a flathead screwdriver as shown in the diagram.
ES-RF31, ES-RF41
ES-RM3B-A, ES-RM3B-K
This product has a built-in rechargeable battery. Be sure to remove the battery before disposing of this product.
How to remove the built-in rechargeable battery
- Power off this product before removing the battery.
- Turn on the power and keep the power on until the battery is completely discharged.
- Follow the procedure below to remove the battery: Remove the screws 1 to 7 of the outer foil section and the bottom cover.
- Insert a thin screwdriver into the screw hole to remove the bottom cover 8.
- Use a slotted screwdriver to remove the battery buckle 9 (x2), and push the cam forward at the same time.
- Remove the adhesive tape 0 from the terminal part.
- Insert a slotted screwdriver into the bottom of the welding
joint - until both ends of the battery are separated from the
welding joint, and then remove the battery.
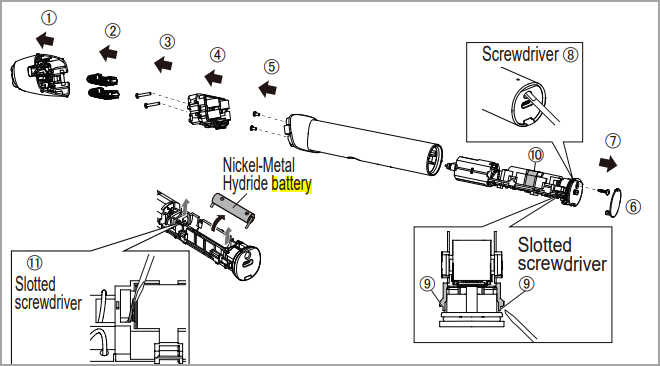
- During disassembly, take care not to short circuit the positive and negative terminals of the removed battery and insulate the terminals by applying tape to them.
- If you cannot remove the battery, please contact an authorized service center.
Note
- This product has a built-in rechargeable battery. Be sure to remove the battery before disposing of this product.
- The battery is to be disposed safely.
- This figure must only be used when disposing of this product and must not be used to repair it.
- If you dismantle this product yourself, it will no longer be waterproof, which may cause it to malfunction.
- We recommend seeking the advice of a dealer or Panasonic’s authorized service center before deciding to dispose of this product, so as to extend the service life of this product as much as possible.
- If you decide to dispose of this product but do not want to disassemble this product by yourself to remove the battery, we recommend taking this product to Panasonic’s authorized service center. which will remove and recycle the battery.
ES-RT17
Models ES-RT31, ES-RT33, ES-RT37
ES-RT47
Models ES-RT51, ES-RT53
ES-RT67
ES-RT77
ES-RT97
ES-RW30
ES-SL33
ES-SL41
ES-SL83
ES-ST25
ES-ST2N
ES-SWLT2W
ES-WD51
ES-WL60, ES-WL80
ES-WR50
This battery is replaceable.
- Always attach the protective cap when installing or replacing the battery.
- Make sure the power switch is in the “0” position.
- Pull the battery cover to remove it.
- Check the polarities positive + and negative - and insert the battery.
- Attach the battery cover. Press firmly until it clicks.
Notes:
- You can use the appliance for approximately 1 month with the Panasonic LR03 (AAA alkaline battery). (When used in an environment at a 20°C (68 °F) room temperature, twice a week, and five minutes at a time.)
- Use only LR03 (AAA alkaline battery).
- Do not use rechargeable type battery.
- If using a battery other than the specified type, the power or number of use may vary.
ES-WV60
This battery is replaceable.
- Make sure the power switch is in the “0” position.
- Turn the battery cover in the direction of the arrow to remove it.
- Check the polarities positive + and negative - and insert the battery.
- Attach the battery cover. aligning it with the mark on the main body, and turning it in the direction of the arrow.
Notes:
- You can use the appliance for approximately 1 month with the Panasonic LR6 (AA alkaline battery). (When used in an environment at a 20°C (68 °F) room temperature, twice a week, and five minutes at a time.)
- Use only LR6 (AA alkaline battery).
ES-WWL6A, ES-WWL8A
Model ES-WWV6N
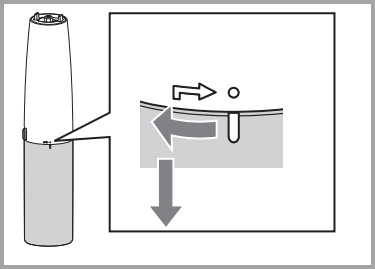
- Turn the battery cover in the direction of the arrow
and remove it.
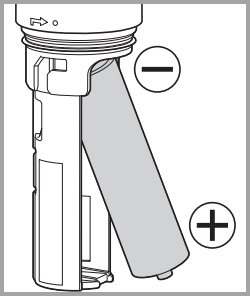
- Check the polarities of the battery, and install it.
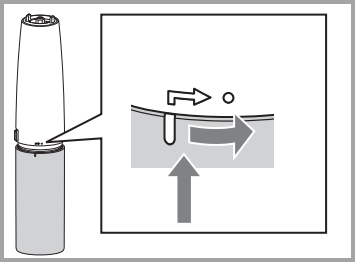
- Attach the battery cover back on, aligning it with
the mark on the main body, and turning it in the
direction of the arrow.
Notes
- You can use the appliance for approximately 1 month with one Panasonic LR6 (AA alkaline battery). (When used for approx. 5 minutes at one time, twice a week in a room temperature of 20 °C (68 °F).)
- Thoroughly wipe the main body to prevent water droplets from getting inside when installing the battery.
- Use only LR6 (AA alkaline battery), otherwise the power or number of uses may vary.
