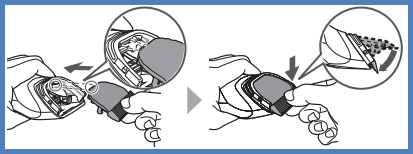
How to replace the foils and/or blades on shaving and grooming products
For Models with replacement blades, for best performance of your product
- Shavers replace the outer foil once every year.
- Shavers replace the inner blade once every two years.
- Beard Trimmers replace the blade once every two years.
To purchase replacement Foils and Blades refer to our Blades and Foils Tool Canada models."
, USA models."
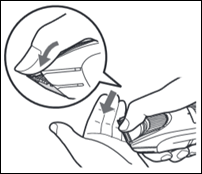
Note: On some models a replacement blade is not available, however the blade can be removed for cleaning.
For instructions on how to remove the blade or foil on your
model select your model number from the list below.
If your model is not on the list Refer
to your models Operating Manual for specific procedure.
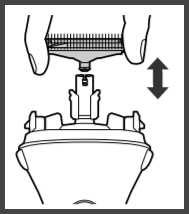
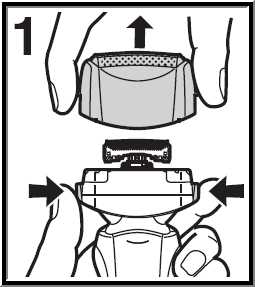
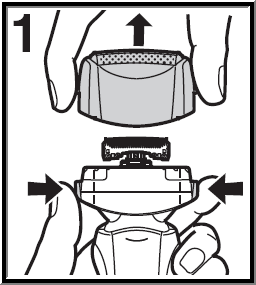
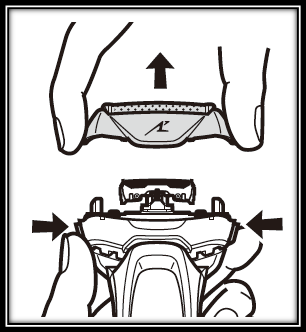
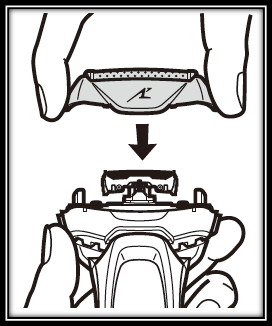
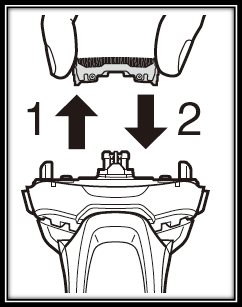
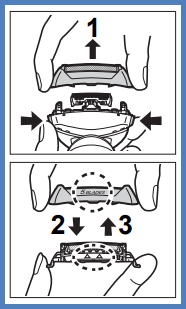
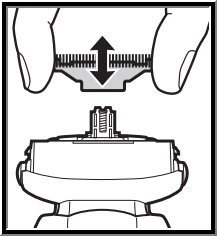
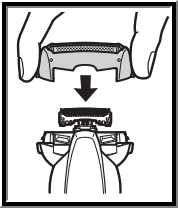
Model ER-GB42
Removing the blade
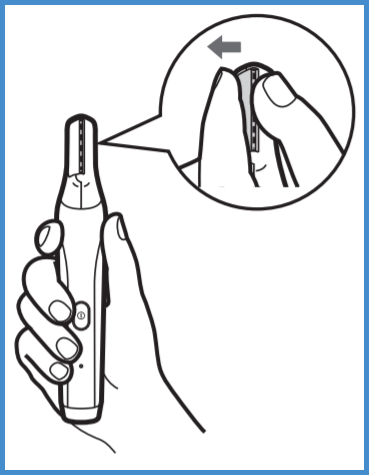
Hold the main body, place your thumb against the blades, and then push them away from the main body.
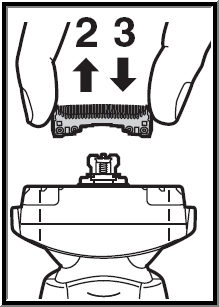
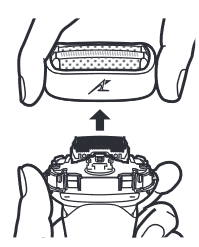
Remounting the blade
Fit the mounting hook into the blade mounting on the trimmer, and then push in until you hear a click.
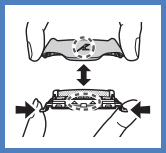
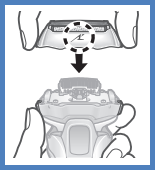
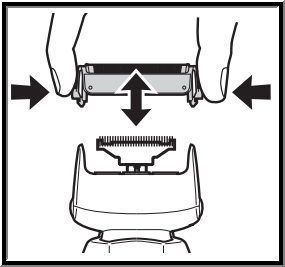
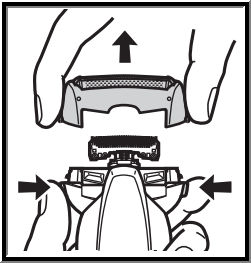
Model ER-GB60, ER-GB80
Mounting the Blade
Fit the mounting hook into the blade mounting on the
trimmer and then push in until you hear a click.
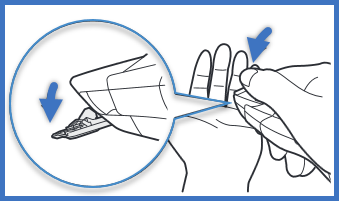
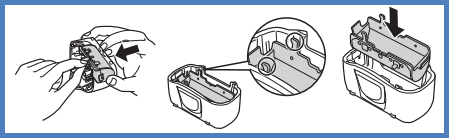
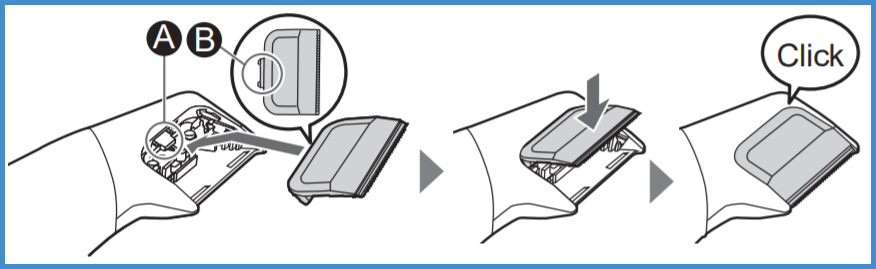
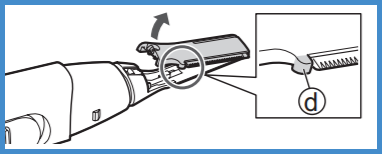
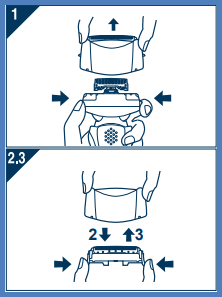
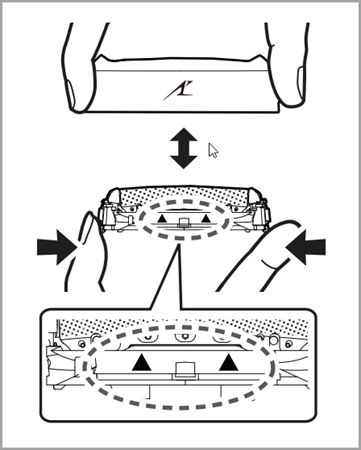
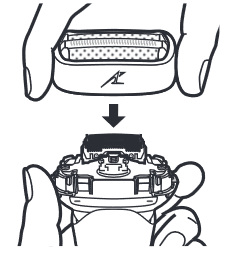
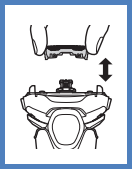
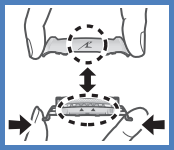
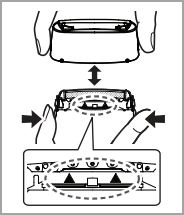
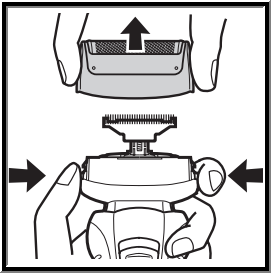
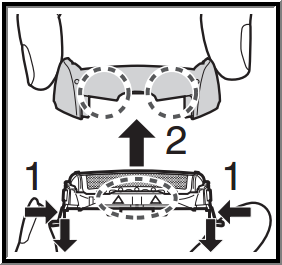
Models ER-GB96
Removing the Blade
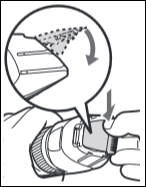
Hold the clipper with the switch facing upward and push the blade with your thumb while catching the blade in your other hand.
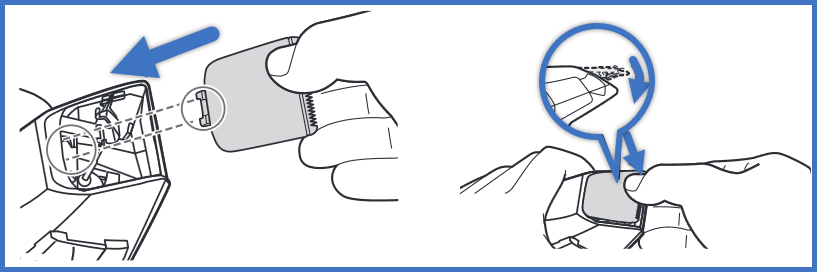
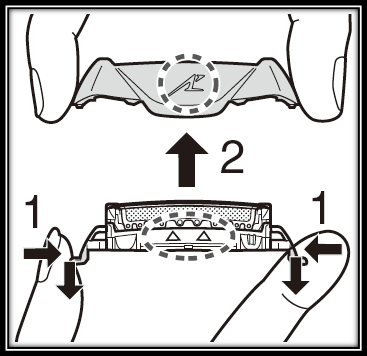
Mounting the blade
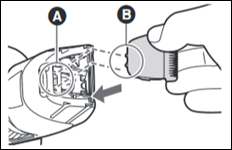
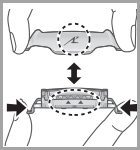
Fit the mounting hook (B) into the blade mounting (A) as shown in the image below, on the clipper and then push in until you hear a click.
Replacement part
Replacement blade WER9620 for ER-GB96. Do not use any blade other than the one dedicated as it may cause defect in performance.
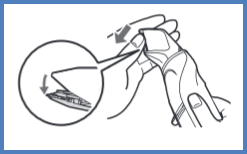
Models ER-GC51, ER-GC71
Removing the Blade
Hold the clipper with the switch facing upward and push the blade with your thumb while catching the blade in your other hand.
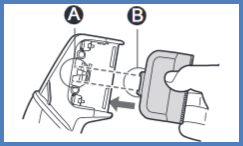
Mounting the blade
Fit the mounting hook (B) into the blade mounting (A) as shown in the image below, on the clipper and then push in until you hear a click.
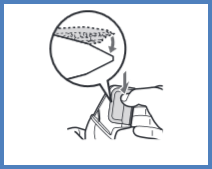
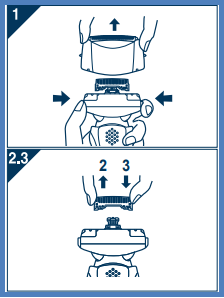
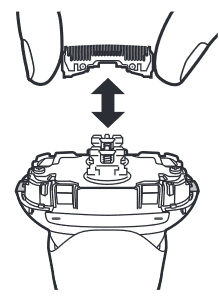
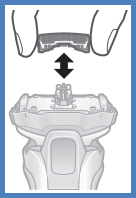
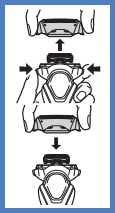
Model ER-GD50
Removing the blade
Hold the trimmer and push the blade with your thumb.
Mounting the blade
Fit the mounting hook (B) into the blade mounting (A) on the trimmer and then push in until you hear a click.
Caution Protecting the skin
- Do not press the blade against your lip or the skin.
- Do not use this product for any purpose other than trimming beard.
- Do not directly apply the blades on ears or rough skin (such as swellings, injuries or blemishes). Doing so may cause skin injury
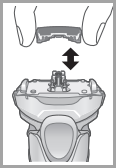
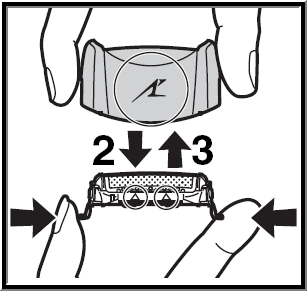
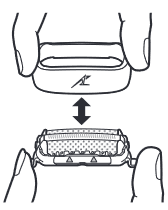
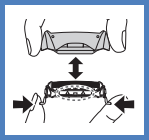
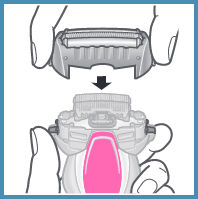
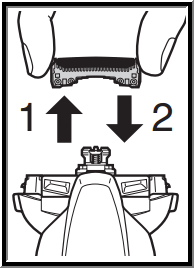
Model ER-GK40
Replacing the outer foil
Never remove the outer foil at any time other than when replacing it.
- Press the foil frame release buttons to remove the foil frame.
- Squeeze the front and the back side of the foil frame and lift up one of the two knobs on the outer foil.
- Slip the outer foil into the frame and guide the
plastic edges onto the hooks in the foil frame until it
clicks into the shaver.
Replacing the inner blade
- Press the foil frame release buttons to remove the foil frame.
- Remove the inner blade by grasping it firmly at both ends and pulling straight away from the shaver
- To insert the new inner blade, hold the blade at both
ends and press downward until it snaps into the shaver.
Model ER-GK60S
Removing the blade.
Hold the trimmer and push the blade with your thumb.
Mounting the blade.
Fit the mounting hook ( B ) into the blade mounting ( A )
as shown in the image below on the trimmer and then push in
until you hear a click.
Model ER-GK80S
Removing the blade.
Please check if the blade is deformed or damaged before removing and mounting it.
- Hold the main body in front.
- Push the metal part of the blade to the left with the
thumb’s belly.
- It is OK to touch the blade with your fingers, but use caution when doing.
- Be careful not to let the blade fall.
Mounting the blade.
Fit the mounting hook ( B ) into the blade mounting ( A )
on the main body as shown in the image below and then push
in until you hear a click.
Replacement Parts
- Blade WER9500
Do not use any blade other than the one dedicated as it may cause problems with performance.
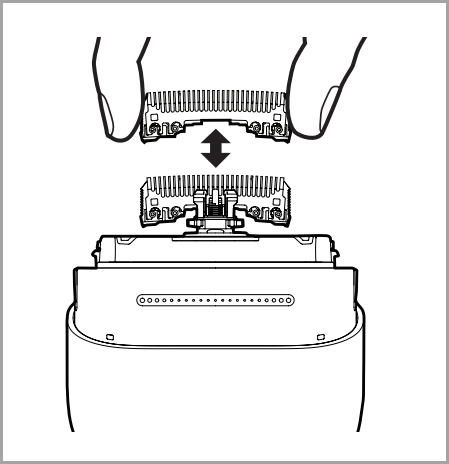
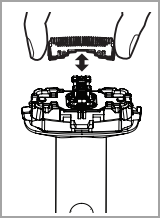
Removing and mounting the blade for Maintenance purpose Model ER-GM40
- Press the head with your fingers to avoid excessive vibration.
- Make sure that the main body is turned off.
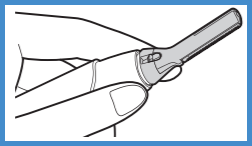
Removing the blade
- Slide the blade locker towards the body of the unit as
indicated by the arrow in the image below. It is easier to
slide it with your nail.
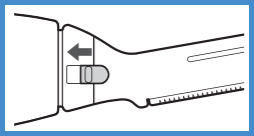
- Remove it in an upward direction as indicated in the
image below. There is a protusion (marked as D in image
below) that assists in the removal. Be careful not to drop
the blade.
Mounting the blade
- Insert the tiny hook located at the top of the main
body onto the hole on the top of the blade.

- Slider the blade lock towards the blade.
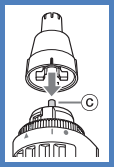
Model ER-GN70
Make sure that the power is off.
How to remove the blade
- Rotate the outer blade and remove it. Rotate the outer
blade until its hash
 mark aligns with the “I” mark of the main body.
- Pull to remove the inner blade.
How to attach the blade
- Insert the inner blade straight along the inner surface of the outer blade.
- Insert the main body’s shaft (c) as shown in the image
below into the hole of the inner blade.
- Align the hash
mark of the outer blade with the “ I ” mark of the
trimmer.
- Align the hash
- Rotate to attach the outer blade.
- Rotate the outer blade to align its hash
mark with the arrow ▲ up mark of the main body.
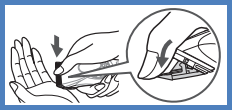
Models ER-GP21
Removing the Blade
Hold the clipper with the switch facing upward and push the blade with your thumb while catching the blade in your other hand.
Mounting the blade
Fit the mounting hook (B) into the blade mounting (A) as shown in the image below, on the clipper and then push in until you hear a click.
Models ER-GP30
Removing the Blade
Hold the clipper with the switch facing upward and push the blade with your thumb while catching the blade in your other hand.
Mounting the blade
Fit the mounting hook (B) into the blade mounting (A) as shown in the image below, on the clipper and then push in until you hear a click.
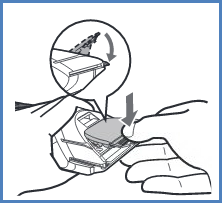
Model ER-GP80
Be sure to turn off the power before you remove the blade.
Removing the blade
Hold the clipper with the switch facing upward and push the blade with your thumb while catching the blade in your other hand.
Mounting the blade
- Set the dial to "2.0".
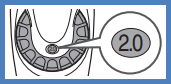
- Fit the mounting hook into the blade mounting on the
clipper and push in until it clicks.
Model ER-SB40
Please use the following procedure to remove and mount the blade.
Removing the blade
Hold the main body with the switch facing upward and push the blade with your thumb while catching the blade in your other hand.
Mounting the blade
Fit the mounting hook (B) into the blade mounting (A) on the main body as shown in the image below and then push in until you hear a click.
Model ER-SC40
Please use the following procedure to remove and mount the blade.
Removing the blade
Hold the main body with the switch facing upward and push the blade with your thumb while catching the blade in your other hand.
Mounting the blade
Fit the mounting hook (B) into the blade mounting (A) on the main body as shown in the image below and then push in until you hear a click.
Model ES-8103
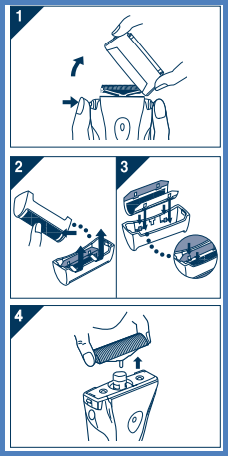
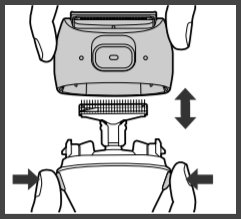
Replacing the system outer foil
- Press the foil frame release buttons and lift the outer foil section upwards as illustrated.
- Press the system outer foil release buttons and pull down the system outer foil as illustrated.
- Insert the system outer foil until it clicks.
- Always attach the system outer foil in proper direction.
- Always insert the system outer foil to the foil frame when attaching to the shaver.
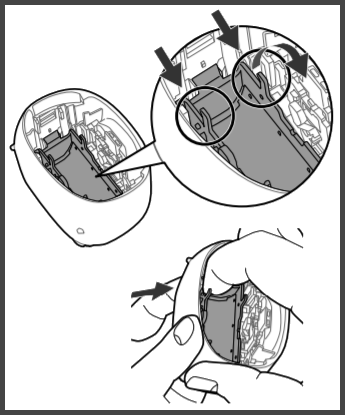
Replacing the inner blades
- Press the foil frame release buttons and lift the outer foil section upwards as illustrated.
- Remove the inner blades one at a time as illustrated. Do not touch the edges (metal parts) of the inner blades to prevent injury to your hand.
- Insert the inner blades one at a time until they click as illustrated.
Model ES-8243
The Check Foil Blade  indicator appears on
the LCD panel once a year. (This will differ depending on
usage.) We recommend checking the system outer foil and in
the inner blades when it appears. Press the OFF/ON switch
for more than 30 seconds to remove the indicator.
indicator appears on
the LCD panel once a year. (This will differ depending on
usage.) We recommend checking the system outer foil and in
the inner blades when it appears. Press the OFF/ON switch
for more than 30 seconds to remove the indicator.
- Press the system outer foil release buttons and lift the system outer foil upwards as illustrated.
- Remove the inner blades one at a time as illustrated. Do not touch the edges (metal parts) of the inner blades to prevent injury to your hand.
- Insert the inner blades one at a time until they click
as illustrated.
- Insert the system outer foil by pushing it downwards until it clicks.
Model ES-3831, ES-3833
Replacing the outer foil
- Press the foil frame release button and lift the foil frame upwards as illustrated.
- Gently push the outer foil in the way as illustrated. Then it will pop up from the foil frame.
- The new outer foil should be slightly bent and pushed in until it is hooked in the foil frame.
Replacing the inner blade
- Remove the inner blade. Do not touch the edges (metal parts) of the inner blade to prevent injury to your hand.
- Insert the inner blade until it clicks.
Note:
- Turn the shaver off before replacing the outer foil and the inner blade.
Model ES-ALV6HR
Replacing the system outer foil
- Press the system outer foil release buttons and pull down the system outer foil.
- Do not press the system outer foil release buttons with excessive force. Doing so may bend the system outer foil, preventing complete attachment to the foil frame.
- Align the foil frame mark (
 ) and the system outer foil
mark (
) and the system outer foil
mark ( ) and securely attach together until it clicks
Replacing the inner blades
- Remove the inner blades one at a time.
- Insert the inner blades one at a time.
Model ES-CM3A-K, ES-CM3A-V, ES-CM3A-W
- It is recommended to replace the system outer foil once a year and the inner blades once every two years.
Replacement parts
- Replacement parts are available at your dealer or Service Center.
Replacement parts for ES-CM3A - System outer foil WES9087
Inner blades - WES9068.
Outer foil section
How to remove- Press the foil frame release buttons to lift and remove the outer foil section.
How to install
- Turn the foil frame mark (
 ) to the front, and securely
attach the outer foil section onto the main body until a
“click” sound is heard.
) to the front, and securely
attach the outer foil section onto the main body until a
“click” sound is heard.
System outer foil
How to remove
- Press the system outer foil release buttons and pull down the system outer foil.
How to install
- Align the foil frame mark () with the system outer
foil mark (), and securely attach them together until a
“click” sound is heard.
- Do not press the system outer foil release buttons
with excessive force.
- Do not press the system outer foil release buttons
with excessive force.
- Doing so may bend the system outer foil, preventing
complete attachment to the foil frame.
- The system outer foil cannot be reversely installed.
- When installing the system outer foil into the main body, ensure that the system outer foil is inserted into the foil frame.
Inner blades
How to remove
- Remove one inner blade at a time.
- Do not touch the edges (metallic section) of the inner blades in case your hands are injured.
How to install
- Insert one inner blade at a time until they are fixed in
position.
Note
- Do not throw away the foil frame.
Model ES-GA21
Replacing the system outer foil
- Press the foil frame release buttons and lift the outer foil section upwards as illustrated.
- Press the system outer foil release buttons and pull down the system outer foil as illustrated.
- Insert the system outer foil until it clicks.
- Always attach the system outer foil in proper direction.
- Always insert the system outer foil to the foil frame when attaching to the shaver.
Replacing the inner blades
- Press the foil frame release buttons and lift the outer foil section upwards as illustrated.
- Remove the inner blades one at a time as illustrated. Do not touch the edges (metal parts) of the inner blades to prevent injury to your hand.
- Insert the inner blades one at a time until they click as illustrated.
Model ES-LA63A
The Check Blade Foil ![]() indicator appears on the lamp display once a
year. (This will differ depending on usage.)
indicator appears on the lamp display once a
year. (This will differ depending on usage.)
We recommend checking the system outer foil and the inner blades when it appears.
Press the ON / OFF switch for more than 30 seconds to turn off the indicator.
Replacing the system outer foil
- Press the foil frame release buttons and lift the outer
foil section upwards.
- Press the system outer foil release buttons and pull down the system outer foil.
- Align the foil frame mark
 and the system outer foil up ▲ mark and securely attach
together.
and the system outer foil up ▲ mark and securely attach
together.
- The system outer foil cannot be reversely attached.
- Always insert the system outer foil to the foil
frame when attaching to the shaver.
- After turning the foil frame mark
to the front, securely attach the outer foil section to
the shaver until it clicks.
Replacing the inner blades
- Press the foil frame release buttons and lift the outer
foil section upwards.
- Remove the inner blades one at a time. Do not touch the edges (metal parts) of the inner blades to prevent injury to your hand.
- Insert the inner blades one at a time until they
click.
Replacement parts
| Part Description | Part number |
|---|---|
| System outer foil and inner blades | WES9025 |
| System outer foil | WES9165 |
| Inner blades | WES9068 |
Model ES-LA93
The Check Blade Foil ![]() indicator appears on the lamp display once a
year. (This will differ depending on usage.)
indicator appears on the lamp display once a
year. (This will differ depending on usage.)
We recommend checking the system outer foil and the inner blades when it appears.
Press the ON / OFF switch for more than 30 seconds to turn off the indicator.
Replacing the system outer foil
- Press the foil frame release buttons and lift the outer
foil section upwards.
- Press the system outer foil release buttons and pull down the system outer foil.
- Align the foil frame mark
and the system outer foil up ▲ mark and securely attach
together.
- The system outer foil cannot be reversely attached.
- Always insert the system outer foil to the foil
frame when attaching to the shaver.
- After turning the foil frame mark
to the front, securely attach the outer foil section to
the shaver until it clicks.
Replacing the inner blades
- Press the foil frame release buttons and lift the outer
foil section upwards.
- Remove the inner blades one at a time. Do not touch the edges (metal parts) of the inner blades to prevent injury to your hand.
- Insert the inner blades one at a time until they
click.
Model ES-LF51
Replacing the system outer foil
- Press the foil frame release buttons and lift the outer
foil section upwards.
- Press the system outer foil release buttons and pull down the system outer foil.
- Align the foil frame mark
and the system outer foil up ▲ mark and securely attach
together.
- The system outer foil cannot be reversely attached.
- Always insert the system outer foil to the foil
frame when attaching to the shaver.
- After turning the foil frame mark
to the front, securely attach the outer foil section to
the shaver until it clicks.
Replacing the inner blades
- Press the foil frame release buttons and lift the outer
foil section upwards.
- Remove the inner blades one at a time. Do not touch the edges (metal parts) of the inner blades to prevent injury to your hand.
- Insert the inner blades one at a time until they
click.
Replacement parts
| Part Description | Part number |
|---|---|
| System outer foil and inner blades | WES9027 |
| System outer foil | WES9167 |
| Inner blades | WES9068 |
Models ES-LS8A, ES-LS9A
Removing the outer foil section
- Press the foil frame release buttons and lift the outer foil section upwards.
Attaching the outer foil section
- After turning the foil frame mark to the front, securely attach the outer foil section to the shaver until it clicks.
Replacing the system outer foil
- Press the system outer foil release buttons and pull down the system outer foil.
- Align the foil frame mark
 and the system outer foil up mark ▲
and securely attach together until it clicks.
and the system outer foil up mark ▲
and securely attach together until it clicks.
- The system outer foil cannot be reversely attached.
- Always insert the system outer foil to the foil frame when attaching to the shaver.
- Do not press the system outer foil release buttons with excessive force. Doing so may bend the system outer foil, preventing complete attachment to the foil frame.
Note
Do not throw away the foil frame.
| Part Description | Part number |
|---|---|
| System outer foil | WES9600 |
Models ES-LT2B
Removing the outer foil section (Replace system outer foil once every year)
- Press the foil frame release buttons and lift the outer foil section upwards.
Attaching the outer foil section
- After turning the foil frame mark
to the front, securely attach the outer foil section to
the shaver until it clicks.
Replacing the system outer foil
- Press the system outer foil release buttons and pull down the system outer foil.
- Align the foil frame mark
and the system outer foil up mark ▲ and securely
attach together until it clicks.
- The system outer foil cannot be reversely attached.
- Always insert the system outer foil to the foil frame when attaching to the shaver.
- Do not press the system outer foil release buttons
with excessive force. Doing so may bend the system
outer foil, preventing complete attachment to the foil
frame.
Replacing the inner blades
- Remove the inner blades one at a time.
- Insert the inner blades one at a time.
Replacement parts
| Part Description | Part number |
|---|---|
| System outer foil | WES9087 |
| Inner blades | WES9068 |
Models ES-LT3N
Removing the outer foil section
- Press the foil frame release buttons and lift the outer foil section upwards.
Attaching the outer foil section
- After turning the foil frame mark
to the front, securely attach the outer foil section to
the shaver until it clicks.
Replacing the system outer foil
- Press the system outer foil release buttons and pull down the system outer foil.
- Align the foil frame mark
and the system outer foil up mark ▲ and securely
attach together until it clicks.
- The system outer foil cannot be reversely attached.
- Always insert the system outer foil to the foil frame when attaching to the shaver.
- Do not press the system outer foil release buttons with excessive force. Doing so may bend the system outer foil, preventing complete attachment to the foil frame.
Replacing the inner blades
- Remove the inner blades one at a time.
- Insert the inner blades one at a time.
Replacement parts
| Part Description | Part number |
|---|---|
| System outer foil and inner blades | WES9015 |
| System outer foil | WES9089 |
| Inner blades | WES9068 |
Model ES-LT41
Replacing the system outer foil
- Press the foil frame release buttons and lift the outer
foil section upwards.
- Press the system outer foil release buttons and pull down the system outer foil.
- Align the foil frame mark
and the system outer foil up ▲ mark and securely attach
together.
- The system outer foil cannot be reversely attached.
- Always insert the system outer foil to the foil
frame when attaching to the shaver.
- After turning the foil frame mark
to the front, securely attach the outer foil section to
the shaver until it clicks.
Replacing the inner blades
- Press the foil frame release buttons and lift the outer
foil section upwards.
- Remove the inner blades one at a time. Do not touch the edges (metal parts) of the inner blades to prevent injury to your hand.
- Insert the inner blades one at a time until they
click.
Replacement parts
| Part Description | Part number |
|---|---|
| System outer foil and inner blades | WES9013 |
| System outer foil | WES9087 |
| Inner blades | WES9068 |
Models ES-LT5N
Removing the outer foil section
- Press the foil frame release buttons and lift the outer foil section upwards.
Attaching the outer foil section
- After turning the foil frame mark
to the front, securely attach the outer foil section to
the shaver until it clicks.
Replacing the system outer foil
- Press the system outer foil release buttons and pull down the system outer foil.
- Align the foil frame mark
and the system outer foil up mark ▲ and securely
attach together until it clicks.
- The system outer foil cannot be reversely attached.
- Always insert the system outer foil to the foil frame when attaching to the shaver.
- Do not press the system outer foil release buttons with excessive force. Doing so may bend the system outer foil, preventing complete attachment to the foil frame.
Replacing the inner blades
- Remove the inner blades one at a time.
- Insert the inner blades one at a time.
Replacement parts
| Part Description | Part number |
|---|---|
| System outer foil and inner blades | WES9015 |
| System outer foil | WES9089 |
| Inner blades | WES9068 |
Models ES-LT67
Removing the outer foil section
- Press the foil frame release buttons and lift the outer foil section upwards.
Attaching the outer foil section
- After turning the foil frame mark
to the front, securely attach the outer foil section to
the shaver until it clicks.
Replacing the system outer foil
- Press the system outer foil release buttons and pull down the system outer foil.
- Align the foil frame mark
and the system outer foil up mark ▲ and securely
attach together until it clicks.
- The system outer foil cannot be reversely attached.
- Always insert the system outer foil to the foil frame when attaching to the shaver.
- Do not press the system outer foil release buttons with excessive force. Doing so may bend the system outer foil, preventing complete attachment to the foil frame.
Replacing the inner blades
- Remove the inner blades one at a time.
- Insert the inner blades one at a time.
Replacement parts
| Part Description | Part number |
|---|---|
| System outer foil and inner blades | WES9015 |
| System outer foil | WES9089 |
| Inner blades | WES9068 |
Model ES-LT7N
The Check Blade Foil ![]() indicator appears on the lamp display once a
year. (This will differ depending on usage.)
indicator appears on the lamp display once a
year. (This will differ depending on usage.)
We recommend checking the system outer foil and the inner blades when it appears.
Press the power switch for more than 30 seconds to turn off the indicator.
Even if the indicator is not turned off right after the replacement, it will automatically turn off within approximately 7 uses.
Removing the outer foil section
- Press the foil frame release buttons and lift the outer foil section upwards.
Attaching the outer foil section
- After turning the foil frame mark
to the front, securely attach the outer foil section to
the shaver until it clicks.
Replacing the system outer foil
- Press the system outer foil release buttons and pull down the system outer foil.
- Align the foil frame mark
and the system outer foil up mark ▲ and securely attach
together.
- The system outer foil cannot be reversely attached.
- Always insert the system outer foil to the foil frame when attaching to the shaver.
- Do not press the system outer foil release buttons with excessive force. Doing so may bend the system outer foil, preventing complete attachment to the foil frame.
Replacing the inner blades
- Remove the inner blades one at a time. Do not touch the edges (metal parts) of the inner blades to prevent injury to your hand.
- Insert the inner blades one at a time until they click.
Note:
- Do not throw away the foil frame.
Replacement parts
| Part Description | Part number |
|---|---|
| System outer foil and inner blades | WES9015 |
| System outer foil | WES9089 |
| Inner blades | WES9068 |
| Detergent for cleaning system | WES4L03 |
Model ES-LT71
Replacing the system outer foil
- Press the foil frame release buttons and lift the outer
foil section upwards.
- Press the system outer foil release buttons and pull down the system outer foil.
- Align the foil frame mark
and the system outer foil up ▲ mark and securely attach
together.
- The system outer foil cannot be reversely attached.
- Always insert the system outer foil to the foil
frame when attaching to the shaver.
- After turning the foil frame mark
to the front, securely attach the outer foil section to
the shaver until it clicks.
Replacing the inner blades
- Press the foil frame release buttons and lift the outer
foil section upwards.
- Remove the inner blades one at a time. Do not touch the edges (metal parts) of the inner blades to prevent injury to your hand.
- Insert the inner blades one at a time until they
click.
Model ES-LV6N
The Check Blade Foil ![]() indicator appears on the lamp display once a
year. (This will differ depending on usage.)
indicator appears on the lamp display once a
year. (This will differ depending on usage.)
We recommend checking the system outer foil and the inner blades when it appears.
Press the power switch for more than 30 seconds to turn off the indicator.
Even if the indicator is not turned off right after the replacement, it will automatically turn off within approximately 7 uses.
Removing the outer foil section
- Press the foil frame release buttons and lift the outer foil section upwards.
Attaching the outer foil section
- After turning the foil frame mark
to the front, securely attach the outer foil section to
the shaver until it clicks.
Replacing the system outer foil
- Press the system outer foil release buttons and pull down the system outer foil.
- Align the foil frame mark
and the system outer foil up mark ▲ and securely attach
together.
- The system outer foil cannot be reversely attached.
- Always insert the system outer foil to the foil frame when attaching to the shaver.
- Do not press the system outer foil release buttons with excessive force. Doing so may bend the system outer foil, preventing complete attachment to the foil frame.
Replacing the inner blades
- Remove the inner blades one at a time. Do not touch the edges (metal parts) of the inner blades to prevent injury to your hand.
- Insert the inner blades one at a time until they click.
Note:
- Do not throw away the foil frame.
Replacement parts
| Part Description | Part number |
|---|---|
| System outer foil and inner blades | WES9034 |
| System outer foil | WES9175 |
| Inner blades | WES9170 |
Model ES-LV6Q
Check foil blade
indicator appears on the lamp display once a year. (Based
on one 3-minute shave use per day) We recommend checking
the system outer foil and the inner blades when it appears.
Press the power switch for more than 30 seconds to turn off
the indicator. If the indicator is not turned off right
after the replacement, it will automatically turn off
within approximately 7 uses.
Removing the outer foil section
- Press the foil frame release buttons and lift the outer foil section upwards.

Attaching the outer foil section
- After turning the foil frame mark
 to the front, securely attach the outer foil section to
the shaver until it clicks.
to the front, securely attach the outer foil section to
the shaver until it clicks.
Replacing the system outer foil
- Press the system outer foil release buttons and pull down the system outer foil. Do not press the system outer foil release buttons with excessive force. Doing so may bend the system outer foil, preventing complete attachment to the foil frame.
- Align the foil frame mark
and the system outer foil up mark ▲ and securely
attach together until it clicks.
Replacing the inner blades
- Remove the inner blades one at a time.
- Insert the inner blades one at a time.
Note:
Do not throw away the foil frame.
Replacement parts
| Part Description | Part number |
|---|---|
| System outer foil | WES9177 |
| Inner blades | WES9170 |
Model ES-LV61
When the check blade, foil  indicator appears on the LCD panel once a year. (This will
differ depending on usage). We recommend checking the
system outer foil and the inner blades when it appears.
Press the Power switch for more than 30 seconds to turn off
the indicator.
indicator appears on the LCD panel once a year. (This will
differ depending on usage). We recommend checking the
system outer foil and the inner blades when it appears.
Press the Power switch for more than 30 seconds to turn off
the indicator.
Replacing the system outer foil
- Press the foil frame release buttons and lift the outer foil section upwards.
- Press the system outer foil release buttons and pull down the system outer foil.
- Align the foil frame mark
 and the system outer foil up mark ▲ and securely attach
together.
and the system outer foil up mark ▲ and securely attach
together.
- The system outer foil cannot be reversely attached.
- Always insert the system outer foil to the foil
frame when attaching to the shaver.
- After turning the foil frame mark
to the front, securely attach the outer foil
section to the shaver until it clicks.
Replacing the inner blades
- Press the foil frame release buttons and lift the outer foil section upwards.
- Remove the inner blades one at a time. Do not touch the edges (metal parts) of the inner blades to prevent injury to your hand.
- Insert the inner blades one at a time until they
click.

Replacement parts
| Part Description | Part number |
|---|---|
| System outer foil and inner blades | WES9030 |
| System outer foil | WES9171 |
| Inner blades | WES9170 |
Model ES-LV65
The Check Blade Foil ![]() indicator appears on the lamp display once a
year. (This will differ depending on usage.)
indicator appears on the lamp display once a
year. (This will differ depending on usage.)
We recommend checking the system outer foil and the inner blades when it appears.
Press the power switch for more than 30 seconds to turn off the indicator.
Removing the outer foil section
- Press the foil frame release buttons and lift the outer foil section upwards.
Attaching the outer foil section
- After turning the foil frame mark
to the front, securely attach the outer foil section to
the shaver until it clicks.
Replacing the system outer foil
- Press the system outer foil release buttons and pull down the system outer foil.
- Align the foil frame mark
and the system outer foil up mark ▲ and securely attach
together.
- The system outer foil cannot be reversely attached.
- Always insert the system outer foil to the foil frame when attaching to the shaver.
- Do not press the system outer foil release buttons with excessive force. Doing so may bend the system outer foil, preventing complete attachment to the foil frame.
Replacing the inner blades
- Remove the inner blades one at a time. Do not touch the edges (metal parts) of the inner blades to prevent injury to your hand.
- Insert the inner blades one at a time until they click.
Note:
- Do not throw away the foil frame.
Replacement parts
| Part Description | Part number |
|---|---|
| System outer foil and inner blades | WES9032 |
| System outer foil | WES9173 |
| Inner blades | WES9170 |
Model ES-LV67
Removing the outer foil section
- Press the foil frame release buttons and lift the outer foil section upwards.
Attaching the outer foil section
- After turning the foil frame mark
to the front, securely attach the outer foil section to
the shaver until it clicks.
Replacing the system outer foil
- Press the system outer foil release buttons and pull down the system outer foil. Do not press the system outer foil release buttons with excessive force. Doing so may bend the system outer foil, preventing complete attachment to the foil frame.
- Align the foil frame mark
and the system outer foil up mark ▲ and securely
attach together until it clicks.
Replacing the inner blades
- Remove the inner blades one at a time.
- Insert the inner blades one at a time.
Note:
Do not throw away the foil frame.
Replacement parts
| Part Description | Part number |
|---|---|
| System outer foil and inner blades | WES9032 |
| System outer foil | WES9173 |
| Inner blades | WES9170 |
Model ES-LV81
When the check blade, foil
indicator appears on the LCD panel once a year. (This will
differ depending on usage). We recommend checking the
system outer foil and the inner blades when it appears.
Press the Power switch for more than 30 seconds to turn off
the indicator.
Replacing the system outer foil
- Press the foil frame release buttons and lift the outer foil section upwards.
- Press the system outer foil release buttons and pull down the system outer foil.
- Align the foil frame mark
and the system outer foil up mark ▲ and securely attach
together.
- The system outer foil cannot be reversely attached.
- Always insert the system outer foil to the foil
frame when attaching to the shaver.
- After turning the foil frame mark
to the front, securely attach the outer foil
section to the shaver until it clicks.
Replacing the inner blades
- Press the foil frame release buttons and lift the outer foil section upwards.
- Remove the inner blades one at a time. Do not touch the edges (metal parts) of the inner blades to prevent injury to your hand.
- Insert the inner blades one at a time until they
click.
Replacement parts
| Part Description | Part number |
|---|---|
| System outer foil and inner blades | WES9030 |
| System outer foil | WES9171 |
| Inner blades | WES9170 |
Model ES-LV9N
The Check Blade Foil ![]() indicator appears on the lamp display once a
year. (This will differ depending on usage.)
indicator appears on the lamp display once a
year. (This will differ depending on usage.)
We recommend checking the system outer foil and the inner blades when it appears.
Press the power switch for more than 30 seconds to turn off the indicator.
Even if the indicator is not turned off right after the replacement, it will automatically turn off within approximately 7 uses.
Removing the outer foil section
- Press the foil frame release buttons and lift the outer foil section upwards.
Attaching the outer foil section
- After turning the foil frame mark
to the front, securely attach the outer foil section to
the shaver until it clicks.
Replacing the system outer foil
- Press the system outer foil release buttons and pull down the system outer foil.
- Align the foil frame mark
and the system outer foil up mark ▲ and securely attach
together.
- The system outer foil cannot be reversely attached.
- Always insert the system outer foil to the foil frame when attaching to the shaver.
- Do not press the system outer foil release buttons with excessive force. Doing so may bend the system outer foil, preventing complete attachment to the foil frame.
Replacing the inner blades
- Remove the inner blades one at a time. Do not touch the edges (metal parts) of the inner blades to prevent injury to your hand.
- Insert the inner blades one at a time until they click.
Note:
- Do not throw away the foil frame.
Replacement parts
| Part Description | Part number |
|---|---|
| System outer foil and inner blades | WES9034 |
| System outer foil | WES9175 |
| Inner blades | WES9170 |
| Detergent for cleaning system | WES4L03 |
Model ES-LV9Q
Check foil blade
indicator appears on the lamp display once a year. (Based
on one 3-minute shave use per day) We recommend checking
the system outer foil and the inner blades when it appears.
Press the power switch for more than 30 seconds to turn off
the indicator. If the indicator is not turned off right
after the replacement, it will automatically turn off
within approximately 7 uses.
Removing the outer foil section
- Press the foil frame release buttons and lift the outer foil section upwards.
Attaching the outer foil section
- After turning the foil frame mark
to the front, securely attach the outer foil section to
the shaver until it clicks.
Replacing the system outer foil
- Press the system outer foil release buttons and pull down the system outer foil. Do not press the system outer foil release buttons with excessive force. Doing so may bend the system outer foil, preventing complete attachment to the foil frame.
- Align the foil frame mark
and the system outer foil up mark ▲ and securely
attach together until it clicks.
Replacing the inner blades
- Remove the inner blades one at a time.
- Insert the inner blades one at a time.
Note:
Do not throw away the foil frame.
Replacement parts
| Part Description | Part number |
|---|---|
| System outer foil | WES9177 |
| Inner blades | WES9170 |
| Detergent for cleaning and charging system | WES4L03 |
Model ES-LV95
The Check Blade Foil ![]() indicator appears on the lamp display once a
year. (This will differ depending on usage.)
indicator appears on the lamp display once a
year. (This will differ depending on usage.)
We recommend checking the system outer foil and the inner blades when it appears.
Press the power switch for more than 30 seconds to turn off the indicator.
Removing the outer foil section
- Press the foil frame release buttons and lift the outer foil section upwards.
Attaching the outer foil section
- After turning the foil frame mark
to the front, securely attach the outer foil section to
the shaver until it clicks.
Replacing the system outer foil
- Press the system outer foil release buttons and pull down the system outer foil.
- Align the foil frame mark
and the system outer foil up mark ▲ and securely attach
together.
- The system outer foil cannot be reversely attached.
- Always insert the system outer foil to the foil frame when attaching to the shaver.
- Do not press the system outer foil release buttons with excessive force. Doing so may bend the system outer foil, preventing complete attachment to the foil frame.
Replacing the inner blades
- Remove the inner blades one at a time. Do not touch the edges (metal parts) of the inner blades to prevent injury to your hand.
- Insert the inner blades one at a time until they click.
Note:
- Do not throw away the foil frame.
Replacement parts
| Part Description | Part number |
|---|---|
| System outer foil and inner blades | WES9032 |
| System outer foil | WES9173 |
| Inner blades | WES9170 |
| Detergent for Cleaning System | WES4L03 |
Model ES-LV97
Removing the outer foil section
- Press the foil frame release buttons and lift the outer foil section upwards.
Attaching the outer foil section
- After turning the foil frame mark
to the front, securely attach the outer foil section to
the shaver until it clicks.
Replacing the system outer foil
- Press the system outer foil release buttons and pull down the system outer foil. Do not press the system outer foil release buttons with excessive force. Doing so may bend the system outer foil, preventing complete attachment to the foil frame.
- Align the foil frame mark
and the system outer foil up mark ▲ and securely
attach together until it clicks.
Replacing the inner blades
- Remove the inner blades one at a time.
- Insert the inner blades one at a time.
Note:
Do not throw away the foil frame.
Replacement parts
| Part Description | Part number |
|---|---|
| System outer foil and inner blades | WES9032 |
| System outer foil | WES9173 |
| Inner blades | WES9170 |
| Detergent for cleaning and charging system | WES4L03 |
Model ES-RF31
Replacing the system outer foil
- Press the foil frame release buttons and lift the outer foil section upwards as illustrated.
- Press the system outer foil release buttons and pull down the system outer foil as illustrated.
- Insert the system outer foil until it clicks.
- Always attach the system outer foil in proper direction.
- Always insert the system outer foil to the foil frame when attaching to the shaver.
Replacing the inner blades
- Press the foil frame release buttons and lift the outer foil section upwards as illustrated.
- Remove the inner blades one at a time as illustrated. Do not touch the edges (metal parts) of the inner blades to prevent injury to your hand.
- Insert the inner blades one at a time until they click as illustrated.
Model ES-RM3B-K, ES-RM3B-A
Replacing the system outer foil and the inner blades
- It is recommended to replace the system outer foil once a year and the inner blades once every two years.Replacing the system outer foil and the inner blades.
- It is recommended to replace the system outer foil once a year and the inner blades once every two years.
Replacement parts
Replacement parts are available at your dealer or Service Center.
| Replacement parts for ES-RM3B | |
|---|---|
| System outer foil | Inner blades |
| WES9087 | WES9068 |
Outer foil section
How to remove
- Press the foil frame release button, and lift to remove the outer foil section.
How to install
- Insert the right side first, and then insert the right side first, and then insert the left side until it is in place.
System Outer foil section
How to remove- Press the system outer foil release buttons, and pull down the system outer foil.
How to install
- Align them correctly, and securely attach them together until a "click" sound is heard.
- The system outer foil cannot be reversely installed.
- To install it back to the shaver, make sure that the system outer foil is inserted into the foil frame.
How to remove
- Remove one inner blade at a time.
- Do not touch the edges (metallic section) of the inner blades in case your hands are injured.
- Do not touch the edges (metallic section) of the inner blades in case your hands are injured.
How to install
- Insert one inner blade at a time until they are fixed in position.
Note
- Do not press the system outer foil release buttons with excessive force.
Doing so may bend the system outer foil, preventing complete attachment to the foil frame.
Model ES-RT17
Removing the outer foil section
- Press the foil frame release buttons and lift the outer foil section upwards.
Attaching the outer foil section
- Securely attach the outer foil section to the shaver until it clicks.
Replacing the system outer foil
- Press the system outer foil release buttons and pull down the system outer foil.
- Insert the system outer foil until it clicks.
- Always attach the system outer foil in proper direction.
- Always insert the system outer foil to the foil frame when attaching to the shaver.
Replacing the inner blades
- Remove the inner blades one at a time. Do not touch the edges (metal parts) of the inner blades to prevent injury to your hand.
- Insert the inner blades one at a time until they click.
Replacement parts
| Part Description | Part number |
|---|---|
| System outer foil and inner blades | WES9013 |
| System outer foil | WES9087 |
| Inner blades | WES9068 |
Model ES-RT31
Replacing the outer foil section
- Press the system outer foil release buttons and lift
the system outer foil upwards as illustrated.
- Insert the system outer foil by pushing it downwards until it clicks.
Replacing the inner blades
- Press the foil frame release buttons and lift the outer
foil section upwards as illustrated.
- Remove the inner blades one at a time as illustrated.
Do not touch the edges (metal parts) of the innerblades to
prevent injury toyour hand.
- Insert the inner blades one at a time until they click as illustrated.
Model ES-RT33
Removing the outer foil section
- Press the foil frame release buttons and lift the outer foil section upwards.
Attaching the outer foil section
- Securely attach the outer foil section to the shaver until it clicks.
Replacing the system outer foil
- Press the system outer foil release buttons and pull down the system outer foil.
- Insert the system outer foil until it clicks as
illustrated.
- Always attach the system outer foil in proper direction.
- Always inser the system outer foil to the foil
frame when attaching to the shaver.
Replacing the inner blades
- Remove the inner blades one at a time. Do not touch the edges (metal parts) of the inner blades to prevent injury to your hand.
- Insert the inner blades one at a time unti they
click.
Replacement parts
| Part Description | Part number |
|---|---|
| System outer foil and inner blades | WES9013 |
| System outer foil | WES9087 |
| Inner blades | WES9068 |
Model ES-RT47
Removing the outer foil section
- Press the foil frame release buttons and lift the outer foil section upwards.
Attaching the outer foil section
- Securely attach the outer foil section to the shaver until it clicks.
Replacing the system outer foil
- Press the system outer foil release buttons and pull down the system outer foil.
- Insert the system outer foil until it clicks.
- Always attach the system outer foil in proper direction.
- Always insert the system outer foil to the foil frame when attaching to the shaver.
Replacing the inner blades
- Remove the inner blades one at a time. Do not touch the edges (metal parts) of the inner blades to prevent injury to your hand.
- Insert the inner blades one at a time until they click.
Replacement parts
| Part Description | Part number |
|---|---|
| System outer foil and inner blades | WES9013 |
| System outer foil | WES9087 |
| Inner blades | WES9068 |
Model ES-RT51
Replacing the outer foil section
- Press the system outer foil release buttons and lift
the system outer foil upwards as illustrated.
- Insert the system outer foil by pushing it downwards until it clicks.
Replacing the inner blades
- Press the foil frame release buttons and lift the outer
foil section upwards as illustrated.
- Remove the inner blades one at a time as illustrated.
Do not touch the edges (metal parts) of the innerblades to
prevent injury toyour hand.
- Insert the inner blades one at a time until they click as illustrated.
Model ES-RT53
Removing the outer foil section
- Press the foil frame release buttons and lift the outer foil section upwards.
Attaching the outer foil section
- Securely attach the outer foil section to the shaver until it clicks.
Replacing the system outer foil
- Press the system outer foil release buttons and pull down the system outer foil.
- Insert the system outer foil until it clicks as
illustrated.
- Always attach the system outer foil in proper direction.
- Always inser the system outer foil to the foil
frame when attaching to the shaver.
Replacing the inner blades
- Remove the inner blades one at a time. Do not touch the edges (metal parts) of the inner blades to prevent injury to your hand.
- Insert the inner blades one at a time unti they
click.
Replacement parts
| Part Description | Part number |
|---|---|
| System outer foil and inner blades | WES9013 |
| System outer foil | WES9087 |
| Inner blades | WES9068 |
Models ES-RT67, ES-RT77, ES-RT97
Removing the outer foil section
- Press the foil frame release buttons and lift the outer foil section upwards.
Attaching the outer foil section
- Securely attach the outer foil section to the shaver until it clicks.
Replacing the system outer foil
- Press the system outer foil release buttons and pull down the system outer foil.
- Insert the system outer foil until it clicks.
- Always attach the system outer foil in proper direction.
- Always insert the system outer foil to the foil frame when attaching to the shaver.
Replacing the inner blades
- Remove the inner blades one at a time. Do not touch the edges (metal parts) of the inner blades to prevent injury to your hand.
- Insert the inner blades one at a time until they click.
Replacement parts
| Part Description | Part number |
|---|---|
| System outer foil and inner blades | WES9013 |
| System outer foil | WES9087 |
| Inner blades | WES9068 |
Model ES-RW30
Replacing the outer foil section
- Press the system outer foil release buttons and lift
the system outer foil upwards as illustrated.
- Insert the system outer foil by pushing it downwards until it clicks.
Replacing the inner blades
- Press the foil frame release buttons and lift the outer
foil section upwards as illustrated.
- Remove the inner blades one at a time as illustrated.
Do not touch the edges (metal parts) of the innerblades to
prevent injury toyour hand.
- Insert the inner blades one at a time until they click as illustrated.
Model ES-SL21
Check foil blade
indicator appears on the lamp display once a year. (Based
on one 3-minute shave use per day) We recommend checking
the system outer foil and the inner blades when it appears.
Press the power switch for more than 30 seconds to turn off
the indicator. If the indicator is not turned off right
after the replacement, it will automatically turn off
within approximately 7 uses.
Removing the outer foil section
- Press the foil frame release buttons and lift the outer foil section upwards.
Attaching the outer foil section
- After turning the foil frame mark
to the front, securely attach the outer foil section to
the shaver until it clicks.
Replacing the system outer foil
- Press the system outer foil release buttons and pull down the system outer foil. Do not press the system outer foil release buttons with excessive force. Doing so may bend the system outer foil, preventing complete attachment to the foil frame.
- Align the foil frame mark
and the system outer foil up mark ▲ and securely
attach together until it clicks.
Replacing the inner blades
- Remove the inner blades one at a time.
- Insert the inner blades one at a time.
Note:
Do not throw away the foil frame.
Replacement parts
| Part Description | Part number |
|---|---|
| System outer foil and inner blades | WES9013 |
| System outer foil | WES9087 |
| Inner blades | WES9068 |
Model ES-SL33
Replacing the system outer foil
- Press the system outer foil release buttons and pull
down the system outer foil.
- Align the front side of the foil frame with the system outer foil up mark ▲ and insert them firmly together.
Note:
- The system outer foil cannot be reversely attached.
- Always insert the system outer foil to the foil frame when attaching to the shaver.
Replacing the inner blades
- Press the system outer foil release buttons and pull down the system outer foil.
- Remove the inner blades one at a time. Do not touch the
edges (metal parts) of the inner blades to prevent injury
to your hand.
- Insert the inner blades one at a time until they click.
Replacement parts
| Part Description | Part number |
|---|---|
| System outer foil and inner blades | WES9013 |
| System outer foil | WES9087 |
| Inner blades | WES9068 |
Model ES-SL41
Check foil blade
indicator appears on the lamp display once a year. (Based
on one 3-minute shave use per day) We recommend checking
the system outer foil and the inner blades when it appears.
Press the power switch for more than 30 seconds to turn off
the indicator. If the indicator is not turned off right
after the replacement, it will automatically turn off
within approximately 7 uses.
Removing the outer foil section
- Press the foil frame release buttons and lift the outer foil section upwards.
Attaching the outer foil section
- After turning the foil frame mark
to the front, securely attach the outer foil section to
the shaver until it clicks.
Replacing the system outer foil
- Press the system outer foil release buttons and pull down the system outer foil. Do not press the system outer foil release buttons with excessive force. Doing so may bend the system outer foil, preventing complete attachment to the foil frame.
- Align the foil frame mark
and the system outer foil up mark ▲ and securely
attach together until it clicks.
Replacing the inner blades
- Remove the inner blades one at a time.
- Insert the inner blades one at a time.
Note:
Do not throw away the foil frame.
Replacement parts
| Part Description | Part number |
|---|---|
| System outer foil and inner blades | WES9013 |
| System outer foil | WES9087 |
| Inner blades | WES9068 |
Model ES-SL83
Replacing the system outer foil
- Press the system outer foil release buttons and pull
down the system outer foil.
- Align the front side of the foil frame with the system outer foil up mark ▲ and insert them firmly together.
Note:
- The system outer foil cannot be reversely attached.
- Always insert the system outer foil to the foil frame when attaching to the shaver.
Replacing the inner blades
- Press the system outer foil release buttons and pull down the system outer foil.
- Remove the inner blades one at a time. Do not touch the
edges (metal parts) of the inner blades to prevent injury
to your hand.
- Insert the inner blades one at a time until they click.
Replacement parts
| Part Description | Part number |
|---|---|
| System outer foil and inner blades | WES9013 |
| System outer foil | WES9087 |
| Inner blades | WES9068 |
Model ES-ST2N
Replacing the system outer foil
- Press the foil frame release buttons and lift the outer
foil section upwards.
Attaching the outer foil section
- After turning the water inlet surface to the front,
securely attach the outer foil section to the shaver until
it clicks
Replacing the system outer foil
- Press the foil frame release buttons and lift the outer
foil section upwards.
- Align the water inlet surface and the system outer foil
up mark ▲ and securely attach together.
- Do not press the system outer foil release buttons with excessive force. Doing so may bend the system outer foil, preventing complete attachment to the foil frame
Replacing the inner blades
- Remove the inner blades one at a time.
- Insert the inner blades one at a time
Replacement parts
| Part Description | Part number |
|---|---|
| System outer foil | WES9087 |
| Inner blades | WES9068 |
Model ES-ST25
Removing the outer foil section
- Press the foil frame release buttons and lift the outer
foil section upwards.
Attaching the outer foil section
- After turning the water inlet surface to the front,
securely attach the outer foil section to the
shaver until it clicks.
Replacing the system outer foil
- Press the foil frame release buttons and pull down the system outer foil.
- Align the water inlet surface and the system outer foil
up mark ▲ and securely attach together.
- The system outer foil cannot be reversely attached.
- Always insert the system outer foil to the foil
frame when attaching to the shaver.
Replacing the inner blades
- Remove the inner blades one at a time. Do not touch the edges (metal parts) of the inner blades to prevent injury to your hand.
- Insert the inner blades one at a time until they
click.
Replacement parts
| Part Description | Part number |
|---|---|
| System outer foil and inner blades | WES9013 |
| System outer foil | WES9087 |
| Inner blades | WES9068 |
Models ES-SWLT2W
Removing the outer foil section (Replace system outer foil once every year)
- Press the foil frame release buttons and lift the outer foil section upwards.
Attaching the outer foil section
- After turning the foil frame mark
to the front, securely attach the outer foil section to
the shaver until it clicks.
Replacing the system outer foil
- Press the system outer foil release buttons and pull down the system outer foil.
- Align the foil frame mark
and the system outer foil up mark ▲ and securely
attach together until it clicks.
- The system outer foil cannot be reversely attached.
- Always insert the system outer foil to the foil frame when attaching to the shaver.
- Do not press the system outer foil release buttons
with excessive force. Doing so may bend the system
outer foil, preventing complete attachment to the foil
frame.
Replacing the inner blades
- Remove the inner blades one at a time.
- Insert the inner blades one at a time.
Replacement parts
| Part Description | Part number |
|---|---|
| System outer foil and inner blades | WES9013 |
| System outer foil | WES9087 |
| Inner blades | WES9068 |
Models ES-WL60, ES-WL80
Replacing the outer foil
- Press the outer foil frame release buttons to remove
the foil frame.
- Hold the knobs on the outer foil with your finger as illustrated in the image below. Lift it up in the direction of the arrow while pushing the edge of outer foil from the outside.
- Align the directions of knobs as illustrated below and
insert the new outer foil into the frame.
- Insert the plastic edges into the frame until they click.
Replacing the inner blade
- Hold the inner blade at both ends firmly and pull it straight away from the shaver to remove.
- Insert the new inner blade by holding it at both ends
and press it downward until it clicks.