How to reset an audio product - Panasonic Audio products
The following information pertains to Panasonic Audio products including home stereo systems, portable audio systems, earbuds and headphones.
For instructions on resetting a Panasonic Audio product select your model from the list below.
If your model is not listed Refer to your models Operating Manual for specific procedure.
Models RP-BTD10
- Connect the unit to a computer using the USB charging cord.
- Press the RESET hole with a thin, pointed object, (check that the LED (red) goes out) keep pressing the RESET hole for approximately 5 seconds to reset the unit.
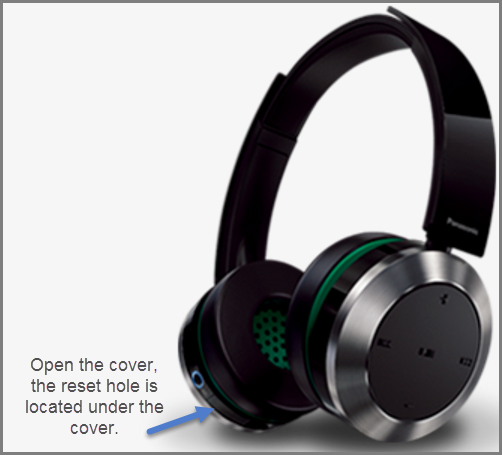
Note
- All the previous operations will be canceled.
- The pairing device information will not be deleted.
Models RP-BTD5
When you want to delete all pairing device information, etc., you can restore the unit to the factory settings (original settings upon purchase).
- Turn off the unit.
- Press and hold the Power button
 and the Previous button
  for 5 seconds
or more simultaneously.
- The LED on the left speaker will light in red for approximately 2 seconds. The unit will restore to the factory settings.
Models RP-BTS10, RP-BTS35, RP-BTS55
When you want to delete all pairing device information, etc., you can restore the unit to the factory settings (original settings upon purchase).
Charge the battery before restoring the unit.
- Press and hold the power button
 for approximately 5 seconds
- The unit starts searching for Bluetooth ® devices to connect.
- Press and hold the plus + and minus - buttons for 6 seconds or more simultaneously while searching it is
in BT search mode.
- The LED will blink fast in blue. The unit will restore to the factory settings.
Note
- When pairing a device again, delete the registering information (example Device: “RP-HF400B”) from the Bluetooth ® device’s menu, and register this unit with the Bluetooth ® device again.
Models RP-HD605, RP-HD610
This unit can be reset when all operations are rejected. To reset the unit, connect the unit to a computer using the USB charging cord. All the previous operations will be cancelled. (The pairing device information will not be deleted.)
When you want to delete all pairing device information, etc., you can restore the unit to the factory settings (original settings upon purchase). Charge the battery before restoring the unit.
- While the unit is turned off, press and hold
 for at least 5 seconds until the power/pairing
LED starts blinking alternately in blue and red.
- While the power/pairing LED is blinking alternately in blue and red, slide and hold the [Multiple functions
button] towards “+” and at the same time press and hold
 for at least 5 seconds.
- The default settings will be restored after the power/pairing LED (blue) blinks fast and the unit turns off.
Note
- When pairing a device again, delete the registering information (example Device: “RP-HD605N”) from the Bluetooth® device’s menu, and register this unit with the Bluetooth® device again.
Models RP-HF400B, RP-HJE120
Models RP-HTX80, RP-HTX90
- While the unit is turned off, press and hold the Power button
 for at least 5 seconds until the LED starts
blinking alternately in blue and red.
- While the LED is blinking alternately in blue and red, press and hold the Plus
 and Minus
  buttons at the same
time for at least 5 seconds.
- The default settings will be restored after the LED (blue) blinks fast and the unit turns off.
Note
- When pairing a device again, delete the registering information (Ex. : Device: “RP-HTX80B”) from the Bluetooth® device’s menu, and register this unit with the Bluetooth ® device again.
Model RX-D550
When the following situations occur, reset the memory.
- There is no response when buttons are pressed.
- You want to clear and reset the memory contents.
- Remove the batteries from this unit.
- Disconnect the AC power supply cord. Wait at least 30 seconds before proceeding to step 3.
- While pressing and holding down on the Power
 button on the unit, reconnect the AC power supply cord.
- Keep holding down on the Power button until "---------" appears on the display.
- Release the Power button.
All the settings are returned to the factory defaults. It is necessary to set the settings again.
Model RZ-B110
When you want to delete all pairing device information, etc. in the earphones, you can restore the earphones to the factory settings (original settings upon purchase)
Important
- Charge the earphones before restoring the earphones to their factory settings
- Take both earphones (L and R) out of the charging cradle.
- Touch the touch sensor (L or R) rapidly 6 times in disconnected state. When the reset is finished, the unit beeps
To re-pair the earphones with a Bluetooth® device, delete the registered information (device name: RZ-B110W) on the device, then pair the earphones with the Bluetooth® device again
Model RZ-B310
When you want to delete all pairing device information, etc. in the earphones, you can restore the earphones to the factory settings (original settings upon purchase)
Important
- Charge the earphones before restoring the earphones to their factory settings
- Open the charging cradle lid.
- While the earphones are in the charging cradle, press the reset button (located on the back side of the charging case) rapidly 5 times. When the reset is finished, the status indicator goes off.
The Status indicator flashes in orange 3 times. When the reset is completed, the status indicator goes off.
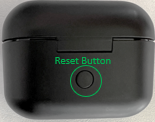
To re-pair the earphones with a Bluetooth® device, delete the registered information (device name: RZ-B310W) on the device, then pair the earphones with the Bluetooth® device again
Models RZ-S300, RZ-S500
When you want to delete all pairing device information, etc. in the earphones, you can restore the earphones to the factory settings (original settings upon purchase). Follow these steps to successfully perform a factory reset.
- Put both earphones (Left and Right) into the charging cradle to charge the earphones fully.
- Take the Right side earphone out of the charging cradle.
- While the earphone LED lights (blue) (about 5 seconds), touch and hold the touch sensor Right for about 7 seconds. The earphone LED will light alternately in blue and red.
- Release your finger from the touch sensor Right.
- Touch and hold the touch sensor Right for about 10 seconds.The earphone LED (blue) blinks rapidly, and when the power turns off, the earphone returns to the factory settings.
- Do the same Steps 2 to 5 above for the Left side earphone.
Note
- To re-pair the earphones with a Bluetooth® device, delete the registered information (device name: RZ-S300 or RZ-S500) on the device, then pair the earphones with the Bluetooth® device again.
Models SC-AK450
When the following situations occur, reset the memory:
- There is no response when buttons are pressed.
- You want to clear and reset the memory contents.
- Disconnect the AC power supply cord. (Wait for at least 3 minutes before proceeding to step 2.)
- While pressing and holding down on the Power
 button on the unit, reconnect the AC power supply cord.
- Keep holding down on the Power button until "---------" appears on the display.
- Release the Power button.
Note
All the settings are set back to the factory preset. It is necessary to set the memory items again.
Models SC-AKX14, SC-AKX18, SC-AKX640
Models SC-CMAX5
Model SC-GA10
- Touch and hold
 and
and  buttons on the product.
 - The Orange LED indicators will light up from left to right.
- The White LED indicators will light up from left to right.
- Release the buttons.
- The product will reset and reboot ready to be setup again with the Google Home App.
Model SC-GN01
This is done when returning the unit to the state of purchase, such as by discarding or transferring the unit
- Press [VOL -] Volume down button until the volume reaches the minimum level [0].
- An operation tone is made when the volume reaches the minimum level [0]
- Press and hold the [SOUND] and [MUTE] buttons for about 5 seconds or more.
- An operation tone is made and the unit is in the factory settings mode
- When the unit enters the factory settings mode, the operation indicator blinks once every second.
- Press the [MIC MUTE] button while the unit is in the factory settings mode.
- The settings are each initialized, returning to the factory settings.
Models SC-HC20, SC-HC25, SC-HC27, SC-HC28
When the following situations occur, reset the memory:
- There is no response when buttons are pressed.
- You want to clear and reset the memory contents.
- Disconnect the AC power supply cord. (Wait for at least 3 minutes before proceeding to step 2.)
- While pressing and holding down the [POWER] button on the unit, reconnect the AC power supply cord. Dashes “--------” appear on the display.
- Release [POWER].
All the settings are set back to the factory preset.
It is necessary to set the memory items again.
Models SC-HC200, SC-HC295, SC-HC300, SC-HC400, SC-HC410
Models SC-PM250
Models SC-PM270
Models SC-PM600, SC-PM700
Models SC-PMX90
Model SC-RS50
Models SC-MAX670, SC-MAX4700, SC-MAX8700
Model SC-BTX70
To Reset from the Menu.
- While stopped, Press [BD/SD] to select “BD/DVD”.
- Press [SETUP].
- Press the arrow up ▲ or down ▼ button to select "Others" and press [OK].
- Press the arrow up ▲ or down ▼ button to select "Restore Default Settings" and press [OK].
- Select “Yes”.
This returns all values in the Setup menu and the on-screen menu to the default settings, except for:
- “Remote Control Code”
- “On-screen Language”
- “IP Address/DNS Settings”
- “Proxy Server Settings”
- “DVD-Video Ratings”
- “BD-Video Ratings”
- “Network Service”
To Reset the unit manually
- Press the Power button on the unit to turn off the unit.
- Press and hold the fast forward [ ►►/►► ], [Power] and the [Disc OPEN/CLOSE] buttons on the unit at the same time for more than 5 seconds until “PLEASE WAIT” is displayed on the unit.
- The power is turned on and then turned off automatically.
Model SC-HT40
The operation settings for the unit will be initialized to the settings made at the time of shipment. However, any preset radio stations will not be erased.
- Press and hold [ ― SETUP] to enter the setup menu.
- Press [TUNE - or + ] to select "RESET" then press [ENTER].
- Press [TUNE
+] to
select "RESET
YES" then press [ENTER].
(To cancel, select "RESET NO".)
Models SC-HTB450, SC-HTB70
- While the main unit is on, press [
 POWER ] on the main unit for more than 4 seconds.
 - All the indicators will blink twice when the main unit is reset.
If the system does not operate as expected, returning the settings to the factory preset may solve the problem.
Models SC-HTB580, SC-HTB880
Reset the memory when the following situations occur:
- There is no response when buttons are pressed.
- You want to clear and reset the memory contents.
- Turn the system ON.
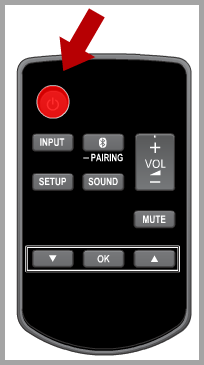
- Press and hold the Power button on the main unit for a minimum of 4 seconds.
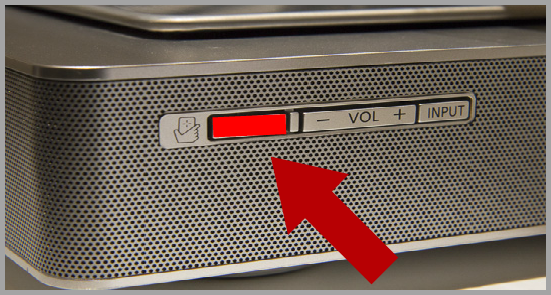
- Release the Power button. "RESET" is shown on the display.

- Turn off the unit and then turn it back on again. All the settings are reset to the factory defaults.
Models SC-HTE180, SC-HTE80
Models SC-PMX100, SC-PMX150
Model SC-PMX7, SC-PMX70
Models SC-PMX80, SC-PMX800
Models SC-UA3
When the following situations occur, reset the memory:
- There is no response when buttons are pressed.
- You want to clear and reset the memory contents.
- Disconnect the AC power supply cord. (Wait for at least 3 minutes before proceeding to step 2.)
- While pressing and holding down the [POWER] button on the unit, reconnect the AC power supply cord. Dashes “--------” appear on the display.
- Release [POWER].
All the settings are set back to the factory preset.
It is necessary to set the memory items again.
Model SC-UA7
When the following situations occur, reset the memory.
- There is no response when buttons are pressed.
- You want to clear and reset the memory contents.
- Press and hold the POWER
 button on the unit until "RESET?" is shown.
 - While you touch and hold the POWER on the unit, touch [SELECT].
- "Reset" is shown. After "---------" is shown, the unit will turn off automatically.
All the settings are set back to the factory defaults. It is necessary to reset the memory items.
