How to set the Auto Focus mode. - DC-LX100M2, DMC-FZ1000
Applicable Shooting modes
For model DC-LX100M2
For model DMC-FZ100
Press [AF Tracking] which allows the focusing method that suits the positions and number of the subjects to be selected.
| Icon | Setting | Description | Example |
|---|---|---|---|
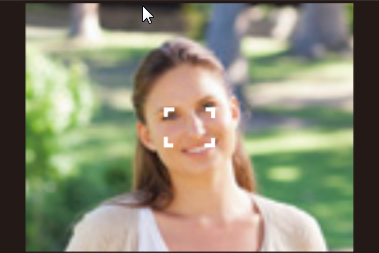
| Face/Eye Detection icon | Face/Eye Detection |
|
Example Image. To be used as a visual reference. |
| AF Tracking Icon | Tracking |
|
Example Image. To be used as a visual reference. |
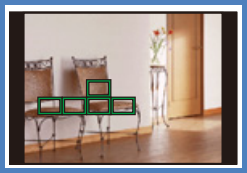
| 49-Area Icon | 49-Area |
|
Example Image. To be used as a visual reference. |
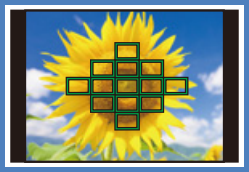
| Custom Multi Icon | Custom Multi |
|
Example Image. To be used as a visual reference. |
| 1-Area Icon | 1-Area |
|
Example Image. To be used as a visual reference. |
| Pinpoint Icon | Pinpoint |
|
Example Image. To be used as a visual reference. |


- In Intelligent Auto Mode and Intelligent Auto Plus Mode, you can switch to either [Face Detection] or [AF Tracking].
About Face/Eye Detection
When the camera detects faces, AF areas are displayed and the eye to be brought into focus are indicated.
- Yellow: The colour changes to green when the shutter button is pressed halfway and focus is achieved.
- White: This is displayed when more than one face is detected. Faces that are at the same distance as the face inside the yellow AF area will be brought into focus.
- The camera can detect the faces of up to 15 people. Only the eyes of the face to be brought into focus can be detected.
Changing the eye to be brought into focus
For model DC-LX100M2, you can touch the eye to be brought into focus.
- Touching Auto focus tracking off icon or pressing [Menu/Set] will cancel the setting of the eye that has been brought into focus.
Locking the Subject to be Tracked
Button operation
Aim the AF Tracking area (B) over the subject and then press the shutter button halfway.
- The AF area turns green when the subject is detected.
- The AF area turns yellow when you release the shutter button.
- Press [Menu/Set] to clear the lock.
Touch operation (DC-LX100M2)
Touch the subject.
- Perform this operation with the Touch Shutter function canceled.
- The AF Tracking area turns yellow while the subject is locked.
- Touch [AF Tracking Icon] to clear the lock.
- The focus range will be the same as that of [AF Macro Icon].
- The AF Tracking area will blink in red and then disappear if the lock fails.

See also:
Visit this site to learn how to select a Focus Mode (AFS/AFF/AFC)