How to set the clock - Panasonic Audio products
For instructions on setting a clock on a Panasonic Audio
product select your model from the list below.
If your model is not listed Refer
to your models Operating Manual for specific procedure.
RX-D550
This is a 24-hour clock.
To Set
- Press [SETUP] repeatedly to select "CLOCK".
- Press the arrow up ▲ or down ▼ button to set the time and then press [OK].
To check the time
- Press [SETUP]. repeatedly to select "CLOCK" and then press [OK].
- In standby mode, press [DISPLAY].
Note:
- The clock is reset when there is a power failure or when the AC power supply cord is removed.
- Reset the clock regularly to maintain accuracy.
- If the unit is powered by batteries, the clock setting will be lost when the unit is turned off.
SC-AKX14
This is a 12-hour clock.
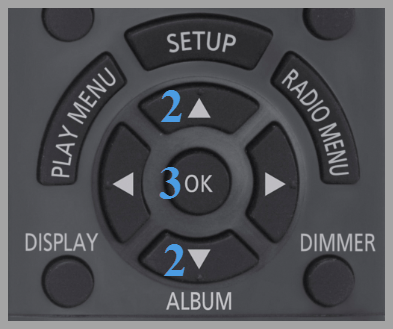
- Press [CLOCK/TIMER] to select
“CLOCK”.
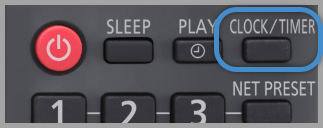
- Within 10 seconds press the arrow up ▲ or down ▼ button to set the time.
- Press [OK] to finish.
To check the time
- Press [CLOCK/TIMER].
Note
- Reset the clock regularly to maintain accuracy.
- The clock is reset when there is a power failure or when the AC power supply cord is removed.
SC-AKX18
This is a 12-hour clock.
To Set
- Press [SETUP] repeatedly to select "CLOCK".
- Press the arrow up ▲ or down ▼ button to set the time and then press [OK].
To check the time
- Press [SETUP]. repeatedly to select "CLOCK" and then press [OK].
- In standby mode, press [DISPLAY].
Note:
- Reset the clock regularly to maintain accuracy.
SC-AKX640
This is a 12-hour clock.
To Set
- Press [SETUP] repeatedly to select "CLOCK".
- Press the arrow left ◄ or right ► button to to set the time.
- Press [OK].
To check the time
- Press [SETUP]. repeatedly to select "CLOCK" and then press [OK].
- In standby mode, press [DISPLAY].
Note:
- Reset the clock regularly to maintain accuracy.
SC-CH400
This is a 12-hour clock.
To Set
- Press [SETUP] repeatedly to select "CLOCK".
- Press the arrow up ▲ or down ▼ button to set the time and then press [OK].
To check the time
- Press [SETUP]. repeatedly to select "CLOCK" and then press [OK].
- In standby mode, press [DISPLAY].
Note:
- Reset the clock regularly to maintain accuracy.
SC-HC200
This is a 12-hour clock.
To Set
- Press [SETUP] repeatedly to select "CLOCK".
- Press the arrow up ▲ or down ▼ button to set the time and then press [OK].
To check the time
- Press [SETUP]. repeatedly to select "CLOCK" and then press [OK].
- In standby mode, press [DISPLAY].
Note:
- Reset the clock regularly to maintain accuracy.
SC-HC25
This is a 12-hour clock.
- Press [CLOCK/TIMER] to select
“CLOCK”.
- Within 10 seconds press the arrow up ▲ or down ▼ button to set the time.
- Press [OK] to finish.
To check the time
- Press [CLOCK/TIMER].
Note
- Reset the clock regularly to maintain accuracy.
- The clock is reset when there is a power failure or when the AC power supply cord is removed.
SC-HC295
This is a 12-hour clock.
To Set
- Press [SETUP] repeatedly to select "CLOCK".
- Press the arrow up ▲ or down ▼ button to set the time and then press [OK].
To check the time
- Press [SETUP]. repeatedly to select "CLOCK" and then press [OK].
- In standby mode, press [DISPLAY].
Note:
- Reset the clock regularly to maintain accuracy.
SC-HC300
This is a 12-hour clock.
To Set
- Press [SETUP] repeatedly to select "CLOCK".
- Press the arrow up ▲ or down ▼ button to set the time and then press [OK].
To check the time
- Press [SETUP]. repeatedly to select "CLOCK" and then press [OK].
- In standby mode, press [DISPLAY].
Note:
- Reset the clock regularly to maintain accuracy.
SC-HC400
This is a 12-hour clock.
- Press [CLOCK/TIMER] to select
“CLOCK”.
- Within 20 seconds press the arrow up ▲ or down ▼ button to set the time.
- Press [OK] to
finish.
To check the time
- Press [CLOCK/TIMER].
Note
- Reset the clock regularly to maintain accuracy.
- The clock is reset when there is a power failure or when the AC power supply cord is removed.
- Buttons vary by model
SC-HC410
This is a 12-hour clock.
- Press [CLOCK/TIMER] to select
“CLOCK”.
- Within 20 seconds press the arrow up ▲ or down ▼ button to set the time.
- Press [OK] to
finish.
To check the time
- Press [CLOCK/TIMER].
Note
- Reset the clock regularly to maintain accuracy.
- The clock is reset when there is a power failure or when the AC power supply cord is removed.
- Buttons vary by model
SC-MAX4700
This is a 12-hour clock.
To Set
- Press [SETUP] repeatedly to select "CLOCK".
- Press the arrow left ◄ or right ► button to to set the time.
- Press [OK].
To check the time
- Press [SETUP]. repeatedly to select "CLOCK" and then press [OK].
- In standby mode, press [DISPLAY].
Note:
- Reset the clock regularly to maintain accuracy.
SC-MAX670
This is a 12-hour clock.
- Press [CLOCK/TIMER] to select
“CLOCK”.
- Within 20 seconds press the arrow up ▲ or down ▼ button to set the time.
- Press [OK] to
finish.
To check the time
- Press [CLOCK/TIMER].
Note
- Reset the clock regularly to maintain accuracy.
- The clock is reset when there is a power failure or when the AC power supply cord is removed.
- Buttons vary by model
SC-MAX8700
This is a 12-hour clock.
To Set
- Press [SETUP] repeatedly to select "CLOCK".
- Press the arrow left ◄ or right ► button to to set the time.
- Press [OK].
To check the time
- Press [SETUP]. repeatedly to select "CLOCK" and then press [OK].
- In standby mode, press [DISPLAY].
Note:
- Reset the clock regularly to maintain accuracy.
Models SC-PM250, SC-PM600
This is a 12-hour clock.
To Set
- Press [SETUP] repeatedly to select "CLOCK".
- Press the arrow up ▲ or down ▼ button to set the time and then press [OK].
To check the time
- Press [SETUP]. repeatedly to select "CLOCK" and then press [OK].
- In standby mode, press [DISPLAY].
Note:
- Reset the clock regularly to maintain accuracy.
Models SC-PM270K, SC-PM270PP
This is a 12-hour clock.
- Press SETUP repeatedly to select “CLOCK”.
- Press R, T to set the time and then press OK.
To check the time
- Press SETUP repeatedly to select “CLOCK” and then press OK.
- In standby mode, press DISPLAY.
Note:
Reset the clock regularly to maintain accuracy.
SC-PMX100, SC-PMX150
This is a 12-hour clock.
- Press [CLOCK/TIMER] to select
“CLOCK”.
- Within 20 seconds press the arrow up ▲ or down ▼ button to set the time.
- Press [OK] to
finish.
To check the time
- Press [CLOCK/TIMER].
Note
- Reset the clock regularly to maintain accuracy.
- The clock is reset when there is a power failure or when the AC power supply cord is removed.
- Buttons vary by model
SC-PMX80
This is a 12-hour clock.
- Press [CLOCK/TIMER] to select
“CLOCK”.
- Within 20 seconds press the arrow up ▲ or down ▼ button to set the time.
- Press [OK] to
finish.
To check the time
- Press [CLOCK/TIMER].
Note
- Reset the clock regularly to maintain accuracy.
- The clock is reset when there is a power failure or when the AC power supply cord is removed.
- Buttons vary by model
SC-PMX9, SC-PMX90
This is a 12-hour clock.
- Press [CLOCK/TIMER] to select
“CLOCK”.
- Within 20 seconds press the arrow up ▲ or down ▼ button to set the time.
- Press [OK] to
finish.
To check the time
- Press [CLOCK/TIMER].
Note
- Reset the clock regularly to maintain accuracy.
- The clock is reset when there is a power failure or when the AC power supply cord is removed.
SC-RS50
This is a 12-hour clock.
- Press [CLOCK/TIMER] to select
“CLOCK”.
- Within 20 seconds press the arrow up ▲ or down ▼ button to set the time.
- Press [OK] to
finish.
To check the time
- Press [CLOCK/TIMER].
Note
- Reset the clock regularly to maintain accuracy.
- The clock is reset when there is a power failure or when the AC power supply cord is removed.
- Buttons vary by model
SC-UA3
This is a 12-hour clock.
To Set
- Press [SETUP] repeatedly to select "CLOCK".
- Press the arrow left ◄ or right ► button to to set the time.
- Press [OK].
To check the time
- Press [SETUP]. repeatedly to select "CLOCK" and then press [OK].
- In standby mode, press [DISPLAY].
Note:
- Reset the clock regularly to maintain accuracy.
SC-UA7
This is a 12-hour clock.
To Set
- Press [SETUP] repeatedly to select "CLOCK".
- Press the arrow up ▲ or down ▼ button to set the time and then press [OK].
To check the time
- Press [SETUP]. repeatedly to select "CLOCK" and then press [OK].
- In standby mode, press [DISPLAY].
Note:
- Reset the clock regularly to maintain accuracy.
SC-UX100
This is a 12-hour clock.
To Set
- Press [SETUP] repeatedly to select "CLOCK".
- Press the arrow up ▲ or down ▼ button to set the time and then press [OK].
To check the time
- Press [SETUP]. repeatedly to select "CLOCK" and then press [OK].
- In standby mode, press [DISPLAY].
Note:
- Reset the clock regularly to maintain accuracy.