


How to set up the Massage Lounger.
This answer provides information on setting up and installing most massage chairs. For more information on a specific model not listed refer to the operating instruction manual .
Model EP-MA70
Where to use the unit
- Keep at least 4 inches (10cm) away from the wall.
- Avoid places where the unit will be exposed to direct sunlight for long periods of time or places where it will be exposed to high temperatures, such as in front of a heater, etc., as this can cause discoloration or hardening of the leather.
- Placing a mat or cloth under the unit is recommended to prevent floor damage. The size of the mat should be sufficient [at least 47.2 in. × 27.5 in. (120 cm × 70 cm)] to cover the areas where the unit touches and where the legrest could touch the floor.
- Set the unit near a power outlet.
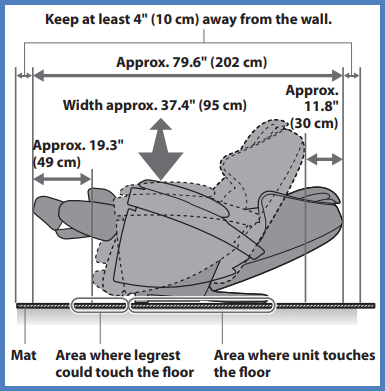
- Exact dimensions will vary depending on model. refer to the operating instructions for your model. Model shown is for EP-MA70.
Unpacking the unit
- Remove the top of the shipping container.
- Remove the packing and cushioning materials and take out all accessories.
- Remove everything from the box and install the unit.
- The unit is very heavy, be careful to avoid back injuries. (The unit must be carried by two or more people.)
- Hold onto the sides.
- Hold onto the sides of the legrest.
- Do not hold onto the front side. The sole massage section might slide, and injuries may occur.
- To put the unit down on the floor. Put the unit down slowly and carefully watch your step
- Put down the legrest by holding it with your hands until it has been set on the floor completely. If you release your hands before the legrest is fully extended, the legrest will forcefully return to the initial position.
- The floor may get damaged, so it is recommended to place a mat on the floor.
How to assemble the Massage Lounger
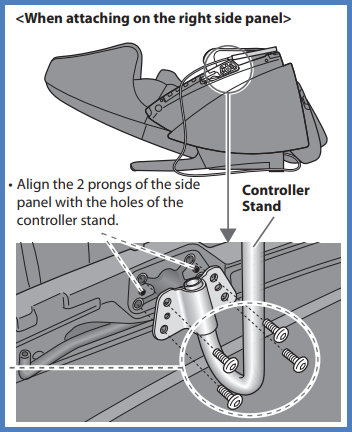
Attaching the Controller Stand
- The controller stand can attached to the right or left side panel of the unit.
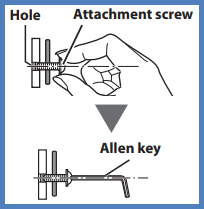
- Fasten the controller stand with the attachment screws. (4 positions)
- Tighten the 4 screws lightly using your fingers. (Make the screws level with the holes.)
- Tighten the screws firmly with the allen key. Screw may be damaged if you tighten the screw inserted into the hole crookedly using an allen key.
Note
- When attaching on the right side panel align the 2 prongs of the side panel with the holes of the controller stand.
Attach the Armrests
- Insert the armrest into the unit. “R” (right side) and “L” (left side) are indicated at the bottom of the armrest.
- Insert the armrest from the top aligning the arrow ▲ marks on the side of the armrest. Be careful to avoid pinching your fingers or the air plugs.
- Slide the armrest toward the front while pushing it downward.
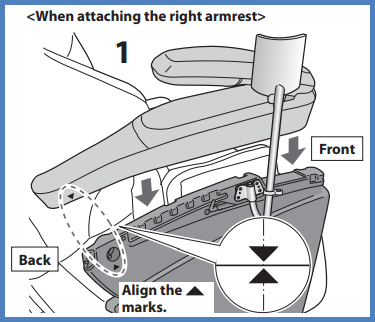
- Fasten the armrest with the attachment screws. (For model EP-MA73, one position for each side.) Put an attachment screw on the edge of the allen key and tighten the screw horizontally to the hole.
- Screw may be damaged if you tighten the screw inserted into the hole crookedly using an allen key.
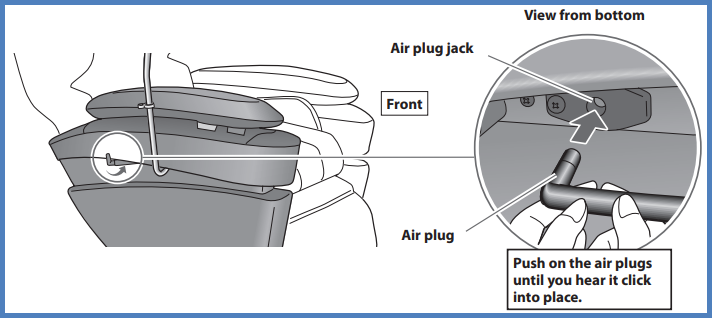
Connect the air plugs. (Both sides)
- Insert the air plugs into the air plug sockets on the lower part of the armrest. (Armrest massage will not operate unless the air plugs are inserted securely.)
- Follow the same step when connecting to the armrest on the left side.
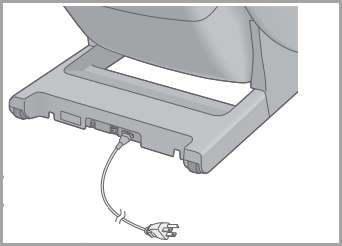
Connect the power cords to the unit.
- Check for dirt and damage on appliance inlet of the power switch section and the connector of the power cord.
- Insert the connector into the appliance inlet.
- Be sure to push the connector in all the way.

- Raise the backrest to the upright position.
- Insert the power plug into the power socket. For model EP-MA73, always be sure to insert into an AC 120 V plug.
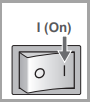
- Confirm the lock switch key is set to the "open" position.
- Confirm the power switch is set to the "on" position.
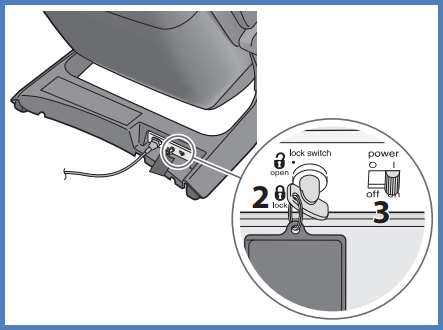
- Press the power button on the controller twice. Press once and then press again approx. 1 second later. Backrest will rise automatically.
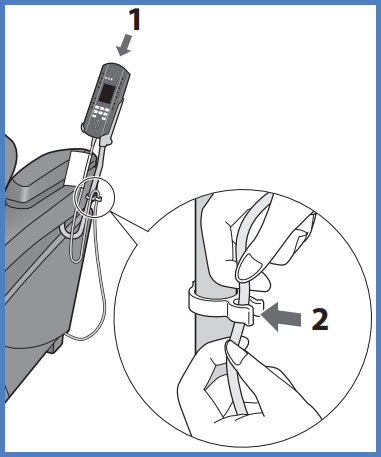
Placing the controller.
- Placw the controller into the controller stand.
- Fasten the controller cord using the clip. Fasten so the cable under the clip will not sag too much with the backrest raised. (Because there is a chance of your legs, etc., getting caught in the cord.)
The controller cord is fastened to the right side prior to leaving the factory. To use the controller stand on the left side:
- Run the controller cord to the left.
- Press the power button on the controller to turn on the power.
- Press the leg raise
 button on the controller and hold until the legrest has risen as far as it will go.
 - Continue pressing until a "beep-beep-beep" sound is heard.
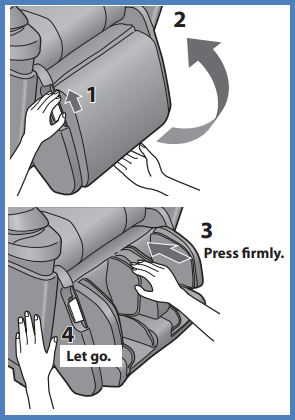
- Disconnect the controller cord. Hook is released by pressing on the tab on the fastening band with your fingers.
- Move the controller cord under the legrest to the left side.
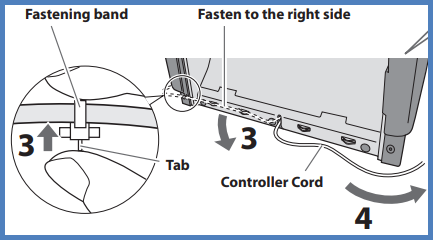
- Fasten the controller cord. Press down from the edge if it does not fit in easily.
- Insert the tip of the fastening band into the hole.
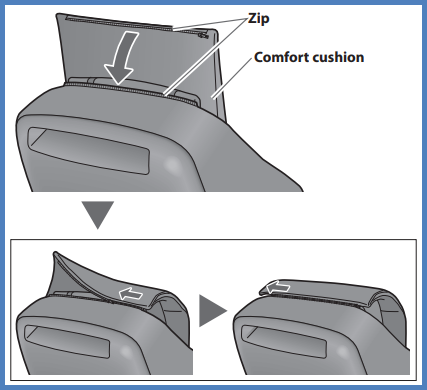
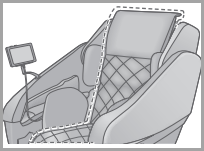
Fasten the pillow and the comfort cushion.
- Fasten the pillow using the fasteners.
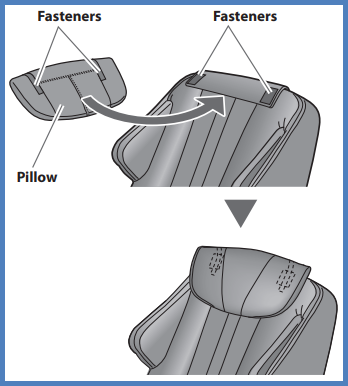
- Fasten the comfort cushion using the zip.
Before sitting down
Check the following before using this unit:
- Check the surrounding area.
- Make sure there are no objects, people, or pets in the vicinity of the unit.
- Check the power cord and the power plug. Be sure to push the connector all the way into the appliance inlet.
- Flip up the comfort cushion and deploy the leg/sole massage section.
- Do not massage with the comfort cushion still on the backrest.
How to deploy the leg, sole massage section
- Pull the release lever in the direction of the arrow.
- Rotate from the bottom.
- Rotate until it clicks into place.
- Release the lever.
- Check that the legrest does not rotate and is locked into place.
Check the unit.
- Make sure there are no tears or rips in the fabric.
- Make sure there is no foreign matter between the parts of the unit.
- Make sure the massage heads are in the retracted position. When the massage heads are not in the retracted position, press the power button twice to return the massage heads to the retracted position.
- Make sure the legrest is in the fully lowered position. When the legrest is not fully lowered, the legrest will lower by pressing on the power button twice.
- Check that the legrest does not rotate and is locked into place.
Adjust the pillow position.
- Remove the pillow.
- Adjust the height of the pillow so that the bottom edge is at ear level.
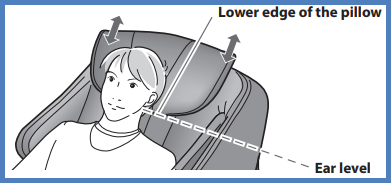
- If positioned too low, the pillow may interfere with a massage of the area around the neck.
- When the reclining angle changes, the position of the pillow may shift. In that case, readjust the position.
Adjust the sole massage.
- Slide the sole massage section to your preferred position. It will slide out up to 7.1 inches (18 cm).
- Push with your feet to slide the legrest out.
- Lift your soles slightly and the legrest returns.
Adjust the controller stand.
- Horizontal orientation can be adjusted.
Model EP-MA73
Where to use the unit
- Keep at least 4 inches (10cm) away from the wall.
- Avoid places where the unit will be exposed to direct sunlight for long periods of time or places where it will be exposed to high temperatures, such as in front of a heater, etc., as this can cause discoloration or hardening of the leather.
- Placing a mat or cloth under the unit is recommended to prevent floor damage. The size of the mat should be sufficient [at least 47.2 in. × 27.5 in. (120 cm × 70 cm)] to cover the areas where the unit touches and where the legrest could touch the floor.
- Set the unit near a power outlet.
- Exact dimensions will vary depending on model. refer to the operating instructions for your model. Model shown is for EP-MA70.
Unpacking the unit
- Remove the top of the shipping container.
- Remove the packing and cushioning materials and take out all accessories.
- Remove everything from the box and install the unit.
- The unit is very heavy, be careful to avoid back injuries. (The unit must be carried by two or more people.)
- Hold onto the sides.
- Hold onto the sides of the legrest.
- Do not hold onto the front side. The sole massage section might slide, and injuries may occur.
- To put the unit down on the floor. Put the unit down slowly and carefully watch your step
- Put down the legrest by holding it with your hands until it has been set on the floor completely. If you release your hands before the legrest is fully extended, the legrest will forcefully return to the initial position.
- The floor may get damaged, so it is recommended to place a mat on the floor.
How to assemble the Massage Lounger
Attaching the Controller Stand
- The controller stand can attached to the right or left side panel of the unit.
- Fasten the controller stand with the attachment screws. (4 positions)
- Tighten the 4 screws lightly using your fingers. (Make the screws level with the holes.)
- Tighten the screws firmly with the allen key. Screw may be damaged if you tighten the screw inserted into the hole crookedly using an allen key.
Note
- When attaching on the right side panel align the 2 prongs of the side panel with the holes of the controller stand.
Attach the Armrests
- Insert the armrest into the unit. “R” (right side) and “L” (left side) are indicated at the bottom of the armrest.
- Insert the armrest from the top aligning the arrow ▲ marks on the side of the armrest. Be careful to avoid pinching your fingers or the air plugs.
- Slide the armrest toward the front while pushing it downward.
- Fasten the armrest with the attachment screws. (For model EP-MA73, one position for each side.) Put an attachment screw on the edge of the allen key and tighten the screw horizontally to the hole.
- Screw may be damaged if you tighten the screw inserted into the hole crookedly using an allen key.
Connect the air plugs. (Both sides)
- Insert the air plugs into the air plug sockets on the lower part of the armrest. (Armrest massage will not operate unless the air plugs are inserted securely.)
- Follow the same step when connecting to the armrest on the left side.
Connect the power cords to the unit.
- Check for dirt and damage on appliance inlet of the power switch section and the connector of the power cord.
- Insert the connector into the appliance inlet.
- Be sure to push the connector in all the way.
- Raise the backrest to the upright position.
- Insert the power plug into the power socket. For model EP-MA73, always be sure to insert into an AC 120 V plug.
- Confirm the lock switch key is set to the "open" position.
- Confirm the power switch is set to the "on" position.
- Press the power button on the controller twice. Press once and then press again approx. 1 second later. Backrest will rise automatically.
Placing the controller.
- Placw the controller into the controller stand.
- Fasten the controller cord using the clip. Fasten so the cable under the clip will not sag too much with the backrest raised. (Because there is a chance of your legs, etc., getting caught in the cord.)
The controller cord is fastened to the right side prior to leaving the factory. To use the controller stand on the left side:
- Run the controller cord to the left.
- Press the power button on the controller to turn on the power.
- Press the leg raise button on the controller and hold until the legrest has risen as far as it will go.
- Continue pressing until a "beep-beep-beep" sound is heard.
- Disconnect the controller cord. Hook is released by pressing on the tab on the fastening band with your fingers.
- Move the controller cord under the legrest to the left side.
- Fasten the controller cord. Press down from the edge if it does not fit in easily.
- Insert the tip of the fastening band into the hole.
Fasten the pillow and the comfort cushion.
- Fasten the pillow using the fasteners.
- Fasten the comfort cushion using the zip.
Before sitting down
Check the following before using this unit:
- Check the surrounding area.
- Make sure there are no objects, people, or pets in the vicinity of the unit.
- Check the power cord and the power plug. Be sure to push the connector all the way into the appliance inlet.
- Flip up the comfort cushion and deploy the leg/sole massage section.
- Do not massage with the comfort cushion still on the backrest.
How to deploy the leg, sole massage section
- Pull the release lever in the direction of the arrow.
- Rotate from the bottom.
- Rotate until it clicks into place.
- Release the lever.
- Check that the legrest does not rotate and is locked into place.
Check the unit.
- Make sure there are no tears or rips in the fabric.
- Make sure there is no foreign matter between the parts of the unit.
- Make sure the massage heads are in the retracted position. When the massage heads are not in the retracted position, press the power button twice to return the massage heads to the retracted position.
- Make sure the legrest is in the fully lowered position. When the legrest is not fully lowered, the legrest will lower by pressing on the power button twice.
- Check that the legrest does not rotate and is locked into place.
Adjust the pillow position.
- Remove the pillow.
- Adjust the height of the pillow so that the bottom edge is at ear level.
- If positioned too low, the pillow may interfere with a massage of the area around the neck.
- When the reclining angle changes, the position of the pillow may shift. In that case, readjust the position.
Adjust the sole massage.
- Slide the sole massage section to your preferred position. It will slide out up to 7.1 inches (18 cm).
- Push with your feet to slide the legrest out.
- Lift your soles slightly and the legrest returns.
Adjust the controller stand.
- Horizontal orientation can be adjusted.
Model EP-MAG3
Where to use the unit
- Keep at least 4 inches (10cm) away from the wall.
- Avoid places where the unit will be exposed to direct sunlight for long periods of time or places where it will be exposed to high temperatures, such as in front of a heater, etc., as this can cause discoloration or hardening of the leather.
- Placing a mat or cloth under the unit is recommended to prevent floor damage. The size of the mat should be sufficient [at least 47.2 in. × 27.5 in. (120 cm × 70 cm)] to cover the areas where the unit touches and where the legrest could touch the floor.
- Set the unit near a power outlet.
- Exact dimensions will vary depending on model. refer to the operating instructions for your model. Model shown is for EP-MA70.
Unpacking the unit
- Remove the top of the shipping container.
- Remove the packing and cushioning materials and take out all accessories.
- Remove everything from the box and install the unit.
- The unit is very heavy, be careful to avoid back injuries. (The unit must be carried by two or more people.)
- Hold onto the sides.
- Hold onto the sides of the legrest.
- Do not hold onto the front side. The sole massage section might slide, and injuries may occur.
- To put the unit down on the floor. Put the unit down slowly and carefully watch your step
- Put down the legrest by holding it with your hands until it has been set on the floor completely. If you release your hands before the legrest is fully extended, the legrest will forcefully return to the initial position.
- The floor may get damaged, so it is recommended to place a mat on the floor.
How to assemble the Massage Lounger
Attaching the Controller Stand
- The controller stand can attached to the right or left side panel of the unit.
- Fasten the controller stand with the attachment screws. (4 positions)
- Tighten the 4 screws lightly using your fingers. (Make the screws level with the holes.)
- Tighten the screws firmly with the allen key. Screw may be damaged if you tighten the screw inserted into the hole crookedly using an allen key.
Note
- When attaching on the right side panel align the 2 prongs of the side panel with the holes of the controller stand.
Attach the Armrests
- Insert the armrest into the unit. “R” (right side) and “L” (left side) are indicated at the bottom of the armrest.
- Insert the armrest from the top aligning the arrow ▲ marks on the side of the armrest. Be careful to avoid pinching your fingers or the air plugs.
- Slide the armrest toward the front while pushing it downward.
- Fasten the armrest with the attachment screws. (For model EP-MA73, one position for each side.) Put an attachment screw on the edge of the allen key and tighten the screw horizontally to the hole.
- Screw may be damaged if you tighten the screw inserted into the hole crookedly using an allen key.
Connect the air plugs. (Both sides)
- Insert the air plugs into the air plug sockets on the lower part of the armrest. (Armrest massage will not operate unless the air plugs are inserted securely.)
- Follow the same step when connecting to the armrest on the left side.
Connect the power cords to the unit.
- Check for dirt and damage on appliance inlet of the power switch section and the connector of the power cord.
- Insert the connector into the appliance inlet.
- Be sure to push the connector in all the way.
- Raise the backrest to the upright position.
- Insert the power plug into the power socket. For model EP-MA73, always be sure to insert into an AC 120 V plug.
- Confirm the lock switch key is set to the "open" position.
- Confirm the power switch is set to the "on" position.
- Press the power button on the controller twice. Press once and then press again approx. 1 second later. Backrest will rise automatically.
Placing the controller.
- Placw the controller into the controller stand.
- Fasten the controller cord using the clip. Fasten so the cable under the clip will not sag too much with the backrest raised. (Because there is a chance of your legs, etc., getting caught in the cord.)
The controller cord is fastened to the right side prior to leaving the factory. To use the controller stand on the left side:
- Run the controller cord to the left.
- Press the power button on the controller to turn on the power.
- Press the leg raise button on the controller and hold until the legrest has risen as far as it will go.
- Continue pressing until a "beep-beep-beep" sound is heard.
- Disconnect the controller cord. Hook is released by pressing on the tab on the fastening band with your fingers.
- Move the controller cord under the legrest to the left side.
- Fasten the controller cord. Press down from the edge if it does not fit in easily.
- Insert the tip of the fastening band into the hole.
Fasten the pillow and the comfort cushion.
- Fasten the pillow using the fasteners.
- Fasten the comfort cushion using the zip.
Before sitting down
Check the following before using this unit:
- Check the surrounding area.
- Make sure there are no objects, people, or pets in the vicinity of the unit.
- Check the power cord and the power plug. Be sure to push the connector all the way into the appliance inlet.
- Flip up the comfort cushion and deploy the leg/sole massage section.
- Do not massage with the comfort cushion still on the backrest.
How to deploy the leg, sole massage section
- Pull the release lever in the direction of the arrow.
- Rotate from the bottom.
- Rotate until it clicks into place.
- Release the lever.
- Check that the legrest does not rotate and is locked into place.
Check the unit.
- Make sure there are no tears or rips in the fabric.
- Make sure there is no foreign matter between the parts of the unit.
- Make sure the massage heads are in the retracted position. When the massage heads are not in the retracted position, press the power button twice to return the massage heads to the retracted position.
- Make sure the legrest is in the fully lowered position. When the legrest is not fully lowered, the legrest will lower by pressing on the power button twice.
- Check that the legrest does not rotate and is locked into place.
Adjust the pillow position.
- Remove the pillow.
- Adjust the height of the pillow so that the bottom edge is at ear level.
- If positioned too low, the pillow may interfere with a massage of the area around the neck.
- When the reclining angle changes, the position of the pillow may shift. In that case, readjust the position.
Adjust the sole massage.
- Slide the sole massage section to your preferred position. It will slide out up to 7.1 inches (18 cm).
- Push with your feet to slide the legrest out.
- Lift your soles slightly and the legrest returns.
Adjust the controller stand.
- Horizontal orientation can be adjusted.
Model EP-MAN1K, EP-MAN1C
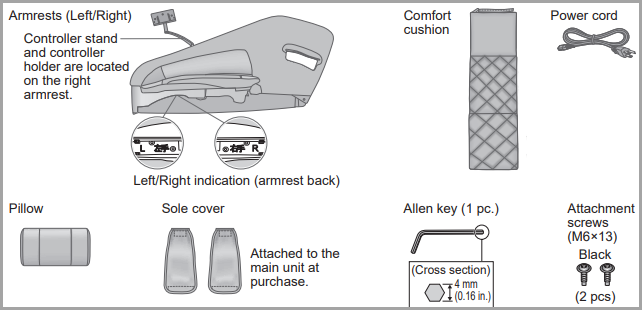
Checking the Accessory list
- Armrests (Left/Right)
- Controller Stand
- Controller Holder (located on the right armrest)
- Left/Right indication (armrest back)
- Comfort Cushion
- Power Cord
- Pillow
- Sole Cover (Attached to the main unit at purchase)
- Allen Key (1 pc.) (Cross section is 4mm in height (0.16 inches))
- Attachment Screws (M6x13) Black (2 pcs)
Where to use the unit.
- Ensure there is adequate space to recline. Unit body dimensions (Height approx. 122 cm (48.0 in.) × W2 width* approx. 85 cm (33.5 in.) × Depth* approx. 200 cm (78.7 in.))
- * When installing near a wall, etc. In the reclining state, make sure that the backrest and the legrest are separated from walls, etc., by 10 cm (3.9 in.) or more, and the armrest is separated from walls, etc., by 5 cm (2.0 in.) or more.
- Do not expose the massage lounger to direct sunlight or high temperatures, such as in front of heating sources. This can cause discoloration or hardening of the synthetic leather.
Installing
- Always carry the lounge with at least 2 or more people!
- Place your fingers in the groove.
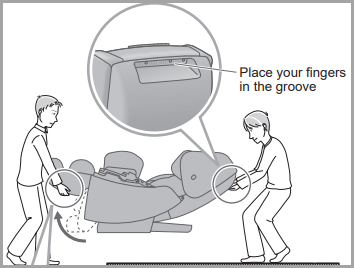
- Since the unit is heavy, be careful to avoid back injuries.(Unit weight Approx. 94 kg (207.2 lbs))
- Watch your step carefully and put down the unit slowly. Lay out a mat, etc. Since the unit may damage the flooring, it is recommended to place the unit on a mat. When placing a mat under the unit, the size of the mat should be sufficient (at least 130 cm × 70 cm (51.2 in. × 27.6 in)) to cover the areas where the unit touches and where the legrest could touch the floor.
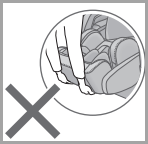
- Hold the sides of the legrest.
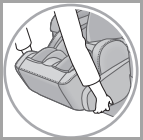
- Hold the legrest with your hands until it has been set on the floor completely.
- If you release the legrest too soon, it will spring back to the initial position
- Do not hold by the foot part. The sole massage section might slide, and injuries may occur.
- Turn on the power and raise the backrest to the upright position.
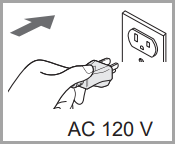
- Insert the power plug into the power outlet.
- Always be sure to insert into an AC 120 V plug. Watch your step to prevent tripping on power cord or the like.
- Always be sure to insert into an AC 120 V plug. Watch your step to prevent tripping on power cord or the like.
- Confirm the power switch is set to the "I" (On) position on th.e Massage chair body rear side
- Press
 on the controller twice
 - Press it once, and then press it again after the screen appears. Backrest will rise automatically
- Switch OFF the power. Set the power switch to the "O" (Off) position on the back of the main unit. Unplug the power plug from the wall socket. Warning
- After each massage, push the power switch on the unit backside to the "O" (Off) position and unplug the power plug.(To prevent breakage or injury from misuse by children.)
Assembly Instructions:
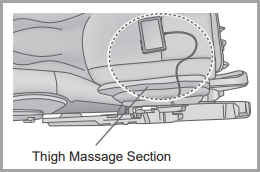
- Place the controller on the seat so that the controller cord passes over the thigh massage section. (Do not trap the controller cord when installing armrests)
- Check the "Right" and "Left" markings on the underside of the armrest and the hook catch part on the inside.
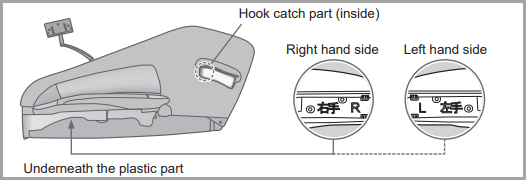
- Attach the right-hand side armrest to the main unit:
- Hold the part of the armrest on the right-hand side with both hands from the outside.
- Hook the inside hooks onto the hooks (blue) on the side of the main body and lower the armrests along the main body.
-
Make sure that the controller cord is not trapped.
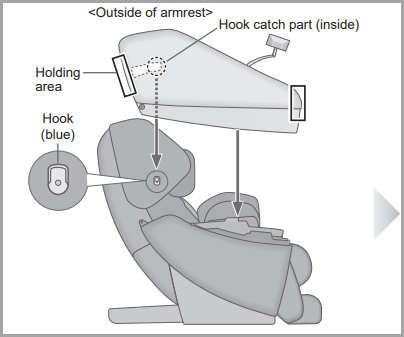
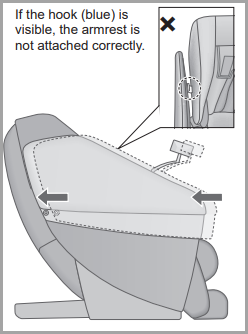
- Slide the armrests back. Make sure that the hooks (blue) on the side of the main unit are not visible through the gap between the main unit and the armrest.If the hook (blue) is visible, the armrest is not attached correctly.
- Check for misaligned screw holes and secure with mounting screws.
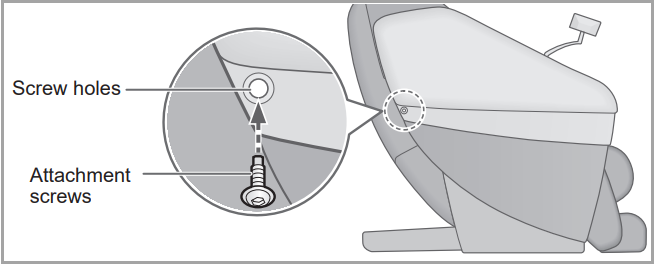
How to tighten the screws
- Place the screw on the tip of a allen key.
- Tighten the screw while ensuring that the screw hole and the screw head become flat.
- Screw may be damaged if you tighten the screw inserted into the hole crookedly using an allen key.
- Attaching the left hand side in the same way.
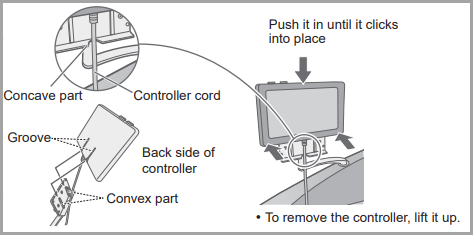
- Attach the controller to the controller holder.
 The controller stand and controller holder cannot be installed on the left armrest.
 - Insert the controller cord into the recess of the controller holder.
- Align the groove on the back of the controller horizontally with the convex part of the controller holder and slide it into place
Attaching the pillow
- Attach the pillow using the velcro fastener.
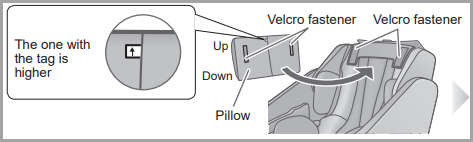 The Recommended position of the pillow when using the massage lounger.
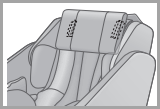
- Attaching the comfort cushion. Attach the cushion using the fastener.
- When the Comfort cushion is attached, the chair can be used as a chair.
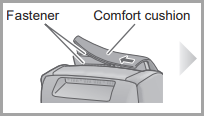
- When the Comfort cushion is attached, the chair can be used as a chair.