How to use the camera underwater. [ Underwater mode ] - DC-TS7
Applicable Shooting mode
Underwater Mode
This is optimal for recording images underwater at a depth exceeding 3 m (9.8 feet).
- Press [MODE].
- Press [▲ / ▼ / ◄ / ►] to select [Underwater Shooting Mode] and then press [MENU / SET].

Important Note:
- This camera’s waterproof/dustproof rating complies with the
“IPX8” and “IP6X” ratings. Provided the care and maintenance
guidelines described in this document are strictly followed,
this camera can operate underwater, to a depth not exceeding 31
m (102 feet) for a time not exceeding 60 minutes.
- This means that the camera can be used underwater for specified time in specified pressure in accordance with the handling method established by Panasonic.
- This does not guarantee no destruction, no malfunction, or waterproofing in all conditions.
- Waterproofing is not guaranteed if the unit is subject to an impact as a result of being hit or dropped etc. If an impact to the camera occurs, it should be inspected (subject to a fee) by Panasonic to verify that the waterproofing is still effective.
- Using the camera in environments where splashing with hot spring water, oil or alcohol is likely to occur may cause the water/dust resistance and impact resistance of the camera to deteriorate.
- When the camera is splashed with detergent, soap, hot spring, bath additive, sun oil, sun screen, chemical, etc., wipe it off immediately.
- Waterproof function of the camera is for sea water and fresh water only.
- Any malfunction caused by customer misuse, or mishandling will not be covered by the warranty.
- The inside of this unit is not waterproof. Water leakage will cause malfunction.
- Supplied accessories such as battery pack etc. are not waterproof (excluding hand strap).
- Card and battery are not waterproof. Do not handle with a wet hand. Also, do not insert wet card or battery into the camera.
- [Precautions] is displayed when this unit is turned on for the first time after purchase, with the side door completely closed.
- Please check beforehand to maintain the waterproof performance.
- The [Precautions] screen will be
displayed every time the camera is turned on if you select
[No] before displaying the screen, turn off
the camera while checking the screen, or press [MENU
/ SET] to force close the screen.
- Press [◄] to select [Yes], and press
[MENU / SET].
- The recording screen is displayed if you select [No].
- Press [◄ / ►] to change the screen.
- After the final screen (12 / 12), press [MENU / SET] to finish.
- Press [◄] to select [Yes], and press
[MENU / SET].
- When [MENU / SET] is pressed after the final screen (12 / 12), [Precautions] is not displayed from the next time this unit is turned on.
- This can also be viewed from [Precautions] in the [Setup] menu.
- Check that there are no foreign objects on the inner side
of the side door.
- If there is any foreign object, such as lint, hair, sand, etc., on the surrounding area, water will leak within a few seconds causing malfunction.
- Wipe it off with a soft, dry cloth if there is any liquid. It may cause water leaks and malfunction if you use the camera with liquid adhered.
- If foreign objects are present, wipe them off with a dry, lint-free cloth.
- Be extremely careful to remove the small sand etc. that may adhere to the sides and corners of the rubber seal.
- Check for cracks and deformation of the rubber seal on
the side door.
- The integrity of the rubber seals may decrease after
about 1 year, with use and age. To avoid permanently
damaging the camera, the seals should be replaced once
each year. Please contact a Panasonic authorized
servicentre for related costs and other information.
- For information on service select "Support Links" then "Service locator"
- The integrity of the rubber seals may decrease after
about 1 year, with use and age. To avoid permanently
damaging the camera, the seals should be replaced once
each year. Please contact a Panasonic authorized
servicentre for related costs and other information.
- Close the side door securely.
- Lock the [LOCK] switch securely until the red part is no longer visible.
- To prevent water intrusion, be careful not to catch foreign objects such as liquids, sand, hair, dust, or the strap cord.
- Use the camera underwater to 31 m (102 feet) with the water temperature between 0 °C and 40 °C (32 °F and 104 °F).
- Do not use the camera at a depth of over 31 m (102 feet).
- Do not use it in the hot water over 40 oC (104 oF) (in the bath or hot spring).
- Do not use the camera underwater for longer than 60 minutes continuously.
- Do not open or close the side door underwater.
- Do not apply shock to the camera underwater. Waterproof performance may not be maintained, and there is a chance of water leak.
- Do not dive into the water holding the camera. Do not use the camera in a location where the water will splash strongly, such as rapid flow or waterfall. It may cause malfunction.
- The camera will sink in the water. Take care not to drop the camera and lose it underwater by securely placing the strap around your wrist or similar measure.
- Make sure to clean the camera after using it.
- Thoroughly wipe off any water droplets, sand, and saline matter on your hands, body, hair, etc.
- It is recommended to clean the camera indoors, avoiding places where water spray or sand may fall.
- After using it underwater, always clean the camera rather
than leaving it in a dirty state.
- Leaving the camera with foreign objects or saline matter on it may cause damage, discoloration, corrosion, unusual odour, or deterioration of the waterproof performance.
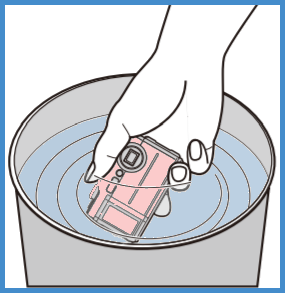
- Rinse with fresh water with the side door closed.
- After use at the seaside or underwater, soak the unit in fresh water pooled in a shallow container for 10 minutes or less.
- Do not use chemicals such as benzine, thinner, alcohol or cleanser, soap or detergents.
- If the diopter adjustment dial, shutter button, the camera [ON / OFF] button or other parts are not moving smoothly, there may be trapped foreign objects. As continued use may cause these parts to get stuck or cause other malfunctions, shake the camera in fresh water to wash off any foreign objects. After that, check that the parts of the camera are moving smoothly.
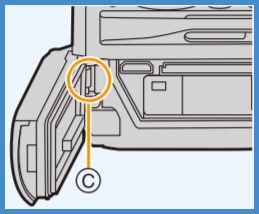
- Bubbles may come out of the drainage hole when you immerse the camera in water, but this is not a malfunction.
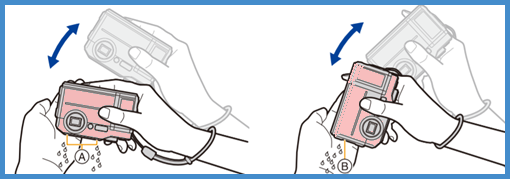
- Tap the camera lightly against your palm while holding it
upside down and then with the illustrated side facing down,
and then wipe off the water droplets with a soft, dry cloth.
- Repeat this step a few times if water is left in the microphone or speaker hole.
- Fasten the strap firmly to your wrist to avoid
dropping the camera.
- Dry the camera by standing it on a dry cloth in a well
ventilated shaded area.
- This unit incorporates drain design, draining water in gaps in the camera [ON / OFF] button and zoom button etc.
- Do not dry the camera with hot air from dryer or similar. Waterproof performance will deteriorate due to deformation.
- Confirm that there are no water droplets, open the side
door, and wipe off any water droplets or sand left inside
using a soft, dry cloth.
- Water droplets may adhere to the card or battery when the side door is opened without thoroughly drying. Also, water may accumulate in the gap around the card/battery slot or the terminal connector. Be sure to wipe any water off with a soft, dry cloth.
- The water droplets may seep into the camera when the side door is closed while it is still wet, causing condensation or failure.
Handling of the camera
About the [Precautions] display
Check before using underwater
Do not open or close the side door in places with sand and dust, close to water, or with wet hands. Sand or dust adhering may cause water leaks.
Using the camera underwater
Caring for the camera after using it underwater
Do not open or close the side door until the sand and dust is removed by rinsing the camera with water.
Salt Residue
When particles such as salt residues from seawater are adhering to the camera, the arm of the side door and various other components may whiten. Use damp cotton swabs or similar to wipe until the whitened part is removed.