


How to use the telephone answering machine.
The following instructions about the operation of a Panasonic Answering machine applies to most models.
Select your model from the list below for specific operation instructions. If your model is not listed or for specific models instructions Refer to your models Operating Manual.
Answering System (Machine) vs Voicemail
Using a Panasonic telephone, you can receive two different types of voice messages:
(1) Answering System (Machine) Messages
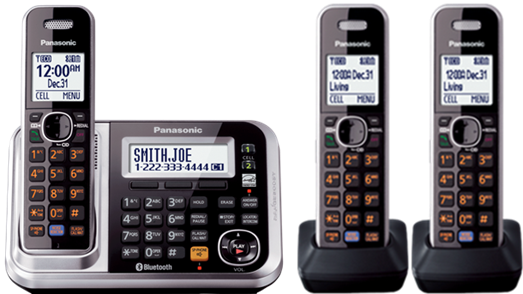
An answering machine message is stored on your telephone’s built-in recording device. When you have a new answering machine message:
- New messages/play indicator will flash on the base.
- “New message” will be displayed on the handset.
- Press [ MENU # 3 2 3 ] on the handset or [ PLAY/STOP ] on the base to listen.
(2) Voicemail Messages
Voicemail Is a service offered by your telephone provider. Messages are stored in their system and accessed remotely. When you have a new voicemail:
- “New Voice Mail”, “Voice mail msg. via phone co.” or a voicemail icon will be displayed on the handset.
- Typically you will need to dial an access number given to you by your telephone service provider, followed by a security code or PIN number. Contact your telephone service provider for specific access instructions.
- Your Panasonic telephone will allow you to store your access number and PIN for convenience.
Note: Because telephone service providers sometimes bundle services, you may not receive an indicator on your telephone when you have a voicemail. In this case, you will need to contact your telephone service provider to see what services you have and how to access them.
Use Voicemail instead of your answering machine
At any time you can turn off your answering machine and utilize only voicemail.
Use your Answering machine instead of Voicemail
Contact your telephone service provider to disable your voicemail service.
Use both your Answering machine and Voicemail
In this case, if you are on a call or the answering machine is already recording a message and you receive another call, the third caller is able to leave a voicemail message. If you are not on a call or the answering machine is not recording a message, the caller can leave a message on the answering machine
- Contact your telephone service provider to learn how to program your voicemail settings.
- Set your answering machine to answer calls at least 2 rings earlier than your voicemail (i.e. if your telephone provider tells you that voicemail is set to answer after 6 rings, set your answering machine to 4 rings). Some providers program voicemail based on a time delay in seconds rather than rings. In this case, use 6 seconds per ring as the standard when setting the answering machine ring count.
- Your Panasonic telephone will allow you to store your access number and PIN for convenience.
How to turn the Answering Machine On
On the Base unit
Press the [ Answer ON/OFF ] button.
On a handset
To turn on
- Press [ MENU # 3 2 7 ].
- Press [ ON ]
To turn off
- Press [ MENU # 3 2 8 ].
- Press [ OFF ]
Note: When the answering system is turned on an answer on indicator ![]() or answer on light is displayed.
or answer on light is displayed.
How to Set the Ring Count
You can adjust the ring count on your phone before built in answering machine picks up.
On the Handset
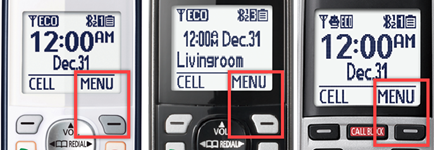
Examples of Menu Button Location
- Press [ MENU # 2 1 1 ].
- Press the arrow up ▲ or down ▼ button to select the desired ring count. The ring count before the unit answers can be set at 2 to 7 rings, or “Toll saver”. The default setting is “4”.
- Press [ SAVE ].
- Press [ OFF ].
When “Toll saver” is selected, the unit’s answering system answers at the end of 2nd ring when new messages have been recorded, or at the end of the 5th ring when there are no new messages. If you call your phone from outside to listen to new messages, you know that there are no new messages when the phone rings for the 3rd time. You can then hang up without being charged for the call.
Example of programming, model in video KX-TGD59x series buttons and displays vary by model.
How to Record A Greeting Message
Your own greeting message can be set up through the handset only. To record the greeting message;
- Press [ MENU # 3 0 2 ].
- Press the arrow up ▲ or down ▼ button to select " YES ".
- Press [ SELECT ]. After a beep sounds, hold the handset about 20 cm (8 inches) away and speak clearly into the microphone (2 minutes max).
- Press [ STOP ] to complete the recording.
- Press [ OFF ] or [ EXIT ]
Example of programming, buttons and displays vary by model.
Model shown is for models using handset KX-TGFA30
How to use the Default (Pre-recorded) Greeting Message
If you erase or do not record your own greeting message, the unit plays a pre-recorded greeting asking callers to leave a message. If you want to use a pre-recorded greeting message once you record your own greeting message, you need to erase your own greeting message.
- On the handset press [ MENU # 3 0 4 ].
- Press [ YES ].
- Press [ OFF ] or [ EXIT ].
Example of programming, buttons and displays vary by model.
How To Remotely Access Recorded Messages
Using a touch-tone phone, you can call your phone number from outside and access the unit to listen to messages or change answering system settings. The unit’s voice guidance prompts you to press certain dial keys to perform different operations.
A 3-digit remote access code must be entered when operating the answering system remotely. This code prevents unauthorized parties from listening to your messages remotely. To prevent unauthorized access to this product, we recommend that you regularly change the remote code.
The default code for accessing the answering machine remotely is "111". To program your own code, perform the following steps on the handset or the base unit;
Examples of Menu Button Location
- Press [ MENU # 3 0 6 ].
- Enter the desired 3-digit remote access code.
- Select [ SAVE ].
- Press [ OFF ].
Please note that the remote code can only be changed using the Panasonic phone and cannot be changed remotely.
Using the answering system remotely
- Dial your phone number from a touch-tone phone.
- After the greeting message starts, enter your remote access code.
- Follow the voice guidance prompts as necessary or control the unit using remote commands.
- When finished, hang up.
Example of programming, buttons and displays vary by model.
How to turn off Call screening
This feature allows you to monitor a message from the handset's speaker when the answering system is recording a message. The default setting is "On".
Single line telephones - Call screening on handset
On the handset
- Press [ MENU # 3 1 0 ].
- Press the arrow up ▲ or down ▼ button to to select "OFF".
- Press [ SAVE ].
- Press [ OFF].
Single line telephones - Call screening on Base Unit
On the handset
- Press [ MENU # * 3 1 0 ].
- Press the arrow up ▲ or down ▼ button to to select " OFF ".
- Press [ SAVE ].
- Press [ OFF ].
Dual line telephones - Call screening on handset
On the handset
- To turn off line 1, Press [ MENU # * 3 1 0 1 ]. To turn off line 2, Press [ MENU # * 3 1 0 2 ].
- Press the arrow up ▲ or down ▼ button to to select " OFF ".
- Press [ SAVE ].
- Press [ OFF ].
How to listen to messages
When new messages have been recorded the message indicator to the base unit flashes and "New Message" is displayed.
From the Base unit
- Press the Play
 button.
- During playback, the message indicator ► on the base unit lights.
- If new messages have been recorded, the base unit plays back new messages.
- If there are no new messages, the base unit plays back all messages.
Operating the answering system during playback
| Key | Operation |
|---|---|
| Arrow up ▲ or down ▼ | Adjust the speaker volume |
|
|
Repeat the message. If pressed within the first 5 seconds of a message, the previous message is played. |
|
|
Skip message |
|
|
Stop Playback |
| [ ERASE ] | Erase currently playing message. |
Listening to messages on the handset
When new messages have been recorded, “New message” is displayed.
- To listen to New messages, Press [ MENU # 3 2 3 ].
- To listen to All messages, Press [ MENU # 3 2 4 ].
- When finished Press [ OFF ]
Operating the answering system during playback
| Key | Operation |
|---|---|
| Arrow up ▲ or down ▼ | Adjust the receiver/speaker volume (during playback). |
| [ 1 ] or arrow left ◄ | Repeat message during playback. If pressed within the first 5 seconds of a message, the previous message is played. |
| [ 2 ] or arrow right ► | Skip message during playback. |
| [ 4 ] | Play New messages |
| [ 5 ] | Play All messages |
| [ * 4 ] | Erase currently playing message |
| [ * 5 ] | Erase all messages |
How to erase Messages
The following information applies to single line telephones. For multi-line telephones Refer to your models Operating Manual.
On the Base unit.
- To erase individual messages during playback press the [ ERASE ] button.
- To erase all messages while the unit is not in use press the [ ERASE ] button twice.
Note: [ ERASE ] button may also be labeled as [ ERASE/MUTE ] or [ X ].
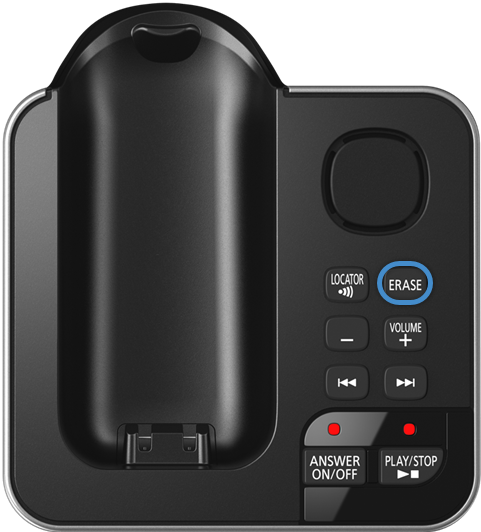
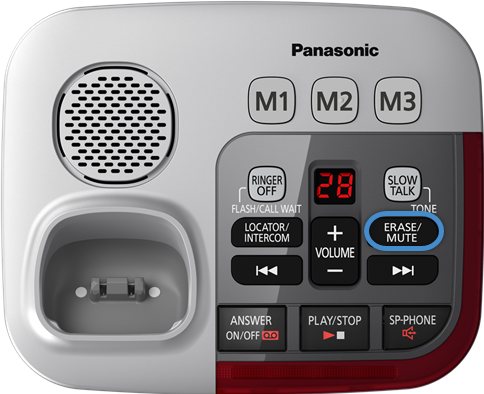
Models shown KX-TGD390 and KX-TGM450 - button location varies by model.
Using the handset
- To erase individual messages during playback on the handset press [ * (asterisk) 4 ].
- To erase all messages during playback on the handset press [ * (asterisk) 5 ].