Speakers and AC power supply connections for model SU-G700M2
Speaker/AC power supply cord
- Use only the supplied AC power supply cord.
- Insert the plugs of the cables to be connected all the way in.
- Do not bend cables at sharp angles.
- This unit can measure the output signal of the amplifier and correct its output to make the optimum adjustment of speaker output.
- To optimize the audio output from the speakers, you can measure the amplifier output signal and correct its output when it is connected to the speakers.
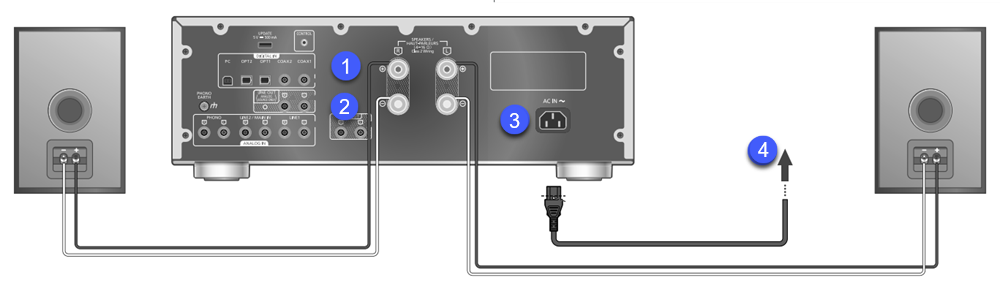
Note: Speaker cables are not supplied
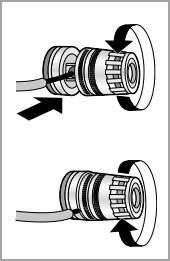
Speaker Connection
- Turn the knobs to loosen them, and insert the core wires into the holes
- Tighten the knobs.
Notes
- When the connections are completed, pull the speaker cables lightly to check that they are connected firmly.
- Be careful not to cross (short-circuit) or reverse the polarity of the speaker wires as doing so
may damage the amplifier.
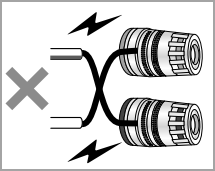
- Wire the polarity (+/-) of the terminals correctly.
Not doing so may adversely affect stereo effects or cause malfunction. - For details, refer to the operating instructions of the speakers.
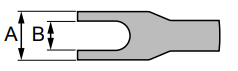
- Though the spade plug (A: 16 mm (5 /8 ”) or less,
B: 8 mm (5 /16 ”) or more) can be connected, some plug may not be connected depending on the shape of plug.
AC power supply cord connection
Connect only after all other connections are completed.
Note: This unit consumes a small amount of AC power even when the unit is in standby mode. Remove the plug from the main electrical outlet if you will not be using the unit for an extended period of time. Place the unit so the plug can be easily removed.
- Insert the AC power supply cord up to a point just before the round hole.
- Connect to a household AC outlet.