


Troubleshooting - Television - No picture, picture problems.
Picture problems maybe caused by the Television or external devices. To determine if the source of the problem is the Television or the external device select a description of the picture problem the Television is experiencing.
The following are picture troubleshooting questions for most models. Refer to your models Operating Manual for specific information.
The color contrast on the television appears to be off.
If the color contrast appears to be off check the following.
- Ensure all connections are correct and secure. Especially check for Component and Video connection since these terminals are shared.
- When using an external video source, such as a Cable/Satellite box or DVD player, check that the device is on and functioning correctly.
- Try viewing a picture from another device, such as a DVD player or a game console, to narrow down the source of the problem.
- Check if electrical products such as kitchen appliances, florescent lights or light dimmers are nearby. They may interfere with the TV's picture.
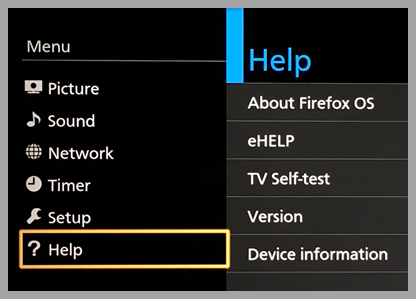
For television models with the "Help" Menu option, perform a " TV Self-Test " to verify proper function of the TV for picture and sound.
Screen shots vary by model series, features & software version.
To access the televison self test mode,
- Press [ MENU ]
- Scroll to [ HELP ] and press [ OK ]
- Scroll to [ TV Self Test ] and press [ OK ]
- View this video for a demo of the TV Self Test.
If the test picture shows correctly, then the problem is with the external device (ex. Cable box, DVD player, etc.) or its connection to the TV.
No picture or sound with Satellite/Cable Box.
Please perform the following troubleshooting steps in the order presented.
- Verify that the Satellite or Cable box is properly connected to the TV (HDMI, Component, Video or for some models Y/Video).
- For models with a component/video adaptor make sure that the device is connected correctly to the TV's Video/Component green connector.
- Please confirm that the red composite cable is connected into the R audio input.
- When using the red component cable, confirm that it is connected in the red input labeled PR/CR.
- Turn the box on and press the [ INPUT ] button on the TV's remote. Select the input that matches the connection name plugged into the TV from the above Inputs (example: Component, HDMI 1, HDMI2, HDMI3, HDMI4, AV 1/Video1, AV 2/Video2 etc.).
- If problem persists, restart your Satellite or Cable box: - Turn off your box. - Unplug the power cord. - Wait 30 seconds. - Plug the power cord back in and wait for the box to restart.
- Check that the external device is on and functioning correctly.
- Try viewing a picture from another device, such as a DVD player or a game console, to narrow down the source of the problem to ensure that it is not a problem with the connected device.
- To ensure that it is not a problem with the cables used, test with different cables.
Testing with different cables
- If connected Via HDMI verify the HDMI version by pressing [ MENU ].
- Select " SETUP " and then press [ OK ] or [►] to enter.
- Select " SYSTEM " and press [ OK ].
- Select " Other Settings ".
- Select HDMI EDID and press [ OK ]. Select the HDMI version: HDMI 2.0 or HDMI 1.4. Select the version based on your external source HDMI version of it's HDMI output. To confirm the HDMI version of your external device contact the manufacture of the product to confirm.
Models with Help Menu
For the models with the following screen shot perform a " TV Self-Test " to verify proper function of the TV for picture and sound.
Screen shots vary by model series, features & software version.
To access the televison self test mode,
- Press [ MENU ]
- Scroll to [ HELP ] and press [ OK ]
- Scroll to [ TV Self Test ] and press [ OK ]
- View this video for a demo of the TV Self Test.
Screen shots vary by model series, features & software version.
If the test picture shows correctly , then the problem is with the external device (ex. Cable box, DVD player, etc.) or its connection to the TV.
Perform the following troubleshooting steps in the order presented.
- Check that the external device is on and functioning correctly.
- Try viewing a picture from another device, such as a DVD player or a game console, to narrow down the source of the problem.
This answer applies to most models. For more specific information refer to your models Operating instructions .
No picture, blue, black, snowy screen.
Please perform the following troubleshooting steps in the order presented.
- Check if the power cord is plugged in and the TV is turned on (front red LED light should be on ; not blinking)
- Press the " INPUT " button on the remote to select the correct input source.
- Ensure all connections are correct and secure. Especially check for Component and Video connection since these terminals are shared.
- When using an external video source, such as a Cable/Satellite box or DVD player, check that the device is on and functioning correctly.
- Press " MENU " on the TV’s remote control. If the menu is displayed, then the TV is working, recheck the above steps.
For television models with the "Help" Menu option, perform a " TV Self-Test " to verify proper function of the TV for picture and sound.
Screen shots vary by model series, features & software version.
To access the televsion self test mode,
- Press [ MENU ]
- Scroll to [ HELP ] and press [ OK ]
- Scroll to [ TV Self Test ] and press [ OK ]
View this video for a demo of the TV Self Test.
If the test picture shows correctly , then the problem is with the external device (ex. Cable box, DVD player, etc.) or its connection to the TV. (refer to the suggestions above)
This answer applies to most models. For more specific information refer to your models Operating instructions .
No picture or unusual when connected via HDMI.
Please perform the following troubleshooting steps in the order presented for no picture or unsual picture.
- Turn the TV and equipment off, then turn them on again. Check if the power cord is plugged in and the TV is turned on (front red LED light should be on, not blinking).
- Ensure the HDMI connection is correct and secure.
- Press the [ INPUT ] button on the remote to select the correct input source.
- When using an external video source, such as a Cable/Satellite box or DVD player, check that the device is on and functioning correctly.
- Test with a different external device such as a DVD player or a game console, to verify the picture.
- Test with a different HDMI cable. Turn the television and external device off, disconnect and reconnect the new HDMI cable, turn the units back on and try again.
- Use equipment compliant with EIA/CEA-861/861D.
- Set HDMI auto setting in the Setup Menu to Mode1.
Television models with the "Help" Menu option
Perform a " TV Self-Test " to verify proper function of the TV for picture and sound.
Image vary by model, features & software version.
To access the televison self test mode
- Press [ MENU ]
- Scroll to [ HELP ] and press [ OK ]
- Scroll to [ TV Self Test ] and press [ OK ]
- View this video for a demo of the TV Self Test.
If the test picture shows correctly , then the problem is with the external device (ex. Cable box, DVD player, etc.) or its connection to the TV.
Models with HDMI 2.0 menu settings
- Set " HDMI 2.0 Setting " in the Setup Menu to " 4K@60Hz 4:2:0 ".
- Press [ Menu ].
- Select " Setup " and press [ OK ].
- Select " HDMI 2.0 Setting " and press [ OK ].
- Select " 4K@60Hz 4:2:0 " and press [ OK ].
- Press [ Exit ] to return to video display.
- For 4K models the valid 4K format varies depending on the HDMI terminal.
Models with HDMI EDID menu setting
- If connected Via HDMI verify the HDMI version by pressing [ MENU ].
- Select " SETUP " and then press [ OK ] or [►] to enter.
- Select " SYSTEM " and press [ OK ].
- Select " Other Settings ".
- Select HDMI EDID and press [ OK ].
- Select the HDMI version to HDMI 2.0 or HDMI 1.4.
- Select the version based on your external source HDMI version of it's HDMI output. To confirm the HDMI version of your external device contact the manufacture of the product to confirm.
This answer applies to most models. For more specific information refer to your models Operating instructions .
No picture, remote response and LED light blinking.
Please perform the following troubleshooting steps in the order presented.
When the power light is flashing this indicates that your television has an internal failure.
- Unplug all cables.
- Unplug the TV's power cord for 60 seconds.
- Power the TV using a different power outlet. Do not use a power strip or surge protector.
If the unit powers back on and the power light is steady, you may have had a temporary power fluctuation.
If the problem persists, contact a Panasonic Authorized Servicentre.
- To find a servicecenter near you, visit our US Service Locator
- To find a servicecenter near you, visit our Canada Service Locator
Note:
Count how many times the LED light blinks. This can help a technician troubleshoot the problem.
View this video on how to troubleshoot a blinking power indicator on the TV.This answer applies to most models. For more specific information refer to your models Operating instructions .
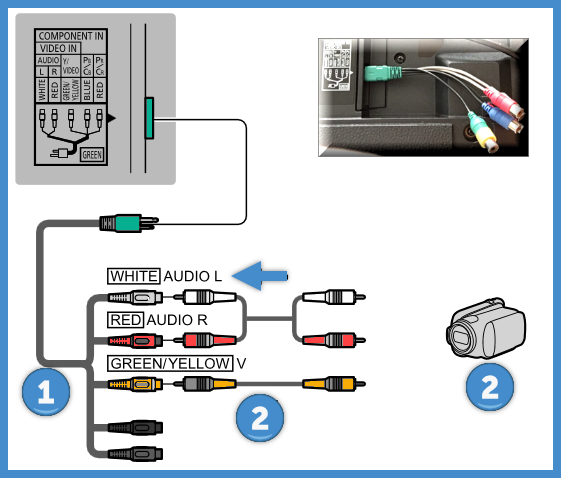
No Picture when using the component/video adapter or composite (yellow cable) / component (green cable) video input.
- Make sure that the yellow composite or green component cable is plugged into the green connection, labeled Y/VIDEO , on the back of the TV.
- For models with a component/video adaptor make sure that the device is connected correctly to the TV's Video/Component green connector.
- Please confirm that the red composite cable is connected into the R audio input.
- When using the red component cable, confirm that it is connected in the red input labeled PR/CR.
- If using VIDEO or Component make sure to select the corresponding input.
- Press [ INPUT ].
- Scroll to [ AV ]
- Press [ ◄ / ► ] or [▲ / ▼] to select Video or component.
- Check that the external device is on and functioning correctly.
- Try viewing a picture from another device, such as a DVD player or a game console, to narrow down the source of the problem.
- Also, ensure that the appropriate input is selected in the TV's input select list.
Note:
If there is an orange connection on the back of the TV this is for audio output.
For television models with the "Help" Menu option, perform a " TV Self-Test " to verify proper function of the TV for picture and sound.
Screen shots vary by model series, features & software version.
For the models with the following screen shot perform a " TV Self-Test " to verify proper function of the TV for picture and sound.
To access the televison self test mode,
- Press [ MENU ]
- Scroll to [ HELP ] and press [ OK ]
- Scroll to [ TV Self Test ] and press [ OK ]
- View this video for a demo of the TV Self Test.
Screen shots vary by model series, features & software version.
If the test picture shows correctly, then the problem is with the external device (ex. Cable box, DVD player, etc.) or its connection to the TV.
- Check that the external device is on and functioning correctly.
- Try viewing a picture from another device, such as a DVD player or a game console, to narrow down the source of the problem.
Picture displays in black and white.
Please perform the following troubleshooting steps in the order presented.
For models with "TV Self-Test" modes you can verify any picture and/or audio problems performing this "TV Self-Test" mode to confirm the proper function of the TV for picture and sound. It your television does not have TV Self-Test please skip steps 1 to 3 and verify the suggested Troubleshooting .
To access the televison self test mode,
- Press [ MENU ]. (screen shots vary by model)
- Select " HELP" and press [ OK ].
- Select " TV Self Test " and press [ OK ].
View this video for a demo of the TV Self Test.
If the test picture shows correctly , then the problem is with the external device (ex. Cable box, DVD player, etc.) or its connection to the TV.
Troubleshooting
- Ensure all connections are correct and secure. Especially check for Component and Video connection since these terminals are shared. When composite or component connections are connected in the wrong input it will output in a black and white picture. How to connect an analogue device
- When using an external video source, such as a Cable/Satellite box or DVD player, check that the device is on and functioning correctly.
- Try viewing a picture from another device, such as a DVD player or a game console, to narrow down the source of the problem.
- Check if electrical products such as kitchen appliances, florescent lights or light dimmers are nearby. They may interfere with the TV's picture.
This answer applies to most models. For more specific information refer to your models Operating instructions .
Picture has black bars on the screen
Black bars on top and bottom
Most movies are filmed in a format wider than your TV's 16:9 aspect ratio. Some discs adjust the picture to eliminate the borders while other discs keep the film's original format.
When the disc's content is in wide-screen format, then black bars are displayed at the top and bottom of the picture.
Black bars on Left/Right:
Older content is filmed in 4:3 (old TV) format. When playing 4:3 content on your HD TV set, black bars are displayed on each side of the screen. To eliminate the side bars, change your TV's FORMAT (aspect) settings. For example, Panasonic TV's have a format mode called "JUST" which is specially designed to stretch a 4:3 image to fill the screen.
Press the [ FORMAT ] or [ ASPECT ] button on the TV remote to remove the black bars from the top and bottom . The option available to remove the horizontal bars is " Zoom " .
View this video for understanding aspect Ratio.
Note: If bars remain.
- Check the aspect settings on your external video source, such as Cable/ Satellite box, DVD/Blu-ray Disc player, etc.
- Some content, such as film-based movies, are available in extra-wide format. Top and bottom bars are unavoidable
Picture has a black box on the screen.
Check to see if Closed Caption (CC) is turned on.
Setting Closed Caption to OFF (setup may vary by model choose the method setup suitable to your model)
The television includes a built-in decoder that is capable of providing a text display of the audio. The program being viewed must be transmitting the Closed Caption (CC) information.
- The settings are “ Analog ” or “ Digital ” depending on the broadcaster.
Method 1
- Press [ MENU ] on the remote control.
- Press [▲]/[▼] to select " Setup " and press [ OK ]/[►].
- Press [◄]/[►] to select " SYSTEM " and press [ OK ].
- Press [▲] or [▼] to select " Closed Caption " and press [ OK ].
- Press [▲] or [▼] to select " Basic Selection " and press [ OK ].
- Select " CC1 " press [ OK ].
- Press [ BACK] and select CC Mode.
- Select " Off ".
Method 2
- Press [ MENU ] on the remote control.
- Press [▲]/[▼] to select " Setup " and press [ OK ].
- Press [▲]/[▼] to select " CC " and press [ OK ].
- Select mode and press [►] to select " On ".
- Press [ OK ].
Method 3
Closed caption is set to text. Set Closed caption off to eliminate the black box.
- Press [ MENU ].
- Press [▼] to select " Setup " and press [ OK ].
- Press [▼] and select " Caption " and press [ OK ]
- Select " Analog Closed Caption " and press [ OK ].
- Press [▼] to select " Off " and press [ OK ].
Method 4
- Press [ MENU ] on the remote control.
- Press [▲] or [▼] to select " Setup ".
- Press [ OK ].
- Press [▲] or [▼] to select " Display customization " press [ OK ].
- Press [▲] or [▼] to select " Closed Caption " press [ OK ].
- Press [▲] or [▼] to select " Mode " press [ OK ].
- Press [▲] or [▼] to select " Off " press [ OK ].
- Press [ EXIT ] to end programming.
For more information on the Closed Caption feature refer to your products Instruction manual.
Picture has a scrolling/moving line/bar on the screen.
A horizontal scrolling/moving line/bar is usually caused by a ground fault and is not a fault with your television.
Possible causes:
- If you have a cable box connected, disconnect the cable box and see if the problem persists (make sure there is no coaxial connection to the TV as well as no composite/component/ HDMI/etc.) If you have a DVD player, connect only the DVD player and test the television.
- If the problem persists, one of the devices connected to the TV may not be properly grounded or it could be in your electrical in your home (or hopefully only on that outlet). You can use an extension cord to test the television on other outlets in your home. If you are using a surge protector, do not use it during your tests.
- If the problem was the cable box, contact your cable company. If the problem remains electrical, you can see if a line conditioner will help (discuss this with your dealer), or else you may need to contact an electrician.
For television models with the "Help" Menu option, perform a " TV Self-Test " to verify proper function of the TV for picture and sound.
Screen shots vary by model series, features & software version. Refer to your models Operating Manual for more information.
To access the televison self test mode,
- Press [ MENU ]
- Scroll to [ HELP ] and press [ OK ]
- Scroll to [ TV Self Test ] and press [ OK ]
View this video for a demo of the TV Self Test.
View this video for a demo of the TV Self Test.
If the test picture shows correctly, then the problem is not with the television.
There is a short black image on the screen.
A black image is displayed to avoid picture distortion when an input signal changes.
Picture is chaotic, torn and with a buzz in the speakers.
Please perform the following troubleshooting steps in the order presented.
For models with "TV Self-Test" modes you can verify any picture and/or audio problems performing this "TV Self-Test" mode to confirm the proper function of the TV for picture and sound. It your television does not have TV Self-Test please skip steps 1 to 3 and verify the suggested Troubleshooting .
To access the televison self test mode,
- Press [ MENU ]. Image varies by model
- Press [▲] [▼] to select " Help " and press [ OK ].
- Press [▲] [▼] to select `` TV Self Test and press [ OK ].
View this video for a demo of the TV Self Test.
View this video for a demo of the TV Self Test.
If the test picture shows correctly , then the problem is with the external device (ex. Cable box, DVD player, etc.) or its connection to the TV.
Troubleshooting
- Ensure all connections are correct and secure. Especially check for Component and Video connection since these terminals are shared.
- When using an external video source, such as a Cable/Satellite box or DVD player, check that the device is on and functioning correctly.
- Try viewing a picture from another device, such as a DVD player or a game console, to narrow down the source of the problem.
- Check if electrical products such as kitchen appliances, florescent lights or light dimmers are nearby. They may interfere with the TV's picture.
This answer applies to most models. For more specific information refer to your models Operating instructions .
Picture is distorted after selecting audio / video ( AV ) input.
Please perform the following troubleshooting steps in the order presented.
For picture problems when connected to the audio / video ( A/V ) input, check the following,
- Ensure that the video OUT on the external device is connected to the TV’s video/component IN. (Green input jack)
- If using VIDEO or COMPONENT IN:
- Press [ INPUT ]
- Scroll to " AV " , " Composite " or " Comp.Video "
- (If applicable) Press [ ◄ or ► ] to select " Video ", " Composite " or " Component ".
For television models with the "Help" Menu option, perform a " TV Self-Test " to verify proper function of the TV for picture and sound.
Screen shots vary by model series, features & software version.
To access the televison self test mode,
- Press [ MENU ]
- Scroll to [ HELP ] and press [ OK ]
- Scroll to [ TV Self Test ] and press [ OK ]
- View this video for a demo of the TV Self Test.
View this video for a demo of the TV Self Test.
If the test picture shows correctly , then the problem is with the external device (ex. Cable box, DVD player, etc.) or its connection to the TV.
This answer applies to most models. For more specific information refer to your models Operating instructions .
Picture is snowy when ANTENNA/CABLE setup is selected.
Please perform the following troubleshooting steps in the order presented.
- When using a cable service (without a box), check that all connections are secure.
- When using a cable or satellite box, change the connection (wiring) to Composite, Component or HDMI.
- If you’re using an antenna, then check that connections are secure. Change the position or direction of the antenna and check the Signal meter.
- Press [ MENU ].
- Select " Setup " and press [ OK ].
- Select " Program channel and press [ OK ].
- Refer to the Operating instructions to reset to Factory defaults and refer to How to program channels scan for channels.
- Process may vary by model. Some models may require first time setup by following the on screen menu.
This answer applies to most models. For more specific information refer to your models Operating instructions .
Picture looks blurry with motion.
Please perform the following troubleshooting steps in the order presented.
Some motion picture blur is normal however you can improve the picture by using the Motion Picture Setting and Clear motion Feature. These features improve motion picture quality by reducing motion blur.
Models with Motion picture setting
- Press [ Menu ].
- Select [ Picture ]
- Select [ Motion Picture Setting ].
- Select from [ Strong ], [ Mid ], [ Weak ], or [ OFF ].
Models with Intelligent Frame Creation
- Press [ Menu ].
- [ Video ].
- Select [ Intelligent Frame Creation ].
- Select from [ Max ], [ Midium ], [ Min ], or [ OFF ].
Models with Clear Motion
This feature makes the moving pictures clearer by controlling the level of backlight.
- Press [ Menu ].
- Select [ Picture ].
- Select [ Clear motion ]
- Select from [ On ]/[ Off ]
- Gray-out conditions: Photo content
Models with MEMC setting
- Press [ Menu ].
- Select [ Picture ] and press [ OK ] or [►].
- Select " PICTURE " and press [ OK ].
- Select " Adanced Settings ".
- Select " MEMC " and turn " On ".
Note:
For best response time in Game mode, MEMC should be "OFF".
This answer applies to most models. For more specific information refer to your models Operating instructions .
Picture looks blurry.
Please perform the following troubleshooting steps in the order presented.
Possible solutions.
- Ensure all connections are correct and secure. Especially check for Component and Video connection since these terminals are shared.
- When using an external video source, such as a Cable/Satellite box or DVD player, check that the device is on and functioning correctly.
- Try viewing a picture from another device, such as a DVD player or a game console, to narrow down the source of the problem.
- Check if electrical products such as kitchen appliances, florescent lights or light dimmers are nearby. They may interfere with the TV's picture.
For television models with the "Help" Menu option, perform a " TV Self-Test " to verify proper function of the TV for picture and sound.
Screen shots vary by model series, features & software version. Refer to your models Operating Manual for more specific information.
To access the televison self test mode,
- Press [ MENU ]
- Scroll to [ HELP ] and press [ OK ]
- Scroll to [ TV Self Test ] and press [ OK ]
- View this video for a demo of the TV Self Test.View this video for a demo of the TV Self Test.
This answer applies to most models. For more specific information refer to your models Operating instructions .
Picture looks dim.
Please perform the following troubleshooting steps in the order presented.
Most TV's are equipped with a money saving feature called Eco Navigation. The TV automatically dims the brightness to save energy. It also puts the picture in “Standard” mode and enables the C.A.T.S. feature so it will adjust the picture brightness automatically depending on the rooms ambient lighting conditions.
This mode will also turn the TV power off if no signal is detected for 10 minutes.
This answer applies to most models. For more specific information refer to your models Operating instructions .