How to adjust the white balance - Lumix Cameras
In sunlight, under incandescent lights or in other such conditions where the color of white takes on a reddish or bluish tinge, the white balance feature adjusts to the color of white which is closest to what is seen by the eye in accordance with the light source.
Select your model from the list below for model specific instructions on using white balance. If your model is not listed, please visit our Operating Manual Lookup to view model-specific information
Instructions for model DC-G100D
Applicable Shooting modes:

White balance (WB) is a function that corrects the color cast produced by the light illuminating the subject.
It corrects the colors so that white objects appear in white to make the overall color closer to what is seen by the eye.
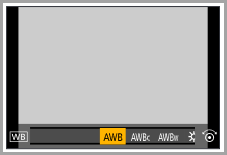
Normally, you can use auto ([AWB], [AWBc] or [AWBw]) to obtain the optimal white balance.
Set this function when the coloring of the image is different from what you expected, or you want to change the coloring to capture the ambience.
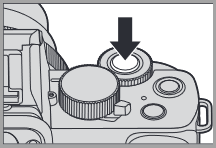
- Press [WB] (►).
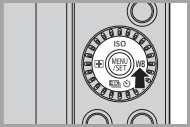
- Select the white balance.
- Rotate
 or
or 
- Rotate
-
Confirm your selection.
- Press the shutter button halfway.
- Press the shutter button halfway.
Setting items (White Balance)
| Item Setting | Item setting function |
|---|---|
| [AWB] | Auto |
| [AWBc] | Auto (Reduces the reddish hue under an incandescent light source) |
| [AWBw] | Auto (Leaves the reddish hue under an incandescent light source) |
 Daylight Icon] Daylight Icon] |
Clear Sky |
 |
Cloudy Sky |

| Shade under a clear sky |
| Incandescent light | |
| Flash | icon|
| [Custom White Balance 1] | Use the White Balance value that was set manually.
|
| [Custom White Balance 2] | |
| [Custom White Balance 3] | |
| [Custom White Balance 4] | |
| [Custom Temperature White Balance] | Use the preset color temperature setting. |


*1 It operates as [AWB] during video recording or when recording with [4K PHOTO] or [Post Focus].
Brightness (Exposure)/Coloring/Picture effect
- [AWB] will work within this range.
- Blue sky
- Cloudy sky (Rain)
- Shade
- Sunlight
- White fluorescent light
- Incandescent light bulb.
- Sunrise and sunset
- Candlelight
K=Kelvin Color Temperature
| Color Temperature | Brightness (Exposure)/Coloring/Picture effect settings |
|---|---|
| 10000 K | 2 |
| 9000 K | |
| 8000 K | 3  , 4 only 7000 K , 4 only 7000 K  |
| 7000 K | |
| 6000 K | |
| 5000 K | 5  |
| 4000 K | 6  |
| 3000 K | 1 [AWB] |
| 2000 K | 7  , 8 , 8  |
| Less then 2000 K | 9  |
 Under lighting such as fluorescent or LED lighting, the appropriate white balance will vary depending on the lighting type.
Use [AWB], [AWBc], [AWBw] or [
Under lighting such as fluorescent or LED lighting, the appropriate white balance will vary depending on the lighting type.
Use [AWB], [AWBc], [AWBw] or [ The white balance is fixed to [AWB] while [Filter Settings] is being used.
- The White Balance may not operate correctly if you take pictures using a flash and the subject is recorded outside of the effective flash range.
- In [SCN] mode, settings suitable for each scene are made.
- In [SCN] mode, changing the scene or recording mode will return White Balance settings (including the White Balance fine adjustment setting) back to [AWB].
 />] to [
 ].
].
Brightness (Exposure)/Coloring/Picture effect
Registering the White Set ([
] to [])
Take pictures of a white object under the light source of the recording location to adjust the white balance until it appears white.
- Press [WB] (►) and then select any value from [] to [].
- Press ▲.
- Aim the camera at a white object so that it appears inside the frame at
the center of the screen and then press
 .
.
- This will set the white balance and return you to the recording screen.
After retrieving the image for noise reduction with [Live View Composite], the white set registration cannot be used.
Color Temperature Setting ([ ] to
] to  ])
])
Set the numeric value for the white balance color temperature.
- Press [WB] (►) and then select any value from [] to [].
- Press ▲.
- Press [▲ / ▼] to select the color temperature and then press ▲.
- You can set a color temperature from [2500K] to [10000K].
Adjusting the White balance in coloring
You can adjust the coloring even when the coloring you want to apply is not produced by the selected white balance.
- Press [WB] (►).
- Select the white balance and then press ▼.
- The adjustment screen is displayed.
- Adjust the coloring.
◄: [A] (AMBER: ORANGE) ▲: [G] (GREEN: GREENISH) ►: [B] (BLUE: BLUISH) ▼: [M] (MAGENTA: REDDISH)- You can also touch the graph to make adjustments.
- Press [DISP.] to return to the unadjusted state.
- You can set the White Balance Bracket
by rotating or .
Instructions for model DC-ZS80
Applicable Shooting modes:
In sunlight, under incandescent lights or in other such conditions where the color of white takes on a reddish or bluish tinge, this item adjusts to the color of white which is closest to what is seen by the eye in accordance with the light source.
- Press [MENU] → [Rec] → [White Balance]
- Rotate the control dial to select the White Balance.
- Press [MENU/SET] to finalize the setting.
- You can also press the shutter button halfway to set the White Balance.

| Icon | Information |
|---|---|
| [AWB] | Automatic adjustment in accordance with the light source. |
| [AWBc] / [AWBw] |
|
| [Clear Sky White Balance] | Adjust to the color under a clear sky. |
| [Cloudy Sky White Balance] | Adjust to the color under a cloudy sky. |
| [Shade White Balance] | Adjust to the color in the shade. |
| [Incandescent White Balance] | Adjust to the color under incandescent lights. |
| [Flash White Balance] | Adjust to the color that is optimal for taking pictures using the flash. |
| [Custom White Balance 1] | Use the White Balance value that was set manually.
|
| [Custom White Balance 2] | |
| [Custom White Balance 3] | |
| [Custom White Balance 4] | |
| [Custom Temperature White Balance] | Use the preset color temperature setting.
|
| *1 - The [AWB] setting is applied while recording motion pictures, recording 4K photos, or recording in [Post Focus]. | |


Hint: Under fluorescent lighting, LED lighting fixtures, etc., the optimal White Balance will vary depending on the lighting type, so use [AWB], [Custom White Balance 1], [Custom White Balance 2], [Custom White Balance 3], [Custom White Balance 4]
- The White Balance may not operate correctly if you take pictures using a flash or the subject is recorded outside of the effective flash range.
- In Scene Guide Mode, changing the scene or recording mode will return White Balance settings (including the White Balance fine adjustment setting) back to [AWB].
- In the Scene Guide Mode, settings suitable for each scene are made.
Jump to section
- Auto White Balance
- Setting the White Balance manually
- Setting the White Balance using color temperature
- Performing White Balance fine adjustments
- Bracket recording using White Balance
Auto White Balance
When [AWB] (Automatic White Balance) is set, the coloring is adjusted in accordance with the light source. However, if the scene is too bright or too dark or if other extreme conditions apply, the pictures may appear reddish or bluish. The White Balance may not operate correctly if there is a multiple number of light sources. In that case, set the [White Balance] to settings other than [AWB] to adjust the coloring.
- Press [MENU] → [Rec] → [White Balance].
- Rotate the control dial to select the [AWB].
- Press [MENU / SET] to finalize the setting.

Setting the White Balance manually
Take a picture of a white object under the target light source to adjust colors.
- Press [MENU] → [Rec] → [White Balance].
- Rotate the control dial to select [Custom White Balance 1] / [Custom White Balance 2] / [Custom White Balance 3] / [Custom White Balance 4].
- Press [▲].
- Point the camera at a white object such as a piece of paper, ensuring that it is inside the frame at the center of the screen, and press the shutter button.
- This will set the White Balance and return you to the recording screen.
- The same operation can be performed by pressing [MENU / SET].
- It may not be possible to set the correct White Balance if subjects are too bright or too dark. In this case, adjust the brightness and try to set the White Balance again.
Setting the White Balance using color temperature
You can set the White Balance using color temperature. Color temperature is a numeric value that expresses the color of light (unit: Kelvin). A picture becomes bluish when the color temperature value is higher, and reddish when the temperature value is lower.
- Press [MENU] → [Rec] → [White Balance].
- Rotate the rear dial to select [Custom Colour Temperature].
- Press [▲].
- Use [▲ / ▼] to select the color temperature value and press [MENU / SET].
- You can set the color temperature from [2500K] to [10000K].
- Press [MENU / SET] to finalize the setting.
- You can also press the shutter button halfway to set the White Balance.
Performing White Balance fine adjustments
White Balance settings can be individually fine-tuned if colors still do not appear as anticipated.
- Press [MENU] → [Rec] → [White Balance].
- Rotate the rear dial to select the White Balance.
- Press [▲].
- Use [▲ / ▼ / ◄ / ►] to perform White Balance fine adjustments.
- You can also make fine adjustments by touching the White Balance graph. • Pressing [DISP.] button resets the position back to the center.
- Press [MENU / SET].
- Press [MENU / SET] to finalize the setting.
- You can also press the shutter button halfway to set the White Balance.
Notes for White Balance fine adjustments:
- When you set a new White Balance value by selecting [Custom White Balance 1] / [Custom White Balance 2] / [Custom White Balance 3] / [Custom White Balance 4] or change the color temperature by selecting [Custom Colour Temperature], the White Balance fine adjustment level will be returned to the standard setting (center point).
- When you perform fine adjustments of the White Balance toward the [A] (amber) or [B] (blue) side, the color of the White Balance icon displayed on the screen will change to the fine-tuned color.
- When you perform fine adjustments of the White Balance toward the [G] (green) or [M] (magenta) side, [+] (green) or [-] (magenta) will be displayed in the White Balance icon on the screen.
- Settings remain applied when using flash.
Bracket recording using White Balance
Bracket settings are performed based on the fine adjustment values for White Balance, and three pictures with different coloring are automatically recorded when the shutter button is pressed once.
- Press [MENU] → [Rec] → [White Balance].
- Rotate the rear dial to select the White Balance.
- Press [▲].
- Use [▲ / ▼ / ◄ / ►] to perform White Balance fine adjustments.
- Press [MENU / SET].
- Rotate the rear dial to perform the Bracket setting.
- Press [MENU / SET].
- Press [MENU / SET] to finalize the setting.
- You can also press the shutter button halfway to set the White Balance.
Notes:
- When the White Balance Bracket is set, [BKT] appears on the White Balance icon.
- When the camera is turned off (Including [Sleep Mode]), the White Balance Bracket setting is canceled.
- This function is not available in the following cases:
- When using [Panorama Shot Mode].
- When using scene guide modes
- [Glistening Water]
- [Glittering Illuminations]
- [Handheld Night Shot]
- [Soft Image of a Flower]
- When using [Burst].
- When recording 4K photos.
- When using [Auto Bracket].
- When recording using [Post Focus].
- When taking still pictures while a motion picture is being recorded.
- When [Quality] is set to [Raw / JPEG Uncompressed] / [Raw / JPEG Compressed] / [RAW]
- When [HDR] is set to [ON].
- When using [Time Lapse Shot].


To view more White Balance information for this model, please click here to view the Operating Manual
Instructions for model DMC-F3
Applicable Recording / Shooting Modes:
- Press [Menu/Set].
- Select [Rec] menu and press [Menu/Set].
- Select [White Balance] and press [Menu/Set].
- Select a setting, and then press [Menu/Set].
In sunlight, under incandescent lights or in other such conditions where the color of white takes on a reddish or bluish tinge, this item adjusts to the color of white which is closest to what is seen by the eye in accordance with the light source.
| Icon | Settings | Description |
|---|---|---|
| [AWB] | Auto White Balance | Automatic adjustment. |
| [Daylight Icon] | Daylight | When taking pictures outdoors under a clear sky. |
| [Cloudy Icon] | Cloudy | When taking pictures outdoors under a cloudy sky. |
| [Shade Icon] | Shade | When taking pictures outdoors in the shade. |
| [Incandescent Icon] | Incandescent | When taking pictures under incandescent lights. |
| White Set Icon | White Set | Value set by using [White Set Setting]. |
| [White Set Setting Icon] | White Set Setting | Set manually. |


- Under fluorescent lighting, LED lighting fixture etc., the appropriate White Balance will vary depending on the lighting type, so use [AWB] or [White Set Setting]
- The White Balance setting for a Scene Mode returns to [AWB] when the Scene Mode is changed.
- The setting is fixed to [AWB] in the following cases:
- Scene Mode: [Scenery] / [Night Portrait] / [Night Scenery] / [Handheld Night Shot] / [Food] / [Sunset] / [Starry Sky]
To view more White Balance information for this model, please click here to view the Operating Manual
Instructions for model DMC-FH1
Applicable Recording / Shooting Modes:
To view more White Balance information for this model, please click here to view the Operating Manual
Instructions for model DMC-FH10
Applicable Recording / Shooting Modes:
To view more White Balance information for this model, please click here to view the Operating Manual
Instructions for model DMC-FH2
Applicable Recording / Shooting Modes:
To view more White Balance information for this model, please click here to view the Operating Manual
Instructions for model DMC-FH20
Applicable Recording / Shooting Modes:
To view more White Balance information for this model, please click here to view the Operating Manual
Instructions for model DMC-FH22
Applicable Shooting modes
In sunlight, under incandescent lights or in other such conditions where the color of white takes on a reddish or bluish tinge, this item adjusts to the color of white which is closest to what is seen by the eye in accordance with the light source.
- Turn the camera on.
- Slide the [REC] / [PLAYBACK] selector switch to [Rec].
- Touch [MODE].
- Touch [NORMAL PICTURE].
- Press [MENU] to display the menu.
- Touch [WHITE BALANCE].
| Icon | Setting | Description |
|---|---|---|
| [AWB] | [Auto White Balance] | Automatic adjustment. |
| [Daylight White Balance] | [Daylight] | When taking pictures outdoors under a clear sky. |
| [Cloudy White Balance] | [Cloudy] | When taking pictures outdoors under a cloudy sky. |
| [Shade White Balance] | [Shade] | When taking pictures outdoors in the shade. |
| [Incandescent White Balance] | [Incandescent] | When taking pictures under incandescent lights |
| [White Set White Balance] | [White Set] | Value set by using [White Set White Balance SET]. |
| [White Set White Balance SET] | [White Set Setting] | Set manually. |
Notes:
- The optimal White Balance will differ depending on the type of halogen lighting being recorded under so use [AWB] or [n].
- The White Balance setting is memorized even if the camera is turned off. However, the White Balance setting for a Scene Mode returns to [AWB] when the Scene Mode is changed.
- In the Scene Modes listed below, White Balance is fixed to [AWB]:
- [SCENERY]
- [NIGHT PORTRAIT]
- [NIGHT SCENERY]
- [FOOD]
- [PARTY]
- [CANDLE LIGHT]
- [SUNSET]
- [FLASH BURST]
- [STARRY SKY]
- [FIREWORKS]
- [BEACH]
- [SNOW]
- [AERIAL PHOTO]
- [FILM GRAIN]
To view more White Balance information for this model, please click here to view the Operating Manual
Instructions for model DMC-FH25
Applicable Recording / Shooting Modes:
To view more White Balance information for this model, please click here to view the Operating Manual
Instructions for model DMC-FH3
Applicable Recording / Shooting Modes:
To view more White Balance information for this model, please click here to view the Operating Manual
Instructions for model DMC-FH4
To view more White Balance information for this model, please click here to view the Operating Manual
Instructions for model DMC-FH5
Applicable Recording / Shooting Modes:
To view more White Balance information for this model, please click here to view the Operating Manual
Instructions for model DMC-FH6
Applicable Recording / Shooting Modes:
To view more White Balance information for this model, please click here to view the Operating Manual
Instructions for model DMC-FH8
Applicable Recording / Shooting Modes:
To view more White Balance information for this model, please click here to view the Operating Manual
Instructions for model DMC-FP5
Applicable Recording / Shooting Modes
In sunlight, under incandescent lights or in other such conditions where the color of white takes on a reddish or bluish tinge, this item adjusts to the color of white which is closest to what is seen by the eye in accordance with the light source.
Select [White Balance] from the recording menu.
| White Balance Settings | Description of Settings |
|---|---|
| [AWB Auto White Balance] | Automatic adjustment. |
| [Daylight] | When taking pictures outdoors under a clear sky. |
| [Cloudy] | When taking pictures outdoors under a cloudy sky. |
| [Shade] | When taking pictures outdoors in the shade. |
| [Incandescent] | When taking pictures under incandescent lights. |
| [White Set Manual] | Value set by using [White Set Setting]. |
| [White Set Setting] | Set manually. |
Note:
- The White Balance setting is memorized even if the camera is turned off. However, the White Balance setting for a Scene Mode returns to [AWB] when the Scene Mode is changed.
- In the Scene Modes listed below, White Balance is fixed to [AWB]:
- [Scenery] / [Night Portrait] / [Night Scenery] / [Food] / [Party] / [Candle Light] / [Sunset] / [Flash Burst] / [Starry Sky] / [Fireworks] / [Beach] / [Snow] / [Aerial Photo] / [Film Grain]
To view more White Balance information for this model, please click here to view the Operating Manual
Instructions for model DMC-FP7
To view more White Balance information for this model, please click here to view the Operating Manual
Instructions for model DMC-FX700
In sunlight, under incandescent lights or in other such conditions where the color of white takes on a reddish or bluish tinge, this item adjusts to the color of white which is closest to what is seen by the eye in accordance with the light source.
Applicable Modes
- Turn the camera on.
- Slide [Rec]/[Placyback] to [Still Camera].
- Press [Mode].
- Touch [Program AE].
- Touch [White Balance].
| Settings | Description |
|---|---|
| [AWBAuto White Balance] | Automatic adjustment. |
| [Daylight] | When taking pictures outdoors under a clear sky. |
| [Cloudy] | When taking pictures outdoors under a cloudy sky. |
| [Shade | When taking pictures outdoors in the shade. |
| [Incandescent] | When taking pictures under incandescent lights. |
| [White Set] | Value set by using [White Balance Setting] |
| [White Set Setting] | Set manually. |
Notes:
- In the Scene Modes listed below, White Balance is fixed to [AWB]:
- [Scenery]/[Night Portrait]/[Night Scenery]/[Handheld Night Shot]/[Food]/[Party]/[Candle Light]/[Sunset]/[Flash Burst]/[Starry Sky]/[Fireworks]/[Beach]/[Snow]/[Aerial Photo]/[Film Grain]
- The White Balance setting is memorized even if the camera is turned off. However, the White Balance setting for a Scene Mode returns to [AWB] when the Scene Mode is changed.
To view more White Balance information for this model, please click here to view the Operating Manual
Instructions for model DMC-GH4
Applicable Shooting modes:
In sunlight, under incandescent lights or in other such conditions where the color of white takes on a reddish or bluish tinge, this item adjusts to the color of white which is closest to what is seen by the eye in accordance with the light source.
- Press [WB].
- Rotate the rear dial or front dial to select the White Balance.
- Setting can also be performed by rotating the control dial.
- Press [WB] to set.
- You can also press the shutter button halfway to set.
| Icon | Information |
|---|---|
| [AWB] | Automatic adjustment in accordance with the light source. |
| [Clear Sky White Balance] | Adjust to the color under a clear sky. |
| [Cloudy Sky White Balance] | Adjust to the color under a cloudy sky. |
| [Shade White Balance] | Adjust to the color in the shade. |
| [Incandescent White Balance] | Adjust to the color under incandescent lights. |
| [Flash White Balance] | Adjust to the color that is optimal for taking pictures using the flash. |
| [Custom White Balance 1] | Use the White Balance value that was set manually. |
| [Custom White Balance 2] | |
| [Custom White Balance 3] | |
| [Custom White Balance 4] | |
| [Custom Temperature White Balance] | Use the preset color temperature setting. |
| *1 - The [AWB] setting is applied while recording motion pictures. | |
Hint: Under fluorescent lighting, LED lighting fixtures, etc., the optimal White Balance will vary depending on the lighting type, so use [AWB], [Custom White Balance 1], [Custom White Balance 2], [Custom White Balance 3] or [Custom White Balance 4].
To view more White Balance information for this model, please click here to view the Operating Manual
Instructions for model DMC-SZ1
Applicable Recording / Shooting Modes:
To view more White Balance information for this model, please click here to view the Operating Manual
Instructions for model DMC-SZ10
Applicable Recording / Shooting Modes:
To view more White Balance information for this model, please click here to view the Operating Manual
Instructions for model DMC-TS6
Applicable Recording / Shooting Modes:
To view more White Balance information for this model, please click here to view the Operating Manual
Instructions for model DMC-ZS100
Applicable Shooting modes
In sunlight, under incandescent lights or in other such conditions where the color of white takes on a reddish or bluish tinge, this item adjusts to the color of white which is closest to what is seen by the eye in accordance with the light source.
- Press [WB] (►) on the camera body.
- Rotate the rear dial to select the White Balance.
- Press [MENU/SET] to finalize the setting.
- You can also press the shutter button halfway to set the White Balance.
| Icon | Information |
|---|---|
| [AWB] | Automatic adjustment in accordance with the light source. |
| [Clear Sky White Balance] | Adjust to the color under a clear sky. |
| [Cloudy Sky White Balance] | Adjust to the color under a cloudy sky. |
| [Shade White Balance] | Adjust to the color in the shade. |
| [Incandescent White Balance] | Adjust to the color under incandescent lights. |
| [Flash White Balance] | Adjust to the color that is optimal for taking pictures using the flash. |
| [Custom White Balance 1] | Use the White Balance value that was set manually. |
| [Custom White Balance 2] | |
| [Custom White Balance 3] | |
| [Custom White Balance 4] | |
| [Custom Temperature White Balance] | Use the preset color temperature setting. |
| *1 - The [AWB] setting is applied while recording motion pictures, recording 4K photos, or recording in [Post Focus]. | |
Hint: Under fluorescent lighting, LED lighting fixtures, etc., the optimal White Balance will vary depending on the lighting type, so use [AWB], [Custom White Balance 1], [Custom White Balance 2], [Custom White Balance 3], [Custom White Balance 4]
- The White Balance may not operate correctly if you take pictures using a flash or the subject is recorded outside of the effective flash range.
- In Scene Guide Mode, changing the scene or recording mode will return White Balance settings (including the White Balance fine adjustment setting) back to [AWB].
- In the Scene Guide Mode, settings suitable for each scene are made.
Jump to section
- Auto White Balance
- Setting the White Balance manually
- Setting the White Balance using color temperature
- Performing White Balance fine adjustments
- Bracket recording using White Balance
Auto White Balance
When [AWB] (Automatic White Balance) is set, the coloring is adjusted in accordance with the light source. However, if the scene is too bright or too dark or if other extreme conditions apply, the pictures may appear reddish or bluish. The White Balance may not operate correctly if there is a multiple number of light sources. In that case, set the [White Balance] to settings other than [AWB] to adjust the coloring.
- Press [WB] (►).
- Rotate the rear dial to select the [AWB].
- Press [MENU / SET] to finalize the setting.
Setting the White Balance manually
Take a picture of a white object under the target light source to adjust colors.
- Press [WB] (►).
- Rotate the rear dial to select [Custom White Balance 1] / [Custom White Balance 2] / [Custom White Balance 3] / [Custom White Balance 4].
- Press [▲].
- Point the camera at a white object such as a piece of paper, ensuring that it is inside the frame at the center of the screen, and press the shutter button.
- This will set the White Balance and return you to the recording screen.
- The same operation can be performed by pressing [MENU / SET].
- It may not be possible to set the correct White Balance if subjects are too bright or too dark. In this case, adjust the brightness and try to set the White Balance again.
Setting the White Balance using color temperature
You can set the White Balance using color temperature. Color temperature is a numeric value that expresses the color of light (unit: Kelvin). A picture becomes bluish when the color temperature value is higher, and reddish when the temperature value is lower.
- Press [WB] (►).
- Rotate the rear dial to select [Custom Colour Temperature].
- Press [▲].
- Use [▲ / ▼] to select the color temperature value and press [MENU / SET].
- You can set the color temperature from [2500K] to [10000K].
- Press [MENU / SET] to finalize the setting.
- You can also press the shutter button halfway to set the White Balance.
Performing White Balance fine adjustments
White Balance settings can be individually fine-tuned if colors still do not appear as anticipated.
- Press [WB] (►).
- Rotate the rear dial to select the White Balance.
- Press [▲].
- Use [▲ / ▼ / ◄ / ►] to perform White Balance fine adjustments.
- You can also make fine adjustments by touching the White Balance graph. • Pressing [DISP.] button resets the position back to the center.
- Press [MENU / SET].
- Press [MENU / SET] to finalize the setting.
- You can also press the shutter button halfway to set the White Balance.
Notes for White Balance fine adjustments:
- When you set a new White Balance value by selecting [Custom White Balance 1] / [Custom White Balance 2] / [Custom White Balance 3] / [Custom White Balance 4] or change the color temperature by selecting [Custom Colour Temperature], the White Balance fine adjustment level will be returned to the standard setting (center point).
- When you perform fine adjustments of the White Balance toward the [A] (amber) or [B] (blue) side, the color of the White Balance icon displayed on the screen will change to the fine-tuned color.
- When you perform fine adjustments of the White Balance toward the [G] (green) or [M] (magenta) side, [+] (green) or [-] (magenta) will be displayed in the White Balance icon on the screen.
- Settings remain applied when using flash.
Bracket recording using White Balance
Bracket settings are performed based on the fine adjustment values for White Balance, and three pictures with different coloring are automatically recorded when the shutter button is pressed once.
- Press [WB] (►).
- Rotate the rear dial to select the White Balance.
- Press [▲].
- Use [▲ / ▼ / ◄ / ►] to perform White Balance fine adjustments.
- Press [MENU / SET].
- Rotate the rear dial to perform the Bracket setting.
- Press [MENU / SET].
- Press [MENU / SET] to finalize the setting.
- You can also press the shutter button halfway to set the White Balance.
Notes:
- When the White Balance Bracket is set, [BKT] appears on the White Balance icon.
- When the camera is turned off (Including [Sleep Mode]), the White Balance Bracket setting is canceled.
- This function is not available in the following cases:
- When using [Panorama Shot Mode].
- When using scene guide modes
- [Glistening Water]
- [Glittering Illuminations]
- [Handheld Night Shot]
- [Soft Image of a Flower]
- When using [Burst].
- When recording 4K photos.
- When using [Auto Bracket].
- When recording using [Post Focus].
- When taking still pictures while a motion picture is being recorded.
- When [Quality] is set to [Raw / JPEG Uncompressed] / [Raw / JPEG Compressed] / [RAW]
- When [HDR] is set to [ON].
- When [Multi Exp.] is set.
- When using [Time Lapse Shot].
To view more White Balance information for this model, please click here to view the Operating Manual
Instructions for model DMC-ZS45
Applicable Recording / Shooting Modes:
To view more White Balance information for this model, please click here to view the Operating Manual
Instructions for model DMC-ZS50
Applicable Recording / Shooting Modes:
- Under fluorescent lighting, LED lighting fixture etc., the appropriate White Balance will vary depending on the lighting type, so use [AWB] or [White Set Setting]
- The White Balance setting for a Scene Mode returns to [AWB] when the Scene Mode is changed.
- The setting is fixed to [AWB] in the following cases:
- Scene Mode: [Scenery] / [Night Portrait] / [Night Scenery] / [Handheld Night Shot] / [Food] / [Sunset] / [Starry Sky]
- Beach and Snorkeling Mode
- Advanced Underwater Mode
To view more White Balance information for this model, please click here to view the Operating Manual
Instructions for model DMC-ZS60
Applicable Shooting modes:
| Icon | Information |
|---|---|
| [AWB] | Automatic adjustment in accordance with the light source. |
| [Clear Sky White Balance] | Adjust to the color under a clear sky. |
| [Cloudy Sky White Balance] | Adjust to the color under a cloudy sky. |
| [Shade White Balance] | Adjust to the color in the shade. |
| [Incandescent White Balance] | Adjust to the color under incandescent lights. |
| [Flash White Balance] | Adjust to the color that is optimal for taking pictures using the flash. |
| [Custom White Balance 1] | Use the White Balance value that was set manually. |
| [Custom White Balance 2] | |
| [Custom Temperature White Balance] | Use the preset color temperature setting. |
| *1 - The [AWB] setting is applied while recording motion pictures, recording 4K photos, or recording in [Post Focus]. | |
Hint: Under fluorescent lighting, LED lighting fixtures, etc., the optimal White Balance will vary depending on the lighting type, so use [AWB], [Custom White Balance 1], [Custom White Balance 2]
- The White Balance may not operate correctly if you take pictures using a flash or the subject is recorded outside of the effective flash range.
- In Scene Guide Mode, changing the scene or recording mode will return White Balance settings (including the White Balance fine adjustment setting) back to [AWB].
- In the Scene Guide Mode, settings suitable for each scene are made.
Jump to section
- Auto White Balance
- Setting the White Balance manually
- Setting the White Balance using color temperature
- Performing White Balance fine adjustments
- Bracket recording using White Balance
Auto White Balance
When [AWB] (Automatic White Balance) is set, the coloring is adjusted in accordance with the light source. However, if the scene is too bright or too dark or if other extreme conditions apply, the pictures may appear reddish or bluish. The White Balance may not operate correctly if there is a multiple number of light sources. In that case, set the [White Balance] to settings other than [AWB] to adjust the coloring.
- Press [MENU] → [Rec] → [White Balance].
- Rotate the control dial to select the [AWB].
- Press [MENU / SET] to finalize the setting.
Setting the White Balance manually
Take a picture of a white object under the target light source to adjust colors.
- Press [MENU] → [Rec] → [White Balance].
- Rotate the control dial to select [Custom White Balance 1] / [Custom White Balance 2] / [Custom White Balance 3] / [Custom White Balance 4].
- Press [▲].
- Point the camera at a white object such as a piece of paper, ensuring that it is inside the frame at the center of the screen, and press the shutter button.
- This will set the White Balance and return you to the recording screen.
- The same operation can be performed by pressing [MENU / SET].
- It may not be possible to set the correct White Balance if subjects are too bright or too dark. In this case, adjust the brightness and try to set the White Balance again.
Setting the White Balance using color temperature
You can set the White Balance using color temperature. Color temperature is a numeric value that expresses the color of light (unit: Kelvin). A picture becomes bluish when the color temperature value is higher, and reddish when the temperature value is lower.
- Press [MENU] → [Rec] → [White Balance].
- Rotate the rear dial to select [Custom Colour Temperature].
- Press [▲].
- Use [▲ / ▼] to select the color temperature value and press [MENU / SET].
- You can set the color temperature from [2500K] to [10000K].
- Press [MENU / SET] to finalize the setting.
- You can also press the shutter button halfway to set the White Balance.
Performing White Balance fine adjustments
White Balance settings can be individually fine-tuned if colors still do not appear as anticipated.
- Press [MENU] → [Rec] → [White Balance].
- Rotate the rear dial to select the White Balance.
- Press [▲].
- Use [▲ / ▼ / ◄ / ►] to perform White Balance fine adjustments.
- You can also make fine adjustments by touching the White Balance graph. • Pressing [DISP.] button resets the position back to the center.
- Press [MENU / SET].
- Press [MENU / SET] to finalize the setting.
- You can also press the shutter button halfway to set the White Balance.
Notes for White Balance fine adjustments:
- When you set a new White Balance value by selecting [Custom White Balance 1] / [Custom White Balance 2] / [Custom White Balance 3] / [Custom White Balance 4] or change the color temperature by selecting [Custom Colour Temperature], the White Balance fine adjustment level will be returned to the standard setting (center point).
- When you perform fine adjustments of the White Balance toward the [A] (amber) or [B] (blue) side, the color of the White Balance icon displayed on the screen will change to the fine-tuned color.
- When you perform fine adjustments of the White Balance toward the [G] (green) or [M] (magenta) side, [+] (green) or [-] (magenta) will be displayed in the White Balance icon on the screen.
- Settings remain applied when using flash.
Bracket recording using White Balance
Bracket settings are performed based on the fine adjustment values for White Balance, and three pictures with different coloring are automatically recorded when the shutter button is pressed once.
- Press [MENU] → [Rec] → [White Balance].
- Rotate the rear dial to select the White Balance.
- Press [▲].
- Use [▲ / ▼ / ◄ / ►] to perform White Balance fine adjustments.
- Press [MENU / SET].
- Rotate the rear dial to perform the Bracket setting.
- Press [MENU / SET].
- Press [MENU / SET] to finalize the setting.
- You can also press the shutter button halfway to set the White Balance.
Notes:
- When the White Balance Bracket is set, [BKT] appears on the White Balance icon.
- When the camera is turned off (Including [Sleep Mode]), the White Balance Bracket setting is canceled.
- This function is not available in the following cases:
- When using [Panorama Shot Mode].
- When using scene guide modes
- [Glistening Water]
- [Glittering Illuminations]
- [Handheld Night Shot]
- [Soft Image of a Flower]
- When using [Burst].
- When recording 4K photos.
- When using [Auto Bracket].
- When recording using [Post Focus].
- When taking still pictures while a motion picture is being recorded.
- When [Quality] is set to [Raw / JPEG Uncompressed] / [Raw / JPEG Compressed] / [RAW]
- When [HDR] is set to [ON].
- When using [Time Lapse Shot].
To view more White Balance information for this model, please click here to view the Operating Manual