


How to charge and charging tips for shaving and grooming products.
Charge Preparation
- Turn the Shaver or Trimmer off.
- Wipe off any water droplets on the appliance socket.
Select your model for specific charging instructions from the list below. If your model is not listed Refer to your models Operating Manual for specific procedure.
For problems with charging, Refer to "Troubleshooting charging".
Model ER-224
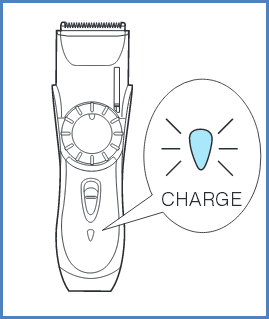
When charging the beard/hair trimmer for the first time or when it has not been in use for more than 6 months, charge it for the activation for at least 16 hours before use.
If it seems to be losing speed you can fully charge the trimmer in 8 hours. A full charge will supply enough power for approx. 6 trims (5 minutes per trim for a normal beard).
- Connect the adaptor to the beard/ hair trimmer.
- Plug the adaptor to an AC outlet. In some areas, a special plug adaptor may be required. The charge indicatorlamp lights up when the trimmer is being charged.
Cautions for Charging.
- Dry the trimmer completely before charging it.
- Do not charge the trimmer at temperatures below 0 ˚C (32 ˚F) or above 40 ˚C (104 ˚F), or where it will be exposed to direct sunlight or other heat sources.
- Do not continue charging for more than 48 hours as it may damage the battery.
- The trimmer may become warm during operation and charging. This is normal.
- The adaptor is intended to be correctly oriented in a vertical or floor mount position.
Cautions for adaptor.
- Use only the included adaptor RE9-32.
- Keep the adaptor away from water and handle it only with dry hands.
- Store the adaptor in a dry area where it is protected from damage.
Model ER-GB370
Make sure that the trimmer is turned off.
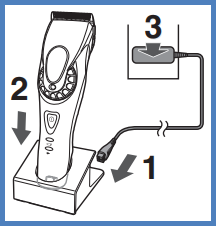
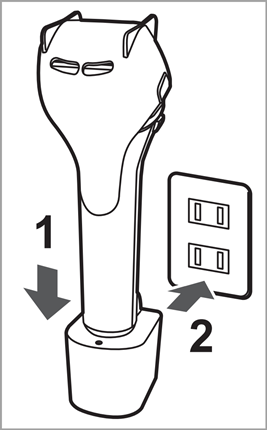
- Place the trimmer on the AC adaptor.
- Plug the trimmer into the AC adaptor until it clicks into place.
- Remove the trimmer with one hand while pressing the AC adaptor with the other hand.
- Insert the power plug into a household outlet.
- The charging time differs depending on the rated voltage.
- 120v - Approx. 15 hours
- 110v - Approx. 20 hours
- Check that the charge indicator lamp glows.
- The charging time differs depending on the rated voltage.
- Disconnect the plug after charging is completed (for safety and to reduce energy usage). The charge indicator lamp continues to glow after charging is complete. There is no indication to show that “charging is complete”.
Notes
- You cannot operate the trimmer while charging.
- When charging the trimmer for the first time or when it has not been in use for more than 6 months, the charge indicator lamp may not glow for a few minutes, or the operating time may shorten. Please charge it for more than 23 hours in such cases.
- Recommended ambient temperature for charging is 0 °C - 35 °C (32 °F - 95 °F). Battery performance may decrease outside of the recommended temperature.
- A full charge supplies enough power for approximately 30 minutes of use.
- You can charge the battery before it is completely discharged. However, it is recommended to charge when the battery is completely discharged. The battery life depends strongly on factors such as how it is used and stored.
- If there is crackling noise on radios or other devices while charging, charge the clipper using a different household outlet.
- Charging is completed after approx. 15 hours. Chargingthe battery for more than 15 hours will not affect battery performance.
Model ER-GB40
Make sure that the trimmer is turned off.
- Place the trimmer on the AC adaptor.
- Plug the trimmer into the AC adaptor until it clicks into place.
- Remove the trimmer with one hand while pressing the AC adaptor with the other hand.
- Insert the power plug into a household outlet.
- The charging time differs depending on the rated voltage.
- 120v - Approx. 15 hours
- 110v - Approx. 20 hours
- Check that the charge indicator lamp glows.
- The charging time differs depending on the rated voltage.
- Disconnect the plug after charging is completed (for safety and to reduce energy usage). The charge indicator lamp continues to glow after charging is complete. There is no indication to show that “charging is complete”.
Notes
- When charging the trimmer for the first time or when it has not been in use for more than 6 months, the charge indicator lamp may not glow for a few minutes, or the operating time may shorten. Please charge it for more than 23 hours in such cases.
- To keep charging the battery will not affect battery performance.
- When the appliance is not used for 6 months or more, the battery will weaken (leak battery fluid, etc.). Fully charge the battery once every 6 months.
- Recommended ambient temperature for charging is 0 ‑ 35 °DegreesC (32 ‑ 95 °DegreesF). The battery may not charge properly or not at all under extreme low or high temperatures.
- The charge indicator lamp glows and stays on until the plug is disconnected from a household outlet.
- Recommended ambient temperature for charging is 0 – 35 °C (32 – 95 °F). Battery performance may decrease under extremely low or high temperatures.
- A full charge supplies enough power for approximately50 minutes of use.
Model ER-GB42
Make sure that the trimmer is turned off.
- Place the trimmer on the AC adaptor.
- Plug the trimmer into the AC adaptor until it clicks into place.
- Remove the trimmer with one hand while pressing the AC adaptor with the other hand.
- Insert the power plug into a household outlet.
- The charging time differs depending on the rated voltage.
- 120v - Approx. 15 hours
- 110v - Approx. 20 hours
- Check that the charge indicator lamp glows.
- The charging time differs depending on the rated voltage.
- Disconnect the plug after charging is completed (for safety and to reduce energy usage). The charge indicator lamp continues to glow after charging is complete. There is no indication to show that “charging is complete”.
Notes
- To keep charging the battery will not affect battery performance.
- If there is noise from the radio or other sources while using or charging the product, move to a different location to use the product.
- When the appliance is not used for 6 months or more, the battery will weaken (leak battery fluid, etc.). Fully charge the battery once every 6 months.
- You can charge the battery before it is completely discharged. However, it is recommended to charge when the battery is completely discharged.
- The battery life depends strongly on factors such as how it is used and stored.
- Recommended ambient temperature for charging is 0 – 35 °C (32 – 95 °F). Battery performance may decrease under extremely low or high temperatures.
- A full charge supplies enough power for approximately 50 minutes of use. (Based on dry using at 20 – 30 °C (68 – 86 °F).) The operating time may differ depending on the frequency of use and the operating method.
- When charging the trimmer for the first time or when it has not been in use for more than 6 months, the operating time may shorten. Please charge it for more than 30 hours in such cases.
- The charge indicator lamp glows and stays on until the plug is disconnected from a household outlet.
Model ER-GB60, ER-GB70, ER-GB80
Make sure that the trimmer is turned off.
- Connect the appliance plug to the appliance socket.
- Plug in the adaptor into a household outlet.
- Check that the charge status lamp glows.
- Charging is completed after approx. 1 hour.
- Disconnect the adaptor when the charge status lamp stops glowing.
- Recommended ambient temperature for charging is 0 – 35°C (32 – 95°F). Battery performance may decrease under extremely low or high temperatures, and the battery may not be charged properly.
- A full charge supplies enough power for approximately 50 minutes of use. The operating time may differ depending on the frequency of use, the operating method and the ambient temperature.
- When charging the trimmer for the first time or when it has not been in use for more than 6 months, the lamp on the main body may not glow for a few minutes, or the operating time may shorten. Please charge it for more than 8 hours in such cases.
- If the shape of the plug does not fit the power outlet, use an attachment plug adaptor of the proper configuration.
AC Operation
If you connect the AC adaptor to the trimmer in the same way as for charging, and turn on the power, you can use it.
- If the remaining battery is too low, the blades may move slowly or stop, even with the AC operation. In this case, charge the battery for 1 minute or more.
- The battery will be discharged, even with the AC operation.
Model ER-GB96
- Turn the trimmer off.
- Connect the appliance plug to the trimmer's socket.

- Plug in the adaptor into a household outlet.
- Check that the charge status lamp glows.
- Charging is completed after approx. 1 hour.
- Disconnect the adaptor when the charge status lamp stops glowing. (charging is completed)
For safety and to reduce energy usage
- If you remove and reinsert the trimmer plug while charging, the charge status lamp glows and turns off after approximately 5 seconds.
Notes :
- Keeping the battery charging will not affect battery performance.
- If there is noise from the radio or other sources while using or charging the trimmer, move to a different location to use the trimmer.
- When the trimmer is not used for 6 months or more, the battery will weaken (leak battery fluid, etc.). Fully charge once every 6 months.
- You can charge the battery before it is completely discharged. However, it is recommended to charge when the battery is completely discharged. The battery life depends strongly on factors such as how it is used and stored.
Model ER-GC51, ER-GC71
Make sure that the clipperis turned off.
- Connect the appliance plug to the appliance socket.
- Plug in the adaptor into a household outlet.
- Check that the charge status lamp
 glows.
 - Charging is completed after approx. 8 hours.
- Check that the charge status lamp
- Disconnect the adaptor after charging is complete. For safety and to reduce energy usage the charge indicator lamp continues to glow after charging is complete. There is no indication to show that "charging is complete".
Note:
- If there is crackling noise on radios or other devices while charging, charge the clipper using a different household outlet.
- When the appliance is not used for 6 months or more, the battery will weaken (leak battery fluid, etc.). Fully charge the battery once every 6 months.
- When charging the trimmer for the first time or when it has not been in use for more than 6 months, the lamp on the main body may not glow for a few minutes, or the operating time may shorten. Please charge it for more than 16 hours in such cases.
- Recommended ambient temperature for charging is 0 °C – 35 °C. The charging time may change or battery performance may decrease outside of the recommended temperature.
- A full charge supplies enough power for approximately 40 minutes of use. The operating time may differ depending on the frequency of use, the operating method and the ambient temperature.
- You can charge the battery before it is completely discharged. However, it is recommended to charge when the battery is completely discharged. The battery life depends strongly on factors such as how it is used and stored.
- If the shape of the plug does not fit the power outlet, use an attachment plug adaptor of the proper configuration.
AC Operation
If you connect the AC adaptor to the trimmer in the same way as for charging, and turn on the power, you can use it.
- If the remaining battery is too low, the blades may move slowly or stop, even with the AC operation. In this case, charge the battery for 3 minute or more.
- The battery will be discharged, even with the AC operation.
Model ER-GD50
Make sure that the trimmer is turned off.
- Connect the appliance plug to the appliance socket.
- Plug in the adaptor into a household outlet.
- Check that the charge status lamp ( ) glows.
- Charging is completed after approx. 1 hour.
- Check that the charge status lamp (
- For safety and to reduce energy usage disconnect the adaptor when the charge status lamp stops glowing. If you remove and reinsert the appliance plug while charging, the charge status lamp glows and turns off after approximately 5 seconds.
Notes
- If there is crackling noise on radios or other devices while charging, charge the trimmer using a different household outlet.
- When the appliance is not used for 6 months or more, the battery will weaken (leak battery fluid, etc.). Fully charge the battery once every 6 months.
- When charging the trimmer for the first time or when it has not been in use for more than 6 months, the lamp on the main body may not glow for a few minutes, or the operating time may shorten. Please charge it for more than 8 hours in such cases.
- Recommended ambient temperature for charging is 0 °C – 35 °C. The charging time may change or battery performance may decrease outside of the recommended temperature.
- A full charge supplies enough power for approximately 50 minutes of use. (Based on dry using at 20 °C-30 °C.) The operating time may differ depending on the frequency of use, the operating method and the ambient temperature.
- You can charge the battery before it is completely discharged. However, it is recommended to charge when the battery is completely discharged. The battery life depends strongly on factors such as how it is used and stored.
AC Operation
If you connect the AC adaptor to the trimmer in the same way as for charging, and turn on the power, you can use it.
- If the remaining battery is too low, the blades may move slowly or stop, even with the AC operation. In this case, charge the battery for 1 minute or more.
- The battery will be discharged, even with the AC operation.
Model ER-GK40
- Make sure that the trimmer is turned off.
- Wipe off any water droplets on the appliance socket.
- Place the trimmer on the AC adaptor until it clicks.
- Insert the power plug into a household outlet. The charging time differs depending on the rated voltage 120 V Approx. 15 hours. 110 V Approx. 20 hours.
- Check that the charge indicator lamp glows.
- For safety and to reduce energy usage, disconnect the power plug after charging is completed. The charge indicator lamp continues to glow after charging is complete. There is no indication to show that “charging iscomplete”.
- You cannot operate the trimmer while charging.
Notes :
- When charging the shaver for the first time or when it has not been in use for more than 6 months, the charge indicator lamp may not glow for a few minutes, or the operating time may shorten. Please charge it for more than 30 hours in such cases.
- Recommended ambient temperature for charging is 0 ‑ 35 °C (32 ‑ 95 °F). The battery may not charge properly or not at all under extreme low or high temperatures.
- The charge indicator lamp glows and stays on until the plug is disconnected from a household outlet.
- A full charge will supply enough power for approx. 4 shaves of 7 minutes each. (This will differ depending on usage.)
- You cannot operate the shaver while charging.
Model ER-GK60
- Make sure that the trimmer is turned off.
- Wipe off any water droplets on the appliance socket.
- Place the trimmer on the AC adaptor until it clicks.
- Insert the power plug into a household outlet. The charging time differs depending on the rated voltage 120 V Approx. 15 hours. 110 V Approx. 20 hours.
- Check that the charge indicator lamp glows.
- For safety and to reduce energy usage, disconnect the power plug after charging is completed. The charge indicator lamp continues to glow after charging is complete. There is no indication to show that “charging iscomplete”.
- You cannot operate the trimmer while charging.
Notes :
- If there is noise from the radio or other sources while using or charging the appliance, move to a different location to use the appliance.
- When the appliance is not used for 6 months or more, the battery will weaken (leak battery fluid, etc.). Fully charge the battery once every 6 months.
- When charging the trimmer for the first time or when it has not been in use for more than 6 months, the charging time may change or the lamp on the AC adaptor may not glow for a few minutes, or the operating time may shorten. Please charge it for more than 30 hours in such cases.
- Recommended ambient temperature for charging is 0 °C – 35 °C (32 °F – 95 °F). Battery performance may decrease outside of the recommended temperature.
- A full charge supplies enough power for approximately 40 minutes of use. (Based on dry using at 20 °C – 30 °C (68 °F – 86 °F)) The operating time may differ depending on the frequency of use, the operating method and the ambient temperature.
- You can charge the battery before it is completely discharged. However, it is recommended to charge when the battery is completely discharged. The battery life depends strongly on factors such as how it is used and stored.
Model ER-GK80
- Make sure that the trimmer is turned off.
- Connect the appliance plug to the appliance socket.
- Plug the adaptor into a household outlet.
- Check that the charge indicator lamp glows.
- Charging is completed after approx. 1 hour.
- If the shape of the plug does not fit the power outlet, use an attachment plug adaptor of the proper configuration.
- Disconnect the adaptor when the charge status lamp stops glowing. (for safety and to reduce energy usage).
How to Check if the charging is complete :
Remove and reinsert the appliance plug. If the charge status lamp glows and turns off after approximately 5 seconds, it is completed.
Notes :
- You cannot operate the main body while charging
- If there is noise from the radio or other sources while using or charging the appliance, move to a different location to use the appliance.
- When the appliance is not used for 6 months or more, the battery will weaken (leak battery fluid, etc.). Fully charge the battery once every 6 months.
- When charging the trimmer for the first time or when it has not been in use for more than 6 months, the charging time may change or the lamp on the AC adaptor may not glow for a few minutes, or the operating time may shorten. Please charge it for more than 8 hours in such cases.
- Recommended ambient temperature for charging is 0 °C – 35 °C (32 °F – 95 °F). Battery performance may decrease outside of the recommended temperature.
- A full charge supplies enough power for approximately 50 minutes of use. (Based on dry using at 20 °C – 30 °C (68 °F – 86 °F)) The operating time may differ depending on the frequency of use, the operating method and the ambient temperature.
- You can charge the battery before it is completely discharged. However, it is recommended to charge when the battery is completely discharged. The battery life depends strongly on factors such as how it is used and stored.
Model ER-GP21
- Make sure that the clipper is turned off.
- Place the clipper on the AC adaptor.
- Insert the power plug into a household outlet.
- Charging is completed after approx. 15 hours.
- Check the charge indicator lamp (
 ) glows.>
 - For safety and to reduce energy usage, disconnect the power plug after charging is completed. The charge indicator lamp ( ) continues to glow after charging is complete. There is no indication to show that “charging is complete”.
Notes:
- If there is crackling noise on radios or other devices while charging, charge the clipper using a different household outlet.
- When the appliance is not used for 6 months or more, the battery will weaken (leak battery fluid, etc.). Fully charge the battery once every 6 months.
- When charging the clipper for the first time or when it has not been in use for more than 6 months, the lamp on the main body may not glow for a few minutes, or the operating time may shorten. Please charge it for more than 23 hours in such cases.
- Recommended ambient temperature for charging is 0 °C – 35 °C (32 °F – 95 °F). Battery performance may decrease outside of the recommended temperature.
- 1 full charge will provide approximately 60 minutes of continuous operation.
Model ER-GP30
Make sure that the clipper is turned off.
- Connect the appliance plug to the appliance socket.
- Plug in the adaptor into a household outlet.
- Check that the charge status lamp glows.
- Charging is completed after approx. 8 hours.
- Check that the charge status lamp
- Disconnect the adaptor after charging is complete. For safety and to reduce energy usage the charge indicator lamp continues to glow after charging is complete. There is no indication to show that "charging is complete".
Note:
- If there is crackling noise on radios or other devices while charging, charge the clipper using a different household outlet.
- When the appliance is not used for 6 months or more, the battery will weaken (leak battery fluid, etc.). Fully charge the battery once every 6 months.
- When charging the trimmer for the first time or when it has not been in use for more than 6 months, the lamp on the main body may not glow for a few minutes, or the operating time may shorten. Please charge it for more than 16 hours in such cases.
- Recommended ambient temperature for charging is 0 °C – 35 °C. The charging time may change or battery performance may decrease outside of the recommended temperature.
- A full charge supplies enough power for approximately 40 minutes of use. The operating time may differ depending on the frequency of use, the operating method and the ambient temperature.
- You can charge the battery before it is completely discharged. However, it is recommended to charge when the battery is completely discharged. The battery life depends strongly on factors such as how it is used and stored.
- If the shape of the plug does not fit the power outlet, use an attachment plug adaptor of the proper configuration.
AC Operation
If you connect the AC adaptor to the trimmer in the same way as for charging, and turn on the power, you can use it.
- If the remaining battery is too low, the blades may move slowly or stop, even with the AC operation. In this case, charge the battery for 3 minute or more.
- The battery will be discharged, even with the AC operation.
Model ER-GP80
Press the power switch to turn off the power.
- Connect the appliance plug to the stand socket.
- Place the clipper on the charging stand.
- Insert the adaptor into a household outlet.
- Charging is required when the recharge lamp blinks.
- The clipper can be used for approximately 5 minutes after the recharge lamp blinks.
- When charging starts, charge status glows.
- When charging is completed, the charge status lamp blinks once again.
- 10 minutes after charging is completed, the charge status lamp blinks once every 2 seconds.
Note:
- 1 full charge will provide approximately 50 minutes of continuous operation. The operating time may differ depending on the frequency of use, the operating method and the ambient temperature.
- Charging is completed after approx. 1 hour
- The charging time may differ when using the clipper for the first time, or if it has not been used for more than 6 months. The lamp on the main body may not glow for several minutes when first starting charging, but will glow when continuing to charge.
- To keep charging the battery will not affect battery performance.
- Recommended ambient temperature for charging is 10 °C – 35 °C (50 °F – 95 °F). The battery may not charge properly or not at all under extreme low or high temperatures.
- When the charge status lamp is blinking rapidly (twice every second), there is a charging malfunction. Please charge the battery in the recommended ambient temperature range.
- If the shape of the plug does not fit the power outlet, use an attachment plug adaptor of the proper configuration.
Charging without the charging stand
- Press the power switch to turn off the power, and insert the appliance plug into the clipper.
- Plug in the adaptor into a household outlet.
AC operation
If you connect the AC adaptor to the clipper in the same way as for charging, and turn on the power, you can use it.
- If the remaining battery is too low, the blades may move slowly or stop, even with the AC operation. In this case, charge the battery for 1 minute or more.
- The battery will be discharged, even with the AC operation.
Model ER-GS60
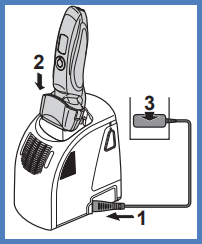
Perform the following steps to charge the clipper if it seems to lose speed.
- Turn off the clipper and insert it in the AC adaptor until it clicks as illustrated.
- The clipper will not charge unless the side terminals are in contact with the charging terminals.
- Wipe off any water droplets on the side terminals.
- If you charge the clipper with power switch turned on, it will start working when you remove from the AC adaptor.
- Put the power plug into a household outlet.
- The charge indicator lamp glows red.
- Charging time differs depending on the rated voltage. 110 V Charging time approx 20 hours. 120 V Charging time approx 15 hours.
- When charging the clipper for the first time or when it has not been in use for more than 6 months, the charge indicator lamp may not glow for a few minutes, or the operating time may shorten. Please charge it for more than 30 hours in such cases.
- Disconnect the power plug after charging is completed.
- To keep charging the battery will not affect battery performance.
- Recommended ambient temperature for charging is 0 ‑ 35 °C (32 ‑ 95 °F). The battery may not charge properly or not at all under extreme low or high temperatures.
- The charge indicator lamp glows and stays on until the power plug is disconnected from a household outlet.
- A full charge supplies enough power for approximately 40 minutes of use.
Note:
- You cannot operate the clipper while charging.
Model ER-SB40
- Connect the appliance plug to the appliance socket.
- Plug in the adaptor into a household outlet.
- Check that the charge status lamp glows.
- Charging is completed after approximately 1 hour.
- Check that the charge status lamp
- Disconnect the adaptor after charging is completed.
While charging
- The charge status lamp glows.
- The battery capacity lamp will blink in order of “LOW”, “MID”, and “HIGH” while the charging progresses.
After charging is completed
- The battery capacity lamp and the charge status lamp ( ) will light up and then turn off after 5 seconds.
Notes
- If there is noise from the radio or other sources while using or charging the appliance, move to a different location to use the appliance.
- The battery will deteriorate if not used for over 6 months, so make sure to perform a full charge at least once every 6 months.
- The charging time may differ when using the appliance for the first time, or if it has not been used for more than 6 months. The lamp on the appliance may not glow for several minutes when first starting charging, but will glow when continuing to charge.
- Recommended ambient temperature for charging is 10 °C – 35 °C (50 °F – 95 °F). It may take longer to charge, or the charge status lamp ( ) will blink quickly and the battery may fail to charge properly in extremely high or low temperatures.
- When the charge status lamp ( ) is blinking rapidly (twice every second), there is a charging malfunction. Please charge the battery in the recommended ambient temperature range.
- 1 full charge will provide approximately 60 minutes of continuous operation. (Based on dry using at 20 °C – 30 °C (68 °F – 86 °F)) The operating time may differ depending on the frequency of use and the operating method.
Model ER-SC40
- Connect the appliance plug to the appliance socket.
- Plug in the adaptor into a household outlet.
- Check that the charge status lamp glows.
- Charging is completed after approximately 1 hour.
- Check that the charge status lamp
- Disconnect the adaptor after charging is completed.
While charging
- The charge status lamp glows.
- The battery capacity lamp will blink in order of “LOW”, “MID”, and “HIGH” while the charging progresses.
After charging is completed
- The battery capacity lamp and the charge status lamp ( ) will light up and then turn off after 5 seconds.
Notes
- If there is noise from the radio or other sources while using or charging the appliance, move to a different location to use the appliance.
- The battery will deteriorate if not used for over 6 months, so make sure to perform a full charge at least once every 6 months.
- The charging time may differ when using the appliance for the first time, or if it has not been used for more than 6 months. The lamp on the appliance may not glow for several minutes when first starting charging, but will glow when continuing to charge.
- Recommended ambient temperature for charging is 10 °C – 35 °C (50 °F – 95 °F). It may take longer to charge, or the charge status lamp ( ) will blink quickly and the battery may fail to charge properly in extremely high or low temperatures.
- When the charge status lamp ( ) is blinking rapidly (twice every second), there is a charging malfunction. Please charge the battery in the recommended ambient temperature range.
- 1 full charge will provide approximately 60 minutes of continuous operation. (Based on dry using at 20 °C – 30 °C (68 °F – 86 °F)) The operating time may differ depending on the frequency of use and the operating method.
Model ES-8103
- Turn the shaver off.
- Wipe off any water droplets on the appliance socket.
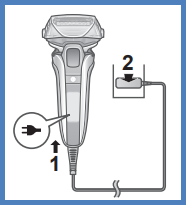
- Insert the appliance plug into the shaver.
- Plug the adaptor into a household outlet.
- Check that the charge status lamp ( ) is glowing.
- Charging is completed after approx. 1 hour.
- If the shape of the plug does not fit the power outlet, use an attachment plug adaptor of the proper configuration.
- Check that the charge status lamp (
- Disconnect the adaptor after charging is completed.
Note:
You cannot operate the shaver while charging.
While charging, the indicators glow. After charging is complete, the indicators blink once every second. 10 minutes after charging is completed, the indicators blink once every 2 seconds. When the battery capacity is low, "10%" appears and charge status lamp blinks. A full charge will supply enough power for approx. 14 shaves of 3 minutes each.
Model ES-8243
- Insert the appliance plug into the shaver.
- Plug in the adaptor into a household outlet.
- The indicators on the LCD panel glow and charging starts.
- Charging is completed when the indicators on the LCD panel blink. (Max. 1 hour later)
- If the shape of the plug does not fit the power outlet, use an attachment plug adaptor of the proper configuration.
Reading the LCD panel
The LCD panel shows the remaining battery capacity from 0% to 100%, in 10% increments.
- While charging, the indicators glow.
- After charging is completed, the indicators blink once every second.
- 10 minutes after charging is completed, the indicators blink once every 2 seconds.
- During use, the used time is shown. The shown time returns to [0'00"] after 10 minutes.
- After use, the used time and the remaining battery capacity are shown alternately after turning off the shaver.
- When the battery capacity is low, you can shave 1 to 2 times after "10%" appears and blinks. (This will differ depending on usage.)
- A full charge will supply enough power for approx. 14 shaves of 3 minutes each.
Model ES-ALV6HS
- Turn the shaver off.
- Wipe off any water droplets on the appliance socket.
- Check that the charge status lamp is glowing.
- Charging is completed after approx. 1 hour.
- If the shape of the plug does not fit the power outlet, use an attachment plug adaptor of the proper configuration.
Model ES-AWL6AG
- Make sure that the shaver is turned off.
- Wipe off any water droplets on the appliance socket.
- The shaver cannot be operated while charging.
- Place the shaver on the AC adaptor until it clicks.
- Insert the power plug into a household outlet.
- It will take approximately 20 hours to fully charge the shaver.
- Check that the charging indicator lamp glows.
- After charging is completed, unplug the power plug and then the shaver. (for safety and energy saving)
- The charging indicator lamp continues to glow after charging is completed. There is no indication to show that “charging is completed”.
- Charging the battery for more than 20 hours will not affect battery performance.
- Always unplug the shaver from the AC adaptor except when charging.
Notes:
- Make sure that the shaver is turned off.
- Wipe off any water droplets on the appliance socket.
- The shaver cannot be operated while charging.
- If you experience noise from the radio or other sources while using or charging the shaver, move to a different location.
- The battery may deteriorate if not used for over 6 months; perform a full charge at least once every 6 months.
- When charging the shaver for the first time or after more than 6 months, the charging time may change, or the lamp may not glow initially. Charge for more than 30 hours in such cases.
- The recommended charging temperature is 0°C – 35°C (32°F – 95°F).
- A full charge supplies enough power for approximately 35 minutes of use (based on dry use at 20°C – 30°C / 68°F – 86°F).
- You can charge the battery before it is completely discharged, but it is recommended to charge when fully discharged.
Model ES-AWL8AV
- Make sure that the shaver is turned off.
- Wipe off any water droplets on the appliance socket.
- You cannot operate the shaver while charging.
- Place the shaver on the AC adapter until it clicks.
- Insert the power plug into a household outlet.
- It will take approximately 20 hours to fully charge the shaver.
- Check that the charging indicator lamp glows.
- After charging is completed, unplug the power plug and then the shaver for safety and energy saving.
- The charging indicator lamp continues to glow even after charging is completed.
- Charging the battery for more than 20 hours will not affect battery performance.
- Always unplug the shaver from the AC adapter except when charging.
Notes:
- If there is noise from the radio or other sources while using or charging the shaver, move to a different location.
- The battery will deteriorate if not used for over 6 months; perform a full charge at least once every 6 months.
- When charging the shaver for the first time or after long-term storage, the charging time may vary. Please charge it for more than 30 hours in such cases.
- The recommended charging temperature is 0°C – 35°C (32°F – 95°F).
- A full charge provides approximately 35 minutes of use, though this may differ based on various conditions.
- You can charge the battery before it is completely discharged, but it’s recommended to do so when fully discharged for optimal battery life.
Model ES-CM3A-K, ES-CM3A-V, ES-CM3A-W
- Before charging, make sure that this product is powered off.
- Do not charge when the socket is wet. Wipe the socket when it is wet before charging.
- Open the protective cap to check that the charge status indicator lights on, and then install the protective cap to avoid damaging the system outer foil.
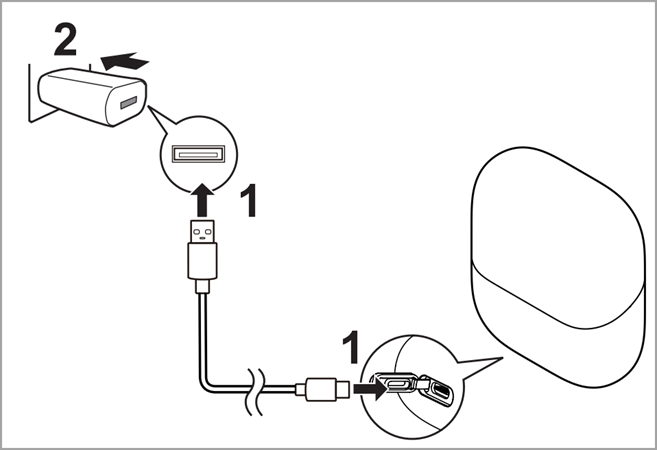
- Insert the USB cable into the main body and the USB power adaptor.
- Connect the USB power adaptor to a household outlet.
- After charging, remove the USB cable and attach the socket cover.
- Be sure to close the socket cover when using or washing.
Display of the charge status indicator during charging.
| Charging in progress | Lights on |
|---|---|
| Charging complete | Lights off |
| Charging abnormal | Blink twice every second |
When the battery capacity is low
- When this product is in use, the charge status indicator blinks once a second.
- When this product is powered off, the main body generates a prompt tone.
How to confirm that charging is completed
- If the Type-C plug is removed and inserted back to charge this product again right after charging is completed, the charge status indicator turns on and then off in about 5 seconds.
Notes
- You cannot operate this product while charging.
- This product may be charged with adaptors other than the specified one, but Panasonic's specified adaptor with splash-resistant design should be used to ensure safety. The Panasonic's specified adaptor is not completely waterproof, so do not immerse the adaptor in water.
- This product uses a Li‑ion battery. Therefore, the service life of the battery will not be affected even if it is charged after each use.
- Charging is completed after approx. 1 hour. The charging time may be shortened, depending on the remaining battery level.
- When this product is used for the first time or when it has not been used for more than 6 months, the charging time may differ and the charge status indicator may not light on immediately. However, it will light on as the charging proceeds.
- If this product has not been used for a long time, the battery performance may be degraded. Therefore, if this product has not been used for more than half a year, please fully charge the battery once every half a year.
- If an ineligible power supply is used for charging or such problems as poor contact of the USB cable occur, the charging time may become longer and this product may even be damaged.
- This product can be used for approximately 60 minutes after it is fully charged. (Based on dry‑shave usages in an ambient temperature range of 20 °C – 30 °C.) The available days depend on the usage conditions: beard thickness, pressure applied to the skin, and use of wet shaving.
- If there is noise from the radio or other sources while this product is used or charged, move this product to a different location or charge it with another household outlet.
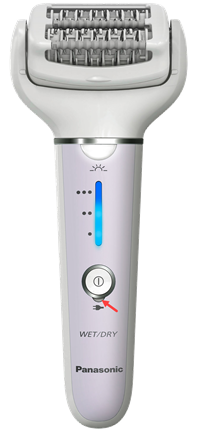
Model ES-EY30V
To ensure optimal performance, it's important to fully charge the appliance before use, as it cannot be operated while charging. The approximate charging time is 1 hour
The runtime of the epilator varies depending on the temperature but is typically around 30 minutes on a one-hour charge (or 35 minutes with the gentle cap for arms and legs).
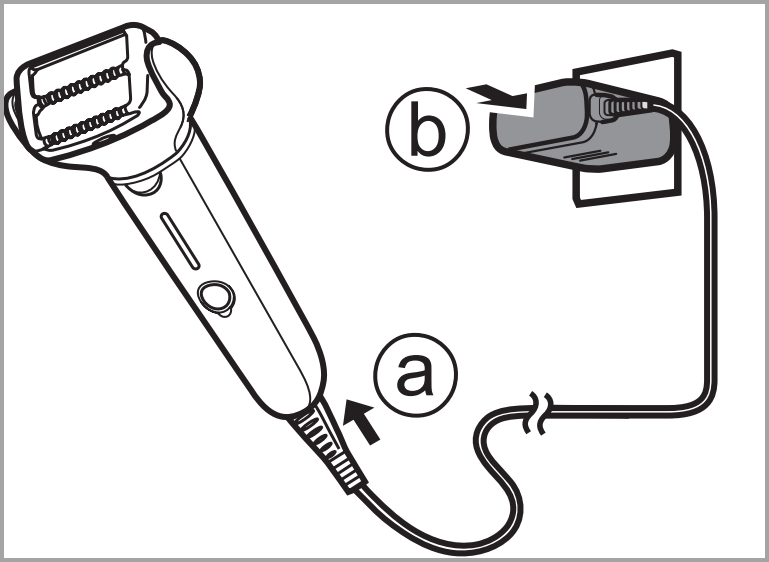
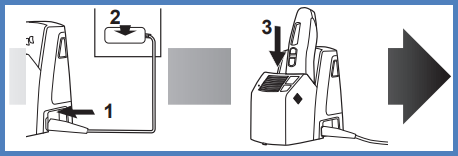
- To charge the appliance, plug the AC adaptor into the epilator and then into a household outlet.
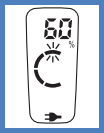
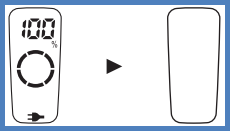
- While charging, the indication/notification light will glow red, turn off when fully charged, and blinks twice a second if there is an error.
- It's recommended to charge the appliance at an ambient temperature of 15°C – 35°C to avoid longer charging times or failure.
- Charging time may also vary depending on the remaining battery.
- Charging the appliance after each use doesn't affect the rechargeable battery's lifespan.
- When charging for the first time or after 6 months of non-use, the charging time may vary, and the indication/notification light may take a few minutes to glow but eventually will activate.
- If there's interference from radio or other sources during use or charging, it's advised to relocate for a smoother experience.
Check the charging status
- unplug and then plug the appliance again while charging to confirm that the indication/notification light glows and turns off after 5 seconds."
Model ES-GA21
- Turn the shaver off.
- Wipe off any water droplets on the appliance socket.
- Insert the appliance plug into the shaver.
- Plug the adaptor into a household outlet.
- Check that the charge status lamp ( ) is glowing.
- Charging is completed after approx. 1 hour.
- If the shape of the plug does not fit the power outlet, use an attachment plug adaptor of the proper configuration.
- Check that the charge status lamp (
- Disconnect the adaptor after charging is completed.
Note:
- While charging the charge status lamp glows red.
- After charging is complete, the charge status lamp blinks red once every second.
- 10 minutes after charging is completed, the charge status lamp blinks red once every 2 seconds.
- A full charge will supply enough power for approx. 14 shaves of 3 minutes each.
Model ES-LA63
- Turn the shaver off.
- Wipe off any water droplets on the appliance socket.
- Insert the appliance plug into the shaver.
- Plug the adaptor into a household outlet.
- Check that the charge status lamp ( ) is glowing.
- Charging is completed after approx. 1 hour.
- If the shape of the plug does not fit the power outlet, use an attachment plug adaptor of the proper configuration.
- Check that the charge status lamp (
- Disconnect the adaptor after charging is completed.
Note:
You cannot operate the shaver while charging.
While charging, the indicators glow. After charging is complete, the indicators blink once every second. 10 minutes after charging is completed, the indicators blink once every 2 seconds. When the battery capacity is low, "10%" appears and charge status lamp blinks. A full charge will supply enough power for approx. 14 shaves of 3 minutes each.
Model ES-LA93
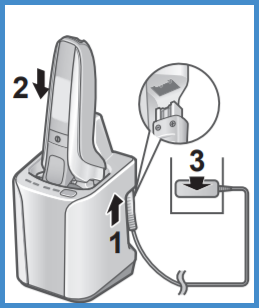
Thoroughly wipe off any drops of water on or around the recharger so that it is dry before charging it.
- Insert the appliance plug into self-cleaning recharger.
- Plug in the adaptor.
- Remove the protective cap and then attach the shaver.
- Turn the shaver off before attaching.
- Check that the outer foil is not deformed or damaged when you are attaching the shaver
- Charging is completed when the indicators on the LCD panel blink. (Max. 1 hour later)
- You can keep the shaver attached to the recharger, or connected to the adaptor, when not using it to maintain full battery capacity. You cannot overcharge the shaver.
- If the shape of the plug does not fit the power outlet, use an attachment plug adaptor of the proper configuration.
Charging without the self-cleaning recharger
- Insert the appliance plug into the shaver.
- Plug in the adaptor into a household outlet.
About the LCD panel
The LCD panel shows the remaining battery capacity from 0% to 100%, in 10% increments.
- While charging, the indicator glows.
- After charging is completed, the indicators blink once every second.
- 10 minutes after charging is completed, the indicators blink once every 2 seconds.
- During use, the used time is shown.
- The indicators turn off after 5 seconds.
- The shown time returns to [0'00"] after 10 minutes.
- After use, the used time and the remaining battery capacity are shown alternatively after turning off the shaver.
- When the battery capacity is low, "10%" appears.
- A full charge will supply enough power for approx. 14 shaves of 3 minutes each.
Model ES-LF51
- Insert the appliance plug into the shaver.
- Plug in the AC adaptor into a household outlet.
Note:
- Turn the shaver off before attaching.
- Charging is completed after approx. 1 hour.
- If the shape of the plug does not fit the power outlet, use an attachment plug adaptor of the proper configuration.
- You cannot operate the shaver while charging.
Reading lamps when charging
- While charging, the charge status lamp glows.
- The LCD panel shows the remaining battery capacity from 0% to 100%, in 20% increments.
- The number of the battery capacity lamp will increase as charging progresses.
- After charging is completed, all the lamps will light up and then turn off after 5 seconds.
- 10 minutes after charging is completed, the indicators blink once every 2 seconds.
- When the battery capacity is low, "0%" appears and the charge status lamp blinks.
Note:
- After charging is completed, turning the power switch ON with the shaver plugged in will cause all the lamps to light up and then turn off after 5 seconds. This shows that the shaver is fully charged.
- Recommended ambient temperature for charging is 5-35 °C (41‑95 °F). The battery may not charge properly or not at all under extreme low or high temperatures. The charge status lamp will blink when there is a problem with charging.
- When charging the shaver for the first time or when it has not been in use for more than 6 months, the charge status lamp may not glow. It will eventually glow if kept connected.
Model ES-LS8A
Make sure that the trimmer is turned off. Wipe off any water droplets on the appliance socket.
- Insert the appliance plug into the shaver.
- Plug the power plug into a household outlet.
- Check that the charge status lamp ( ) is glowing.
- Charging is completed after approx. 1 hour.
- If the shape of the plug does not fit the power outlet, use an attachment plug adaptor of the proper configuration.
- Check that the charge status lamp (
- Disconnect the plug after charging is completed (for safety and to reduce energy usage). The charge indicator lamp continues to glow after charging is complete. There is no indication to show that “charging is complete”.
Notes
- Cannot operate the shaver while charging.
- When charging the trimmer for the first time or when it has not been in use for more than 6 months, the charging time may change or the charge indicator lamp may not glow for a few minutes, or the operating time may shorten.
- To keep charging the battery will not affect battery performance.
- When the appliance is not used for 6 months or more, the battery will weaken (leak battery fluid, etc.). Fully charge the battery once every 6 months.
- Recommended ambient temperature for charging is 10 ‑ 35 °DegreesC (50 ‑ 95 °DegreesF). It may take longer to charge, or the charge status lamp will blink quickly and the battery may fail to charge properly in extremely high or low temperatures.
- The shaver can be used for approximately 2 weeks with a full charge. (Based on one 3‑minute dry‑shave usage per day in an ambient temperature range of 20 °C – 30 °C [68 °F – 86 °F].) The number of usable days varies depending on the following conditions.
- Beard thickness Pressure applied to the skin
- Usage frequency of the sonic vibration cleaning mode.
- If there is noise from the radio or other sources while using or charging the appliance, move to a different location to use the appliance.
How to Quick Charge
Even though the battery runs out, you can shave once after 3-minute charge. (This will differ depending on usage.) glows. The number of the battery capacity lamp will increase as charging progresses.
After charging is completed. 100%” appears and then turns off after 5 seconds.
Notes
- When charging the shaver for the first time or when it has not been in use for more than 6 months, the charging time may change or the charge status lamp ( ) may not glow for a few minutes.
- It will eventually glow if kept connected.
- >Recommended ambient temperature for charging is 10 °C – 35 °C (50 °F – 95 °F). It may take longer to charge, or the charge status lamp ( ) will blink quickly and the battery may fail to charge properly in extremely high or low temperatures.
Model ES-LS9A
Make sure that the trimmer is turned off. Wipe off any water droplets on the appliance socket.
- Insert the appliance plug into the shaver.
- Plug the power plug into a household outlet.
- Check that the charge status lamp ( ) is glowing.
- Charging is completed after approx. 1 hour.
- If the shape of the plug does not fit the power outlet, use an attachment plug adaptor of the proper configuration.
- Check that the charge status lamp (
- Disconnect the plug after charging is completed (for safety and to reduce energy usage). The charge indicator lamp continues to glow after charging is complete. There is no indication to show that “charging is complete”.
Notes
- Cannot operate the shaver while charging.
- When charging the trimmer for the first time or when it has not been in use for more than 6 months, the charging time may change or the charge indicator lamp may not glow for a few minutes, or the operating time may shorten.
- To keep charging the battery will not affect battery performance.
- When the appliance is not used for 6 months or more, the battery will weaken (leak battery fluid, etc.). Fully charge the battery once every 6 months.
- Recommended ambient temperature for charging is 10 ‑ 35 °DegreesC (50 ‑ 95 °DegreesF). It may take longer to charge, or the charge status lamp will blink quickly and the battery may fail to charge properly in extremely high or low temperatures.
- The shaver can be used for approximately 2 weeks with a full charge. (Based on one 3‑minute dry‑shave usage per day in an ambient temperature range of 20 °C – 30 °C [68 °F – 86 °F].) The number of usable days varies depending on the following conditions.
- Beard thickness Pressure applied to the skin
- Usage frequency of the sonic vibration cleaning mode.
- If there is noise from the radio or other sources while using or charging the appliance, move to a different location to use the appliance.
How to Quick Charge
Even though the battery runs out, you can shave once after 3-minute charge. (This will differ depending on usage.) glows. The number of the battery capacity lamp will increase as charging progresses.
After charging is completed. 100%” appears and then turns off after 5 seconds.
Notes
- When charging the shaver for the first time or when it has not been in use for more than 6 months, the charging time may change or the charge status lamp ( ) may not glow for a few minutes.
- It will eventually glow if kept connected.
- >Recommended ambient temperature for charging is 10 °C – 35 °C (50 °F – 95 °F). It may take longer to charge, or the charge status lamp ( ) will blink quickly and the battery may fail to charge properly in extremely high or low temperatures.
Model ES-LS8A
Make sure that the trimmer is turned off. Wipe off any water droplets on the appliance socket.
- Insert the appliance plug into the shaver.
- Plug the power plug into a household outlet.
- Check that the charge status lamp ( ) is glowing.
- Charging is completed after approx. 1 hour.
- If the shape of the plug does not fit the power outlet, use an attachment plug adaptor of the proper configuration.
- Check that the charge status lamp (
- Disconnect the plug after charging is completed (for safety and to reduce energy usage). The charge indicator lamp continues to glow after charging is complete. There is no indication to show that “charging is complete”.
Notes
- Cannot operate the shaver while charging.
- When charging the trimmer for the first time or when it has not been in use for more than 6 months, the charging time may change or the charge indicator lamp may not glow for a few minutes, or the operating time may shorten.
- To keep charging the battery will not affect battery performance.
- When the appliance is not used for 6 months or more, the battery will weaken (leak battery fluid, etc.). Fully charge the battery once every 6 months.
- Recommended ambient temperature for charging is 10 ‑ 35 °DegreesC (50 ‑ 95 °DegreesF). It may take longer to charge, or the charge status lamp will blink quickly and the battery may fail to charge properly in extremely high or low temperatures.
- The shaver can be used for approximately 2 weeks with a full charge. (Based on one 3‑minute dry‑shave usage per day in an ambient temperature range of 20 °C – 30 °C [68 °F – 86 °F].) The number of usable days varies depending on the following conditions.
- Beard thickness Pressure applied to the skin
- Usage frequency of the sonic vibration cleaning mode.
- If there is noise from the radio or other sources while using or charging the appliance, move to a different location to use the appliance.
How to Quick Charge
Even though the battery runs out, you can shave once after 3-minute charge. (This will differ depending on usage.) glows. The number of the battery capacity lamp will increase as charging progresses.
After charging is completed. 100%” appears and then turns off after 5 seconds.
Notes
- When charging the shaver for the first time or when it has not been in use for more than 6 months, the charging time may change or the charge status lamp ( ) may not glow for a few minutes.
- It will eventually glow if kept connected.
- >Recommended ambient temperature for charging is 10 °C – 35 °C (50 °F – 95 °F). It may take longer to charge, or the charge status lamp ( ) will blink quickly and the battery may fail to charge properly in extremely high or low temperatures.
Model ES-LS9A
Make sure that the trimmer is turned off. Wipe off any water droplets on the appliance socket.
- Insert the appliance plug into the self cleaning recharger.
- Remove the protective cap while pressing the side of the cap and insert the shaver into the self cleaning recharger.
- Slowly insert the shaver into the self-cleaning recharger taking care not to damage the system outer foil.
- Plug the power plug into a household outlet.
- Check that the charge status lamp ( ) is glowing.
- Charging is completed after approx. 1 hour.
- If the shape of the plug does not fit the power outlet, use an attachment plug adaptor of the proper configuration.
- Check that the charge status lamp (
- Disconnect the plug after charging is completed (for safety and to reduce energy usage). The charge indicator lamp continues to glow after charging is complete. There is no indication to show that “charging is complete”.
Notes
- Cannot operate the shaver while charging.
- When charging the trimmer for the first time or when it has not been in use for more than 6 months, the charging time may change or the charge indicator lamp may not glow for a few minutes, or the operating time may shorten.
- To keep charging the battery will not affect battery performance.
- When the appliance is not used for 6 months or more, the battery will weaken (leak battery fluid, etc.). Fully charge the battery once every 6 months.
- Recommended ambient temperature for charging is 10 ‑ 35 °DegreesC (50 ‑ 95 °DegreesF). It may take longer to charge, or the charge status lamp will blink quickly and the battery may fail to charge properly in extremely high or low temperatures.
- The shaver can be used for approximately 2 weeks with a full charge. (Based on one 3‑minute dry‑shave usage per day in an ambient temperature range of 20 °C – 30 °C [68 °F – 86 °F].) The number of usable days varies depending on the following conditions.
- Beard thickness Pressure applied to the skin
- Usage frequency of the sonic vibration cleaning mode.
- If there is noise from the radio or other sources while using or charging the appliance, move to a different location to use the appliance.
How to Quick Charge
Even though the battery runs out, you can shave once after 3-minute charge. (This will differ depending on usage.) glows. The number of the battery capacity lamp will increase as charging progresses.
After charging is completed. 100%” appears and then turns off after 5 seconds.
Notes
- When charging the shaver for the first time or when it has not been in use for more than 6 months, the charging time may change or the charge status lamp ( ) may not glow for a few minutes.
- It will eventually glow if kept connected.
- >Recommended ambient temperature for charging is 10 °C – 35 °C (50 °F – 95 °F). It may take longer to charge, or the charge status lamp ( ) will blink quickly and the battery may fail to charge properly in extremely high or low temperatures.
Model ES-LL21, ES-LL41
- Turn the shaver off.
- Wipe off any water droplets on the appliance socket.
- Insert the appliance plug into the shaver.
- Plug the adaptor into a household outlet.
- Check that the charge status lamp ( ) is glowing.
- Charging is completed after approx. 1 hour.
- If the shape of the plug does not fit the power outlet, use an attachment plug adaptor of the proper configuration.
- Check that the charge status lamp (
- Disconnect the adaptor after charging is completed.
Note:
You cannot operate the shaver while charging.
While charging the charge status lamp glows. The number of the battery capacity lamp will increase as charging progresses.
After charging is completed, all the battery capacity lamp and the charge status lamp will glow and then turn off after 5 seconds.
Notes :
- When charging the shaver for the first time or when it has not been in use for more than 6 months, the charging time may change or the charge status lamp may not glow for a few minutes. It will eventually glow if kept connected.
- Recommended ambient temperature for charging is 10 °C – 35 °C (50 °F – 95 °F). It may take longer to charge, or the charge status lamp will blink quickly and the battery may fail to charge properly in extremely high or low temperatures.
- The battery used is a lithium‑ion, so charging after every use will have no effect on battery life.
- The shaver can be used for approximately 2 weeks with a full charge. (Based on one 3‑minute dry‑shave usages per day in an ambient temperature range of 20 °C – 30 °C (68 °F – 86 °F).) The number of usable days varies depending on the following conditions.
- Beard thickness
- Pressure applied to the skin
- Usage frequency of the sonic vibration cleaning mode
- If there is noise from the radio or other sources while using or charging the appliance, move to a different location to use the appliance.
Model ES-LT2B
- Turn the shaver off.
- Wipe off any water droplets on the appliance socket.
- Insert the appliance plug into the shaver
- Plug in the adaptor into a household outlet
- Check that the charge status lamp ( ) is glowing.
- Charging is completed after approx. 1 hour.
- If the shape of the plug does not fit the power outlet, use an attachment plug adaptor of the proper configuration.
- Check that the charge status lamp (
- Disconnect the adaptor after charging is completed and the charge status lamp ( ) turns off.
- While charging the charge status lamp ( ) glows red.
- After charging is completed the charge status lamp ( ) turns off.
- Abnormal charging the charge status lamp ( ) will blink twice every second.
- After charging is completed, turning the power switch ON with the shaver plugged in will cause the charge status lamp ( ) to light up and then turn off after 5 seconds.
This shows that the shaver is fully charged.
- When charging the shaver for the first time or when it has not been in use for more than 6 months, the charging time may change or the charge status lamp ( ) may not glow for a few minutes. It will eventually glow if kept connected.
- Recommended ambient temperature for charging is 10 °C – 35 °C (50 °F – 95 °F). It may take longer to charge or the battery may fail to charge properly in extremely high or low temperatures.
- The charge status lamp ( ) will blink twice every second when there is a problem with charging. Charge the shaver within the recommended ambient temperature range.
- The shaver can be used for approximately 2 weeks with a full charge. (Based on one 3-minute dry-shave usages per day in an ambient temperature range of 20 °C – 30 °C [68 °F – 86 °F].)
- The number of usable days varies depending on the following conditions.
- Beard thickness
- Pressure applied to the skin
- Usage of wet shaving.
- Usage in shaving foam mode.
- If there is noise from the radio or other sources while using or charging the appliance, move to a different location to use the appliance.
Note
You cannot operate the shaver while charging.
Quick charge
Even though the battery runs out, you can shave once after 3-minute charge. (This will differ depending on usage.)
Model ES-LT3N
- Turn the shaver off.
- Wipe off any water droplets on the appliance socket.
- Insert the appliance plug into the shaver.
- Plug the adaptor into a household outlet.
- Check that the charge status lamp ( ) is glowing.
- Charging is completed after approx. 1 hour.
- If the shape of the plug does not fit the power outlet, use an attachment plug adaptor of the proper configuration.
- Check that the charge status lamp (
- Disconnect the adaptor after charging is completed.
Note:
You cannot operate the shaver while charging.
While charging the charge status lamp glows. The number of the battery capacity lamp will increase as charging progresses.
After charging is completed, all the battery capacity lamp and the charge status lamp will glow and then turn off after 5 seconds.
Notes :
- When charging the shaver for the first time or when it has not been in use for more than 6 months, the charging time may change or the charge status lamp may not glow for a few minutes. It will eventually glow if kept connected.
- Recommended ambient temperature for charging is 10 °C – 35 °C (50 °F – 95 °F). It may take longer to charge, or the charge status lamp will blink quickly and the battery may fail to charge properly in extremely high or low temperatures.
- The shaver can be used for approximately 2 weeks with a full charge. (Based on one 3‑minute dry‑shave usages per day in an ambient temperature range of 20 °C – 30 °C (68 °F – 86 °F).) The number of usable days varies depending on the following conditions.
- Beard thickness
- Pressure applied to the skin
- Usage frequency of the sonic vibration cleaning mode
- If there is noise from the radio or other sources while using or charging the appliance, move to a different location to use the appliance.
Model ES-LT41
- Turn the shaver off.
- Wipe off any water droplets on the appliance socket.
- Insert the appliance plug into the shaver.
- Plug the adaptor into a household outlet.
- Check that the charge status lamp is glowing.
- Charging is completed after approx. 1 hour.
- If the shape of the plug does not fit the power outlet, use an attachment plug adaptor of the proper configuration.
- Check that the charge status lamp
- Disconnect the adaptor after charging is completed.
Note:
You cannot operate the shaver while charging.
The percentage of available battery capacity indicators glow. The percentage of the available battery capacity will increase as charging progresses. After charging is completed, the indicators blink once every second.
Notes:
- Recommended ambient temperature for charging is 15 - 35 °C (59 - 95 °F). The battery may degrade the performance or may not charge under extreme low or high temperatures. The indicators will blink twice every second when there is a problem with charging.
- When charging the shaver for the first time or when it has not been in use for more than 6 months, the indicators may not glow. It will eventually glow if kept connected.
Model ES-LT5N
- Turn the shaver off.
- Wipe off any water droplets on the appliance socket.
- Insert the appliance plug into the shaver.
- Plug the adaptor into a household outlet.
- Check that the charge status lamp is glowing.
- Charging is completed after approx. 1 hour.
- If the shape of the plug does not fit the power outlet, use an attachment plug adaptor of the proper configuration.
- Check that the charge status lamp
- Disconnect the adaptor after charging is completed.
Note:
You cannot operate the shaver while charging.
While charging the charge status lamp glows. The number of the battery capacity lamp will increase as charging progresses.
After charging is completed, all the battery capacity lamp and the charge status lamp will glow and then turn off after 5 seconds.
Notes :
- When charging the shaver for the first time or when it has not been in use for more than 6 months, the charging time may change or the charge status lamp may not glow for a few minutes. It will eventually glow if kept connected.
- Recommended ambient temperature for charging is 10 °C – 35 °C (50 °F – 95 °F). It may take longer to charge, or the charge status lamp will blink quickly and the battery may fail to charge properly in extremely high or low temperatures.
- The shaver can be used for approximately 2 weeks with a full charge. (Based on one 3‑minute dry‑shave usages per day in an ambient temperature range of 20 °C – 30 °C (68 °F – 86 °F).) The number of usable days varies depending on the following conditions.
- Beard thickness
- Pressure applied to the skin
- Usage frequency of the sonic vibration cleaning mode
- If there is noise from the radio or other sources while using or charging the appliance, move to a different location to use the appliance.
Model ES-LT67
- Turn the shaver off.
- Wipe off any water droplets on the appliance socket.
- Insert the appliance plug into the shaver.
- Plug the adaptor into a household outlet.
- Check that the charge status lamp ( ) is glowing.
- Charging is completed after approx. 1 hour.
- If the shape of the plug does not fit the power outlet, use an attachment plug adaptor of the proper configuration.
- Check that the charge status lamp (
- Disconnect the adaptor after charging is completed.
Note:
You cannot operate the shaver while charging.
While charging the charge status lamp glows. The number of the battery capacity lamp will increase as charging progresses.
After charging is completed, all the battery capacity lamp and the charge status lamp will glow and then turn off after 5 seconds.
Notes :
- When charging the shaver for the first time or when it has not been in use for more than 6 months, the charging time may change or the charge status lamp may not glow for a few minutes. It will eventually glow if kept connected.
- Recommended ambient temperature for charging is 10 °C – 35 °C (50 °F – 95 °F). It may take longer to charge, or the charge status lamp will blink quickly and the battery may fail to charge properly in extremely high or low temperatures.
- The shaver can be used for approximately 2 weeks with a full charge. (Based on one 3‑minute dry‑shave usages per day in an ambient temperature range of 20 °C – 30 °C (68 °F – 86 °F).) The number of usable days varies depending on the following conditions.
- Beard thickness
- Pressure applied to the skin
- Usage frequency of the sonic vibration cleaning mode
- If there is noise from the radio or other sources while using or charging the appliance, move to a different location to use the appliance.
Model ES-LT7N
- Turn the shaver off.
- Wipe off any water droplets on the main body rear terminals.
- Insert the appliance plug into the self-cleaning recharger.
- Remove the protective cap while pressing the side of the cap and insert the shaver into the self-cleaning recharger. Slowly insert the shaver into the self-cleaning recharger taking care not to damage the system outer foil.
- Plug the adaptor into a household outlet.
- Check that the charge status lamp is glowing
- Charging is completed after approx. 1 hour.
- If the shape of the plug does not fit the power outlet, use an attachment plug adaptor of the proper configuration.
- Check that the charge status lamp
- Disconnect the adaptor after charging is completed.
Charge Status indicators
- While charging the charge status lanp glows. The number of the battery capacity lamp will increase as charging progresses. Image shown on display may vary depending on the model.
- After charging is completed all the battery capacity lamp and the charge status lamp will glow and then turn off after 5 seconds. Image shown on display may vary depending on the model.
Notes
- When charging the shaver for the first time or when it has not been in use for more than 6 months, the charging time may change or the charge status lamp may not glow for a few minutes. It will eventually glow if kept connected.
- Recommended ambient temperature for charging is 10 °C – 35 °C (50 °F – 95 °F). It may take longer to charge, or the charge status lamp will blink quickly and the battery may fail to charge properly in extremely high or low temperatures.
- The shaver can be used for approximately 2 weeks with a full charge. (Based on one 3‑minute dry‑shave usages per day in an ambient temperature range of 20 °C – 30 °C (68 °F – 86 °F).) The number of usable days varies depending on the following conditions.
- Beard thickness
- Pressure applied to the skin
- Usage frequency of the sonic vibration cleaning mode
- If there is noise from the radio or other sources while using or charging the appliance, move to a different location to use the appliance.
Charging without the self-cleaning recharger
- Turn the shaver off.
- Wipe off any water droplets on the appliance socket.
- Insert the appliance plug into the shaver.
- Plug the adaptor into a household outlet.
- Disconnect the adaptor after charging is completed.
Note :
- You cannot operate the shaver while charging.
Model ES-LT71
Charging using the self-cleaning recharger
Thoroughly wipe off any drops of water on or around the self cleaning recharger so that it is dry before charging the shaver.
- Insert the appliance plug into the self-cleaning recharger.
- Remove the protective cap and then gently insert the shaver as shown.
- Plug in the AC adaptor into a household outlet.
- The “Charge” course starts when attaching the shaver.
- Turn the shaver off before inserting.
- Check that the outer foil is not deformed or damaged when you insert the shaver
- Wipe off any water droplets on the main body rear terminal.
- You can charge even when the STATUS lamp of the self-cleaning recharger is blinking.
- Charging is completed after approx. 1 hour.
- If the shape of the plug does not fit the power outlet, use an attachment plug adaptor of the proper configuration.
- You can keep the shaver attached to the self-cleaning recharger, or connected to the AC adaptor, when not using it to maintain full battery capacity. You cannot overcharge the shaver.
Charging without the self-cleaning recharger
- Insert the appliance plug into the shaver.
- Plug in the AC adaptor into a household outlet.
- You cannot operate shaver while charging.
Reading lamps when charging
- While charging, the charge status lamp glows, the number of the battery capacity lamp will increase as charging progresses.
- After charging is completed, all the lamps will light up and then turn off after 5 seconds.
- After charging is completed, turning the power switch ON with the shaver plugged in will cause all the lamps to light up and then turn off after 5 seconds. This shows that the shaver is fully charged.
- Recommended ambient temperature for charging is 5‑35 °C (41-95 °F). The battery may not charge properly or not at all under extreme low or high temperatures. The charge status lamp will blink when there is a problem with charging.
- When charging the shaver for the first time or when it has not been in use for more than 6 months, the charge status lamp may not glow. It will eventually glow if kept connected.
Model ES-LV6N, ES-LV6Q
- Turn the shaver off.
- Wipe off any water droplets on the appliance socket.
- Insert the appliance plug into the shaver.
- Plug the adaptor into a household outlet.
- Check that the charge status lamp ( ) is glowing.
- Charging is completed after approx. 1 hour.
- If the shape of the plug does not fit the power outlet, use an attachment plug adaptor of the proper configuration.
- Check that the charge status lamp (
- Disconnect the adaptor after charging is completed.
Note:
You cannot operate the shaver while charging.
While charging the charge status lamp glows. The number of the battery capacity lamp will increase as charging progresses.
After charging is completed, all the battery capacity lamp and the charge status lamp will glow and then turn off after 5 seconds.
Notes :
- When charging the shaver for the first time or when it has not been in use for more than 6 months, the charging time may change or the charge status lamp may not glow for a few minutes. It will eventually glow if kept connected.
- Recommended ambient temperature for charging is 10 °C – 35 °C (50 °F – 95 °F). It may take longer to charge, or the charge status lamp will blink quickly and the battery may fail to charge properly in extremely high or low temperatures.
- The battery used is a lithium-ion, so charging after every use will have no effect on battery life. However for safety precautions we recommend unplugging it when charging is not necessary.
- The shaver can be used for approximately 2 weeks with a full charge. (Based on one 3‑minute dry‑shave usages per day in an ambient temperature range of 20 °C – 30 °C (68 °F – 86 °F).) The number of usable days varies depending on the following conditions.
- Beard thickness
- Pressure applied to the skin
- Usage frequency of the sonic vibration cleaning mode
- If there is noise from the radio or other sources while using or charging the appliance, move to a different location to use the appliance.
Model ES-LV61
- Turn the shaver off.
- Wipe off any water droplets on the appliance socket.
- Insert the appliance plug into the shaver.
- Plug the adaptor into a household outlet.
- Check that the charge status lamp ( ) is glowing.
- Charging is completed after approx. 1 hour.
- If the shape of the plug does not fit the power outlet, use an attachment plug adaptor of the proper configuration.
- Check that the charge status lamp (
- Disconnect the adaptor after charging is completed.
Note:
You cannot operate the shaver while charging.
While charging the charge status lamp glows. The number of the battery capacity lamp will increase as charging progresses.
After charging is completed, all the battery capacity lamp and the charge status lamp will glow and then turn off after 5 seconds.
Notes :
- When charging the shaver for the first time or when it has not been in use for more than 6 months, the charging time may change or the charge status lamp may not glow for a few minutes. It will eventually glow if kept connected.
- Recommended ambient temperature for charging is 5-35 °C (41‑95 °F). It may take longer to charge, or the charge status lamp will blink quickly and the battery may fail to charge properly in extremely high or low temperatures.
- The shaver can be used for approximately 2 weeks with a full charge. (Based on one 3‑minute dry‑shave usages per day in an ambient temperature range of 20 °C – 30 °C (68 °F – 86 °F).) The number of usable days varies depending on the following conditions.
- Beard thickness
- Pressure applied to the skin
- Usage frequency of the sonic vibration cleaning mode
- If there is noise from the radio or other sources while using or charging the appliance, move to a different location to use the appliance.
Model ES-LV65
- Turn the shaver off.
- Wipe off any water droplets on the appliance socket.
- Insert the appliance plug into the shaver.
- Plug the adaptor into a household outlet.
- Check that the charge status lamp ( ) is glowing.
- Charging is completed after approx. 1 hour.
- If the shape of the plug does not fit the power outlet, use an attachment plug adaptor of the proper configuration.
- Check that the charge status lamp (
- Disconnect the adaptor after charging is completed.
Note:
You cannot operate the shaver while charging.
While charging the charge status lamp glows. The number of the battery capacity lamp will increase as charging progresses.
After charging is completed, all the battery capacity lamp and the charge status lamp will glow and then turn off after 5 seconds.
Notes :
- When charging the shaver for the first time or when it has not been in use for more than 6 months, the charging time may change or the charge status lamp may not glow for a few minutes. It will eventually glow if kept connected.
- Recommended ambient temperature for charging is 10 °C – 35 °C (50 °F – 95 °F). It may take longer to charge, or the charge status lamp will blink quickly and the battery may fail to charge properly in extremely high or low temperatures.
- The shaver can be used for approximately 2 weeks with a full charge. (Based on one 3‑minute dry‑shave usages per day in an ambient temperature range of 20 °C – 30 °C (68 °F – 86 °F).) The number of usable days varies depending on the following conditions.
- Beard thickness
- Pressure applied to the skin
- Usage frequency of the sonic vibration cleaning mode
- If there is noise from the radio or other sources while using or charging the appliance, move to a different location to use the appliance.
Model ES-LV67
- Turn the shaver off.
- Wipe off any water droplets on the appliance socket.
- Insert the appliance plug into the shaver.
- Plug the adaptor into a household outlet.
- Check that the charge status lamp is glowing.
- Charging is completed after approx. 1 hour.
- If the shape of the plug does not fit the power outlet, use an attachment plug adaptor of the proper configuration.
- Check that the charge status lamp
- Disconnect the adaptor after charging is completed.
- While charging, the charge status lamp glows. The number of the battery capacity lamp will increase as charging progresses.
- After charging is completed, all the battery capacity lamps light up for 5 seconds and then all lamps turn off.
- During abnormal charging, the charge status lamp blinks twice every second.
Note:
- After charging is completed, turning the power switch ON with the shaver plugged in will cause the charge status lamp to light up and then turn off after 5 seconds. This shows that the shaver is fully charged.
- Recommended ambient temperature for charging is 10 – 35 °C (50 – 95 °F). It may take longer to charge or the battery may fail to charge properly in extremely high or low temperatures. Charge the shaver within the recommended ambient temperature range
- When charging the shaver for the first time or when it has not been in use for more than 6 months, the charging time may change or the charge status lamp may not glow for a few minutes. It will eventually glow if kept connected.
- The battery used is a lithium-ion, so charging after every use will have no effect on battery life. However for safety precautions we recommend unplugging it when charging is not necessary.
- The number of usable days varies depending on the following conditions:
- Beard thickness
- Pressure applied to the skin
- Usage frequency of the sonic vibration cleaning mode
- If there is noise from the radio or other sources while using or charging the appliance, move to a different location to use the appliance.
Model ES-LV81
Charging using the self-cleaning recharger
Thoroughly wipe off any drops of water on or around the selfcleaning recharger so that it is dry before charging the shaver.
- Insert the appliance plug into the self-cleaning recharger.
- Remove the protective cap and then gently insert the shaver as shown.
- Plug in the AC adaptor into a household outlet.
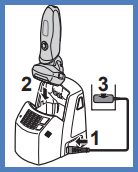
- The “Charge” course starts when attaching the shaver
- Turn the shaver off before inserting.
- Check that the outer foil is not deformed or damaged when you insert the shaver.
- Wipe off any water droplets on the main body rear terminal.
- You can charge even with the STATUS lamp of the self-cleaning recharger is blinking.
- Charging is completed after approx. 1 hour.
- If the shape of the plug does not fit the power outlet, use an attachment plug adaptor of the proper configuration.
You can keep the shaver attached to the self-cleaning recharger, or connected to the AC adaptor, when not using it to maintain full battery capacity. You cannot overcharge the shaver.
Charging without the self cleaning recharger
You can also charge without the self-cleaning recharger.
- Insert the appliance plug into the shaver.
- Plug in the AC adaptor into a household outlet.
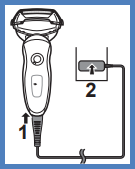
You cannot operate the shaver while charging.
- Recommended ambient temperature for charging is 5‑35 °C (4195 °F). The battery may not charge properly or not at all under extreme low or high temperatures. The indicators on the LCD panel blink when there is a problem with charging.
- When charging the shaver for the first time or when it has not been in use for more than 6 months, the indicators on the LCD panel may not glow. It will eventually glow if kept connected.
Reading the LCD panel when charging
While charging the indicators glow. After charging is completed, battery capacity and charge status will light and then turn off after 5 seconds.
The LCD panel shows the remaining battery capacity from 0% to 100%, in 10% increments.
- After charging is completed, turning the power switch ON with the shaver plugged in will cause Battery capacity and Charge status to light up and then turn off after 5 seconds. This shows that the shaver is fully charged.
Model ES-LV9N, ES-LV9Q
- Turn the shaver off.
- Wipe off any water droplets on the main body rear terminals.
- Insert the appliance plug into the self-cleaning recharger.
- Remove the protective cap while pressing the side of the cap and insert the shaver into the self-cleaning recharger. Slowly insert the shaver into the self-cleaning recharger taking care not to damage the system outer foil.
- Plug the adaptor into a household outlet.
- Check that the charge status lamp is glowing
- Charging is completed after approx. 1 hour.
- If the shape of the plug does not fit the power outlet, use an attachment plug adaptor of the proper configuration.
- Check that the charge status lamp
- Disconnect the adaptor after charging is completed.
Charge Status indicators
- While charging the charge status lanp glows. The number of the battery capacity lamp will increase as charging progresses. Image shown on display may vary depending on the model.
- After charging is completed all the battery capacity lamp and the charge status lamp will glow and then turn off after 5 seconds. Image shown on display may vary depending on the model.
Notes
- When charging the shaver for the first time or when it has not been in use for more than 6 months, the charging time may change or the charge status lamp may not glow for a few minutes. It will eventually glow if kept connected.
- Recommended ambient temperature for charging is 10 °C – 35 °C (50 °F – 95 °F). It may take longer to charge, or the charge status lamp will blink quickly and the battery may fail to charge properly in extremely high or low temperatures.
- The battery used is a lithium-ion, so charging after every use will have no effect on battery life. However for safety precautions we recommend unplugging it when charging is not necessary.
- The shaver can be used for approximately 2 weeks with a full charge. (Based on one 3‑minute dry‑shave usages per day in an ambient temperature range of 20 °C – 30 °C (68 °F – 86 °F).) The number of usable days varies depending on the following conditions.
- Beard thickness
- Pressure applied to the skin
- Usage frequency of the sonic vibration cleaning mode
- If there is noise from the radio or other sources while using or charging the appliance, move to a different location to use the appliance.
Charging without the self-cleaning recharger
- Turn the shaver off.
- Wipe off any water droplets on the appliance socket.
- Insert the appliance plug into the shaver.
- Plug the adaptor into a household outlet.
- Disconnect the adaptor after charging is completed.
Note :
- You cannot operate the shaver while charging.
Model ES-LV95, ES-LV97
- Turn the shaver off.
- Wipe off any water droplets on the main body rear terminals.
- Insert the appliance plug into the self-cleaning recharger.
- Remove the protective cap while pressing the side of the cap and insert the shaver into the self-cleaning recharger. Slowly insert the shaver into the self-cleaning recharger taking care not to damage the system outer foil.
- Plug the adaptor into a household outlet.
- Check that the charge status lamp is glowing
- Charging is completed after approx. 1 hour.
- If the shape of the plug does not fit the power outlet, use an attachment plug adaptor of the proper configuration.
- Check that the charge status lamp
- Disconnect the adaptor after charging is completed.
Charge Status indicators
- While charging the charge status lanp glows. The number of the battery capacity lamp will increase as charging progresses. Image shown on display may vary depending on the model.
- After charging is completed all the battery capacity lamp and the charge status lamp will glow and then turn off after 5 seconds. Image shown on display may vary depending on the model.
Notes
- When charging the shaver for the first time or when it has not been in use for more than 6 months, the charging time may change or the charge status lamp may not glow for a few minutes. It will eventually glow if kept connected.
- Recommended ambient temperature for charging is 10 °C – 35 °C (50 °F – 95 °F). It may take longer to charge, or the charge status lamp will blink quickly and the battery may fail to charge properly in extremely high or low temperatures.
- The battery used is a lithium-ion, so charging after every use will have no effect on battery life. However for safety precautions we recommend unplugging it when charging is not necessary.
- The shaver can be used for approximately 2 weeks with a full charge. (Based on one 3‑minute dry‑shave usages per day in an ambient temperature range of 20 °C – 30 °C (68 °F – 86 °F).) The number of usable days varies depending on the following conditions.
- Beard thickness
- Pressure applied to the skin
- Usage frequency of the sonic vibration cleaning mode
- If there is noise from the radio or other sources while using or charging the appliance, move to a different location to use the appliance.
Charging without the self-cleaning recharger
- Turn the shaver off.
- Wipe off any water droplets on the appliance socket.
- Insert the appliance plug into the shaver.
- Plug the adaptor into a household outlet.
- Disconnect the adaptor after charging is completed.
Note :
- You cannot operate the shaver while charging.
Model ES-PV3A-K, ES-PV6A-W
- Turn the shaver off.

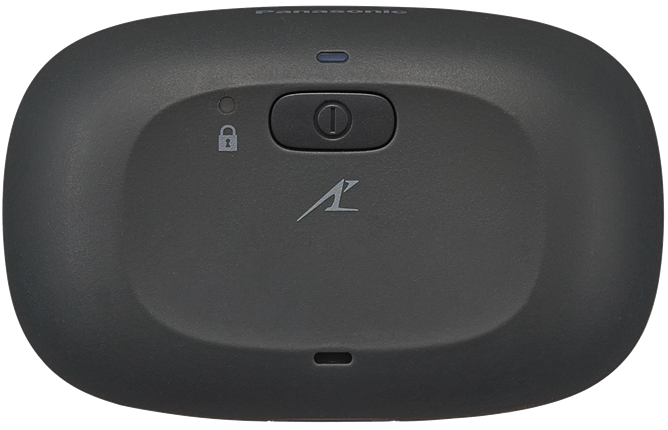
- Wipe off any water droplets on the appliance socket.
- Use the specified USB power adaptor and USB cable.

- The USB power adaptor is sold separately.
- Open the socket cover and insert the USB plug firmly into the main body and USB power adaptor.

- Insert the USB power adaptor firmly into a household outlet.
- Check that the charge status lamp is glowing.

- Charging is completed after approx. 2 hours.
- Check that the charge status lamp is glowing.
- Remove the USB power adaptor from the household outlet, and remove the USB plug from the main body after the charge status lamp turns off.
- Close the socket cover
Note
- You cannot operate the shaver while charging.
- When the battery capacity is low. The appliance beeps twice after switched off.
- The charge status lamp blinks once every second when operating the shaver. You can shave 2 to 3 times after the charge status lamp blinks. (This will differ depending on usage.)
- The shaver may be charged with adaptors and cables other than the specified ones, but Panasonic's specified adaptor with splash-resistant design and a USB cable with an overheating protection feature should be used to ensure safety. The adaptor is not completely waterproof, so prevent it from getting wet.
- After charging is completed, turning the power switch ON with the shaver plugged in will cause the charge status lamp to light up and then turn off after 5 seconds.
Model ES-RF31
- Turn the shaver off.
- Wipe off any water droplets on the appliance socket.
- Insert the appliance plug into the shaver.
- Plug the adaptor into a household outlet.
- Check that the charge status lamp is glowing.
- Charging is completed after approx. 1 hour.
- If the shape of the plug does not fit the power outlet, use an attachment plug adaptor of the proper configuration.
- Check that the charge status lamp
- Disconnect the adaptor after charging is completed.
Note:
You cannot operate the shaver while charging.
The percentage of available battery capacity indicators glow. The percentage of the available battery capacity will increase as charging progresses. After charging is completed, the indicators blink once every second.
Notes:
- Recommended ambient temperature for charging is 15 - 35 °C (59 - 95 °F). The battery may degrade the performance or may not charge under extreme low or high temperatures. The indicators will blink twice every second when there is a problem with charging.
- When charging the shaver for the first time or when it has not been in use for more than 6 months, the indicators may not glow. It will eventually glow if kept connected.
Model ES-RM3B-A, ES-RM3B-K, ES-RM3B-G
- Before charging, make sure that this product is powered off.
- Attach the protective cap to avoid damaging the system outer foil.
- Do not charge when the socket is wet. Wipe the socket when it is wet before charging.
- Open the socket cover, insert the USB cable into the main body and the USB power adaptor.
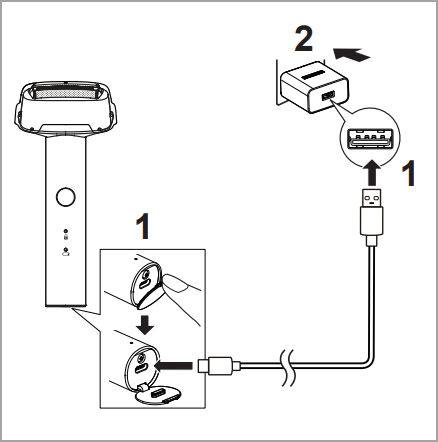
- Connect the USB power adaptor 1 to a household outlet.
- Check the gradual change in the breathing status of the charge status indicator (
 ).
). - Charging is completed after approx. 1 hour. The charging time may be shortened, depending on the remaining battery level.
Display during charging
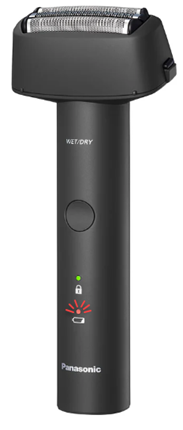
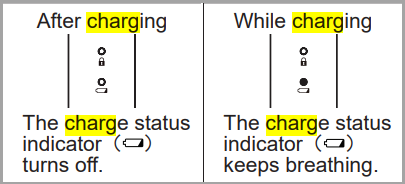
- Check the gradual change in the breathing status of the charge status indicator (
- After charging, remove the USB cable and attach the socket cover.
- Charging the battery for more than 1 hour does not affect its performance.
- Be sure to close the socket cover when using or washing. How to confirm that charging is completed
- If the USB plug (Type-C) is removed and then inserted back right after charging is completed, the charge status indicator( )turns on and then off in about 5 seconds.
- If the USB plug (Type-C) is removed and then inserted back right after charging is completed, the charge status indicator(
Notes
- You cannot operate this product while charging.
- This product may be charged with adaptors other than the specified one, but Panasonic's specified adaptor with splash-resistant design should be used to ensure safety. The Panasonic's specified adaptor is not completely waterproof, so do not immerse the adaptor in water.
- If an ineligible USB power adaptor is used for charging or such problems as poor contact of the USB cable occur, the charging time may become longer and the product may even be damaged.
- When this product is used for the first time or when it has not been used for more than 6 months, the operating time may be shortened, or the charge status indicator( ) may not light on immediately after charging is started. However, everything should be back to normal after 8 hours of charging.
- The recommended ambient temperature range for charging is 0 ℃ - 35 ℃ (32 ℉ - 95 ℉). When the room temperature exceeds or falls below the recommended ambient temperature range for charging, the charging time may differ and the battery performance may be degraded.
- The shaver can be used for approximately 2 weeks after it is fully charged. (Based on dry shaving for 3 minutes a day at an ambient temperature of 20 ℃ (68 ℉) to 30 ℃ (86 ℉).) The number of available days depends on the following conditions: - beard thickness - pressure applied to the skin - use of wet shaving
- If there is noise from the radio or other sources while this product is used or charged, move the product to a different location or charge it with another USB power adaptor.
Model ES-RT17
- Turn the shaver off.
- Wipe off any water droplets on the appliance socket.
- Place the shaver on the AC adaptor.
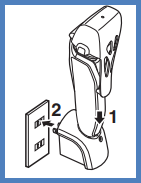
- Plug in the AC adaptor into the household outlet.
- Check that the charge indicator lamp glows.
- Charging is completed after approx. 8 hours.
- Disconnect the AC adaptor after charging is completed.
- The charge indicator lamp continues to glow after charging is complete. There is no indication to show that "charging is complete".
- Charging the battery for more than 8 hours will not affect battery performance.
Note:
- You cannot operate the shaver while charging.
- When charging the shaver for the first time or when it has not been in use for more than 6 months, the charge indicator lamp may not glow for a few minutes, or the operating time may shorten. Please charge it for more than 16 hours in such cases.
- Recommended ambient temperature for charging is 0 °C – 35 °C (32 °F – 95 °F). Battery performance may decrease outside of the recommended temperature.
- The shaver can be used for approx. one week with a full charge. (Based on one 3-minute dry-shave use per day). The number of usable days varies depending on the following conditions.
- Beard thickness
- Pressure applied to the skin
- Ambient temperature
- Usage frequency
- If there is a noise from radio or other source while using the shaver, move to a different location to use the shaver.
Model ES-RT33
- Insert the appliance plug into the shaver.
- Plug in the AC adaptor into a household outlet.
Note:
- Turn the shaver off before attaching.
- Charging is completed after approx. 1 hour.
- If the shape of the plug does not fit the power outlet, use an attachment plug adaptor of the proper configuration.
- You cannot operate the shaver while charging.
Reading lamps when charging
- While charging, the charge status lamp glows.
- After charging is completed, all the lamps will light up and then turn off after 5 seconds.
- The charge status lamp turns off after 5 seconds.
Note:
- After charging is completed, turning the power switch ON with the shaver plugged in will cause all the lamps to light up and then turn off after 5 seconds. This shows that the shaver is fully charged.
- Recommended ambient temperature for charging is 5-35 °C (41‑95 °F). The battery may not charge properly or not at all under extreme low or high temperatures. The charge status lamp will blink when there is a problem with charging.
- When charging the shaver for the first time or when it has not been in use for more than 6 months, the charge status lamp may not glow. It will eventually glow if kept connected.
- Please charge it for more than 8 hours in such cases.
Model ES-RT37
- Turn the shaver off.
- Wipe off any water droplets on the appliance socket.
- Insert the appliance plug into the shaver.
- Plug the adaptor into a household outlet.
- Check that the charge status lamp is glowing.
- Charging is completed after approx. 1 hour.
- If the shape of the plug does not fit the power outlet, use an attachment plug adaptor of the proper configuration.
- Check that the charge status lamp
- Disconnect the adaptor after charging is completed.
While charging, the charge status lamp
glows. After charging is completed, the charge status lamp turns off. During abnormal charging, the charge status lamp blinks twice every second. Note:
- After charging is completed, turning the power switch ON with the shaver plugged in will cause the charge status lamp to light up and then turn off after 5 seconds. This shows that the shaver is fully charged.
- Recommended ambient temperature for charging is 10 – 35 °C (50 – 95 °F). It may take longer to charge or the battery may fail to charge properly in extremely high or low temperatures. Charge the shaver within the recommended ambient temperature range
- When charging the shaver for the first time or when it has not been in use for more than 6 months, the charging time may change or the charge status lamp may not glow for a few minutes. It will eventually glow if kept connected.
- After charging is completed, turning the power switch ON with the shaver plugged in will cause the charge status lamp
Model ES-RT47
- Turn the shaver off.
- Wipe off any water droplets on the appliance socket.
- Insert the appliance plug into the shaver.
- Plug the adaptor into a household outlet.
- Check that the charge status lamp is glowing.
- Charging is completed after approx. 1 hour.
- If the shape of the plug does not fit the power outlet, use an attachment plug adaptor of the proper configuration.
- Check that the charge status lamp
- Disconnect the adaptor after charging is completed.
While charging, the charge status lamp glows. After charging is completed, the charge status lamp turns off. During abnormal charging, the charge status lamp blinks twice every second.
Note:
- After charging is completed, turning the power switch ON with the shaver plugged in will cause the charge status lamp to light up and then turn off after 5 seconds. This shows that the shaver is fully charged.
- Recommended ambient temperature for charging is 10 – 35 °C (50 – 95 °F). It may take longer to charge or the battery may fail to charge properly in extremely high or low temperatures. Charge the shaver within the recommended ambient temperature range
- When charging the shaver for the first time or when it has not been in use for more than 6 months, the charging time may change or the charge status lamp may not glow for a few minutes. It will eventually glow if kept connected.
Model ES-RT51
- Insert the appliance plug into the shaver.
- Plug in the AC adaptor into a household outlet.
Note:
- Turn the shaver off before attaching.
- Charging is completed after approx. 1 hour.
- If the shape of the plug does not fit the power outlet, use an attachment plug adaptor of the proper configuration.
- You cannot operate the shaver while charging.
Reading lamps when charging
- While charging, the charge status lamp glows.
- The number of the battery capacity lamp will increase as charging progresses.
- After charging is completed, all the lamps will light up and then turn off after 5 seconds.
Note:
- After charging is completed, turning the power switch ON with the shaver plugged in will cause all the lamps to light up and then turn off after 5 seconds. This shows that the shaver is fully charged.
- Recommended ambient temperature for charging is 5-35 °C (41‑95 °F). The battery may not charge properly or not at all under extreme low or high temperatures. The charge status lamp will blink when there is a problem with charging.
- When charging the shaver for the first time or when it has not been in use for more than 6 months, the charge status lamp may not glow. It will eventually glow if kept connected.
Model ES-RT53
- Insert the appliance plug into the shaver.
- Plug in the AC adaptor into a household outlet.
Note:
- Turn the shaver off before attaching.
- Charging is completed after approx. 1 hour.
- If the shape of the plug does not fit the power outlet, use an attachment plug adaptor of the proper configuration.
- You cannot operate the shaver while charging.
Reading lamps when charging
- While charging, the charge status lamp glows.
- The LCD panel shows the remaining battery capacity from 0% to 100%, in 20% increments.
- After charging is completed, all the lamps will light up and then turn off after 5 seconds.
Note:
- After charging is completed, turning the power switch ON with the shaver plugged in will cause all the lamps to light up and then turn off after 5 seconds. This shows that the shaver is fully charged.
- Recommended ambient temperature for charging is 5-35 °C (41‑95 °F). The battery may not charge properly or not at all under extreme low or high temperatures. The charge status lamp will blink when there is a problem with charging.
- When charging the shaver for the first time or when it has not been in use for more than 6 months, the charge status lamp may not glow. It will eventually glow if kept connected.
Model ES-RT67, ES-RT77
- Turn the shaver off.
- Wipe off any water droplets on the appliance socket.
- Insert the appliance plug into the shaver.
- Plug the adaptor into a household outlet.
- Check that the charge status lamp is glowing.
- Charging is completed after approx. 1 hour.
- If the shape of the plug does not fit the power outlet, use an attachment plug adaptor of the proper configuration.
- Check that the charge status lamp
- Disconnect the adaptor after charging is completed.
- While charging, the charge status lamp glows. The number of the battery capacity lamp will increase as charging progresses.
- After charging is completed, all the battery capacity lamps light up for 5 seconds and then all lamps turn off.
- During abnormal charging, the charge status lamp blinks twice every second.
Note:
- After charging is completed, turning the power switch ON with the shaver plugged in will cause the charge status lamp to light up and then turn off after 5 seconds. This shows that the shaver is fully charged.
- Recommended ambient temperature for charging is 10 – 35 °C (50 – 95 °F). It may take longer to charge or the battery may fail to charge properly in extremely high or low temperatures. Charge the shaver within the recommended ambient temperature range
- When charging the shaver for the first time or when it has not been in use for more than 6 months, the charging time may change or the charge status lamp may not glow for a few minutes. It will eventually glow if kept connected.
- The number of usable days varies depending on the following conditions:
- Beard thickness
- Pressure applied to the skin
Model ES-RT97
- Turn the shaver off.
- Wipe off any water droplets on the main body rear terminals.
- Insert the appliance plug into the self-cleaning recharger, pull up the arm until it clicks.
- Remove the protective cap while pressing the side of the cap and insert the shaver into the self-cleaning recharger. Slowly insert the shaver into the self-cleaning recharger taking care not to damage the system outer foil, push down the arm until it clicks.
- Plug the adaptor into a household outlet.
- Check that the charge status lamp is glowing
- Charging is completed after approx. 1 hour.
- If the shape of the plug does not fit the power outlet, use an attachment plug adaptor of the proper configuration.
- Check that the charge status lamp
- Disconnect the adaptor after charging is completed.
Charge Status indicators
- While charging the charge status lanp glows. The number of the battery capacity lamp will increase as charging progresses. Image shown on display may vary depending on the model.
- After charging is completed all the battery capacity lamp and the charge status lamp will glow and then turn off after 5 seconds. Image shown on display may vary depending on the model.
Notes
- When charging the shaver for the first time or when it has not been in use for more than 6 months, the charging time may change or the charge status lamp may not glow for a few minutes. It will eventually glow if kept connected.
- Recommended ambient temperature for charging is 10 °C – 35 °C (50 °F – 95 °F). It may take longer to charge, or the charge status lamp will blink quickly and the battery may fail to charge properly in extremely high or low temperatures.
- The shaver can be used for approximately 2 weeks with a full charge. (Based on one 3‑minute dry‑shave usages per day in an ambient temperature range of 20 °C – 30 °C (68 °F – 86 °F).) The number of usable days varies depending on the following conditions.
- Beard thickness
- Pressure applied to the skin
- Usage frequency of the sonic vibration cleaning mode
- If there is noise from the radio or other sources while using or charging the appliance, move to a different location to use the appliance.
Charging without the self-cleaning recharger
- Turn the shaver off.
- Wipe off any water droplets on the appliance socket.
- Insert the appliance plug into the shaver.
- Plug the adaptor into a household outlet.
- Disconnect the adaptor after charging is completed.
Note :
- You cannot operate the shaver while charging.
Model ES-RW30
- Turn the shaver off.
- Wipe off any water droplets on the appliance socket.
- Turn off the shaver and insert it in the charging adaptor.
- Plug in the adaptor into a household outlet.

- Check that the charge status lamp ( ) is glowing.
- Charging is completed after approx. 8 hours.
- A full charge will supply enough power for approx. 7 shaves of 3 minutes each.
- Check that the charge status lamp (
- Disconnect the adaptor after charging is completed.
Model ES-SL33
- Turn the shaver off.
- Wipe off any water droplets on the appliance socket.
- Insert the appliance plug into the shaver.
- Plug the adaptor into a household outlet.
- Check that the charge status lamp ( ) is glowing.
- Charging is completed after approx. 1 hour.
- If the shape of the plug does not fit the power outlet, use an attachment plug adaptor of the proper configuration.
- Check that the charge status lamp (
- Disconnect the adaptor after charging is completed.
- Align the appliance plug up arrow ▲ with the appliance plug socket triangle mark ▲ and insert the appliance plug.
- The charging time is approx. 15 hours.
- Charging the battery for more than 15 hours will not affect battery performance.
- The charge status lamp stays on in red when charging is in progress.
- When charging is complete, the charge status lamp remains on in red after charging is completed.
- If there is crackling noise on radios or other devices while charging, charge the shaver using a different household outlet.
- When the appliance is not used for 6 months or more, the battery will weaken (leak battery fluid, etc.). Fully charge the battery once every 6 months.
- Recommended ambient temperature for charging is 0-35 °C. (32 °F - 95 °F). Battery performance may decrease outside of the recommended temperature.
- When charging the shaver for the first time or when it has not been in use for more than 6 months, the lamp on the main body may not glow for a few minutes, or the operating time may shorten. Please charge it for more than 23 hours in such cases.
- You can charge the battery before it is completely discharged. However, it is recommended to charge when the battery is completely discharged. The battery life depends strongly on factors such as how it is used and stored.
Model ES-SL41
Perform the following steps to charge the shaver if it seems to lose the speed. You can fully charge the shaver in 8 hours. A full charge will supply enough power for approx. 7 shaves of 3 minutes each.
- Turn off the shaver and insert it in the charging adaptor.
- Plug in the adaptor into a household outlet.
- The charge indicator lamp glows and stays on until the shaver is removed from the charging adaptor.
Notes for model ES-SL41
- If you charge the shaver with the power switch turned on, it will start working when you remove the shaver from the AC adaptor.
- Charging is completed after approx. 15 hours.
- When charging the shaver for the first time, or when it has not been in use for more than 6 months, the charge indicator lamp may not glow for a few minutes, or the operating time may shorten. Please charge it for more than 23 hours in such cases.
- If the shape of the plug does not fit the power outlet, use an attachment plug adaptor with proper configuration.
- Charging the battery for more than 15 hours will not affect battery performance.
- Recommended ambient temperature for charging is 0 ‑ 35 °C (32 ‑ 95 °F). The battery may not charge under extreme low or high temperatures.
- The charge indicator lamp glows and stays on until the plug is disconnected from a household outlet.
Model ES-SL83
- Insert the appliance plug into the charging stand.
- Place the shaver on the charging stand.
- Plug in the adaptor into a household outlet.
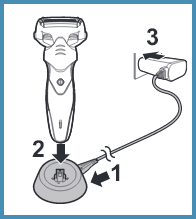
Charge indicator
- Charging in progress - The Low battery charge status lamp stay red.
- Charging Complete - The Low battery charge status lamp turns off.
- Charging abnormal - The Low battery charge status lamp blinks in red quicly every 2 seconds.
Notes
- After charging is completed, if the power switch is turned on while the shaver is being charged, the low battery/charge status lamp lights on in red and then turns off after 5 seconds. This means that the shaver has been fully charged.
- Recommended ambient temperature for charging is 10-35 °C (50 °F - 95 °F). It may take longer to charge, or the low battery/charge status lamp will blink in red quickly and the battery may fail to charge properly in extremely high or low temperatures.
- When charging the shaver for the first time or when it has not been in use for more then 6 months, the low battery/charge status lamp (red) may not glow. It will eventually glow if kept connected for several minutes.
- You can charge the battery before it is completely discharged. However, it is recommended to charge when the battery is completely discharged. The battery life depends strongly on factors such as how it is used and stored.
Model ES-ST2N
- Turn the shaver off.
- Attach the carrying holder so as not to scratch the system outer foil.
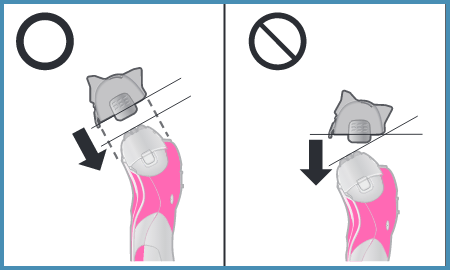
- Wipe off any water droplets on the appliance socket.
- Insert the appliance plug into the shaver.
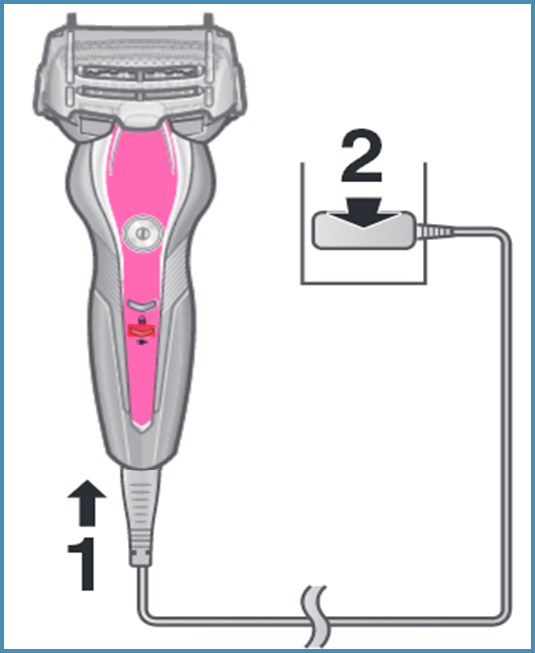
- Plug in the adaptor into a household outlet. Charging is completed after approx. 1 hour. The charging time may differ with the charging capacity.
- Disconnect the adaptor after charging is completed. Charging the battery for more than 1 hour will not affect battery performance.
Note:
- If the shape of the plug does not fit the power outlet, use an attachment plug adaptor of the proper configuration.
- You cannot operate the shaver while charging.
- After charging is completed, turning the power switch ON with the shaver plugged in will cause the charge status lamp to light up and then turn off after 5 seconds. This shows that the shaver is fully charged.
- When charging the shaver for the first time or when it has not been in use for more than 6 months, the charging time may change or the charge status lamp may not glow for a few minutes. It will eventually glow if kept connected.
- You can charge the battery before it is completely discharged. However, it is recommended to charge when the battery is completely discharged. The battery life depends strongly on factors such as how it is used and stored.
- Recommended ambient temperature for charging is 10 °C – 35°C (50°F–94°F). It may take longer to charge or the battery may fail to charge properly in extremely high or low temperatures. The charge status lamp will blink twice every second when there is a problem with charging. Charge the shaver within the recommended ambient temperature range.
- The battery used is a lithium‑ion, so charging after every use will have no effect on battery life.
- The shaver can be used for approximately 2 weeks with a full charge. (Based on one 3‑minute dry‑shave use per day) The number of usable days varies depending on the following conditions.
- Beard thickness.
- Pressure applied to the skin.
- Ambient temperature.
- Usage of wet shaving.
- If there is noise from radio or other source while using the shaver, move to a different location to use the shaver.
- When the battery capacity is low, the charge status lamp blinks once every second when operating the shaver.
- You can shave 2 to 3 times after the charge status lamp blinks. (This will differ depending on usage.)
Model ES-ST25
You can charge the shaver with the carrying holder attached. You cannot operate the shaver while charging.
- Insert the appliance plug into the stand socket.
- Insert the shaver in the charging stand.
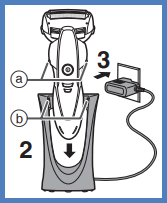
- The shaver will not charge unless the side terminals are in contact with the charging terminals (b).
- Wipe off any water droplets on the side terminals.
- Plug in the adaptor into a household outlet.
- Check that the charge status lamp glows.
- Charging is completed after approx. 1 hour. The charging time may decrease depending on the charging capacity.
- If the shape of the plug does not fit the power outlet, use an attachment plug adaptor of the proper configuration.
- Disconnect the adaptor after charging is completed. Charging the battery for more than 1 hour will not affect battery performance.
- While charging, the charge status lamp glows red.
- After charging is completed, the charge status lamp turns off.
- Abnormal charging, the charge status lamp will blink twice every second.
- After charging is completed, turning the power switch ON with the shaver plugged in will cause charge status lamp to light up and then turn off after 5 seconds. This shows that the shaver is fully charged.
- Recommended ambient temperature for charging is 10 – 35 °C (50 – 95 °F). It may take longer to charge or the battery may fail to charge properly in extremely high or low temperatures. The charge status lamp will blink twice every second when there is a problem with charging. Charge the shaver within the recommended ambient temperature range.
- When charging the shaver for the first time or when it has not been in use for more than 6 months, the charge status lamp may not glow. It will eventually glow if kept connected.
Model ES-SWLT2W
- Turn the shaver off.
- Wipe off any water droplets on the appliance socket.
- Insert the appliance plug into the shaver
- Plug in the adaptor into a household outlet
- Check that the charge status lamp ( ) is glowing.
- Charging is completed after approx. 1 hour.
- If the shape of the plug does not fit the power outlet, use an attachment plug adaptor of the proper configuration.
- Check that the charge status lamp (
- Disconnect the adaptor after charging is completed and the charge status lamp ( ) turns off.
- While charging the charge status lamp ( ) glows red.
- After charging is completed the charge status lamp ( ) turns off.
- Abnormal charging the charge status lamp ( ) will blink twice every second.
- After charging is completed, turning the power switch ON with the shaver plugged in will cause the charge status lamp ( ) to light up and then turn off after 5 seconds.
This shows that the shaver is fully charged.
- When charging the shaver for the first time or when it has not been in use for more than 6 months, the charging time may change or the charge status lamp ( ) may not glow for a few minutes. It will eventually glow if kept connected.
- Recommended ambient temperature for charging is 10 °C – 35 °C (50 °F – 95 °F). It may take longer to charge or the battery may fail to charge properly in extremely high or low temperatures.
- The charge status lamp ( ) will blink twice every second when there is a problem with charging. Charge the shaver within the recommended ambient temperature range.
- The shaver can be used for approximately 2 weeks with a full charge. (Based on one 3-minute dry-shave usages per day in an ambient temperature range of 20 °C – 30 °C [68 °F – 86 °F].)
- The number of usable days varies depending on the following conditions.
- Beard thickness
- Pressure applied to the skin
- Usage of wet shaving.
- Usage in shaving foam mode.
- If there is noise from the radio or other sources while using or charging the appliance, move to a different location to use the appliance.
Note
You cannot operate the shaver while charging.
Quick charge
Even though the battery runs out, you can shave once after 3-minute charge. (This will differ depending on usage.)
Model ES-WL60, ES-WL80
- Make sure that the shaver is turned off.
- Wipe off any water droplets on the appliance socket.
- You cannot operate the shaver while charging.
- Place the shaver on the AC adaptor until it clicks
- Plug in the AC adaptor into the household outlet.
- It will take approximately20 hours to fully charge the shaver.
- Check that the charge indicator lamp glows.
- After charging is completed, unplug the power plug and then the shaver. (for safety and energy saving)
- The charge indicator lamp continues to glow after charging is complete. There is no indication to show that "charging is complete".
- Charging the battery for more than 20 hours will not affect battery performance.
- Always unplug the shaver form the AC adapter except when charging.
Notes:
- You cannot operate the shaver while charging.
- If there is a noise from radio or other source while using the shaver, move to a different location to use the shaver.
- The battery will deteriorate if not used for over 6 months, so make sure to perform a full charge at least once every 6 months.
- When charging the shaver for the first time or when it has not been in use for more than 6 months, the charge indicator lamp may not glow for a few minutes, or the operating time may shorten. Please charge it for more than 30 hours in such cases.
- Recommended ambient temperature for charging is 0 °C – 35 °C (32 °F – 95 °F). Battery performance may decrease outside of the recommended temperature.
- A full charge supplies enough power for approximately 35 minutes of use.
- You can charge the battery before it is completely discharged. However, it is recommended to charge when the battery is completely discharged. The battery life depends strongly on factors such as how it is used and stored.
Model ES-WWL6, ES-WWL8
- Make sure that the shaver is turned off.
- Wipe off any water droplets on the appliance socket.
- You cannot operate the shaver while charging.
- Place the shaver on the AC adaptor until it clicks
- Plug in the AC adaptor into the household outlet.
- It will take approximately20 hours to fully charge the shaver.
- Check that the charge indicator lamp glows.
- After charging is completed, unplug the power plug and then the shaver. (for safety and energy saving)
- The charge indicator lamp continues to glow after charging is complete. There is no indication to show that "charging is complete".
- Charging the battery for more than 20 hours will not affect battery performance.
- Always unplug the shaver form the AC adapter except when charging.
Notes:
- You cannot operate the shaver while charging.
- If there is a noise from radio or other source while using the shaver, move to a different location to use the shaver.
- The battery will deteriorate if not used for over 6 months, so make sure to perform a full charge at least once every 6 months.
- When charging the shaver for the first time or when it has not been in use for more than 6 months, the charge indicator lamp may not glow for a few minutes, or the operating time may shorten. Please charge it for more than 30 hours in such cases.
- Recommended ambient temperature for charging is 0 °C – 35 °C (32 °F – 95 °F). Battery performance may decrease outside of the recommended temperature.
- A full charge supplies enough power for approximately 35 minutes of use.
- You can charge the battery before it is completely discharged. However, it is recommended to charge when the battery is completely discharged. The battery life depends strongly on factors such as how it is used and stored.