


How to use the Automated call block feature.
With automated call block, the unit screens incoming calls before ringing for allowed calls, or ends the calls without ringing for calls identified as robocalls, telemarketing calls, or other undesirable calls. You must have subscribe to Caller ID through you service provider to use Automated call block.
When a call is received, the unit will play the greeting message for automated call block and prompt the caller to enter an access code in order for the unit to identify whether the call is allowed.
If the number is stored in the call block list, the unit disconnects the call without playing the greeting message for automated call block
The unit connects the call without prompting to enter the access code in the following situations:
- The caller's phone number matches an entry in the phone book.
- The caller's name matches an entry in the allow name list.
- The caller's phone number is memorized in the allowed number database.
This feature can be turned on or off by setting the unit to block or unblock mode. The default setting is “Unblock” (off).
Automated Call block settings, features and perimeters do vary by model, select your model from the list below for specific information on your model. If your model is not listed and for all information on a model refer to your models Operating Manual.
Models KX-TG3833, KX-TG3844, KX-TG3845
Allowed number database
Once the caller enters the access code, the caller’s phone number is memorized in the allowed number database as an unblocked number. Callers from this database are allowed to connect without the access code from their next call. 100 entries can be stored to the database (22 digits max. each).
Note
- When the database memory is full, the latest call received will replace the oldest number stored in the list.
- The numbers stored in the database will be erased when you change the access code.
- The numbers stored in the database cannot be displayed.
Select a Automated Call block programming function from the list below to learn how to use it.
- Press the [ CALL BLOCK ] button.
- Press [ SELECT ].
- Press the arrow up ▲ or down ▼ button to select “ Block/Unblock ”. Then press [ SELECT ].
- Press the arrow up ▲ or down ▼ button to select the desired setting " ON or OFF ".
- Press [ SAVE ].
- Press the arrow up ▲ or down ▼ button to select “ Yes ”. Then press [ SELECT ].
- Press [ OFF ].
We recommend you perform a test run of the automated call block procedure to ensure that the automated call block feature is set correctly.
- Press the [ CALL BLOCK ] button.
- Press [ SELECT ].
- Press the arrow up ▲ or down ▼ button to select “ Access code ”. Then press [ SELECT ].
- Press the [ CLEAR ] button.
- Enter in the new access code.
- Press [ SAVE ].
- Press [ OFF ].
You can allow specific callers to pass through by adding the caller’s name to the allow name list. You can store up to 100 names (16 characters max.). If the name stored in the allow name list matches the incoming Caller ID, the unit rings. Callers listed in the allow name list are not required to enter the access code.
- Press the arrow down ▼ to select CID.
- Press the arrow up ▲ or down ▼ button to select the desired entry, then press [ MENU ].
- Press the arrow up ▲ or down ▼ button to select " Save allow name ".
- Press [ SELECT ].
- Press [ OFF ].
- Press the [ CALL BLOCK ] button.
- Press [ SELECT ].
- Press the arrow up ▲ or down ▼ button to select “ Allow name List ”. Then press [ SELECT ].
- Press the arrow up ▲ or down ▼ button to select the entry you want to erase.
- Press the [ ERASE ] button.
- Press the arrow up ▲ or down ▼ button to select “ Yes ”, then press [ SELECT ].
- Press [ OFF ].
- Press the [ CALL BLOCK ] button.
- Press [ SELECT ].
- Press the arrow up ▲ or down ▼ button to select “ Allow name List ”. Then press [ SELECT ].
- Press the [ ERASE ] button.
- Press the arrow up ▲ or down ▼ button to select “ Yes ”, then press [ SELECT ].
- Press [ OFF ].
When the unit answers a call, a greeting message is played to the caller.
You can use either:
- your own greeting message and pre-recorded greeting message
- pre-recorded greeting message
Example of your own greeting message:
- “Hi, you have reached xxxxxxx (Name).”
- “Thank you for your calling, You have reached xxxxxxx (Name).”
- “Hi, you have reached the xxxx (Name) residence.
- Press the [ CALL BLOCK ] button.
- Press [ SELECT ].
- Press the arrow up ▲ or down ▼ button to select “ Automated call greeting ”. Then press [ SELECT ].
- Press the arrow up ▲ or down ▼ button to select “ Record Greeting ”. Then press [ SELECT ].
- Press the arrow up ▲ or down ▼ button to select “ Yes ”, then press [ SELECT ].
- After after a beep sounds, hold the handset about 20 cm (8 inches) away and speak clearly into the microphone (2 minutes max.).
- Press [ STOP ] to stop recording. The unit will play the recorded greeting message for automated call block.
- Press [ OFF ].
This procedure will erase your greeting message for automated call block and reset to the pre-recorded one.
- Press the [ CALL BLOCK ] button.
- Press [ SELECT ].
- Press the arrow up ▲ or down ▼ button to select “ Automated call greeting ”. Then press [ SELECT ].
- Press the arrow up ▲ or down ▼ button to select “ Pre-recorded ”. Then press [ SELECT ].
- Press the arrow up ▲ or down ▼ button to select “ Yes ”.
- Press [ OFF ].
- Press the [ CALL BLOCK ] button.
- Press [ SELECT ].
- Press the arrow up ▲ or down ▼ button to select “ Automated call greeting ”. Then press [ SELECT ].
- Press the arrow up ▲ or down ▼ button to select “ Check greeting ”. Then press [ SELECT ].
- Press [ OFF ] to exit.
Program from the Handset
- Press the [ CALL BLOCK ] button.
- Press [ SELECT ].
- Press the arrow up ▲ or down ▼ button to select “ Blocked calls count ”. Then press [ SELECT ].
- Press the [ OFF ] button to exit or press the [ CLEAR ] button to erase the call count.
- Press the arrow up ▲ or down ▼ button to select “ Yes ”, then press [ SELECT ].
- Press [ OFF ].
For full information for the operation on this model refer to the Operating Manual.
Model KX-TG6145SK
Allowed number database
Once the caller enters the access code, the caller’s phone number is memorized in the allowed number database as an unblocked number. Callers from this database are allowed to connect without the access code from their next call. 100 entries can be stored to the database (22 digits max. each).
Note
- When the database memory is full, the latest call received will replace the oldest number stored in the list.
- The numbers stored in the database will be erased when you change the access code.
- The numbers stored in the database cannot be displayed.
Select a Automated Call block programming function from the list below to learn how to use it.
Program from the Handset or Base Unit
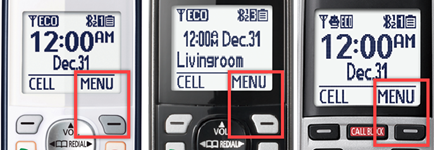
Examples of Menu Button Location
- Press [ MENU # 7 8 7 ].
- Press the arrow up ▲ or down ▼ button to select the desired setting.
- Press [ SAVE ].
- Press the arrow up ▲ or down ▼ button to select " Yes ".
- Press [ SELECT ].
- When programming from the handset Press [ OFF ]. When programming from the Base unit Press [ EXIT ].
We recommend you perform a test run of the automated call block procedure to ensure that the automated call block feature is set correctly.
Note - Programming on the base only available on models with a base keypad and Menu button.
If the unit answers undesirable calls such as robocalls even though the automated call block function is on, change the access code (3 digits max.). The default setting is “1”.
Program from the Handset
Examples of Menu Button Location
- Press [ MENU # 7 8 9 ].
- Press [ CLEAR ].
- Enter the new access code.
- Press [ SAVE ].
- Press [ OFF ].
You can allow specific callers to pass through by adding the caller’s name to the allow name list. You can store up to 100 names (16 characters max.). If the name stored in the allow name list matches the incoming Caller ID, the unit rings. Callers listed in the allow name list are not required to enter the access code.
Program from the Handset
- Press the arrow down ▼ to select CID.
- Press the arrow up ▲ or down ▼ button to select the desired entry, then press [ MENU ].
- Press the arrow up ▲ or down ▼ button to select " Save allow name ".
- Press [ SELECT ].
- Press [ OFF ].
Program from the Base Unit
- Press [ CID ].
- Press the arrow up ▲ or down ▼ button to select the desired entry, then press [ SAVE ].
- Press the arrow up ▲ or down ▼ button to select " Allow name ".
- Press [ SELECT ].
- Press [ OFF ].
Program from the Handset
Examples of Menu Button Location
- Press [ MENU # 7 9 4 ].
- Press the arrow up ▲ or down ▼ button to select the desired entry.
- Press [ ERASE ].
- Press the arrow up ▲ or down ▼ button to select“ Yes ”.
- Press [ SELECT ].
- Press [ OFF ].
Program from the Base
- Press [ MENU # 7 9 4 ].
- Press the arrow up ▲ or down ▼ button to select the desired entry.
- Press [ ERASE ].
- Press the arrow up ▲ or down ▼ button to select“ Yes ”.
- Press [ SELECT ].
- Press [ EXIT ].
Program from the Handset or Base
Examples of Menu Button Location on handset
- Press [ MENU # 7 9 4 ].
- Press [ ERASE ].
- Press the arrow up ▲ or down ▼ button to select “ Yes ”.
- Press [ SELECT ].
- Press the arrow up ▲ or down ▼ button to select“ Yes ”.
- Press [ SELECT ].
- Press [ OFF ] on the handset or [ EXIT ] on the base.
Note - Programming on the base only available on models with a base keypad and Menu button.
When the unit answers a call, a greeting message is played to the caller.
You can use either:
- Record your own greeting message and pre-recorded greeting message
- Use the pre-recorded greeting message
Example of your own greeting message:
- “Hi, you have reached xxxxxxx (Name).”
- “Thank you for your calling, You have reached xxxxxxx (Name).”
- “Hi, you have reached the xxxx (Name) residence.
Examples of Menu Button Location
- Press [ MENU # 7 9 1 ]
- Press the arrow up ▲ or down ▼ button to select “ Yes ”.
- Press [ SELECT ].
- After after a beep sounds, hold the handset about 20 cm (8 inches) away and speak clearly into the microphone (2 minutes max.).
- Press [ STOP ] to stop recording. The unit will play the recorded greeting message for automated call block.
- Press [ OFF ]
This procedure will erase your greeting message for automated call block and reset to the pre-recorded one.
Examples of Menu Button Location
- Press [ MENU # 7 9 3 ].
- Press [ Yes ].
- Press [ OFF ].
Examples of Menu Button Location
- Press [ MENU # 7 9 2 ].
- To exit Press [ OFF ].
Program from the Handset
Examples of Menu Button Location
- Press [ MENU # 7 9 0 ].
- To exit without clearing press [ OFF ].
- To clear, Press [ CLEAR ].
- Press the arrow up ▲ or down ▼ button to select “ Yes ”.
- Press [ SELECT ].
- Press [ OFF ].
Program from the Base Unit
- Press [ MENU # 7 9 0 ].
- to exit without clearing press [ EXIT ].
- To clear, Press [ CLEAR ].
- Press the arrow up ▲ or down ▼ button to select “ Yes ”.
- Press [ SELECT ].
- Press [ EXIT ].
For full information for the operation on this model refer to the Operating Manual.
Model KX-TG885
Allowed number database
Once the caller enters the access code, the caller’s phone number is memorized in the allowed number database as an unblocked number. Callers from this database are allowed to connect without the access code from their next call. 100 entries can be stored to the database (22 digits max. each).
Note
- When the database memory is full, the latest call received will replace the oldest number stored in the list.
- The numbers stored in the database will be erased when you change the access code.
- The numbers stored in the database cannot be displayed.
Select a Automated Call block programming function from the list below to learn how to use it.
- Press the [ CALL BLOCK ] button.
- Press [ SELECT ].
- Press the arrow up ▲ or down ▼ button to select “ Block/Unblock ”. Then press [ SELECT ].
- Press the arrow up ▲ or down ▼ button to select the desired setting " ON or OFF ".
- Press [ SAVE ].
- Press the arrow up ▲ or down ▼ button to select “ Yes ”. Then press [ SELECT ].
- Press [ OFF ] on the handset or [ EXIT ] on the base.
We recommend you perform a test run of the automated call block procedure to ensure that the automated call block feature is set correctly.
- Press the [ CALL BLOCK ] button.
- Press [ SELECT ].
- Press the arrow up ▲ or down ▼ button to select “ Access code ”. Then press [ SELECT ].
- Press the [ CLEAR ] button.
- Enter in the new access code.
- Press [ SAVE ].
- Press [ OFF ].
You can allow specific callers to pass through by adding the caller’s name to the allow name list. You can store up to 100 names (16 characters max.). If the name stored in the allow name list matches the incoming Caller ID, the unit rings. Callers listed in the allow name list are not required to enter the access code.
Program from the Handset
When a cellular phone is paired
- Press the arrow down ▼ to select CID.
- Press the arrow up ▲ or down ▼ button to select the desired entry, then press [ SELECT ].
- Press [ SAVE ].
- Press the arrow up ▲ or down ▼ button to select " Allow name ".
- Press [ SELECT ].
- Press [ OFF ].
Program from the Handset
When a cellular phone is not paired
- Press the arrow down ▼ to select CID.
- Press the arrow up ▲ or down ▼ button to select the desired entry, then press [ MENU ].
- Press the arrow up ▲ or down ▼ button to select " Save allow name ".
- Press [ SELECT ].
- Press [ OFF ].
Program from the Base Unit
- Press the arrow down ▼ to select CID.
- Press the arrow up ▲ or down ▼ button to select the desired entry, then press [ SAVE ].
- Press the arrow up ▲ or down ▼ button to select " Allow name ".
- Press [ SELECT ].
- Press [ OFF ].
Program from a Handset
- Press the [ CALL BLOCK ] button.
- Press [ SELECT ].
- Press the arrow up ▲ or down ▼ button to select “ Allow name List ”. Then press [ SELECT ].
- Press the arrow up ▲ or down ▼ button to select the entry you want to erase.
- Press the [ ERASE ] button.
- Press the arrow up ▲ or down ▼ button to select “ Yes ”, then press [ SELECT ].
- Press [ OFF ].
Program from the Base Unit
- Press the [ CALL BLOCK ] button.
- Press [ SELECT ].
- Press the arrow up ▲ or down ▼ button to select “ Allow name List ”. Then press [ SELECT ].
- Press the arrow up ▲ or down ▼ button to select the entry you want to erase.
- Press the [ ERASE ] button.
- Press the arrow up ▲ or down ▼ button to select “ Yes ”, then press [ SELECT ].
- Press [ EXIT ].
Program from the Handset or Base unit
- Press the [ CALL BLOCK ] button.
- Press [ SELECT ].
- Press the arrow up ▲ or down ▼ button to select “ Allow name List ”. Then press [ SELECT ].
- Press the [ ERASE ] button.
- Press the arrow up ▲ or down ▼ button to select “ Yes ”, then press [ SELECT ].
- Press [ OFF ] on the Handset or [ EXIT ] on the Base.
When the unit answers a call, a greeting message is played to the caller.
You can use either:
- your own greeting message and pre-recorded greeting message
- pre-recorded greeting message
Example of your own greeting message:
- “Hi, you have reached xxxxxxx (Name).”
- “Thank you for your calling, You have reached xxxxxxx (Name).”
- “Hi, you have reached the xxxx (Name) residence.
- Press the [ CALL BLOCK ] button.
- Press [ SELECT ].
- Press the arrow up ▲ or down ▼ button to select “ Automated call greeting ”. Then press [ SELECT ].
- Press the arrow up ▲ or down ▼ button to select “ Record Greeting ”. Then press [ SELECT ].
- Press the arrow up ▲ or down ▼ button to select “ Yes ”, then press [ SELECT ].
- After after a beep sounds, hold the handset about 20 cm (8 inches) away and speak clearly into the microphone (2 minutes max.).
- Press [ STOP ] to stop recording. The unit will play the recorded greeting message for automated call block.
- Press [ OFF ].
This procedure will erase your greeting message for automated call block and reset to the pre-recorded one.
- Press the [ CALL BLOCK ] button.
- Press [ SELECT ].
- Press the arrow up ▲ or down ▼ button to select “ Automated call greeting ”. Then press [ SELECT ].
- Press the arrow up ▲ or down ▼ button to select “ Pre-recorded ”. Then press [ SELECT ].
- Press the arrow up ▲ or down ▼ button to select “ Yes ”.
- Press [ OFF ].
- Press the [ CALL BLOCK ] button.
- Press [ SELECT ].
- Press the arrow up ▲ or down ▼ button to select “ Automated call greeting ”. Then press [ SELECT ].
- Press the arrow up ▲ or down ▼ button to select “ Check greeting ”. Then press [ SELECT ].
- Press [ OFF ] to exit.
Program from the Handset
- Press the [ CALL BLOCK ] button.
- Press [ SELECT ].
- Press the arrow up ▲ or down ▼ button to select “ Blocked calls count ”. Then press [ SELECT ].
- Press the [ OFF ] button to exit or press the [ CLEAR ] button to erase the call count.
- Press the arrow up ▲ or down ▼ button to select “ Yes ”, then press [ SELECT ].
- Press [ OFF ].
Program from the Base Unit
- Press the [ CALL BLOCK ] button.
- Press [ SELECT ].
- Press the arrow up ▲ or down ▼ button to select “ Blocked count ”. Then press [ SELECT ].
- Press the [ EXIT ] button to exit or press the [ CLEAR ] button to erase the call count.
- Press the arrow up ▲ or down ▼ button to select “ Yes ”, then press [ SELECT ].
- Press [ EXIT ].
For full information for the operation on this model refer to the Operating Manual.
Model KX-TG985SK
Allowed number database
Once the caller enters the access code, the caller’s phone number is memorized in the allowed number database as an unblocked number. Callers from this database are allowed to connect without the access code from their next call. 100 entries can be stored to the database (22 digits max. each).
Note
- When the database memory is full, the latest call received will replace the oldest number stored in the list.
- The numbers stored in the database will be erased when you change the access code.
- The numbers stored in the database cannot be displayed.
Select a Automated Call block programming function from the list below to learn how to use it.
Program from the Handset or Base Unit
Examples of Menu Button Location
- Press [ MENU # 7 8 7 ].
- Press the arrow up ▲ or down ▼ button to select the desired setting.
- Press [ SAVE ].
- Press the arrow up ▲ or down ▼ button to select " Yes ".
- Press [ SELECT ].
- When programming from the handset Press [ OFF ]. When programming from the Base unit Press [ EXIT ].
We recommend you perform a test run of the automated call block procedure to ensure that the automated call block feature is set correctly.
Note - Programming on the base only available on models with a base keypad and Menu button.
If the unit answers undesirable calls such as robocalls even though the automated call block function is on, change the access code (3 digits max.). The default setting is “1”.
Program from the Handset
Examples of Menu Button Location
- Press [ MENU # 7 8 9 ].
- Press [ CLEAR ].
- Enter the new access code.
- Press [ SAVE ].
- Press [ OFF ].
You can allow specific callers to pass through by adding the caller’s name to the allow name list. You can store up to 100 names (16 characters max.). If the name stored in the allow name list matches the incoming Caller ID, the unit rings. Callers listed in the allow name list are not required to enter the access code.
Program from the Handset
When a cellular phone is paired
- Press the arrow down ▼ to select CID.
- Press the arrow up ▲ or down ▼ button to select the desired entry, then press [ SELECT ].
- Press [ SAVE ].
- Press the arrow up ▲ or down ▼ button to select " Allow name ".
- Press [ SELECT ].
- Press [ OFF ].
Program from the Handset
When a cellular phone is not paired
- Press the arrow down ▼ to select CID.
- Press the arrow up ▲ or down ▼ button to select the desired entry, then press [ MENU ].
- Press the arrow up ▲ or down ▼ button to select " Save allow name ".
- Press [ SELECT ].
- Press [ OFF ].
Program from the Base Unit
- Press the arrow down ▼ to select CID.
- Press the arrow up ▲ or down ▼ button to select the desired entry, then press [ SAVE ].
- Press the arrow up ▲ or down ▼ button to select " Allow name ".
- Press [ SELECT ].
- Press [ OFF ].
Program from the Handset
Examples of Menu Button Location
- Press [ MENU # 7 9 4 ].
- Press the arrow up ▲ or down ▼ button to select the desired entry.
- Press [ ERASE ].
- Press the arrow up ▲ or down ▼ button to select“ Yes ”.
- Press [ SELECT ].
- Press [ OFF ].
Program from the Base
- Press [ MENU # 7 9 4 ].
- Press the arrow up ▲ or down ▼ button to select the desired entry.
- Press [ ERASE ].
- Press the arrow up ▲ or down ▼ button to select“ Yes ”.
- Press [ SELECT ].
- Press [ EXIT ].
Program from the Handset or Base
Examples of Menu Button Location on handset
- Press [ MENU # 7 9 4 ].
- Press [ ERASE ].
- Press the arrow up ▲ or down ▼ button to select “ Yes ”.
- Press [ SELECT ].
- Press the arrow up ▲ or down ▼ button to select“ Yes ”.
- Press [ SELECT ].
- Press [ OFF ] on the handset or [ EXIT ] on the base.
Note - Programming on the base only available on models with a base keypad and Menu button.
When the unit answers a call, a greeting message is played to the caller.
You can use either:
- Record your own greeting message and pre-recorded greeting message
- Use the pre-recorded greeting message
Example of your own greeting message:
- “Hi, you have reached xxxxxxx (Name).”
- “Thank you for your calling, You have reached xxxxxxx (Name).”
- “Hi, you have reached the xxxx (Name) residence.
Examples of Menu Button Location
- Press [ MENU # 7 9 1 ]
- Press the arrow up ▲ or down ▼ button to select “ Yes ”.
- Press [ SELECT ].
- After after a beep sounds, hold the handset about 20 cm (8 inches) away and speak clearly into the microphone (2 minutes max.).
- Press [ STOP ] to stop recording. The unit will play the recorded greeting message for automated call block.
- Press [ OFF ]
This procedure will erase your greeting message for automated call block and reset to the pre-recorded one.
Examples of Menu Button Location
- Press [ MENU # 7 9 3 ].
- Press [ Yes ].
- Press [ OFF ].
Examples of Menu Button Location
- Press [ MENU # 7 9 2 ].
- To exit Press [ OFF ].
Program from the Handset
Examples of Menu Button Location
- Press [ MENU # 7 9 0 ].
- To exit without clearing press [ OFF ].
- To clear, Press [ CLEAR ].
- Press the arrow up ▲ or down ▼ button to select “ Yes ”.
- Press [ SELECT ].
- Press [ OFF ].
Program from the Base Unit
- Press [ MENU # 7 9 0 ].
- to exit without clearing press [ EXIT ].
- To clear, Press [ CLEAR ].
- Press the arrow up ▲ or down ▼ button to select “ Yes ”.
- Press [ SELECT ].
- Press [ EXIT ].
For full information for the operation on this model refer to the Operating Manual.
Model KX-TG994SK
Allowed number database
Once the caller enters the access code, the caller’s phone number is memorized in the allowed number database as an unblocked number. Callers from this database are allowed to connect without the access code from their next call. 100 entries can be stored to the database (22 digits max. each).
Note
- When the database memory is full, the latest call received will replace the oldest number stored in the list.
- The numbers stored in the database will be erased when you change the access code.
- The numbers stored in the database cannot be displayed.
Select a Automated Call block programming function from the list below to learn how to use it.
Program from the Handset or Base Unit
Examples of Menu Button Location
- Press [ MENU # 7 8 7 ].
- Press the arrow up ▲ or down ▼ button to select the desired setting.
- Press [ SAVE ].
- Press the arrow up ▲ or down ▼ button to select " Yes ".
- Press [ SELECT ].
- When programming from the handset Press [ OFF ]. When programming from the Base unit Press [ EXIT ].
We recommend you perform a test run of the automated call block procedure to ensure that the automated call block feature is set correctly.
Note - Programming on the base only available on models with a base keypad and Menu button.
If the unit answers undesirable calls such as robocalls even though the automated call block function is on, change the access code (3 digits max.). The default setting is “1”.
Program from the Handset
Examples of Menu Button Location
- Press [ MENU # 7 8 9 ].
- Press [ CLEAR ].
- Enter the new access code.
- Press [ SAVE ].
- Press [ OFF ].
You can allow specific callers to pass through by adding the caller’s name to the allow name list. You can store up to 100 names (16 characters max.). If the name stored in the allow name list matches the incoming Caller ID, the unit rings. Callers listed in the allow name list are not required to enter the access code.
Program from the Handset
When a cellular phone is paired
- Press the arrow down ▼ to select CID.
- Press the arrow up ▲ or down ▼ button to select the desired entry, then press [ SELECT ].
- Press [ SAVE ].
- Press the arrow up ▲ or down ▼ button to select " Allow name ".
- Press [ SELECT ].
- Press [ OFF ].
Program from the Handset
When a cellular phone is not paired
- Press the arrow down ▼ to select CID.
- Press the arrow up ▲ or down ▼ button to select the desired entry, then press [ MENU ].
- Press the arrow up ▲ or down ▼ button to select " Save allow name ".
- Press [ SELECT ].
- Press [ OFF ].
Program from the Base Unit
- Press the arrow down ▼ to select CID.
- Press the arrow up ▲ or down ▼ button to select the desired entry, then press [ SAVE ].
- Press the arrow up ▲ or down ▼ button to select " Allow name ".
- Press [ SELECT ].
- Press [ OFF ].
Program from the Handset
Examples of Menu Button Location
- Press [ MENU # 7 9 4 ].
- Press the arrow up ▲ or down ▼ button to select the desired entry.
- Press [ ERASE ].
- Press the arrow up ▲ or down ▼ button to select“ Yes ”.
- Press [ SELECT ].
- Press [ OFF ].
Program from the Base
- Press [ MENU # 7 9 4 ].
- Press the arrow up ▲ or down ▼ button to select the desired entry.
- Press [ ERASE ].
- Press the arrow up ▲ or down ▼ button to select“ Yes ”.
- Press [ SELECT ].
- Press [ EXIT ].
Program from the Handset or Base
Examples of Menu Button Location on handset
- Press [ MENU # 7 9 4 ].
- Press [ ERASE ].
- Press the arrow up ▲ or down ▼ button to select “ Yes ”.
- Press [ SELECT ].
- Press the arrow up ▲ or down ▼ button to select“ Yes ”.
- Press [ SELECT ].
- Press [ OFF ] on the handset or [ EXIT ] on the base.
Note - Programming on the base only available on models with a base keypad and Menu button.
When the unit answers a call, a greeting message is played to the caller.
You can use either:
- Record your own greeting message and pre-recorded greeting message
- Use the pre-recorded greeting message
Example of your own greeting message:
- “Hi, you have reached xxxxxxx (Name).”
- “Thank you for your calling, You have reached xxxxxxx (Name).”
- “Hi, you have reached the xxxx (Name) residence.
Examples of Menu Button Location
- Press [ MENU # 7 9 1 ]
- Press the arrow up ▲ or down ▼ button to select “ Yes ”.
- Press [ SELECT ].
- After after a beep sounds, hold the handset about 20 cm (8 inches) away and speak clearly into the microphone (2 minutes max.).
- Press [ STOP ] to stop recording. The unit will play the recorded greeting message for automated call block.
- Press [ OFF ]
This procedure will erase your greeting message for automated call block and reset to the pre-recorded one.
Examples of Menu Button Location
- Press [ MENU # 7 9 3 ].
- Press [ Yes ].
- Press [ OFF ].
Examples of Menu Button Location
- Press [ MENU # 7 9 2 ].
- To exit Press [ OFF ].
Program from the Handset
Examples of Menu Button Location
- Press [ MENU # 7 9 0 ].
- To exit without clearing press [ OFF ].
- To clear, Press [ CLEAR ].
- Press the arrow up ▲ or down ▼ button to select “ Yes ”.
- Press [ SELECT ].
- Press [ OFF ].
Program from the Base Unit
- Press [ MENU # 7 9 0 ].
- to exit without clearing press [ EXIT ].
- To clear, Press [ CLEAR ].
- Press the arrow up ▲ or down ▼ button to select “ Yes ”.
- Press [ SELECT ].
- Press [ EXIT ].
For full information for the operation on this model refer to the Operating Manual.
Models KX-TGD830, KX-TGD832, KX-TGD833
Allowed number database
Once the caller enters the access code, the caller’s phone number is memorized in the allowed number database as an unblocked number. Callers from this database are allowed to connect without the access code from their next call. 100 entries can be stored to the database (22 digits max. each).
Note
- When the database memory is full, the latest call received will replace the oldest number stored in the list.
- The numbers stored in the database will be erased when you change the access code.
- The numbers stored in the database cannot be displayed.
Select a Automated Call block programming function from the list below to learn how to use it.
Program from the Handset or Base Unit
Examples of Menu Button Location
- Press [ MENU # 7 8 7 ].
- Press the arrow up ▲ or down ▼ button to select the desired setting.
- Press [ SAVE ].
- Press the arrow up ▲ or down ▼ button to select " Yes ".
- Press [ SELECT ].
- When programming from the handset Press [ OFF ]. When programming from the Base unit Press [ EXIT ].
We recommend you perform a test run of the automated call block procedure to ensure that the automated call block feature is set correctly.
Note - Programming on the base only available on models with a base keypad and Menu button.
If the unit answers undesirable calls such as robocalls even though the automated call block function is on, change the access code (3 digits max.). The default setting is “1”.
Program from the Handset
Examples of Menu Button Location
- Press [ MENU # 7 8 9 ].
- Press [ CLEAR ].
- Enter the new access code.
- Press [ SAVE ].
- Press [ OFF ].
You can allow specific callers to pass through by adding the caller’s name to the allow name list. You can store up to 100 names (16 characters max.). If the name stored in the allow name list matches the incoming Caller ID, the unit rings. Callers listed in the allow name list are not required to enter the access code.
Program from the Handset
Examples of Menu Button Location
- Press the arrow down ▼ button to select CID.
- Press the arrow up ▲ or down ▼ button to select the desired entry.
- Press [ MENU ].
- Press the arrow up ▲ or down ▼ button to select “ Save allow name ”.
- Press [ SELECT ].
- Press [ OFF ]
Program from the Handset
Examples of Menu Button Location
- Press [ MENU # 7 9 4 ].
- Press the arrow up ▲ or down ▼ button to select the desired entry.
- Press [ ERASE ].
- Press the arrow up ▲ or down ▼ button to select“ Yes ”.
- Press [ SELECT ].
- Press [ OFF ].
Program from the Handset or Base
Examples of Menu Button Location on handset
- Press [ MENU # 7 9 4 ].
- Press [ ERASE ].
- Press the arrow up ▲ or down ▼ button to select “ Yes ”.
- Press [ SELECT ].
- Press the arrow up ▲ or down ▼ button to select“ Yes ”.
- Press [ SELECT ].
- Press [ OFF ] on the handset or [ EXIT ] on the base.
Note - Programming on the base only available on models with a base keypad and Menu button.
When the unit answers a call, a greeting message is played to the caller.
You can use either:
- Record your own greeting message and pre-recorded greeting message
- Use the pre-recorded greeting message
Example of your own greeting message:
- “Hi, you have reached xxxxxxx (Name).”
- “Thank you for your calling, You have reached xxxxxxx (Name).”
- “Hi, you have reached the xxxx (Name) residence.
Examples of Menu Button Location
- Press [ MENU # 7 9 1 ]
- Press the arrow up ▲ or down ▼ button to select “ Yes ”.
- Press [ SELECT ].
- After after a beep sounds, hold the handset about 20 cm (8 inches) away and speak clearly into the microphone (2 minutes max.).
- Press [ STOP ] to stop recording. The unit will play the recorded greeting message for automated call block.
- Press [ OFF ]
This procedure will erase your greeting message for automated call block and reset to the pre-recorded one.
Examples of Menu Button Location
- Press [ MENU # 7 9 3 ].
- Press [ Yes ].
- Press [ OFF ].
Examples of Menu Button Location
- Press [ MENU # 7 9 2 ].
- To exit Press [ OFF ].
Program from the Handset
Examples of Menu Button Location
- Press [ MENU # 7 9 0 ].
- To exit without clearing press [ OFF ].
- To clear, Press [ CLEAR ].
- Press the arrow up ▲ or down ▼ button to select “ Yes ”.
- Press [ SELECT ].
- Press [ OFF ].
For full information for the operation on this model refer to the Operating Manual.
Models KX-TGD862, KX-TGD863, KX-TGD864
Allowed number database
Once the caller enters the access code, the caller’s phone number is memorized in the allowed number database as an unblocked number. Callers from this database are allowed to connect without the access code from their next call. 100 entries can be stored to the database (22 digits max. each).
Note
- When the database memory is full, the latest call received will replace the oldest number stored in the list.
- The numbers stored in the database will be erased when you change the access code.
- The numbers stored in the database cannot be displayed.
Select a Automated Call block programming function from the list below to learn how to use it.
Program from the Handset or Base Unit
Examples of Menu Button Location
- Press [ MENU # 7 8 7 ].
- Press the arrow up ▲ or down ▼ button to select the desired setting.
- Press [ SAVE ].
- Press the arrow up ▲ or down ▼ button to select " Yes ".
- Press [ SELECT ].
- When programming from the handset Press [ OFF ]. When programming from the Base unit Press [ EXIT ].
We recommend you perform a test run of the automated call block procedure to ensure that the automated call block feature is set correctly.
Note - Programming on the base only available on models with a base keypad and Menu button.
If the unit answers undesirable calls such as robocalls even though the automated call block function is on, change the access code (3 digits max.). The default setting is “1”.
Program from the Handset
Examples of Menu Button Location
- Press [ MENU # 7 8 9 ].
- Press [ CLEAR ].
- Enter the new access code.
- Press [ SAVE ].
- Press [ OFF ].
You can allow specific callers to pass through by adding the caller’s name to the allow name list. You can store up to 100 names (16 characters max.). If the name stored in the allow name list matches the incoming Caller ID, the unit rings. Callers listed in the allow name list are not required to enter the access code.
Program from the Handset
When a cellular phone is paired
- Press the arrow down ▼ to select CID.
- Press the arrow up ▲ or down ▼ button to select the desired entry, then press [ SELECT ].
- Press [ SAVE ].
- Press the arrow up ▲ or down ▼ button to select " Allow name ".
- Press [ SELECT ].
- Press [ OFF ].
Program from the Handset
When a cellular phone is not paired
- Press the arrow down ▼ to select CID.
- Press the arrow up ▲ or down ▼ button to select the desired entry, then press [ MENU ].
- Press the arrow up ▲ or down ▼ button to select " Save allow name ".
- Press [ SELECT ].
- Press [ OFF ].
Program from the Handset
Examples of Menu Button Location
- Press [ MENU # 7 9 4 ].
- Press the arrow up ▲ or down ▼ button to select the desired entry.
- Press [ ERASE ].
- Press the arrow up ▲ or down ▼ button to select“ Yes ”.
- Press [ SELECT ].
- Press [ OFF ].
Program from the Handset or Base
Examples of Menu Button Location on handset
- Press [ MENU # 7 9 4 ].
- Press [ ERASE ].
- Press the arrow up ▲ or down ▼ button to select “ Yes ”.
- Press [ SELECT ].
- Press the arrow up ▲ or down ▼ button to select“ Yes ”.
- Press [ SELECT ].
- Press [ OFF ] on the handset or [ EXIT ] on the base.
Note - Programming on the base only available on models with a base keypad and Menu button.
When the unit answers a call, a greeting message is played to the caller.
You can use either:
- Record your own greeting message and pre-recorded greeting message
- Use the pre-recorded greeting message
Example of your own greeting message:
- “Hi, you have reached xxxxxxx (Name).”
- “Thank you for your calling, You have reached xxxxxxx (Name).”
- “Hi, you have reached the xxxx (Name) residence.
Examples of Menu Button Location
- Press [ MENU # 7 9 1 ]
- Press the arrow up ▲ or down ▼ button to select “ Yes ”.
- Press [ SELECT ].
- After after a beep sounds, hold the handset about 20 cm (8 inches) away and speak clearly into the microphone (2 minutes max.).
- Press [ STOP ] to stop recording. The unit will play the recorded greeting message for automated call block.
- Press [ OFF ]
This procedure will erase your greeting message for automated call block and reset to the pre-recorded one.
Examples of Menu Button Location
- Press [ MENU # 7 9 3 ].
- Press [ Yes ].
- Press [ OFF ].
Examples of Menu Button Location
- Press [ MENU # 7 9 2 ].
- To exit Press [ OFF ].
Program from the Handset
Examples of Menu Button Location
- Press [ MENU # 7 9 0 ].
- To exit without clearing press [ OFF ].
- To clear, Press [ CLEAR ].
- Press the arrow up ▲ or down ▼ button to select “ Yes ”.
- Press [ SELECT ].
- Press [ OFF ].
For full information for the operation on this model refer to the Operating Manual.
Model KX-TGD890, KX-TGD892
Allowed number database
Once the caller enters the access code, the caller’s phone number is memorized in the allowed number database as an unblocked number. Callers from this database are allowed to connect without the access code from their next call. 100 entries can be stored to the database (22 digits max. each).
Note
- When the database memory is full, the latest call received will replace the oldest number stored in the list.
- The numbers stored in the database will be erased when you change the access code.
- The numbers stored in the database cannot be displayed.
Select a Automated Call block programming function from the list below to learn how to use it.
Program from the Handset or Base Unit
Examples of Menu Button Location
- Press [ MENU # 7 8 7 ].
- Press the arrow up ▲ or down ▼ button to select the desired setting.
- Press [ SAVE ].
- Press the arrow up ▲ or down ▼ button to select " Yes ".
- Press [ SELECT ].
- When programming from the handset Press [ OFF ]. When programming from the Base unit Press [ EXIT ].
We recommend you perform a test run of the automated call block procedure to ensure that the automated call block feature is set correctly.
Note - Programming on the base only available on models with a base keypad and Menu button.
If the unit answers undesirable calls such as robocalls even though the automated call block function is on, change the access code (3 digits max.). The default setting is “1”.
Program from the Handset
Examples of Menu Button Location
- Press [ MENU # 7 8 9 ].
- Press [ CLEAR ].
- Enter the new access code.
- Press [ SAVE ].
- Press [ OFF ].
You can allow specific callers to pass through by adding the caller’s name to the allow name list. You can store up to 100 names (16 characters max.). If the name stored in the allow name list matches the incoming Caller ID, the unit rings. Callers listed in the allow name list are not required to enter the access code.
Program from the Handset
Examples of Menu Button Location
- Press the arrow down ▼ button to select CID.
- Press the arrow up ▲ or down ▼ button to select the desired entry.
- Press [ MENU ].
- Press the arrow up ▲ or down ▼ button to select “ Save allow name ”.
- Press [ SELECT ].
- Press [ OFF ]
Program from the Handset
Examples of Menu Button Location
- Press [ MENU # 7 9 4 ].
- Press the arrow up ▲ or down ▼ button to select the desired entry.
- Press [ ERASE ].
- Press the arrow up ▲ or down ▼ button to select“ Yes ”.
- Press [ SELECT ].
- Press [ OFF ].
Program from the Handset or Base
Examples of Menu Button Location on handset
- Press [ MENU # 7 9 4 ].
- Press [ ERASE ].
- Press the arrow up ▲ or down ▼ button to select “ Yes ”.
- Press [ SELECT ].
- Press the arrow up ▲ or down ▼ button to select“ Yes ”.
- Press [ SELECT ].
- Press [ OFF ] on the handset or [ EXIT ] on the base.
Note - Programming on the base only available on models with a base keypad and Menu button.
When the unit answers a call, a greeting message is played to the caller.
You can use either:
- Record your own greeting message and pre-recorded greeting message
- Use the pre-recorded greeting message
Example of your own greeting message:
- “Hi, you have reached xxxxxxx (Name).”
- “Thank you for your calling, You have reached xxxxxxx (Name).”
- “Hi, you have reached the xxxx (Name) residence.
Examples of Menu Button Location
- Press [ MENU # 7 9 1 ]
- Press the arrow up ▲ or down ▼ button to select “ Yes ”.
- Press [ SELECT ].
- After after a beep sounds, hold the handset about 20 cm (8 inches) away and speak clearly into the microphone (2 minutes max.).
- Press [ STOP ] to stop recording. The unit will play the recorded greeting message for automated call block.
- Press [ OFF ]
This procedure will erase your greeting message for automated call block and reset to the pre-recorded one.
Examples of Menu Button Location
- Press [ MENU # 7 9 3 ].
- Press [ Yes ].
- Press [ OFF ].
Examples of Menu Button Location
- Press [ MENU # 7 9 2 ].
- To exit Press [ OFF ].
Program from the Handset
Examples of Menu Button Location
- Press [ MENU # 7 9 0 ].
- To exit without clearing press [ OFF ].
- To clear, Press [ CLEAR ].
- Press the arrow up ▲ or down ▼ button to select “ Yes ”.
- Press [ SELECT ].
- Press [ OFF ].
For full information for the operation on this model refer to the Operating Manual.
Models KX-TGE632, KX-TGE633, KX-TGE645
Allowed number database
Once the caller enters the access code, the caller’s phone number is memorized in the allowed number database as an unblocked number. Callers from this database are allowed to connect without the access code from their next call. 100 entries can be stored to the database (22 digits max. each).
Note
- When the database memory is full, the latest call received will replace the oldest number stored in the list.
- The numbers stored in the database will be erased when you change the access code.
- The numbers stored in the database cannot be displayed.
Select a Automated Call block programming function from the list below to learn how to use it.
- Press the [ CALL BLOCK ] button.
- Press [ SELECT ].
- Press the arrow up ▲ or down ▼ button to select “ Block/Unblock ”. Then press [ SELECT ].
- Press the arrow up ▲ or down ▼ button to select the desired setting " ON or OFF ".
- Press [ SAVE ].
- Press the arrow up ▲ or down ▼ button to select “ Yes ”. Then press [ SELECT ].
- Press [ OFF ].
We recommend you perform a test run of the automated call block procedure to ensure that the automated call block feature is set correctly.
- Press the [ CALL BLOCK ] button.
- Press [ SELECT ].
- Press the arrow up ▲ or down ▼ button to select “ Access code ”. Then press [ SELECT ].
- Press the [ CLEAR ] button.
- Enter in the new access code.
- Press [ SAVE ].
- Press [ OFF ].
You can allow specific callers to pass through by adding the caller’s name to the allow name list. You can store up to 100 names (16 characters max.). If the name stored in the allow name list matches the incoming Caller ID, the unit rings. Callers listed in the allow name list are not required to enter the access code.
- Press the arrow down ▼ to select CID.
- Press the arrow up ▲ or down ▼ button to select the desired entry, then press [ MENU ].
- Press the arrow up ▲ or down ▼ button to select " Save allow name ".
- Press [ SELECT ].
- Press [ OFF ].
- Press the [ CALL BLOCK ] button.
- Press [ SELECT ].
- Press the arrow up ▲ or down ▼ button to select “ Allow name List ”. Then press [ SELECT ].
- Press the arrow up ▲ or down ▼ button to select the entry you want to erase.
- Press the [ ERASE ] button.
- Press the arrow up ▲ or down ▼ button to select “ Yes ”, then press [ SELECT ].
- Press [ OFF ].
- Press the [ CALL BLOCK ] button.
- Press [ SELECT ].
- Press the arrow up ▲ or down ▼ button to select “ Allow name List ”. Then press [ SELECT ].
- Press the [ ERASE ] button.
- Press the arrow up ▲ or down ▼ button to select “ Yes ”, then press [ SELECT ].
- Press [ OFF ].
When the unit answers a call, a greeting message is played to the caller.
You can use either:
- your own greeting message and pre-recorded greeting message
- pre-recorded greeting message
Example of your own greeting message:
- “Hi, you have reached xxxxxxx (Name).”
- “Thank you for your calling, You have reached xxxxxxx (Name).”
- “Hi, you have reached the xxxx (Name) residence.
- Press the [ CALL BLOCK ] button.
- Press [ SELECT ].
- Press the arrow up ▲ or down ▼ button to select “ Automated call greeting ”. Then press [ SELECT ].
- Press the arrow up ▲ or down ▼ button to select “ Record Greeting ”. Then press [ SELECT ].
- Press the arrow up ▲ or down ▼ button to select “ Yes ”, then press [ SELECT ].
- After after a beep sounds, hold the handset about 20 cm (8 inches) away and speak clearly into the microphone (2 minutes max.).
- Press [ STOP ] to stop recording. The unit will play the recorded greeting message for automated call block.
- Press [ OFF ].
This procedure will erase your greeting message for automated call block and reset to the pre-recorded one.
- Press the [ CALL BLOCK ] button.
- Press [ SELECT ].
- Press the arrow up ▲ or down ▼ button to select “ Automated call greeting ”. Then press [ SELECT ].
- Press the arrow up ▲ or down ▼ button to select “ Pre-recorded ”. Then press [ SELECT ].
- Press the arrow up ▲ or down ▼ button to select “ Yes ”.
- Press [ OFF ].
- Press the [ CALL BLOCK ] button.
- Press [ SELECT ].
- Press the arrow up ▲ or down ▼ button to select “ Automated call greeting ”. Then press [ SELECT ].
- Press the arrow up ▲ or down ▼ button to select “ Check greeting ”. Then press [ SELECT ].
- Press [ OFF ] to exit.
Program from the Handset
- Press the [ CALL BLOCK ] button.
- Press [ SELECT ].
- Press the arrow up ▲ or down ▼ button to select “ Blocked calls count ”. Then press [ SELECT ].
- Press the [ OFF ] button to exit or press the [ CLEAR ] button to erase the call count.
- Press the arrow up ▲ or down ▼ button to select “ Yes ”, then press [ SELECT ].
- Press [ OFF ].
For full information for the operation on this model refer to the Operating Manual.
Series KX-TGE66 and KX-TGE67
Allowed number database
Once the caller enters the access code, the caller’s phone number is memorized in the allowed number database as an unblocked number. Callers from this database are allowed to connect without the access code from their next call. 100 entries can be stored to the database (22 digits max. each).
Note
- When the database memory is full, the latest call received will replace the oldest number stored in the list.
- The numbers stored in the database will be erased when you change the access code.
- The numbers stored in the database cannot be displayed.
Select a Automated Call block programming function from the list below to learn how to use it.
- Press the [ CALL BLOCK ] button.
- Press [ SELECT ].
- Press the arrow up ▲ or down ▼ button to select “ Block/Unblock ”. Then press [ SELECT ].
- Press the arrow up ▲ or down ▼ button to select the desired setting " ON or OFF ".
- Press [ SAVE ].
- Press the arrow up ▲ or down ▼ button to select “ Yes ”. Then press [ SELECT ].
- Press [ OFF ].
We recommend you perform a test run of the automated call block procedure to ensure that the automated call block feature is set correctly.
- Press the [ CALL BLOCK ] button.
- Press [ SELECT ].
- Press the arrow up ▲ or down ▼ button to select “ Access code ”. Then press [ SELECT ].
- Press the [ CLEAR ] button.
- Enter in the new access code.
- Press [ SAVE ].
- Press [ OFF ].
You can allow specific callers to pass through by adding the caller’s name to the allow name list. You can store up to 100 names (16 characters max.). If the name stored in the allow name list matches the incoming Caller ID, the unit rings. Callers listed in the allow name list are not required to enter the access code.
Program from the Handset
When a cellular phone is paired
- Press the arrow down ▼ to select CID.
- Press the arrow up ▲ or down ▼ button to select the desired entry, then press [ SELECT ].
- Press [ SAVE ].
- Press the arrow up ▲ or down ▼ button to select " Allow name ".
- Press [ SELECT ].
- Press [ OFF ].
Program from the Handset
When a cellular phone is not paired
- Press the arrow down ▼ to select CID.
- Press the arrow up ▲ or down ▼ button to select the desired entry, then press [ MENU ].
- Press the arrow up ▲ or down ▼ button to select " Save allow name ".
- Press [ SELECT ].
- Press [ OFF ].
- Press the [ CALL BLOCK ] button.
- Press [ SELECT ].
- Press the arrow up ▲ or down ▼ button to select “ Allow name List ”. Then press [ SELECT ].
- Press the arrow up ▲ or down ▼ button to select the entry you want to erase.
- Press the [ ERASE ] button.
- Press the arrow up ▲ or down ▼ button to select “ Yes ”, then press [ SELECT ].
- Press [ OFF ].
- Press the [ CALL BLOCK ] button.
- Press [ SELECT ].
- Press the arrow up ▲ or down ▼ button to select “ Allow name List ”. Then press [ SELECT ].
- Press the [ ERASE ] button.
- Press the arrow up ▲ or down ▼ button to select “ Yes ”, then press [ SELECT ].
- Press [ OFF ].
When the unit answers a call, a greeting message is played to the caller.
You can use either:
- your own greeting message and pre-recorded greeting message
- pre-recorded greeting message
Example of your own greeting message:
- “Hi, you have reached xxxxxxx (Name).”
- “Thank you for your calling, You have reached xxxxxxx (Name).”
- “Hi, you have reached the xxxx (Name) residence.
- Press the [ CALL BLOCK ] button.
- Press [ SELECT ].
- Press the arrow up ▲ or down ▼ button to select “ Automated call greeting ”. Then press [ SELECT ].
- Press the arrow up ▲ or down ▼ button to select “ Record Greeting ”. Then press [ SELECT ].
- Press the arrow up ▲ or down ▼ button to select “ Yes ”, then press [ SELECT ].
- After after a beep sounds, hold the handset about 20 cm (8 inches) away and speak clearly into the microphone (2 minutes max.).
- Press [ STOP ] to stop recording. The unit will play the recorded greeting message for automated call block.
- Press [ OFF ].
This procedure will erase your greeting message for automated call block and reset to the pre-recorded one.
- Press the [ CALL BLOCK ] button.
- Press [ SELECT ].
- Press the arrow up ▲ or down ▼ button to select “ Automated call greeting ”. Then press [ SELECT ].
- Press the arrow up ▲ or down ▼ button to select “ Pre-recorded ”. Then press [ SELECT ].
- Press the arrow up ▲ or down ▼ button to select “ Yes ”.
- Press [ OFF ].
- Press the [ CALL BLOCK ] button.
- Press [ SELECT ].
- Press the arrow up ▲ or down ▼ button to select “ Automated call greeting ”. Then press [ SELECT ].
- Press the arrow up ▲ or down ▼ button to select “ Check greeting ”. Then press [ SELECT ].
- Press [ OFF ] to exit.
Program from the Handset
- Press the [ CALL BLOCK ] button.
- Press [ SELECT ].
- Press the arrow up ▲ or down ▼ button to select “ Blocked calls count ”. Then press [ SELECT ].
- Press the [ OFF ] button to exit or press the [ CLEAR ] button to erase the call count.
- Press the arrow up ▲ or down ▼ button to select “ Yes ”, then press [ SELECT ].
- Press [ OFF ].
For full information for the operation on this model refer to the Operating Manual.
Model KX-TGF675
Allowed number database
Once the caller enters the access code, the caller’s phone number is memorized in the allowed number database as an unblocked number. Callers from this database are allowed to connect without the access code from their next call. 100 entries can be stored to the database (22 digits max. each).
Note
- When the database memory is full, the latest call received will replace the oldest number stored in the list.
- The numbers stored in the database will be erased when you change the access code.
- The numbers stored in the database cannot be displayed.
Select a Automated Call block programming function from the list below to learn how to use it.
- Press the [ CALL BLOCK ] button.
- Press [ SELECT ].
- Press the arrow up ▲ or down ▼ button to select “ Block/Unblock ”. Then press [ SELECT ].
- Press the arrow up ▲ or down ▼ button to select the desired setting " ON or OFF ".
- Press [ SAVE ].
- Press the arrow up ▲ or down ▼ button to select “ Yes ”. Then press [ SELECT ].
- Press [ OFF ].
We recommend you perform a test run of the automated call block procedure to ensure that the automated call block feature is set correctly.
- Press the [ CALL BLOCK ] button.
- Press [ SELECT ].
- Press the arrow up ▲ or down ▼ button to select “ Access code ”. Then press [ SELECT ].
- Press the [ CLEAR ] button.
- Enter in the new access code.
- Press [ SAVE ].
- Press [ OFF ].
You can allow specific callers to pass through by adding the caller’s name to the allow name list. You can store up to 100 names (16 characters max.). If the name stored in the allow name list matches the incoming Caller ID, the unit rings. Callers listed in the allow name list are not required to enter the access code.
Program from the Handset
When a cellular phone is paired
- Press the arrow down ▼ to select CID.
- Press the arrow up ▲ or down ▼ button to select the desired entry, then press [ SELECT ].
- Press [ SAVE ].
- Press the arrow up ▲ or down ▼ button to select " Allow name ".
- Press [ SELECT ].
- Press [ OFF ].
Program from the Handset
When a cellular phone is not paired
- Press the arrow down ▼ to select CID.
- Press the arrow up ▲ or down ▼ button to select the desired entry, then press [ MENU ].
- Press the arrow up ▲ or down ▼ button to select " Save allow name ".
- Press [ SELECT ].
- Press [ OFF ].
Program from the Base Unit
- Press the arrow down ▼ to select CID.
- Press the arrow up ▲ or down ▼ button to select the desired entry, then press [ SAVE ].
- Press the arrow up ▲ or down ▼ button to select " Allow name ".
- Press [ SELECT ].
- Press [ OFF ].
Program from a Handset
- Press the [ CALL BLOCK ] button.
- Press [ SELECT ].
- Press the arrow up ▲ or down ▼ button to select “ Allow name List ”. Then press [ SELECT ].
- Press the arrow up ▲ or down ▼ button to select the entry you want to erase.
- Press the [ ERASE ] button.
- Press the arrow up ▲ or down ▼ button to select “ Yes ”, then press [ SELECT ].
- Press [ OFF ].
Program from the Base Unit
- Press the [ CALL BLOCK ] button.
- Press [ SELECT ].
- Press the arrow up ▲ or down ▼ button to select “ Allow name List ”. Then press [ SELECT ].
- Press the arrow up ▲ or down ▼ button to select the entry you want to erase.
- Press the [ ERASE ] button.
- Press the arrow up ▲ or down ▼ button to select “ Yes ”, then press [ SELECT ].
- Press [ EXIT ].
Program from the Handset or Base unit
- Press the [ CALL BLOCK ] button.
- Press [ SELECT ].
- Press the arrow up ▲ or down ▼ button to select “ Allow name List ”. Then press [ SELECT ].
- Press the [ ERASE ] button.
- Press the arrow up ▲ or down ▼ button to select “ Yes ”, then press [ SELECT ].
- Press [ OFF ] on the Handset or [ EXIT ] on the Base.
When the unit answers a call, a greeting message is played to the caller.
You can use either:
- your own greeting message and pre-recorded greeting message
- pre-recorded greeting message
Example of your own greeting message:
- “Hi, you have reached xxxxxxx (Name).”
- “Thank you for your calling, You have reached xxxxxxx (Name).”
- “Hi, you have reached the xxxx (Name) residence.
- Press the [ CALL BLOCK ] button.
- Press [ SELECT ].
- Press the arrow up ▲ or down ▼ button to select “ Automated call greeting ”. Then press [ SELECT ].
- Press the arrow up ▲ or down ▼ button to select “ Record Greeting ”. Then press [ SELECT ].
- Press the arrow up ▲ or down ▼ button to select “ Yes ”, then press [ SELECT ].
- After after a beep sounds, hold the handset about 20 cm (8 inches) away and speak clearly into the microphone (2 minutes max.).
- Press [ STOP ] to stop recording. The unit will play the recorded greeting message for automated call block.
- Press [ OFF ].
This procedure will erase your greeting message for automated call block and reset to the pre-recorded one.
- Press the [ CALL BLOCK ] button.
- Press [ SELECT ].
- Press the arrow up ▲ or down ▼ button to select “ Automated call greeting ”. Then press [ SELECT ].
- Press the arrow up ▲ or down ▼ button to select “ Pre-recorded ”. Then press [ SELECT ].
- Press the arrow up ▲ or down ▼ button to select “ Yes ”.
- Press [ OFF ].
- Press the [ CALL BLOCK ] button.
- Press [ SELECT ].
- Press the arrow up ▲ or down ▼ button to select “ Automated call greeting ”. Then press [ SELECT ].
- Press the arrow up ▲ or down ▼ button to select “ Check greeting ”. Then press [ SELECT ].
- Press [ OFF ] to exit.
Program from the Handset
- Press the [ CALL BLOCK ] button.
- Press [ SELECT ].
- Press the arrow up ▲ or down ▼ button to select “ Blocked calls count ”. Then press [ SELECT ].
- Press the [ OFF ] button to exit or press the [ CLEAR ] button to erase the call count.
- Press the arrow up ▲ or down ▼ button to select “ Yes ”, then press [ SELECT ].
- Press [ OFF ].
Program from the Base Unit
- Press the [ CALL BLOCK ] button.
- Press [ SELECT ].
- Press the arrow up ▲ or down ▼ button to select “ Blocked count ”. Then press [ SELECT ].
- Press the [ EXIT ] button to exit or press the [ CLEAR ] button to erase the call count.
- Press the arrow up ▲ or down ▼ button to select “ Yes ”, then press [ SELECT ].
- Press [ EXIT ].
For full information for the operation on this model refer to the Operating Manual.
Models KX-TGF773, KX-TGF774, KX-TGF775
Allowed number database
Once the caller enters the access code, the caller’s phone number is memorized in the allowed number database as an unblocked number. Callers from this database are allowed to connect without the access code from their next call. 100 entries can be stored to the database (22 digits max. each).
Note
- When the database memory is full, the latest call received will replace the oldest number stored in the list.
- The numbers stored in the database will be erased when you change the access code.
- The numbers stored in the database cannot be displayed.
Select a Automated Call block programming function from the list below to learn how to use it.
Program from the Handset or Base Unit
Examples of Menu Button Location
- Press [ MENU # 7 8 7 ].
- Press the arrow up ▲ or down ▼ button to select the desired setting.
- Press [ SAVE ].
- Press the arrow up ▲ or down ▼ button to select " Yes ".
- Press [ SELECT ].
- When programming from the handset Press [ OFF ]. When programming from the Base unit Press [ EXIT ].
We recommend you perform a test run of the automated call block procedure to ensure that the automated call block feature is set correctly.
Note - Programming on the base only available on models with a base keypad and Menu button.
If the unit answers undesirable calls such as robocalls even though the automated call block function is on, change the access code (3 digits max.). The default setting is “1”.
Program from the Handset
Examples of Menu Button Location
- Press [ MENU # 7 8 9 ].
- Press [ CLEAR ].
- Enter the new access code.
- Press [ SAVE ].
- Press [ OFF ].
You can allow specific callers to pass through by adding the caller’s name to the allow name list. You can store up to 100 names (16 characters max.). If the name stored in the allow name list matches the incoming Caller ID, the unit rings. Callers listed in the allow name list are not required to enter the access code.
Program from the Handset
When a cellular phone is paired
- Press the arrow down ▼ to select CID.
- Press the arrow up ▲ or down ▼ button to select the desired entry, then press [ SELECT ].
- Press [ SAVE ].
- Press the arrow up ▲ or down ▼ button to select " Allow name ".
- Press [ SELECT ].
- Press [ OFF ].
Program from the Handset
When a cellular phone is not paired
- Press the arrow down ▼ to select CID.
- Press the arrow up ▲ or down ▼ button to select the desired entry, then press [ MENU ].
- Press the arrow up ▲ or down ▼ button to select " Save allow name ".
- Press [ SELECT ].
- Press [ OFF ].
Program from the Base Unit
- Press the arrow down ▼ to select CID.
- Press the arrow up ▲ or down ▼ button to select the desired entry, then press [ SAVE ].
- Press the arrow up ▲ or down ▼ button to select " Allow name ".
- Press [ SELECT ].
- Press [ OFF ].
Program from the Handset
Examples of Menu Button Location
- Press [ MENU # 7 9 4 ].
- Press the arrow up ▲ or down ▼ button to select the desired entry.
- Press [ ERASE ].
- Press the arrow up ▲ or down ▼ button to select“ Yes ”.
- Press [ SELECT ].
- Press [ OFF ].
Program from the Base
- Press [ MENU # 7 9 4 ].
- Press the arrow up ▲ or down ▼ button to select the desired entry.
- Press [ ERASE ].
- Press the arrow up ▲ or down ▼ button to select“ Yes ”.
- Press [ SELECT ].
- Press [ EXIT ].
Program from the Handset or Base
Examples of Menu Button Location on handset
- Press [ MENU # 7 9 4 ].
- Press [ ERASE ].
- Press the arrow up ▲ or down ▼ button to select “ Yes ”.
- Press [ SELECT ].
- Press the arrow up ▲ or down ▼ button to select“ Yes ”.
- Press [ SELECT ].
- Press [ OFF ] on the handset or [ EXIT ] on the base.
Note - Programming on the base only available on models with a base keypad and Menu button.
When the unit answers a call, a greeting message is played to the caller.
You can use either:
- Record your own greeting message and pre-recorded greeting message
- Use the pre-recorded greeting message
Example of your own greeting message:
- “Hi, you have reached xxxxxxx (Name).”
- “Thank you for your calling, You have reached xxxxxxx (Name).”
- “Hi, you have reached the xxxx (Name) residence.
Examples of Menu Button Location
- Press [ MENU # 7 9 1 ]
- Press the arrow up ▲ or down ▼ button to select “ Yes ”.
- Press [ SELECT ].
- After after a beep sounds, hold the handset about 20 cm (8 inches) away and speak clearly into the microphone (2 minutes max.).
- Press [ STOP ] to stop recording. The unit will play the recorded greeting message for automated call block.
- Press [ OFF ]
This procedure will erase your greeting message for automated call block and reset to the pre-recorded one.
Examples of Menu Button Location
- Press [ MENU # 7 9 3 ].
- Press [ Yes ].
- Press [ OFF ].
Examples of Menu Button Location
- Press [ MENU # 7 9 2 ].
- To exit Press [ OFF ].
Program from the Handset
Examples of Menu Button Location
- Press [ MENU # 7 9 0 ].
- To exit without clearing press [ OFF ].
- To clear, Press [ CLEAR ].
- Press the arrow up ▲ or down ▼ button to select “ Yes ”.
- Press [ SELECT ].
- Press [ OFF ].
Program from the Base Unit
- Press [ MENU # 7 9 0 ].
- to exit without clearing press [ EXIT ].
- To clear, Press [ CLEAR ].
- Press the arrow up ▲ or down ▼ button to select “ Yes ”.
- Press [ SELECT ].
- Press [ EXIT ].
For full information for the operation on this model refer to the Operating Manual.
Models KX-TGF850, KX-TGF852, KX-TGF853
Allowed number database
Once the caller enters the access code, the caller’s phone number is memorized in the allowed number database as an unblocked number. Callers from this database are allowed to connect without the access code from their next call. 100 entries can be stored to the database (22 digits max. each).
Note
- When the database memory is full, the latest call received will replace the oldest number stored in the list.
- The numbers stored in the database will be erased when you change the access code.
- The numbers stored in the database cannot be displayed.
Select a Automated Call block programming function from the list below to learn how to use it.
Program from the Handset or Base Unit
Examples of Menu Button Location
- Press [ MENU # 7 8 7 ].
- Press the arrow up ▲ or down ▼ button to select the desired setting.
- Press [ SAVE ].
- Press the arrow up ▲ or down ▼ button to select " Yes ".
- Press [ SELECT ].
- When programming from the handset Press [ OFF ]. When programming from the Base unit Press [ EXIT ].
We recommend you perform a test run of the automated call block procedure to ensure that the automated call block feature is set correctly.
Note - Programming on the base only available on models with a base keypad and Menu button.
If the unit answers undesirable calls such as robocalls even though the automated call block function is on, change the access code (3 digits max.). The default setting is “1”.
Program from the Handset
Examples of Menu Button Location
- Press [ MENU # 7 8 9 ].
- Press [ CLEAR ].
- Enter the new access code.
- Press [ SAVE ].
- Press [ OFF ].
You can allow specific callers to pass through by adding the caller’s name to the allow name list. You can store up to 100 names (16 characters max.). If the name stored in the allow name list matches the incoming Caller ID, the unit rings. Callers listed in the allow name list are not required to enter the access code.
Program from the Handset
Examples of Menu Button Location
- Press the arrow down ▼ button to select CID.
- Press the arrow up ▲ or down ▼ button to select the desired entry.
- Press [ MENU ].
- Press the arrow up ▲ or down ▼ button to select “ Save allow name ”.
- Press [ SELECT ].
- Press [ OFF ]
Program from the Handset
Examples of Menu Button Location
- Press [ MENU # 7 9 4 ].
- Press the arrow up ▲ or down ▼ button to select the desired entry.
- Press [ ERASE ].
- Press the arrow up ▲ or down ▼ button to select“ Yes ”.
- Press [ SELECT ].
- Press [ OFF ].
Program from the Handset or Base
Examples of Menu Button Location on handset
- Press [ MENU # 7 9 4 ].
- Press [ ERASE ].
- Press the arrow up ▲ or down ▼ button to select “ Yes ”.
- Press [ SELECT ].
- Press the arrow up ▲ or down ▼ button to select“ Yes ”.
- Press [ SELECT ].
- Press [ OFF ] on the handset or [ EXIT ] on the base.
Note - Programming on the base only available on models with a base keypad and Menu button.
When the unit answers a call, a greeting message is played to the caller.
You can use either:
- Record your own greeting message and pre-recorded greeting message
- Use the pre-recorded greeting message
Example of your own greeting message:
- “Hi, you have reached xxxxxxx (Name).”
- “Thank you for your calling, You have reached xxxxxxx (Name).”
- “Hi, you have reached the xxxx (Name) residence.
Examples of Menu Button Location
- Press [ MENU # 7 9 1 ]
- Press the arrow up ▲ or down ▼ button to select “ Yes ”.
- Press [ SELECT ].
- After after a beep sounds, hold the handset about 20 cm (8 inches) away and speak clearly into the microphone (2 minutes max.).
- Press [ STOP ] to stop recording. The unit will play the recorded greeting message for automated call block.
- Press [ OFF ]
This procedure will erase your greeting message for automated call block and reset to the pre-recorded one.
Examples of Menu Button Location
- Press [ MENU # 7 9 3 ].
- Press [ Yes ].
- Press [ OFF ].
Examples of Menu Button Location
- Press [ MENU # 7 9 2 ].
- To exit Press [ OFF ].
Program from the Handset
Examples of Menu Button Location
- Press [ MENU # 7 9 0 ].
- To exit without clearing press [ OFF ].
- To clear, Press [ CLEAR ].
- Press the arrow up ▲ or down ▼ button to select “ Yes ”.
- Press [ SELECT ].
- Press [ OFF ].
For full information for the operation on this model refer to the Operating Manual.
Models KX-TGF870, KX-TGF872
Allowed number database
Once the caller enters the access code, the caller’s phone number is memorized in the allowed number database as an unblocked number. Callers from this database are allowed to connect without the access code from their next call. 100 entries can be stored to the database (22 digits max. each).
Note
- When the database memory is full, the latest call received will replace the oldest number stored in the list.
- The numbers stored in the database will be erased when you change the access code.
- The numbers stored in the database cannot be displayed.
Select a Automated Call block programming function from the list below to learn how to use it.
Program from the Handset or Base Unit
Examples of Menu Button Location
- Press [ MENU # 7 8 7 ].
- Press the arrow up ▲ or down ▼ button to select the desired setting.
- Press [ SAVE ].
- Press the arrow up ▲ or down ▼ button to select " Yes ".
- Press [ SELECT ].
- When programming from the handset Press [ OFF ]. When programming from the Base unit Press [ EXIT ].
We recommend you perform a test run of the automated call block procedure to ensure that the automated call block feature is set correctly.
Note - Programming on the base only available on models with a base keypad and Menu button.
If the unit answers undesirable calls such as robocalls even though the automated call block function is on, change the access code (3 digits max.). The default setting is “1”.
Program from the Handset
Examples of Menu Button Location
- Press [ MENU # 7 8 9 ].
- Press [ CLEAR ].
- Enter the new access code.
- Press [ SAVE ].
- Press [ OFF ].
You can allow specific callers to pass through by adding the caller’s name to the allow name list. You can store up to 100 names (16 characters max.). If the name stored in the allow name list matches the incoming Caller ID, the unit rings. Callers listed in the allow name list are not required to enter the access code.
Program from the Handset
Examples of Menu Button Location
- Press the arrow down ▼ button to select CID.
- Press the arrow up ▲ or down ▼ button to select the desired entry.
- Press [ MENU ].
- Press the arrow up ▲ or down ▼ button to select “ Save allow name ”.
- Press [ SELECT ].
- Press [ OFF ]
Program from the Handset
Examples of Menu Button Location
- Press [ MENU # 7 9 4 ].
- Press the arrow up ▲ or down ▼ button to select the desired entry.
- Press [ ERASE ].
- Press the arrow up ▲ or down ▼ button to select“ Yes ”.
- Press [ SELECT ].
- Press [ OFF ].
Program from the Handset or Base
Examples of Menu Button Location on handset
- Press [ MENU # 7 9 4 ].
- Press [ ERASE ].
- Press the arrow up ▲ or down ▼ button to select “ Yes ”.
- Press [ SELECT ].
- Press the arrow up ▲ or down ▼ button to select“ Yes ”.
- Press [ SELECT ].
- Press [ OFF ] on the handset or [ EXIT ] on the base.
Note - Programming on the base only available on models with a base keypad and Menu button.
When the unit answers a call, a greeting message is played to the caller.
You can use either:
- Record your own greeting message and pre-recorded greeting message
- Use the pre-recorded greeting message
Example of your own greeting message:
- “Hi, you have reached xxxxxxx (Name).”
- “Thank you for your calling, You have reached xxxxxxx (Name).”
- “Hi, you have reached the xxxx (Name) residence.
Examples of Menu Button Location
- Press [ MENU # 7 9 1 ]
- Press the arrow up ▲ or down ▼ button to select “ Yes ”.
- Press [ SELECT ].
- After after a beep sounds, hold the handset about 20 cm (8 inches) away and speak clearly into the microphone (2 minutes max.).
- Press [ STOP ] to stop recording. The unit will play the recorded greeting message for automated call block.
- Press [ OFF ]
This procedure will erase your greeting message for automated call block and reset to the pre-recorded one.
Examples of Menu Button Location
- Press [ MENU # 7 9 3 ].
- Press [ Yes ].
- Press [ OFF ].
Examples of Menu Button Location
- Press [ MENU # 7 9 2 ].
- To exit Press [ OFF ].
Program from the Handset
Examples of Menu Button Location
- Press [ MENU # 7 9 0 ].
- To exit without clearing press [ OFF ].
- To clear, Press [ CLEAR ].
- Press the arrow up ▲ or down ▼ button to select “ Yes ”.
- Press [ SELECT ].
- Press [ OFF ].
For full information for the operation on this model refer to the Operating Manual.
Models KX-TGF880, KX-TGF882, KX-TGF883
Allowed number database
Once the caller enters the access code, the caller’s phone number is memorized in the allowed number database as an unblocked number. Callers from this database are allowed to connect without the access code from their next call. 100 entries can be stored to the database (22 digits max. each).
Note
- When the database memory is full, the latest call received will replace the oldest number stored in the list.
- The numbers stored in the database will be erased when you change the access code.
- The numbers stored in the database cannot be displayed.
Select a Automated Call block programming function from the list below to learn how to use it.
Program from the Handset or Base Unit
Examples of Menu Button Location
- Press [ MENU # 7 8 7 ].
- Press the arrow up ▲ or down ▼ button to select the desired setting.
- Press [ SAVE ].
- Press the arrow up ▲ or down ▼ button to select " Yes ".
- Press [ SELECT ].
- When programming from the handset Press [ OFF ]. When programming from the Base unit Press [ EXIT ].
We recommend you perform a test run of the automated call block procedure to ensure that the automated call block feature is set correctly.
Note - Programming on the base only available on models with a base keypad and Menu button.
If the unit answers undesirable calls such as robocalls even though the automated call block function is on, change the access code (3 digits max.). The default setting is “1”.
Program from the Handset
Examples of Menu Button Location
- Press [ MENU # 7 8 9 ].
- Press [ CLEAR ].
- Enter the new access code.
- Press [ SAVE ].
- Press [ OFF ].
You can allow specific callers to pass through by adding the caller’s name to the allow name list. You can store up to 100 names (16 characters max.). If the name stored in the allow name list matches the incoming Caller ID, the unit rings. Callers listed in the allow name list are not required to enter the access code.
Program from the Handset
When a cellular phone is paired
- Press the arrow down ▼ to select CID.
- Press the arrow up ▲ or down ▼ button to select the desired entry, then press [ SELECT ].
- Press [ SAVE ].
- Press the arrow up ▲ or down ▼ button to select " Allow name ".
- Press [ SELECT ].
- Press [ OFF ].
Program from the Handset
When a cellular phone is not paired
- Press the arrow down ▼ to select CID.
- Press the arrow up ▲ or down ▼ button to select the desired entry, then press [ MENU ].
- Press the arrow up ▲ or down ▼ button to select " Save allow name ".
- Press [ SELECT ].
- Press [ OFF ].
Program from the Handset
Examples of Menu Button Location
- Press [ MENU # 7 9 4 ].
- Press the arrow up ▲ or down ▼ button to select the desired entry.
- Press [ ERASE ].
- Press the arrow up ▲ or down ▼ button to select“ Yes ”.
- Press [ SELECT ].
- Press [ OFF ].
Program from the Handset or Base
Examples of Menu Button Location on handset
- Press [ MENU # 7 9 4 ].
- Press [ ERASE ].
- Press the arrow up ▲ or down ▼ button to select “ Yes ”.
- Press [ SELECT ].
- Press the arrow up ▲ or down ▼ button to select“ Yes ”.
- Press [ SELECT ].
- Press [ OFF ] on the handset or [ EXIT ] on the base.
Note - Programming on the base only available on models with a base keypad and Menu button.
When the unit answers a call, a greeting message is played to the caller.
You can use either:
- Record your own greeting message and pre-recorded greeting message
- Use the pre-recorded greeting message
Example of your own greeting message:
- “Hi, you have reached xxxxxxx (Name).”
- “Thank you for your calling, You have reached xxxxxxx (Name).”
- “Hi, you have reached the xxxx (Name) residence.
Examples of Menu Button Location
- Press [ MENU # 7 9 1 ]
- Press the arrow up ▲ or down ▼ button to select “ Yes ”.
- Press [ SELECT ].
- After after a beep sounds, hold the handset about 20 cm (8 inches) away and speak clearly into the microphone (2 minutes max.).
- Press [ STOP ] to stop recording. The unit will play the recorded greeting message for automated call block.
- Press [ OFF ]
This procedure will erase your greeting message for automated call block and reset to the pre-recorded one.
Examples of Menu Button Location
- Press [ MENU # 7 9 3 ].
- Press [ Yes ].
- Press [ OFF ].
Examples of Menu Button Location
- Press [ MENU # 7 9 2 ].
- To exit Press [ OFF ].
Program from the Handset
Examples of Menu Button Location
- Press [ MENU # 7 9 0 ].
- To exit without clearing press [ OFF ].
- To clear, Press [ CLEAR ].
- Press the arrow up ▲ or down ▼ button to select “ Yes ”.
- Press [ SELECT ].
- Press [ OFF ].
For full information for the operation on this model refer to the Operating Manual.
Model KX-TGF892
Allowed number database
Once the caller enters the access code, the caller’s phone number is memorized in the allowed number database as an unblocked number. Callers from this database are allowed to connect without the access code from their next call. 100 entries can be stored to the database (22 digits max. each).
Note
- When the database memory is full, the latest call received will replace the oldest number stored in the list.
- The numbers stored in the database will be erased when you change the access code.
- The numbers stored in the database cannot be displayed.
Select a Automated Call block programming function from the list below to learn how to use it.
Program from the Handset or Base Unit
Examples of Menu Button Location
- Press [ MENU # 7 8 7 ].
- Press the arrow up ▲ or down ▼ button to select the desired setting.
- Press [ SAVE ].
- Press the arrow up ▲ or down ▼ button to select " Yes ".
- Press [ SELECT ].
- When programming from the handset Press [ OFF ]. When programming from the Base unit Press [ EXIT ].
We recommend you perform a test run of the automated call block procedure to ensure that the automated call block feature is set correctly.
Note - Programming on the base only available on models with a base keypad and Menu button.
If the unit answers undesirable calls such as robocalls even though the automated call block function is on, change the access code (3 digits max.). The default setting is “1”.
Program from the Handset
Examples of Menu Button Location
- Press [ MENU # 7 8 9 ].
- Press [ CLEAR ].
- Enter the new access code.
- Press [ SAVE ].
- Press [ OFF ].
You can allow specific callers to pass through by adding the caller’s name to the allow name list. You can store up to 100 names (16 characters max.). If the name stored in the allow name list matches the incoming Caller ID, the unit rings. Callers listed in the allow name list are not required to enter the access code.
Program from the Handset
Examples of Menu Button Location
- Press the arrow down ▼ button to select CID.
- Press the arrow up ▲ or down ▼ button to select the desired entry.
- Press [ MENU ].
- Press the arrow up ▲ or down ▼ button to select “ Save allow name ”.
- Press [ SELECT ].
- Press [ OFF ]
Program from the Handset
Examples of Menu Button Location
- Press [ MENU # 7 9 4 ].
- Press the arrow up ▲ or down ▼ button to select the desired entry.
- Press [ ERASE ].
- Press the arrow up ▲ or down ▼ button to select“ Yes ”.
- Press [ SELECT ].
- Press [ OFF ].
Program from the Handset or Base
Examples of Menu Button Location on handset
- Press [ MENU # 7 9 4 ].
- Press [ ERASE ].
- Press the arrow up ▲ or down ▼ button to select “ Yes ”.
- Press [ SELECT ].
- Press the arrow up ▲ or down ▼ button to select“ Yes ”.
- Press [ SELECT ].
- Press [ OFF ] on the handset or [ EXIT ] on the base.
Note - Programming on the base only available on models with a base keypad and Menu button.
When the unit answers a call, a greeting message is played to the caller.
You can use either:
- Record your own greeting message and pre-recorded greeting message
- Use the pre-recorded greeting message
Example of your own greeting message:
- “Hi, you have reached xxxxxxx (Name).”
- “Thank you for your calling, You have reached xxxxxxx (Name).”
- “Hi, you have reached the xxxx (Name) residence.
Examples of Menu Button Location
- Press [ MENU # 7 9 1 ]
- Press the arrow up ▲ or down ▼ button to select “ Yes ”.
- Press [ SELECT ].
- After after a beep sounds, hold the handset about 20 cm (8 inches) away and speak clearly into the microphone (2 minutes max.).
- Press [ STOP ] to stop recording. The unit will play the recorded greeting message for automated call block.
- Press [ OFF ]
This procedure will erase your greeting message for automated call block and reset to the pre-recorded one.
Examples of Menu Button Location
- Press [ MENU # 7 9 3 ].
- Press [ Yes ].
- Press [ OFF ].
Examples of Menu Button Location
- Press [ MENU # 7 9 2 ].
- To exit Press [ OFF ].
Program from the Handset
Examples of Menu Button Location
- Press [ MENU # 7 9 0 ].
- To exit without clearing press [ OFF ].
- To clear, Press [ CLEAR ].
- Press the arrow up ▲ or down ▼ button to select “ Yes ”.
- Press [ SELECT ].
- Press [ OFF ].
For full information for the operation on this model refer to the Operating Manual.
Model KX-TGF973
Allowed number database
Once the caller enters the access code, the caller’s phone number is memorized in the allowed number database as an unblocked number. Callers from this database are allowed to connect without the access code from their next call. 100 entries can be stored to the database (22 digits max. each).
Note
- When the database memory is full, the latest call received will replace the oldest number stored in the list.
- The numbers stored in the database will be erased when you change the access code.
- The numbers stored in the database cannot be displayed.
Select a Automated Call block programming function from the list below to learn how to use it.
Program from the Handset or Base Unit
Examples of Menu Button Location
- Press [ MENU # 7 8 7 ].
- Press the arrow up ▲ or down ▼ button to select the desired setting.
- Press [ SAVE ].
- Press the arrow up ▲ or down ▼ button to select " Yes ".
- Press [ SELECT ].
- When programming from the handset Press [ OFF ]. When programming from the Base unit Press [ EXIT ].
We recommend you perform a test run of the automated call block procedure to ensure that the automated call block feature is set correctly.
Note - Programming on the base only available on models with a base keypad and Menu button.
If the unit answers undesirable calls such as robocalls even though the automated call block function is on, change the access code (3 digits max.). The default setting is “1”.
Program from the Handset
Examples of Menu Button Location
- Press [ MENU # 7 8 9 ].
- Press [ CLEAR ].
- Enter the new access code.
- Press [ SAVE ].
- Press [ OFF ].
You can allow specific callers to pass through by adding the caller’s name to the allow name list. You can store up to 100 names (16 characters max.). If the name stored in the allow name list matches the incoming Caller ID, the unit rings. Callers listed in the allow name list are not required to enter the access code.
Program from the Handset
When a cellular phone is paired
- Press the arrow down ▼ to select CID.
- Press the arrow up ▲ or down ▼ button to select the desired entry, then press [ SELECT ].
- Press [ SAVE ].
- Press the arrow up ▲ or down ▼ button to select " Allow name ".
- Press [ SELECT ].
- Press [ OFF ].
Program from the Handset
When a cellular phone is not paired
- Press the arrow down ▼ to select CID.
- Press the arrow up ▲ or down ▼ button to select the desired entry, then press [ MENU ].
- Press the arrow up ▲ or down ▼ button to select " Save allow name ".
- Press [ SELECT ].
- Press [ OFF ].
Program from the Base Unit
- Press the arrow down ▼ to select CID.
- Press the arrow up ▲ or down ▼ button to select the desired entry, then press [ SAVE ].
- Press the arrow up ▲ or down ▼ button to select " Allow name ".
- Press [ SELECT ].
- Press [ OFF ].
Program from the Handset
Examples of Menu Button Location
- Press [ MENU # 7 9 4 ].
- Press the arrow up ▲ or down ▼ button to select the desired entry.
- Press [ ERASE ].
- Press the arrow up ▲ or down ▼ button to select“ Yes ”.
- Press [ SELECT ].
- Press [ OFF ].
Program from the Base
- Press [ MENU # 7 9 4 ].
- Press the arrow up ▲ or down ▼ button to select the desired entry.
- Press [ ERASE ].
- Press the arrow up ▲ or down ▼ button to select“ Yes ”.
- Press [ SELECT ].
- Press [ EXIT ].
Program from the Handset or Base
Examples of Menu Button Location on handset
- Press [ MENU # 7 9 4 ].
- Press [ ERASE ].
- Press the arrow up ▲ or down ▼ button to select “ Yes ”.
- Press [ SELECT ].
- Press the arrow up ▲ or down ▼ button to select“ Yes ”.
- Press [ SELECT ].
- Press [ OFF ] on the handset or [ EXIT ] on the base.
Note - Programming on the base only available on models with a base keypad and Menu button.
When the unit answers a call, a greeting message is played to the caller.
You can use either:
- Record your own greeting message and pre-recorded greeting message
- Use the pre-recorded greeting message
Example of your own greeting message:
- “Hi, you have reached xxxxxxx (Name).”
- “Thank you for your calling, You have reached xxxxxxx (Name).”
- “Hi, you have reached the xxxx (Name) residence.
Examples of Menu Button Location
- Press [ MENU # 7 9 1 ]
- Press the arrow up ▲ or down ▼ button to select “ Yes ”.
- Press [ SELECT ].
- After after a beep sounds, hold the handset about 20 cm (8 inches) away and speak clearly into the microphone (2 minutes max.).
- Press [ STOP ] to stop recording. The unit will play the recorded greeting message for automated call block.
- Press [ OFF ]
This procedure will erase your greeting message for automated call block and reset to the pre-recorded one.
Examples of Menu Button Location
- Press [ MENU # 7 9 3 ].
- Press [ Yes ].
- Press [ OFF ].
Examples of Menu Button Location
- Press [ MENU # 7 9 2 ].
- To exit Press [ OFF ].
Program from the Handset
Examples of Menu Button Location
- Press [ MENU # 7 9 0 ].
- To exit without clearing press [ OFF ].
- To clear, Press [ CLEAR ].
- Press the arrow up ▲ or down ▼ button to select “ Yes ”.
- Press [ SELECT ].
- Press [ OFF ].
Program from the Base Unit
- Press [ MENU # 7 9 0 ].
- to exit without clearing press [ EXIT ].
- To clear, Press [ CLEAR ].
- Press the arrow up ▲ or down ▼ button to select “ Yes ”.
- Press [ SELECT ].
- Press [ EXIT ].
For full information for the operation on this model refer to the Operating Manual.
Model KX-TGF944
Allowed number database
Once the caller enters the access code, the caller’s phone number is memorized in the allowed number database as an unblocked number. Callers from this database are allowed to connect without the access code from their next call. 100 entries can be stored to the database (22 digits max. each).
Note
- When the database memory is full, the latest call received will replace the oldest number stored in the list.
- The numbers stored in the database will be erased when you change the access code.
- The numbers stored in the database cannot be displayed.
Select a Automated Call block programming function from the list below to learn how to use it.
Program from the Handset or Base Unit
Examples of Menu Button Location
- Press [ MENU # 7 8 7 ].
- Press the arrow up ▲ or down ▼ button to select the desired setting.
- Press [ SAVE ].
- Press the arrow up ▲ or down ▼ button to select " Yes ".
- Press [ SELECT ].
- When programming from the handset Press [ OFF ]. When programming from the Base unit Press [ EXIT ].
We recommend you perform a test run of the automated call block procedure to ensure that the automated call block feature is set correctly.
Note - Programming on the base only available on models with a base keypad and Menu button.
If the unit answers undesirable calls such as robocalls even though the automated call block function is on, change the access code (3 digits max.). The default setting is “1”.
Program from the Handset
Examples of Menu Button Location
- Press [ MENU # 7 8 9 ].
- Press [ CLEAR ].
- Enter the new access code.
- Press [ SAVE ].
- Press [ OFF ].
You can allow specific callers to pass through by adding the caller’s name to the allow name list. You can store up to 100 names (16 characters max.). If the name stored in the allow name list matches the incoming Caller ID, the unit rings. Callers listed in the allow name list are not required to enter the access code.
Program from the Handset
- Press the arrow down ▼ to select CID.
- Press the arrow up ▲ or down ▼ button to select the desired entry, then press [ MENU ].
- Press the arrow up ▲ or down ▼ button to select " Save allow name ".
- Press [ SELECT ].
- Press [ OFF ].
Program from the Base Unit
- Press the arrow down ▼ to select CID.
- Press the arrow up ▲ or down ▼ button to select the desired entry, then press [ SAVE ].
- Press the arrow up ▲ or down ▼ button to select " Allow name ".
- Press [ SELECT ].
- Press [ EXIT ].
Program from the Handset
Examples of Menu Button Location
- Press [ MENU # 7 9 4 ].
- Press the arrow up ▲ or down ▼ button to select the desired entry.
- Press [ ERASE ].
- Press the arrow up ▲ or down ▼ button to select“ Yes ”.
- Press [ SELECT ].
- Press [ OFF ].
Program from the Base
- Press [ MENU # 7 9 4 ].
- Press the arrow up ▲ or down ▼ button to select the desired entry.
- Press [ ERASE ].
- Press the arrow up ▲ or down ▼ button to select“ Yes ”.
- Press [ SELECT ].
- Press [ EXIT ].
Program from the Handset or Base
Examples of Menu Button Location on handset
- Press [ MENU # 7 9 4 ].
- Press [ ERASE ].
- Press the arrow up ▲ or down ▼ button to select “ Yes ”.
- Press [ SELECT ].
- Press the arrow up ▲ or down ▼ button to select“ Yes ”.
- Press [ SELECT ].
- Press [ OFF ] on the handset or [ EXIT ] on the base.
Note - Programming on the base only available on models with a base keypad and Menu button.
When the unit answers a call, a greeting message is played to the caller.
You can use either:
- Record your own greeting message and pre-recorded greeting message
- Use the pre-recorded greeting message
Example of your own greeting message:
- “Hi, you have reached xxxxxxx (Name).”
- “Thank you for your calling, You have reached xxxxxxx (Name).”
- “Hi, you have reached the xxxx (Name) residence.
Examples of Menu Button Location
- Press [ MENU # 7 9 1 ]
- Press the arrow up ▲ or down ▼ button to select “ Yes ”.
- Press [ SELECT ].
- After after a beep sounds, hold the handset about 20 cm (8 inches) away and speak clearly into the microphone (2 minutes max.).
- Press [ STOP ] to stop recording. The unit will play the recorded greeting message for automated call block.
- Press [ OFF ]
This procedure will erase your greeting message for automated call block and reset to the pre-recorded one.
Examples of Menu Button Location
- Press [ MENU # 7 9 3 ].
- Press [ Yes ].
- Press [ OFF ].
Examples of Menu Button Location
- Press [ MENU # 7 9 2 ].
- To exit Press [ OFF ].
Program from the Handset
Examples of Menu Button Location
- Press [ MENU # 7 9 0 ].
- To exit without clearing press [ OFF ].
- To clear, Press [ CLEAR ].
- Press the arrow up ▲ or down ▼ button to select “ Yes ”.
- Press [ SELECT ].
- Press [ OFF ].
Program from the Base Unit
- Press [ MENU # 7 9 0 ].
- to exit without clearing press [ EXIT ].
- To clear, Press [ CLEAR ].
- Press the arrow up ▲ or down ▼ button to select “ Yes ”.
- Press [ SELECT ].
- Press [ EXIT ].
For full information for the operation on this model refer to the Operating Manual.
Model KX-TGF975
Allowed number database
Once the caller enters the access code, the caller’s phone number is memorized in the allowed number database as an unblocked number. Callers from this database are allowed to connect without the access code from their next call. 100 entries can be stored to the database (22 digits max. each).
Note
- When the database memory is full, the latest call received will replace the oldest number stored in the list.
- The numbers stored in the database will be erased when you change the access code.
- The numbers stored in the database cannot be displayed.
Select a Automated Call block programming function from the list below to learn how to use it.
Program from the Handset or Base Unit
Examples of Menu Button Location
- Press [ MENU # 7 8 7 ].
- Press the arrow up ▲ or down ▼ button to select the desired setting.
- Press [ SAVE ].
- Press the arrow up ▲ or down ▼ button to select " Yes ".
- Press [ SELECT ].
- When programming from the handset Press [ OFF ]. When programming from the Base unit Press [ EXIT ].
We recommend you perform a test run of the automated call block procedure to ensure that the automated call block feature is set correctly.
Note - Programming on the base only available on models with a base keypad and Menu button.
If the unit answers undesirable calls such as robocalls even though the automated call block function is on, change the access code (3 digits max.). The default setting is “1”.
Program from the Handset
Examples of Menu Button Location
- Press [ MENU # 7 8 9 ].
- Press [ CLEAR ].
- Enter the new access code.
- Press [ SAVE ].
- Press [ OFF ].
You can allow specific callers to pass through by adding the caller’s name to the allow name list. You can store up to 100 names (16 characters max.). If the name stored in the allow name list matches the incoming Caller ID, the unit rings. Callers listed in the allow name list are not required to enter the access code.
Program from the Handset
When a cellular phone is paired
- Press the arrow down ▼ to select CID.
- Press the arrow up ▲ or down ▼ button to select the desired entry, then press [ SELECT ].
- Press [ SAVE ].
- Press the arrow up ▲ or down ▼ button to select " Allow name ".
- Press [ SELECT ].
- Press [ OFF ].
Program from the Handset
When a cellular phone is not paired
- Press the arrow down ▼ to select CID.
- Press the arrow up ▲ or down ▼ button to select the desired entry, then press [ MENU ].
- Press the arrow up ▲ or down ▼ button to select " Save allow name ".
- Press [ SELECT ].
- Press [ OFF ].
Program from the Base Unit
- Press the arrow down ▼ to select CID.
- Press the arrow up ▲ or down ▼ button to select the desired entry, then press [ SAVE ].
- Press the arrow up ▲ or down ▼ button to select " Allow name ".
- Press [ SELECT ].
- Press [ OFF ].
Program from the Handset
Examples of Menu Button Location
- Press [ MENU # 7 9 4 ].
- Press the arrow up ▲ or down ▼ button to select the desired entry.
- Press [ ERASE ].
- Press the arrow up ▲ or down ▼ button to select“ Yes ”.
- Press [ SELECT ].
- Press [ OFF ].
Program from the Base
- Press [ MENU # 7 9 4 ].
- Press the arrow up ▲ or down ▼ button to select the desired entry.
- Press [ ERASE ].
- Press the arrow up ▲ or down ▼ button to select“ Yes ”.
- Press [ SELECT ].
- Press [ EXIT ].
Program from the Handset or Base
Examples of Menu Button Location on handset
- Press [ MENU # 7 9 4 ].
- Press [ ERASE ].
- Press the arrow up ▲ or down ▼ button to select “ Yes ”.
- Press [ SELECT ].
- Press the arrow up ▲ or down ▼ button to select“ Yes ”.
- Press [ SELECT ].
- Press [ OFF ] on the handset or [ EXIT ] on the base.
Note - Programming on the base only available on models with a base keypad and Menu button.
When the unit answers a call, a greeting message is played to the caller.
You can use either:
- Record your own greeting message and pre-recorded greeting message
- Use the pre-recorded greeting message
Example of your own greeting message:
- “Hi, you have reached xxxxxxx (Name).”
- “Thank you for your calling, You have reached xxxxxxx (Name).”
- “Hi, you have reached the xxxx (Name) residence.
Examples of Menu Button Location
- Press [ MENU # 7 9 1 ]
- Press the arrow up ▲ or down ▼ button to select “ Yes ”.
- Press [ SELECT ].
- After after a beep sounds, hold the handset about 20 cm (8 inches) away and speak clearly into the microphone (2 minutes max.).
- Press [ STOP ] to stop recording. The unit will play the recorded greeting message for automated call block.
- Press [ OFF ]
This procedure will erase your greeting message for automated call block and reset to the pre-recorded one.
Examples of Menu Button Location
- Press [ MENU # 7 9 3 ].
- Press [ Yes ].
- Press [ OFF ].
Examples of Menu Button Location
- Press [ MENU # 7 9 2 ].
- To exit Press [ OFF ].
Program from the Handset
Examples of Menu Button Location
- Press [ MENU # 7 9 0 ].
- To exit without clearing press [ OFF ].
- To clear, Press [ CLEAR ].
- Press the arrow up ▲ or down ▼ button to select “ Yes ”.
- Press [ SELECT ].
- Press [ OFF ].
Program from the Base Unit
- Press [ MENU # 7 9 0 ].
- to exit without clearing press [ EXIT ].
- To clear, Press [ CLEAR ].
- Press the arrow up ▲ or down ▼ button to select “ Yes ”.
- Press [ SELECT ].
- Press [ EXIT ].
For full information for the operation on this model refer to the Operating Manual.