


Troubleshooting Error codes or messages on a Technics Audio product
The information in this error code guide applies to most Technics products.
For specific error codes for a model Refer to the models Operating Manual for specific error messages.
!
The selected file cannot be played back. Select a playable file type.
Refer to the models Operating Manual for compatible file types.Adjust Clock
Set the clock before setting the timer.
Refer to the models Operating Manual for compatible file types.Note: The above information may apply to many models, but was specifically taken from the operating manual of model SC-C70.
Adjust Play Timer
Set the starting time and finishing time of the timer.
The current settings are displayed when selecting “ Play Timer Adj. ” and pressing [ OK ]. Press [ OK ] again to access the timer setting screen, and the screen starts blinking
- Press [▲], [▼] or numeric buttons to set the starting time and then press [ OK ].
- Press [▲], [▼] or numeric buttons to set the finishing time and then press [ OK ].
- Press [▲], [▼] to select the music source, volume, day of week and then press [ OK ].
- The repeating setting is as following. “ Everyday ”: Same time everyday “ Once ”: One time “ SAT , SUN ”: Every Saturday and Sunday “ MON to FRI ”: Every Monday to Friday
Note: The above information may apply to many models, but was specifically taken from the operating manual of model SC-C65.
Adjust TIMER
Set the starting time and finishing time of the timer.
Refer to the models Operating Manual for compatible file types.Note: The above information may apply to many models, but was specifically taken from the operating manual of model SC-C70.
ATTENTION : MAX Output Setting
- While using this unit as power amplifier, the volume adjustment with this unit is disabled.
- Adjust the volume little by little with the connected device.
Note: The above information may apply to many models, but was specifically taken from the operating manual of models SC-C70, SU-G700, SU-G700M2.
AUTO OFF
The message "AUTO OFF" displays when the unit has been left unused for about 20 minutes and will shut down within a minute. Press any button to cancel it.
Checking Connection
The unit is checking the connected iPhone/iPad/iPod or a USB device.
Note: The above information may apply to many models, but was specifically taken from the operating manual of models SU-R1, ST-C700.
Checking Device
The unit is checking the connected iPhone/ iPad/iPod or a USB device. After this display has disappeared, start operating.
Note: The above information may apply to many models, but was specifically taken from the operating manual of models SU-G30, SC-C500, SC-C65, SC-C70, SL-G700.
Connect to Network
Connect this unit to the network and then wait for the start of the Firmware Update via Internet.
Note: The above information may apply to many models, but was specifically taken from the operating manual of models SU-G30, SC-C70.
Connect USB Device
- The firmware download has failed.
- Download the latest firmware on the USB flash memory and try again.
Note: The above information may apply to many models, but was specifically taken from the operating manual of models SU-G30, SC-C65, SC-C70, SU-G700, SU-G700M2.
Connecting
The unit is connecting to vTuner. Please wait for a while.If the display does not change, switch the input source, or turn the unit to standby and on again.
Note: The above information may apply to many models, but was specifically taken from the operating manual of model SC-C70.
Device Not Recognized
- For models with USB connection- The connected USB device is may not be supported.
- For models compatible to Apple products - The iPhone/iPad/iPod connected is may not be supported.
- For models compatible to Apple products - Check the iPhone/iPad/iPod connection and confirm it is turned on.
- The format of the file on the on the iPhone/iPad/iPod or USB device is not supported.
- Refer to the models Operating Manual for supported file types.
Note: The above information may apply to many models, but was specifically taken from the operating manual of model SC-C70, SC-C500.
Disconnect PHONES
- When the headphones are connected, measuring the output signal of the amplifier (LAPC) will not start. Disconnect the headphones.
- If you connect headphones during amplifier signal measurement or amplifier output correction, it will be cancelled.
Note: The above information may apply to many models, but was specifically taken from the operating manual of model SU-G700, SU-G700M2
Download Fail
- The firmware download has failed.
- The network is not connected to the internet.
- Press any button to exit and try again later.
- The server cannot be found. Press any button to exit. Make sure that the network is connected to the internet and try again.
Note: The above information may apply to many models, but was specifically taken from the operating manual of model SC-C30, SC-C50, SU-G30, SC-C500, SC-C65, SC-C70, SU-R1, ST-C700, SL-G700.
Empty
- The selected folder is empty. Move tracks into the folder and retry the operation.
- The server is not found on the network. Check to see if the server is connected to the same network as this unit, and retry the connection to this unit.
- No Internet Radio station is registered to the favorite list. Add a station to the list.
Note: The above information may apply to many models, but was specifically taken from the operating manual of models SU-R1, SU-G30, SC-C30, SC-C50, SC-C500, SC-C65, SC-C70, ST-C700, SL-G700.
Error
The message "Error" displays when an incorrect operation is performed. Read the instructions and try again.
Note: The above information may apply to many models, but was specifically taken from the operating manual of model SU-R1, SC-C500, SC-C65, SC-C70, SU-G30, ST-C700, SL-G700.
F□□” (“□” stands for a number.)
Note: Individual specific F codes are also listed in drop down.
An abnormality has occurred. (If this unit detects an abnormality, the protection circuit is activated, and the power may be turned off automatically.)
- Is the volume extremely high? If so, lower the volume.
- Is this unit placed in an extremely hot place? If so, move this unit to a cooler place and wait a few moments and then try to turn it on again.
If the problem persists, write down the displayed number, disconnect the AC mains lead and contact a Technics Authorized Servicenter.
USA Service Center Locator Canada Service & WarrantyNote: The above information may apply to many models, but was specifically taken from the operating manual of models SC-C30, SC-C50, SC-C65, SU-R1, SU-G30, SC-C500, SC-C70, SU-G700, SU-G700M2, ST-C700, SL-G700.
F17
If one of the [33/45/78] speed selector button indicators of the main unit blinks (rapidly or slowly) in orange, provide the displayed error number and the LED’s blinking status at the time of consultation.
Note: The above information may apply to many models, but was specifically taken from the operating manual of models SP-10RS, SL-1000.
F58
If one of the [33/45/78] speed selector button indicators of the main unit blinks (rapidly or slowly) in orange, provide the displayed error number and the LED’s blinking status at the time of consultation.
Note: The above information may apply to many models, but was specifically taken from the operating manual of models SP-10RS, SL-1000.
F76
If one of the [33/45/78] speed selector button indicators of the main unit blinks (rapidly or slowly) in orange, provide the displayed error number and the LED’s blinking status at the time of consultation.
Note: The above information may apply to many models, but was specifically taken from the operating manual of models SP-10RS, SL-1000.
Fail
The network connection is not complete, try the suggestions below then try setting again.
- When performing the network settings, place the compact stereo system closer to the iOS device.
- Check the wireless network password and other settings and try setup again.
- If available try a different connection method. (LAN connection)
- Ensure that other 2.4 GHz devices, such as microwaves, cordless telephones, etc., that are connected to the network, are not nearby as they may result in connection interruptions.
- For models with the "Space Tune" feature, "Fail" may appear if this feature did not finish, check the procedure of setting and retry.
Note: The above information may apply to many models, but was specifically taken from the operating manual of models SC-C30, SC-C50, SC-C500, SC-C65, SC-C70, SL-G700.
Firmware update is available
The firmware (free of charge) for this unit is available. Follow the below instructions to update your Technics Audio System.
For Models SC-C30, SC-C50:
- Press and hold the Play Pause
 button for 5 seconds or longer.
 - The update automatically starts.
- The % of progress is displayed.
- When the update has finished successfully, “Success” is displayed.
- Turn this unit off after “Success” is displayed.
- Turn this unit on after 3 minutes.
For Models SU-G30, SC-C500, SC-C70
- Press [OK].
- Press the arrow up ▲ or down ▼ button to select “Yes” and then press [OK].
- The % of progress is displayed.
- Do not disconnect the AC power supply cord or turn this unit to standby while updating.
- When the update has finished successfully, “Success” is displayed.
- Disconnect the AC power supply cord and reconnect it after 3 minutes.
For Models SU-GX70
- Press [OK].
- Press the arrow up ▲ or down ▼ button to select “Yes” and then press [OK].
- The % of progress is displayed.
- Do not disconnect the AC power supply cord or turn this unit to standby while updating.
- When the update has finished successfully, “Success” is displayed.
- Press
 on the unit to turn the unit off and on. For firmware update information refer to the following website
www.technics.com/support/firmware
.
on the unit to turn the unit off and on. For firmware update information refer to the following website
www.technics.com/support/firmware
.
For Model SL-G700:
- Press [NWP]
- Press [OK].
- Press the arrow up ▲ or down ▼ button to select “Yes” and then press [OK].
- The % of progress is displayed.
- Do not disconnect the AC power supply cord or turn this unit to standby while updating.
- When the update has finished successfully, “Success” is displayed.
- Press the Power button to turn the unit off and back on.
For Firmware update information, Refer to the Technics Global Firmware site.
If your model is not listed Refer to your models Operating Manual for specific procedure.
Full
The message "PGM Full" or "Full" indicates the max number of favored of programmed tracks has been reached.
- For model SC-C30, SC-C50: The number of favourited tracks has reached 9.
- For model SL-C700: The number of programmed tracks has reached 25.
- For models SU-R1, SC-C500, SC-C70, ST-C700: The number of programmed tracks has reached 24.
- For model SL-G700: The number of programmed tracks has reached 20.
If your model is not listed Refer to your models Operating Manual for specific procedure.
Hub Device Not Supported
Possible cause and solutions
- You have connected an iPhone/iPad/iPod or USB device that is not supported.
- If the iPhone/iPad/iPod is compatible, turn it on and connect it correctly.
- The format of the file on the USB device is not supported.
- The format of the file on the iPhone/iPad/iPod or USB device is not supported.
Refer to your models Operating Manual for file format compatibility.
Note: The above information may apply to many models, but was specifically taken from the operating manual of models SC-C500, SC-C70, ST-C700, SU-R1.
Load Fail
The firmware on the USB flash memory cannot be found. Download the latest firmware on the USB flash memory and try again. Refer to "How to update the firmware from a USB stick."
Measurement Fail
The measurement or processing of "Cartridge Optimizer" fails.
Make the following checks.
- " High Level (C21)" / "High Level (C22)" : The output signal is so noisy or the output signal level of turntable is too high. Remove the dust from the record. Confirm the setting of "Gain" and adjust the input level of this unit. Check if "MM/MC" setting of this unit matches the cartridge type of the turntable or not.
- " Low Level (C11)" / "Low Level (C12)" / "Low Level (C13)" : The record is not played back, or the output signal level of turntable is too low. Confirm the turntable is connected correctly and the record is played back properly. Confirm the setting of "Gain" and adjust the input level of this unit. Check if "MM/MC" setting of this unit matches the cartridge type of the turntable or not.
- " Low Quality (C31)" / "Low Quality (C32)" / "Low Quality (C33)" The output signal of turntable is so noisy. Remove the dust from the record. Or play another track. If the problem still persists, consult your dealer.
- " Speed Mismatch" rotation of turntable and play back in correct RPM.
- " System Error" It may be system error. Consult your dealer.strong
No Device
Models SC-C500, SC-C65, SC-C70
No USB device is connected. Connect the USB device to be played.
Models SU-G700, SU-G700M2, SU-R1000
USB flash memory with new firmware is not connected. Connect the USB flash memory with new firmware.
Models SC-C30, SC-C50, SL-G700
No USB device is connected. Connect the USB device to be played.
The USB device cannot be played back. Check to see if the file system of USB device is playable.
If your model is not listed Refer to your models Operating Manual for specific procedure.
No Disc
- No CD is inserted.
- Insert the disc to be played.
Note: The above information may apply to many models, but was specifically taken from the operating manual of models SC-C65.
No File
There is no CD inserted or there is a non-compatible CD inserted.
- Examine the content. You can only play the supported format.
- Insert a compatible disc.
- Make sure the disc has a CD Logo.
Refer to your models Operating Manual for supported file formats.
No Layer
There is no available layer to be played back. Insert a Hybrid Super Audio CD disc which has a CD layer and Super Audio CD layer.
Note: The above information may apply to many models, but was specifically taken from the operating manual of model SL-G700.
No Network Connection Available
The mesage "No Network Connection" or "No Network Available" indicates that this unit is not connected to the network. Check the network connection.
Note: The above information may apply to many models, but was specifically taken from the operating manual of models SU-R1, SC-C65, SC-C70, SU-G30, ST-C700, SL-G700.
No Play
There is no CD inserted or there is a non-compatible CD inserted.
- Examine the content. You can only play the supported format.
- Insert a compatible disc.
- Make sure the disc has a CD Logo.
Refer to your models Operating Manual for supported file formats.
Note: The above information may apply to many models, but was specifically taken from the operating manual of models SC-C500, SC-C70, ST-C700, SU-R1.
Not ConditionalThis message indicates that the function you have tried to use is not available with the current settings. Check the steps and settings.
Note: The above information may apply to many models, but was specifically taken from the operating manual of models SU-R1, SL-C700 and ST-C700.
Not Measured
Measuring the output signal for the output correction function (LAPC) has not been done yet. Measure the output signal.
Note: The above information may apply to many models, but was specifically taken from the operating manual of model SU-G700, SU-G700M2
Not Supported
Possible cause and solutions
- For models with USB connection - The connected USB device is not supported.
- For models compatible to Apple products - The iPhone/iPad/iPod connected is not supported.
- For models compatible to Apple products - Check the iPhone/iPad/iPod connection and confirm it is turned on.
- The format of the file on the on the iPhone/iPad/iPod or USB device is not supported.
- Refer to the models Operating Manual for supported file types.
Note: The above information may apply to many models, but was specifically taken from the operating manual of model SC-C500, SCC-70.
Not Valid
The function you have tried to use is not available with the current settings.
- Check the steps and settings.
- Registration/subscription may be required for some functions. (Not available on all models)
- For model SL-G700 : Another input source than “CD” cannot be selected while this unit is in “Pure Disc Playback” mode.
- For model SU-R1000 : The current input source is different from the one in "Cartridge Optimiser" setting. Switch the input source correctly. [MUTE] is not valid while the measurement of "Cartridge Optimiser". Adjust the volume.
Note: The above information may apply to many models, but was specifically taken from the operating manual of models SC-C30, SC-C50, SC-C500, SC-C65, SC-C70, SU-G700, SU-G700M2, SL-G700, SU-R1000.
Operate via App
The key operation of this unit is disabled/the remote control is not working.
Make sure to operate from the dedicated application “Technics Audio Center” (free of charge) when you stream music files from the device on your network or online music services etc.
Note: The above information may apply to many models, but was specifically taken from the operating manual of models SC-C30, SC-C50, SC-C65, SL-G700.
Over Flow or Signal Overflow
The message "Over Flow" or " Signal Overflow" indicates that the audio from the analogue audio input terminal in use is distorted.
Select “Attenuator” in the setup menu, and change the setting for the analogue audio input terminal in use to “On”.
Model SU-G30 - Select “Attenuator (LINE)” or “Attenuator (PHONO)” according to the selected analogue audio input, and change the setting of the attenuator to “On”.
Note: The above information may apply to many models, but was specifically taken from the operating manual of models SU-G30, SU-R1, SU-G700.
PGM Full
The message "PGM Full" or "Full" indicates the max number of favored of programmed tracks has been reached.
- For model SC-C30, SC-C50: The number of favourited tracks has reached 9.
- For model SL-C700: The number of programmed tracks has reached 25.
- For models SU-R1, SC-C500, SC-C65, SC-C70, ST-C700: The number of programmed tracks has reached 24.
- For model SL-G700: The number of programmed tracks has reached 20.
If your model is not listed Refer to your models Operating Manual for specific procedure.
PHONES Connected
- The headphones are connected.
- Sound is not output from headphones jack and speaker output terminals when the headphones are connected and “MAIN IN” is selected as input source of this unit.
Note: The above information may apply to many models, but was specifically taken from the operating manual of model SU-G700, SU-G700M2.
Please Wait
"Please Wait" is displayed, when this unit is turned on/off. (For up to 1 minute and 30 seconds)
Note: The above information may apply to many models, but was specifically taken from the operating manual of model SU-R1, SC-C500, SC-C65, SC-C70, ST-C700, SL-G700.
Reading
The unit is checking the CD information. fter this display has disappeared, start operating.
Note: The above information may apply to many models, but was specifically taken from the operating manual of models SC-C65, SC-C70, SL-G700.
Remote □ " ( “□” stands for a number. )
The remote control and this unit are using different codes. Change the code on the remote control.
- Press [SETUP].
- Press the arrow up ▲ or down ▼ button to select “Remote Control” and then press [OK].
- The current remote control code of this unit is displayed.
- When “Set Mode 1/2” is displayed, set the remote control code of the remote control.
- To set “Mode 1”: Press and hold [OK] and [1] for at least 4 seconds.
- To set “Mode 2”: Press and hold [OK] and [2] for at least 4 seconds.
- Point the remote control at this unit, and press and hold [OK] for at least 4 seconds.
- When the remote control code is changed, the new code will appear on the display for a few seconds.
Note: The above information may apply to many models, but was specifically taken from the operating manual of model SU-R1, SU-G30, SL-C700, SC-C500, SC-C65, SC-C70, SU-G700, SU-G700M2, ST-C700, SL-G700, SU-R1000.
Remote Mode
Basic playback control buttons on the touch panel/remote control are not available. (While playing back music stored on the DLNA server with this unit (DMR), etc.)
Use the connected device for basic playback control.
Note: The above information may apply to many models, but was specifically taken from the operating manual of model SC-C500, SC-C70.
Searching
The message "Searching" indicates that the unit is checking the DLNA / Media server on the network.
Check to see if there is another server on the same network.
Note: The above information may apply to many models, but was specifically taken from the operating manual of models SU-R1, SU-G30, SC-C500, SC-C65, SC-C70, ST-C700, SL-G700.
Signal Overflow
The message "Over Flow" or " Signal Overflow" indicates that the audio from the analogue audio input terminal in use is distorted.
Select “Attenuator” in the setup menu, and change the setting for the analogue audio input terminal in use to “On”.
Model SU-G30 - Select “Attenuator (LINE)” or “Attenuator (PHONO)” according to the selected analogue audio input, and change the setting of the attenuator to “On”.
Note: The above information may apply to many models, but was specifically taken from the operating manual of models SU-G30, SU-R1, SU-G700.
This track is not available
- Some content may not be available on the music streaming service, etc.
Touch Switch Off
The touch switch operation of this unit is disabled. Turn it on.
- Press [ SETUP ]
- Press the arrow up ▲ or down ▼ button to select [ Touch Switch ]
- Press [ OK ]
- Press the arrow up ▲ or down ▼ button to select [ ON ]
- Press [ OK ]
Note: The above information may apply to many models, but was specifically taken from the operating manual of models SC-C65, SC-C70.
Unconnected
Check that the control unit is connected to the main Unit
Image of connection for Model SP-10RS
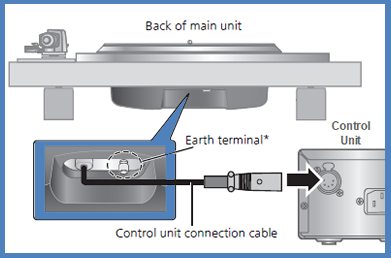
Image of connection for Model SL-1000
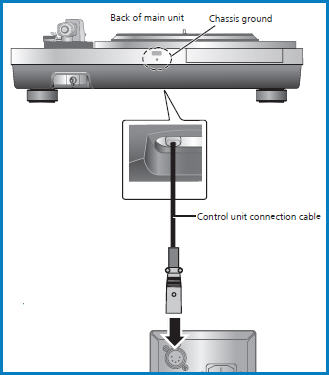
Note: The above information may apply to many models, but was specifically taken from the operating manual of models SP-10RS, SL-1000.
Unlocked
- A mode was selected, but no device is connected. Check the connection with the device.
- Audio signals, such as sampling frequency components, are not input correctly. Audio modes for SU-R1 - PC, AES, COAX1, COAX2, COAX3, OPT Audio modes for ST-C700, SC-C500 - PC Audio modes for SC-C30, SC-C50, SC-C65, SC-C70 - OPT Audio modes for SU-G700, SU-G700M2 - COAX1, COAX2, OPT1, OPT2, PC Audio modes for SL-G700 - COAX, OPT Audio modes for SU-R1000 - COAX1, COAX2, OPT1, OPT2, PC1, PC2
- If your model is not listed or to check a file format Refer to your models Operating Manual.
Note: The above information may apply to many models, but was specifically taken from the operating manual of models SU-R1, ST-C700, SC-C500, SC-C30, SC-C50, SC-C70, SU-G700, SU-G700M2, SL-G700, SU-R1000.
Unrecognizable Device
Possible cause and solutions
- You have connected an iPhone/iPad/iPod or USB device that is not supported.
- If the iPhone/iPad/iPod is compatible, turn it on and connect it correctly.
- The format of the file on the iPhone/iPad/iPod or USB device is not supported.
- To check a file format Refer to your models Operating Manual.
Note: The above information may apply to many models, but was specifically taken from the operating manual of models SU-R1 and ST-C700.
Unsupported
Possible cause and solutions
- You have connected an iPhone/iPad/iPod or USB device that is not supported.
- If the iPhone/iPad/iPod is compatible, turn it on and connect it correctly.
- The format of the file on the iPhone/iPad/iPod or USB device is not supported.
- To check a file format Refer to your models Operating Manual.
Note: The above information may apply to many models, but was specifically taken from the operating manual of models SU-R1 and ST-C700.
Unsupported USB Device
Possible cause and solutions
- You have connected an iPhone/iPad/iPod or USB device that is not supported.
- If the iPhone/iPad/iPod is compatible, turn it on and connect it correctly.
- The format of the file on the iPhone/iPad/iPod or USB device is not supported.
- To check a file format Refer to your models Operating Manual.
Note: The above information may apply to many models, but was specifically taken from the operating manual of models SU-R1 and ST-C700.
USB Device Not Supported
Possible cause and solutions
- You have connected a USB device that is not supported.
- The format of the file on the USB device is not supported.
- To check a file format Refer to your models Operating Manual.
Note: The above information may apply to many models, but was specifically taken from the operating manual of models SC-C70.
USB not Supported
Possible cause and solutions
- You have connected an iPhone/iPad/iPod or USB device that is not supported.
- If the iPhone/iPad/iPod is compatible, turn it on and connect it correctly.
- The format of the file on the iPhone/iPad/iPod or USB device is not supported.
- To check a file format Refer to your models Operating Manual.
Note: The above information may apply to many models, but was specifically taken from the operating manual of models SC-C500.
USB Over Current Error
- The iPhone/iPad/iPod or USB device is drawing too much power.
- Disconnect the iPhone/iPad/iPod or USB device.
- Turn the unit off (or standby mode) and on again.
Note: The above information may apply to many models, but was specifically taken from the operating manual of models SC-C30, SC-C50, SC-C65, SC-C70, SU-G700, SU-G700M2, SU-R1, SC-C500, SU-G30, ST-C700, SL-G700, SU-R1000.
VOLUME □□ OK” (“□” stands for a number.)
When the input source is switched to “LINE2” or other source from “MAIN IN”, the volume level after switching the input source is displayed.
Confirm and adjust the volume before pressing [OK].
Note: The above information may apply to many models, but was specifically taken from the operating manual of models SU-G700, SU-G700M2, SU-R1000.
Wi-Fi Setup
For Models SC-C30, SC-C50
- Wireless LAN (Wi-Fi) setting may start when this unit is turned on.
- If you stop the Wi-Fi setting, press the input select
 . button
 - To keep the Wi-Fi setting, start the “Google Home” app and follow the on-screen instructions.
- If you stop the Wi-Fi setting, press the input select
For Models SL-G700
- Select “On” and press [OK] to enter the network setting.
- To exit the network setting, select “Off” and press [OK].
Note: The above information may apply to many models, but was specifically taken from the operating manual of models SC-C30, SC-C50, SC-C65, SL-G700.
Wired LAN
The LAN cable is connected to this unit.
Disconnect the LAN cable when setting the wireless LAN connection.
Note: The above information may apply to many models, but was specifically taken from the operating manual of models SC-C30, SC-C50.