


How to set the Light Sensitivity (ISO) - Lumix Cameras
If your model is not listed below, click here to access our Operating Manual lookup to find more information
For model DC-FZ1000M2
Applicable Shooting Modes
Raising the value of the ISO setting allows the sensitivity to light (ISO sensitivity) to be set. Setting to a higher value enables pictures to be taken even in dark places without the resulting pictures coming out dark.
Setting the Light Sensitivity
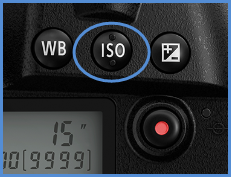
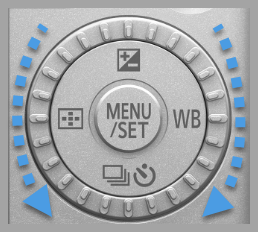
- Press ▲ [ISO] on the body of your unit.
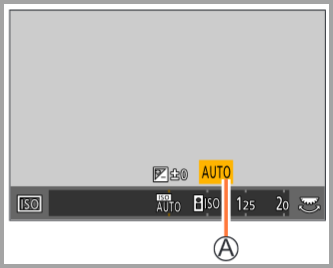
- Select the ISO sensitivity by rotating the rear or front dial.
- Press [ MENU / SET ] to set.
- You can also press the shutter button halfway to set.
| Auto |
The ISO sensitivity is automatically adjusted according to the brightness.
|
| Intelligent ISO |
The camera detects movement of the subject and then automatically sets the optimum ISO sensitivity and shutter speed to suit the movement of the subject and brightness of the scene to minimize the jitter of the subject.
|
| [L.80] *2 / [L.100] *2 / from [125] to [12800] / [H.25600] *2 | The ISO sensitivity is fixed to various settings. |
|
|

Notes:
- Cannot select [ Intelligent ISO ] in the following cases:
- Manual Exposure Mode
- Shutter-Priority AE Mode
- When [ Multi Exp. ] is set, the maximum setting is [ ISO3200 ].
- You can use the following settings when recording 4K photos or when recording using [ Post Focus ]:
- [ AUTO ], [ 80 ] - [ 3200 ]
Notes for DC-LX100M2
- Use the Quick menu to change the setting when [ Direct Focus Area ] is set to [ ON ], as the AF area is moved with the cursor button in this case.
- When recording motion pictures or recording with the 4K Photo or Post Focus function, the setting items change to the following:
- [ AUTO ]
- [ 200 ] to [ 6400 ]
- When [ Extended ISO ] is set to [ ON ]:
- [ L.100 ] to [ 6400 ]
Notes for DC-FZ1000M2
- You can use the following ISO sensitivity settings when recording in Creative Video Mode, when recording 4K photos, or when recording using [ Post Focus ]
- [ AUTO ]
- [ 125 ] to [ 6400 ]
- When [ Extended ISO ] is set to [ ON ]:
- [ L.80 ] to [ 6400 ]
To view more Light Sensitivity information for this model, please click here to view the Operating Manual
For model DC-FZ80
Applicable Shooting Modes
Raising the value of the ISO setting allows the sensitivity to light (ISO sensitivity) to be set. Setting to a higher value enables pictures to be taken even in dark places without the resulting pictures coming out dark.
Setting the Light Sensitivity
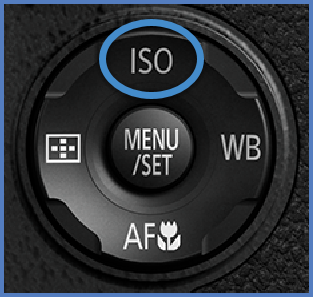
- Press ▲ ( ISO ) on the control dial of your unit.
- Select the ISO sensitivity value by rotating the rear dial.
- Press the rear dial to set your desired value.
- You can also press the shutter button halfway to set.

| Auto |
The ISO sensitivity is automatically adjusted according to the brightness.
|
| Intelligent ISO |
ISO sensitivity is automatically set in a range of up to 3200 (with the flash on: 1600) depending on the movement and brightness of a subject. *1
|
| 80 to 3200 to 6400 * 2 | The ISO sensitivity is fixed to various settings. |
|
|
Notes:
- Cannot select [ Intelligent ISO ] in the following cases:
- Shutter-Priority AE Mode
- Manual Exposure Mode
- When [ Multi Exp. ] is set, the maximum setting is [ ISO 3200 ].
To view more Light Sensitivity information for this model, please click here to view the Operating Manual
For model DC-G100
Applicable Shooting modes
Raising the value of the ISO setting allows the sensitivity to light (ISO sensitivity) to be set. Setting to a higher value enables pictures to be taken even in dark places without the resulting pictures coming out dark.
Setting the Light Sensitivity
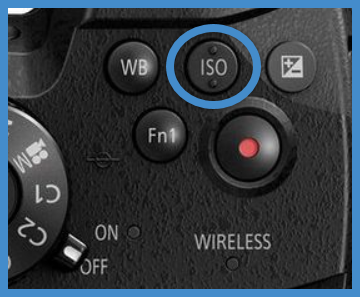
- Press [ ISO ].
- Select the ISO sensitivity by rotating the rear dial or the front dial.
- Press [ ISO ] to set.
- You can also press the shutter button halfway to set.
| Auto |
The ISO sensitivity is automatically adjusted according to the brightness.
|
| Intelligent ISO |
The camera detects movement of the subject and then automatically sets the optimum ISO sensitivity and shutter speed to suit the movement of the subject and brightness of the scene to minimize the jitter of the subject.
|
| L.100 *2 / from 200 to 25600 |
The ISO sensitivity is fixed to various settings.
|
|
|
Notes:
- Cannot select [ Intelligent ISO ] in the following cases:
- Shutter-Priority AE Mode
- Manual Exposure Mode
- When [ Multi Exp. ] is set, the maximum setting is [ ISO 3200 ].
- ISO values below will be selectable in Creative Video Mode:
- [ AUTO ]
- [ 200 ]
- [ 6400 ]
To view more Light Sensitivity information for this model, please click here to view the Operating Manual
For model DC-G9
Applicable Shooting Modes
Raising the value of the ISO setting allows the sensitivity to light (ISO sensitivity) to be set. Setting to a higher value enables pictures to be taken even in dark places without the resulting pictures coming out dark.
Setting the Light Sensitivity
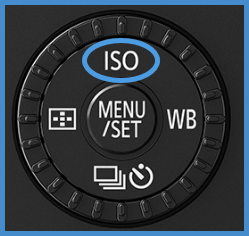
- Press ( ISO ) on the body of your unit.
- Select the ISO sensitivity by rotating the rear dial.
- You can switch the functions between the rear dial and the front dial by pressing [ DISP. ]
- Rotate the front dial to set the upper limit of ISO sensitivity.
- It will work when the [ Sensitivity ] is set to [ AUTO ] or [ Intelligent ISO ].
- Set the [ ISO Auto Upper Limit Setting ] in [ ISO Sensitivity (photo) ] (or in [ ISO Sensitivity (video) ] when using Creative Video Mode).
- Press the rear dial to set.
- You can also press the shutter button halfway to set.
| Auto |
The ISO sensitivity is automatically adjusted according to the brightness.
|
| Intelligent ISO |
The camera detects movement of the subject and then automatically sets the optimum ISO sensitivity and shutter speed to suit the movement of the subject and brightness of the scene to minimize the jitter of the subject.
|
| L100 *2 / from 200 to 25600 | The ISO sensitivity is fixed to various settings. |
|
|
Notes:
- Cannot select [ Intelligent ISO ] in the following cases:
- Shutter-Priority AE Mode
- Manual Exposure Mode
- When [ Multi Exp. ] is set, the maximum setting is [ ISO3200 ].
- When [ High Resolution Mode ] is set, the maximum setting is [ ISO1600 ].
- With Creative Video Mode, 6K/4K Photo, or Post Focus, you can set an ISO sensitivity value that falls in the range of:
- [ AUTO ], [ 200 ] to [ 12800 ] ([ 100 ] to [ 12800 ] if [ Extended ISO ] is set)
[Extended ISO] and [ISO Increments]
ISO Increments
-
Press [
MENU
] → [
Custom
] → [
Exposure
] → [
ISO Increments
]
- You can adjust the ISO sensitivity settings for every 1/3 EV .


Extended ISO
-
Press [
MENU
] → [
Custom
] → [
Exposure
] → [
Extended ISO
]
- ISO sensitivity can be set up to minimum [ ISO100 ].
Watch this video for more information on ISO increments and Extended ISO.
To view more Light Sensitivity information for this model, please click here to view the Operating Manual
For model DC-G95
Applicable Shooting modes
Raising the value of the ISO setting allows the sensitivity to light (ISO sensitivity) to be set. Setting to a higher value enables pictures to be taken even in dark places without the resulting pictures coming out dark.
Setting the Light Sensitivity
- Press [ ISO ].
- Select the ISO sensitivity by rotating the rear dial or the front dial.
- You can also use the control dial to select the ISO sensitivity.
- Press [ ISO ] to set.
- You can also press the shutter button halfway to set.
| Auto |
The ISO sensitivity is automatically adjusted according to the brightness.
|
| Intelligent ISO |
The camera detects movement of the subject and then automatically sets the optimum ISO sensitivity and shutter speed to suit the movement of the subject and brightness of the scene to minimize the jitter of the subject.
|
| L.100 *2 / from 200 to 25600 |
The ISO sensitivity is fixed to various settings.
|
|
|
Notes:
- Cannot select [ Intelligent ISO ] in the following cases:
- Shutter-Priority AE Mode
- Manual Exposure Mode
- When [ Multi Exp. ] is set, the maximum setting is [ ISO 3200 ].
- ISO values below will be selectable in Creative Video Mode:
- [ AUTO ]
- [ 200 ]
- [ 6400 ]
- When the following functions are being used, the ISO sensitivity that can be set is restricted:
- Creative Video Mode / 4K Photo recording / Post-Focus Recording:
- [ AUTO ], [ 200 ] to [ 6400 ] ([ L.100 ] to [ 6400 ] if [ Extended ISO ] is set to [ ON ])
- LiveView Composite recording:
- [ 200 ] to [ 1600 ] ([ L.100 ] to [ 1600 ] if [ Extended ISO ] is set to [ ON ])
- Creative Video Mode / 4K Photo recording / Post-Focus Recording:
To view more Light Sensitivity information for this model, please click here to view the Operating Manual
For model DC-GH5
Applicable Modes
Raising the value of the ISO setting allows the sensitivity to light (ISO sensitivity) to be set. Setting to a higher value enables pictures to be taken even in dark places without the resulting pictures coming out dark.
Setting the Light Sensitivity
- Press ( ISO ) on the body of your unit.
- Select the ISO sensitivity value by rotating the rear dial.
- You can switch the functions between the rear dial and the front dial by pressing [ DISP. ].
- Rotate the front dial to set the [ ISO Upper Limit Setting ].
- Set the [ ISO Auto Upper Limit Setting ] in [ ISO Sensitivity (photo) ] (or in [ ISO Sensitivity (video) ] when using Creative Video Mode)
- It will work when the [ Sensitivity ] is set to [ AUTO ] or [ Intelligent ISO ].
- Press [ ISO ] to set your desired value.
- You can also press the shutter button halfway to set.
| Auto |
The ISO sensitivity is automatically adjusted according to the brightness.
|
| Intelligent ISO |
The camera detects movement of the subject and then automatically sets the optimum ISO sensitivity and shutter speed to suit the movement of the subject and brightness of the scene to minimize the jitter of the subject.
|
| L.100 *2 from 200 to 25600 | The ISO sensitivity is fixed to various settings. |
|
|
Notes:
- Cannot select [ Intelligent ISO ] in the following cases:
- Shutter-Priority AE Mode
- Manual Exposure Mode
- When [ Multi Exp. ] is set, the maximum setting is [ ISO 3200 ].
- When [ Photo Style ] is set to [ V-Log L ], the lower limit of the ISO sensitivity is fixed to [ ISO400 ].
- With Creative Video Mode, 6K/4K Photo, or Post Focus, you can set an ISO sensitivity value that falls in the range of:
- Value range: [ AUTO ], [ 200 ] to [ 12800 ] ([ 100 ] to [ 12800 ] if [ Extended ISO ] is set)
To view more Light Sensitivity information for this model, please click here to view the Operating Manual
For model DC-GH5S
Applicable Shooting Modes
Raising the value of the ISO setting allows the sensitivity to light (ISO sensitivity) to be set. Setting to a higher value enables pictures to be taken even in dark places without the resulting pictures coming out dark.
Setting the Light Sensitivity
- Press ( ISO ) on the body of your unit.
- Select the ISO sensitivity value by rotating the rear dial.
- You can switch the functions between the rear dial and the front dial by pressing [ DISP. ].
- Rotate the front dial to set the [ ISO Upper Limit Setting ].
- Set the [ ISO Auto Upper Limit Setting ] in [ ISO Sensitivity (photo) ] (or in [ ISO Sensitivity (video) ] when using Creative Video Mode)
- It will work when the [ Sensitivity ] is set to [ AUTO ] or [ Intelligent ISO ].
- Press [ ISO ] to set your desired value.
- You can also press the shutter button halfway to set.
| Auto |
The ISO sensitivity is automatically adjusted according to the brightness.
|
| Intelligent ISO |
The camera detects movement of the subject and then automatically sets the optimum ISO sensitivity and shutter speed to suit the movement of the subject and brightness of the scene to minimize the jitter of the subject.
|
| 160 to 51200 *2 (L.80 to H.204800 when [Extended ISO] is used) | The ISO sensitivity is fixed to various settings. |
|
|
Notes:
- Cannot select [ Intelligent ISO ] in the following cases:
- Shutter-Priority AE Mode
- Manual Exposure Mode
- Creative Video Mode
- With [Extended ISO] in the [ Custom ] ([ Exposure ]) menu, you can perform recording with higher ISO sensitivity settings, such as [ISO204800]. These settings enable recording of scenes such as those in dark environments, but also cause noise and horizontal stripes to appear more often.
- When [ Multi Exp. ] is set, the maximum setting is [ ISO6400 ].
- When [ Photo Style ] is set to [ Like709 ], the lower limit of the ISO sensitivity is fixed to [ ISO160 ].
- When the effect is set to [ Hybrid Log Gamma ], the lower limit of the ISO sensitivity is fixed to [ ISO320 ].
- When the effect is set to [ V-Log L ], the lower limit of the ISO sensitivity is fixed to [ ISO320 ] and the upper limit to [ ISO25600 ].
- If you set [ Rec Quality ] to a motion picture setting with a size of [ FHD ] and enable [ Variable Frame Rate ], the upper limit of the ISO sensitivity will be set to [ ISO51200 ].
To view more Light Sensitivity information for this model, please click here to view the Operating Manual
For model DC-GH6
Applicable Shooting Modes
You can set light sensitivity (ISO sensitivity). With the default settings, you can set in the range between 100 and 25600 (between 100 and 12800 in [ Creative Video ] mode) in 1/3 EV increments.

- Press [ ISO ]
- Select [ ISO Sensitivity ]
- Rotate the front dial, rear dial, or control dial
- Selection is also possible by pressing [ ISO ].
- Confirm your selection.
- Press the shutter button fully.
Characteristics of the ISO Sensitivity
By increasing the ISO sensitivity, the shutter speed can be increased in dark places to prevent camera shake and subject blur. However, higher ISO sensitivities also increase the amount of noise in the recorded images.
For model DC-GX850
Applicable Modes
Raising the value of the ISO setting allows the sensitivity to light (ISO sensitivity) to be set. Setting to a higher value enables pictures to be taken even in dark places without the resulting pictures coming out dark.
Setting the Light Sensitivity
- Press [ MENU ] → [ Rec ] → [ Sensitivity ].
- Select the ISO sensitivity by rotating the control dial.
- Press [ MENU / SET ] when you have selected your desired setting.
- You can also press the shutter button halfway to set.

| Auto |
The ISO sensitivity is automatically adjusted according to the brightness.
|
| Intelligent ISO |
The camera detects movement of the subject and then automatically sets the optimum ISO sensitivity and shutter speed to suit the movement of the subject and brightness of the scene to minimize the jitter of the subject.
|
| L100 *1 / from 200 to 25600 | The ISO sensitivity is fixed to various settings. |
| *1 Only available when [Extended ISO] is set. | |
Notes:
- Cannot select [ Intelligent ISO ] in the following cases:
- Shutter-Priority AE Mode
- Manual Exposure Mode
- When [ Multi Exp. ] is set, the maximum setting is [ ISO 3200 ].
To view more Light Sensitivity information for this model, please click here to view the Operating Manual
For model DC-GX9
Applicable Shooting modes
Raising the value of the ISO setting allows the sensitivity to light (ISO sensitivity) to be set. Setting to a higher value enables pictures to be taken even in dark places without the resulting pictures coming out dark.
Setting the Light Sensitivity
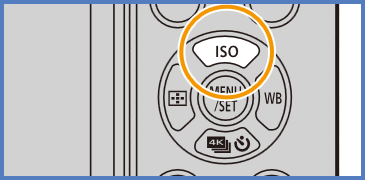
- Press [ ISO ] (▲)
- Select the ISO sensitivity by rotating the rear dial.
- Rotate the front dial to set the [ ISO Auto Upper Limit Setting ].
- It will work when the [Sensitivity] is set to [AUTO] or [ Intelligent ISO ]
- You can switch the functions between the rear dial and the front dial by pressing [ DISP. ] button.
- Press [ MENU / SET ] when you have selected your desired setting.
- You can also press the shutter button halfway to set.
| Settings | Information |
|---|---|
| Auto | The ISO sensitivity is automatically set in a range up to 3200 *1 according to the brightness of the subject. |
| Intelligent ISO |
ISO Sensitivity is automatically set in a range up to 3200 *1 depending on the movement and brightness of a subject.
|
| L.100 *2 , from 200 to 25600 | The ISO sensitivity is fixed at the selected setting. |
|
|
Notes:
- When [ Multi Exp. ] is set, the maximum setting is [ ISO3200 ].
- Cannot select [ Intelligent ISO ] in the following cases:
- Shutter-Priority AE Mode
- Manual Exposure Mode
- ISO sensitivity is set to [ AUTO ] (for motion pictures) while a motion picture is being recorded. (When not in Creative Video Mode).
- You can use the following settings in the Creative Video Mode, when recording 4K photos, or when recording with [ Post Focus ].
- [ AUTO ] / [ 200 ] to [ 6400 ] ([ L.100 ] to [ 6400 ] when [ Extended ISO ] is [ ON ])
Setting the [ISO Increments] and [Extended ISO]
[ISO Increments]
Press [ MENU ] → [ Custom Settings ] → [ Exposure Bracketing ] → [ ISO Increments ]
You can change the setting to increase ISO sensitivity by 1 EV or 1/3 EV.
[Extended ISO]
Press [ MENU ] → [ Custom Settings ] → [ Exposure Bracketing ] → [ Extended ISO ]
You can extend the numeric values that can be set for ISO Sensitivity.
ISO: Increments: Extended
Watch this video for more information on ISO increments and Extended ISO.
Model shown in video is DC-G9. Settings may vary.
To view more Light Sensitivity information for this model, please click here to view the Operating Manual
For model DC-LX100M2
Applicable Shooting Modes
Raising the value of the ISO setting allows the sensitivity to light (ISO sensitivity) to be set. Setting to a higher value enables pictures to be taken even in dark places without the resulting pictures coming out dark.
Setting the Light Sensitivity
- Press ▲ [ISO] on the body of your unit.
- Select the ISO sensitivity by rotating the control dial.
- For model DC-FZ1000M2, select the ISO sensitivity by rotating the rear or front dial.
- Press [ MENU / SET ] to set.
- You can also press the shutter button halfway to set.
| Auto |
The ISO sensitivity is automatically adjusted according to the brightness.
|
| Intelligent ISO |
The camera detects movement of the subject and then automatically sets the optimum ISO sensitivity and shutter speed to suit the movement of the subject and brightness of the scene to minimize the jitter of the subject.
|
| DC-LX100M2: L.100 *2, from 200 to 25600 DC-FZ1000M2: [L.80] *2 / [L.100] *2 / from [125] to [12800] / [H.25600] *2 | The ISO sensitivity is fixed to various settings. |
|
|
Notes:
- Cannot select [ Intelligent ISO ] in the following cases:
- Manual Exposure Mode
- Shutter-Priority AE Mode
- When [ Multi Exp. ] is set, the maximum setting is [ ISO3200 ].
- You can use the following settings when recording 4K photos or when recording using [ Post Focus ]:
- [ AUTO ], [ 80 ] - [ 3200 ]
- Use the Quick menu to change the setting when [ Direct Focus Area ] is set to [ ON ], as the AF area is moved with the cursor button in this case.
- When recording motion pictures or recording with the 4K Photo or Post Focus function, the setting items change to the following:
- [ AUTO ]
- [ 200 ] to [ 6400 ]
- When [ Extended ISO ] is set to [ ON ]:
- [ L.100 ] to [ 6400 ]
To view more Light Sensitivity information for this model, please click here to view the Operating Manual
For model DC-S1
Applicable Shooting modes
Set the ISO sensitivity (sensitivity to lighting) manually. We recommend higher settings to take clear pictures in darker locations.
Setting the Light Sensitivity
- Press [ ISO ] (▲).
- Select the ISO sensitivity by rotating the rear dial.
- You can switch the functions between the rear dial and the side dial by pressing the [ DISP. ] button.
- Rotate the side dial to set the upper limit of ISO sensitivity.
- t will work when the ISO sensitivity is set to [ AUTO ] or [ Intelligent ISO ]
- Press [ MENU / SET ].
- You can also press the shutter button halfway to set.
| Settings | Information |
|---|---|
| Auto | ISO sensitivity is automatically set in a range up to 3200 (with the flash on: 1600)* depending on the brightness of a subject. |
| Intelligent ISO |
ISO sensitivity is automatically set in a range up to 3200 (with the flash on: 1600)* depending on the movement and brightness of a subject.
|
| [ 100 ] / [ 200 ] / [ 400 ] / [ 800 ] / [ 1600 ] / [ 3200 ] / [ 6400 ] |
The ISO sensitivity is fixed at the selected setting.
|
| * When the [ ISO Limit Set ] of the [ Rec ] menu is set to anything except [ OFF ], it is set automatically within the value set in [ ISO Limit Set ]. | |
Notes:
- When [ Multi Exp. ] is set, the maximum setting is [ 3200 ].
- Cannot select [ Intelligent ISO ] in the following cases:
- Shutter-Priority AE Mode
- Manual Exposure Mode
- [ AUTO ] and [ Intelligent ISO ] are not available when taking pictures with the shutter speed set to [ B ] (Bulb) in Manual Exposure Mode.
- You can use the following settings in the Creative Video Mode or when recording 4K Photos.
- [ AUTO ], [ 100 ] to [ 6400 ].
- Depending on the setting of ISO sensitivity, the shutter speed is restricted as shown below:
| ISO sensitivity (When [ISO Increments] is set to [1/3EV]) | Shutter speed (seconds) |
|---|---|
| [ AUTO ] / [ Intelligent ISO ] | Automatically changes depending on the ISO sensitivity setting. |
| 100 / 125 / 160 / 200 / 250 / 320 / 400 / 500 / 640 / 800 / 1000 / 1250 / 1600 |
|
| 2000 / 2500 / 3200 |
|
| 4000 / 5000 / 6400 |
|
|
|
Setting the upper limit of ISO Sensitivity
Applicable Shooting modes
You can set the upper limit of ISO sensitivity when ISO sensitivity is set to [ AUTO ] or [ Intelligent ISO ]
Press [ MENU ] → [ Rec ] → [ ISO Limit Set ]
Settings:
- [ 200 ]
- [ 400 ]
- [ 800 ]
- [ 1600 ]
- [ 3200 ]
- [ 6400 ]
- [ OFF ]
Notes:
- This function is not available in the following cases:
- [ Clear Nightscape ], [ Cool Night Sky ], [ Warm Glowing Nightscape ], [ Handheld Night Shot ] (Scene Guide Mode)
- During motion picture recording.
Setting the incremental value of ISO Sensitivity
Applicable Shooting modes
You can change the setting to increase ISO sensitivity by 1 EV or 1/3 EV.
Press [ MENU ] → [ Rec ] → [ ISO Increments ]
| Increment Setting | Available ISO Settings |
|---|---|
| [ 1/3 EV ] | [ 100 ] / [ 125 ] / [ 160 ] / [ 200 ] / [ 250 ] / [ 320 ] / [ 400 ] / [ 500 ] / [ 640 ] / [ 800 ] / [ 1000 ] / [ 1250 ] / [ 1600 ] / [ 2000 ] / [ 2500 ] / [ 3200 ] / [ 4000 ] / [ 5000 ] / [ 6400 ] |
| [ 1 EV ] | [ 100 ] / [ 200 ] / [ 400 ] / [ 800 ] / [ 1600 ] / [ 3200 ] / [ 6400 ] |
| When this setting is changed from [ 1/3EV ] to [ 1 EV ], the setting for ISO sensitivity may be changed. (The closest ISO sensitivity that can be set for [ 1 EV ] will be used.) | |
To view more Light Sensitivity information for this model, please click here to view the Operating Manual
For model DC-S1H
Applicable Shooting modes
Set the ISO sensitivity (sensitivity to lighting) manually. We recommend higher settings to take clear pictures in darker locations.
Setting the Light Sensitivity
- Press [ ISO ] (▲).
- Select the ISO sensitivity by rotating the rear dial.
- You can switch the functions between the rear dial and the side dial by pressing the [ DISP. ] button.
- Rotate the side dial to set the upper limit of ISO sensitivity.
- t will work when the ISO sensitivity is set to [ AUTO ] or [ Intelligent ISO ]
- Press [ MENU / SET ].
- You can also press the shutter button halfway to set.
| Settings | Information |
|---|---|
| Auto | ISO sensitivity is automatically set in a range up to 3200 (with the flash on: 1600)* depending on the brightness of a subject. |
| Intelligent ISO |
ISO sensitivity is automatically set in a range up to 3200 (with the flash on: 1600)* depending on the movement and brightness of a subject.
|
| [ 100 ] / [ 200 ] / [ 400 ] / [ 800 ] / [ 1600 ] / [ 3200 ] / [ 6400 ] |
The ISO sensitivity is fixed at the selected setting.
|
| * When the [ ISO Limit Set ] of the [ Rec ] menu is set to anything except [ OFF ], it is set automatically within the value set in [ ISO Limit Set ]. | |
Notes:
- When [ Multi Exp. ] is set, the maximum setting is [ 3200 ].
- Cannot select [ Intelligent ISO ] in the following cases:
- Shutter-Priority AE Mode
- Manual Exposure Mode
- [ AUTO ] and [ Intelligent ISO ] are not available when taking pictures with the shutter speed set to [ B ] (Bulb) in Manual Exposure Mode.
- You can use the following settings in the Creative Video Mode or when recording 4K Photos.
- [ AUTO ], [ 100 ] to [ 6400 ].
- Depending on the setting of ISO sensitivity, the shutter speed is restricted as shown below:
| ISO sensitivity (When [ISO Increments] is set to [1/3EV]) | Shutter speed (seconds) |
|---|---|
| [ AUTO ] / [ Intelligent ISO ] | Automatically changes depending on the ISO sensitivity setting. |
| 100 / 125 / 160 / 200 / 250 / 320 / 400 / 500 / 640 / 800 / 1000 / 1250 / 1600 |
|
| 2000 / 2500 / 3200 |
|
| 4000 / 5000 / 6400 |
|
|
|
Setting the upper limit of ISO Sensitivity
Applicable Shooting modes
You can set the upper limit of ISO sensitivity when ISO sensitivity is set to [ AUTO ] or [ Intelligent ISO ]
Press [ MENU ] → [ Rec ] → [ ISO Limit Set ]
Settings:
- [ 200 ]
- [ 400 ]
- [ 800 ]
- [ 1600 ]
- [ 3200 ]
- [ 6400 ]
- [ OFF ]
Notes:
- This function is not available in the following cases:
- [ Clear Nightscape ], [ Cool Night Sky ], [ Warm Glowing Nightscape ], [ Handheld Night Shot ] (Scene Guide Mode)
- During motion picture recording.
Setting the incremental value of ISO Sensitivity
Applicable Shooting modes
You can change the setting to increase ISO sensitivity by 1 EV or 1/3 EV.
Press [ MENU ] → [ Rec ] → [ ISO Increments ]
| Increment Setting | Available ISO Settings |
|---|---|
| [ 1/3 EV ] | [ 100 ] / [ 125 ] / [ 160 ] / [ 200 ] / [ 250 ] / [ 320 ] / [ 400 ] / [ 500 ] / [ 640 ] / [ 800 ] / [ 1000 ] / [ 1250 ] / [ 1600 ] / [ 2000 ] / [ 2500 ] / [ 3200 ] / [ 4000 ] / [ 5000 ] / [ 6400 ] |
| [ 1 EV ] | [ 100 ] / [ 200 ] / [ 400 ] / [ 800 ] / [ 1600 ] / [ 3200 ] / [ 6400 ] |
| When this setting is changed from [ 1/3EV ] to [ 1 EV ], the setting for ISO sensitivity may be changed. (The closest ISO sensitivity that can be set for [ 1 EV ] will be used.) | |
To view more Light Sensitivity information for this model, please click here to view the Operating Manual
For model DC-S1R
Applicable Shooting modes
Set the ISO sensitivity (sensitivity to lighting) manually. We recommend higher settings to take clear pictures in darker locations.
Setting the Light Sensitivity
- Press [ ISO ] (▲).
- Select the ISO sensitivity by rotating the rear dial.
- You can switch the functions between the rear dial and the side dial by pressing the [ DISP. ] button.
- Rotate the side dial to set the upper limit of ISO sensitivity.
- t will work when the ISO sensitivity is set to [ AUTO ] or [ Intelligent ISO ]
- Press [ MENU / SET ].
- You can also press the shutter button halfway to set.
| Settings | Information |
|---|---|
| Auto | ISO sensitivity is automatically set in a range up to 3200 (with the flash on: 1600)* depending on the brightness of a subject. |
| Intelligent ISO |
ISO sensitivity is automatically set in a range up to 3200 (with the flash on: 1600)* depending on the movement and brightness of a subject.
|
| [ 100 ] / [ 200 ] / [ 400 ] / [ 800 ] / [ 1600 ] / [ 3200 ] / [ 6400 ] |
The ISO sensitivity is fixed at the selected setting.
|
| * When the [ ISO Limit Set ] of the [ Rec ] menu is set to anything except [ OFF ], it is set automatically within the value set in [ ISO Limit Set ]. | |
Notes:
- When [ Multi Exp. ] is set, the maximum setting is [ 3200 ].
- Cannot select [ Intelligent ISO ] in the following cases:
- Shutter-Priority AE Mode
- Manual Exposure Mode
- [ AUTO ] and [ Intelligent ISO ] are not available when taking pictures with the shutter speed set to [ B ] (Bulb) in Manual Exposure Mode.
- You can use the following settings in the Creative Video Mode or when recording 4K Photos.
- [ AUTO ], [ 100 ] to [ 6400 ].
- Depending on the setting of ISO sensitivity, the shutter speed is restricted as shown below:
| ISO sensitivity (When [ISO Increments] is set to [1/3EV]) | Shutter speed (seconds) |
|---|---|
| [ AUTO ] / [ Intelligent ISO ] | Automatically changes depending on the ISO sensitivity setting. |
| 100 / 125 / 160 / 200 / 250 / 320 / 400 / 500 / 640 / 800 / 1000 / 1250 / 1600 |
|
| 2000 / 2500 / 3200 |
|
| 4000 / 5000 / 6400 |
|
|
|
Setting the upper limit of ISO Sensitivity
Applicable Shooting modes
You can set the upper limit of ISO sensitivity when ISO sensitivity is set to [ AUTO ] or [ Intelligent ISO ]
Press [ MENU ] → [ Rec ] → [ ISO Limit Set ]
Settings:
- [ 200 ]
- [ 400 ]
- [ 800 ]
- [ 1600 ]
- [ 3200 ]
- [ 6400 ]
- [ OFF ]
Notes:
- This function is not available in the following cases:
- [ Clear Nightscape ], [ Cool Night Sky ], [ Warm Glowing Nightscape ], [ Handheld Night Shot ] (Scene Guide Mode)
- During motion picture recording.
Setting the incremental value of ISO Sensitivity
Applicable Shooting modes
You can change the setting to increase ISO sensitivity by 1 EV or 1/3 EV.
Press [ MENU ] → [ Rec ] → [ ISO Increments ]
| Increment Setting | Available ISO Settings |
|---|---|
| [ 1/3 EV ] | [ 100 ] / [ 125 ] / [ 160 ] / [ 200 ] / [ 250 ] / [ 320 ] / [ 400 ] / [ 500 ] / [ 640 ] / [ 800 ] / [ 1000 ] / [ 1250 ] / [ 1600 ] / [ 2000 ] / [ 2500 ] / [ 3200 ] / [ 4000 ] / [ 5000 ] / [ 6400 ] |
| [ 1 EV ] | [ 100 ] / [ 200 ] / [ 400 ] / [ 800 ] / [ 1600 ] / [ 3200 ] / [ 6400 ] |
| When this setting is changed from [ 1/3EV ] to [ 1 EV ], the setting for ISO sensitivity may be changed. (The closest ISO sensitivity that can be set for [ 1 EV ] will be used.) | |
To view more Light Sensitivity information for this model, please click here to view the Operating Manual
For model DC-S5
Applicable Shooting modes
Set the ISO sensitivity (sensitivity to lighting) manually. We recommend higher settings to take clear pictures in darker locations.
Setting the Light Sensitivity
- Press [ ISO ] (▲).
- Select the ISO sensitivity by rotating the rear dial.
- You can switch the functions between the rear dial and the side dial by pressing the [ DISP. ] button.
- Rotate the side dial to set the upper limit of ISO sensitivity.
- t will work when the ISO sensitivity is set to [ AUTO ] or [ Intelligent ISO ]
- Press [ MENU / SET ].
- You can also press the shutter button halfway to set.
| Settings | Information |
|---|---|
| Auto | ISO sensitivity is automatically set in a range up to 3200 (with the flash on: 1600)* depending on the brightness of a subject. |
| Intelligent ISO |
ISO sensitivity is automatically set in a range up to 3200 (with the flash on: 1600)* depending on the movement and brightness of a subject.
|
| [ 100 ] / [ 200 ] / [ 400 ] / [ 800 ] / [ 1600 ] / [ 3200 ] / [ 6400 ] |
The ISO sensitivity is fixed at the selected setting.
|
| * When the [ ISO Limit Set ] of the [ Rec ] menu is set to anything except [ OFF ], it is set automatically within the value set in [ ISO Limit Set ]. | |
Notes:
- When [ Multi Exp. ] is set, the maximum setting is [ 3200 ].
- Cannot select [ Intelligent ISO ] in the following cases:
- Shutter-Priority AE Mode
- Manual Exposure Mode
- [ AUTO ] and [ Intelligent ISO ] are not available when taking pictures with the shutter speed set to [ B ] (Bulb) in Manual Exposure Mode.
- You can use the following settings in the Creative Video Mode or when recording 4K Photos.
- [ AUTO ], [ 100 ] to [ 6400 ].
- Depending on the setting of ISO sensitivity, the shutter speed is restricted as shown below:
| ISO sensitivity (When [ISO Increments] is set to [1/3EV]) | Shutter speed (seconds) |
|---|---|
| [ AUTO ] / [ Intelligent ISO ] | Automatically changes depending on the ISO sensitivity setting. |
| 100 / 125 / 160 / 200 / 250 / 320 / 400 / 500 / 640 / 800 / 1000 / 1250 / 1600 |
|
| 2000 / 2500 / 3200 |
|
| 4000 / 5000 / 6400 |
|
|
|
Setting the upper limit of ISO Sensitivity
Applicable Shooting modes
You can set the upper limit of ISO sensitivity when ISO sensitivity is set to [ AUTO ] or [ Intelligent ISO ]
Press [ MENU ] → [ Rec ] → [ ISO Limit Set ]
Settings:
- [ 200 ]
- [ 400 ]
- [ 800 ]
- [ 1600 ]
- [ 3200 ]
- [ 6400 ]
- [ OFF ]
Notes:
- This function is not available in the following cases:
- [ Clear Nightscape ], [ Cool Night Sky ], [ Warm Glowing Nightscape ], [ Handheld Night Shot ] (Scene Guide Mode)
- During motion picture recording.
Setting the incremental value of ISO Sensitivity
Applicable Shooting modes
You can change the setting to increase ISO sensitivity by 1 EV or 1/3 EV.
Press [ MENU ] → [ Rec ] → [ ISO Increments ]
| Increment Setting | Available ISO Settings |
|---|---|
| [ 1/3 EV ] | [ 100 ] / [ 125 ] / [ 160 ] / [ 200 ] / [ 250 ] / [ 320 ] / [ 400 ] / [ 500 ] / [ 640 ] / [ 800 ] / [ 1000 ] / [ 1250 ] / [ 1600 ] / [ 2000 ] / [ 2500 ] / [ 3200 ] / [ 4000 ] / [ 5000 ] / [ 6400 ] |
| [ 1 EV ] | [ 100 ] / [ 200 ] / [ 400 ] / [ 800 ] / [ 1600 ] / [ 3200 ] / [ 6400 ] |
| When this setting is changed from [ 1/3EV ] to [ 1 EV ], the setting for ISO sensitivity may be changed. (The closest ISO sensitivity that can be set for [ 1 EV ] will be used.) | |
To view more Light Sensitivity information for this model, please click here to view the Operating Manual
For model DC-TS7
Applicable Shooting Modes
Raising the value of the ISO setting allows the sensitivity to light (ISO sensitivity) to be set. Setting to a higher value enables pictures to be taken even in dark places without the resulting pictures coming out dark.
Setting the Light Sensitivity
- Press [ MENU ] → [ Recording ] → [ Sensitivity ]
- Press [◄ / ►] to select the ISO sensitivity.
- Press [ MENU / SET ] to set.
| Auto |
The ISO sensitivity is automatically adjusted according to the brightness.
|
| Intelligent ISO |
The camera detects movement of the subject and then automatically sets the optimum ISO sensitivity and shutter speed to suit the movement of the subject and brightness of the scene to minimize the jitter of the subject.
|
| From 80 to 3200, H.6400 *2 | The ISO sensitivity is fixed to various settings. |
|
|
Notes:
- Cannot select [ Intelligent ISO ] in the following cases:
- Manual Exposure Mode
- You can use the following settings when recording 4K photos or when recording using [ Post Focus: ].
- [ AUTO ], [ 80 ] - [ 3200 ]
To view more Light Sensitivity information for this model, please click here to view the Operating Manual
For model DC-ZS200
Applicable Modes
Raising the value of the ISO setting allows the sensitivity to light (ISO sensitivity) to be set. Setting to a higher value enables pictures to be taken even in dark places without the resulting pictures coming out dark.
Setting the Light Sensitivity
- Press [ MENU ] → [ Rec ] → [ Sensitivity ].
- Select the ISO sensitivity by rotating the rear dial.
- Press [ MENU / SET ] when you have selected your desired setting.
- You can also press the shutter button halfway to set.
| Settings | Information |
|---|---|
| Auto | ISO sensitivity is automatically set in a range up to 3200(with the flash on: 4000) *1 according to the brightness of the subject. |
| Intelligent ISO |
ISO Sensitivity is automatically set in a range up to 3200(with the flash on: 4000) *1 depending on the movement and brightness of a subject.
|
| [ L.80 ] *2 / [ L.100 ] *2 / from [ 125 ] to [ 12800 ] / [ H.25600 ] *2 | The ISO sensitivity is fixed at the selected setting. |
|
|
Notes:
- When [ Multi Exp. ] is set, the maximum setting is [ 3200 ].
- Cannot select [ Intelligent ISO ] in the following cases:
- Shutter-Priority AE Mode
- Manual Exposure Mode
- ISO sensitivity is set to [ AUTO ] (for motion pictures) while a motion picture is being recorded. (When not in Creative Video Mode).
- You can use the following settings in the Creative Video Mode (Available through [ MENU ] → [ Motion Picture ] → [ Sensitivity ]), when recording 4K photos, or when recording with [ Post Focus ].
- [ AUTO ], [ 125 ] to [ 6400 ] ([ L.80 ] to [ 6400 ] when [ Extended ISO ] is set to [ ON ])

To view more Light Sensitivity information for this model, please click here to view the Operating Manual
For model DC-ZS70
Applicable Modes
Raising the value of the ISO setting allows the sensitivity to light (ISO sensitivity) to be set. Setting to a higher value enables pictures to be taken even in dark places without the resulting pictures coming out dark.
Setting the Light Sensitivity
- Press [ MENU ] → [ Motion Picture ] / [ Rec ] → [ Sensitivity ].
- Select the ISO sensitivity by rotating the control dial.
- Press [ MENU / SET ] when you have selected your desired setting.
- You can also press the shutter button halfway to set.
| Settings | Information |
|---|---|
| Auto | The ISO sensitivity is automatically set in a range up to 3200(with the flash on: 1600) according to the brightness of the subject. *1 |
| Intelligent ISO |
ISO Sensitivity is automatically set in a range up to 3200(with the flash on: 1600) depending on the movement and brightness of a subject. *1
|
| 80 to 3200, 6400 *2 | The ISO sensitivity is fixed at the selected setting. |
|
|
Notes:
- When [ Multi Exp. ] is set, the maximum setting is [ 3200 ].
- Cannot select [ Intelligent ISO ] in the following cases:
- Shutter-Priority AE Mode
- Manual Exposure Mode
- You can use the following settings in the Creative Video Mode, when recording 4K photos, or when recording with [ Post Focus ].
- [ AUTO ] / [ 80 ] to [ 3200 ]
To view more Light Sensitivity information for this model, please click here to view the Operating Manual
For model DC-ZS80
Applicable Modes
Raising the value of the ISO setting allows the sensitivity to light (ISO sensitivity) to be set. Setting to a higher value enables pictures to be taken even in dark places without the resulting pictures coming out dark.
Setting the Light Sensitivity
- Press [ MENU ] → [ Motion Picture ] / [ Rec ] → [ Sensitivity ].
- Select the ISO sensitivity by rotating the control dial.
- Press [ MENU / SET ] when you have selected your desired setting.
- You can also press the shutter button halfway to set.
| Settings | Information |
|---|---|
| Auto | The ISO sensitivity is automatically set in a range up to 3200(with the flash on: 1600) according to the brightness of the subject. *1 |
| Intelligent ISO |
ISO Sensitivity is automatically set in a range up to 3200(with the flash on: 1600) depending on the movement and brightness of a subject. *1
|
| 80 to 3200, 6400 *2 | The ISO sensitivity is fixed at the selected setting. |
|
|
Notes:
- When [ Multi Exp. ] is set, the maximum setting is [ 3200 ].
- Cannot select [ Intelligent ISO ] in the following cases:
- Shutter-Priority AE Mode
- Manual Exposure Mode
- ISO sensitivity is set to [ AUTO ] (for motion pictures) while a motion picture is being recorded. (When not in Creative Video Mode).
- You can use the following settings in the Creative Video Mode, when recording 4K photos, or when recording with [ Post Focus ].
- [ AUTO ] / [ 80 ] to [ 3200 ]
To view more Light Sensitivity information for this model, please click here to view the Operating Manual
For model DMC-CM1
Applicable Shooting Modes
Raising the value of the ISO setting allows the sensitivity to light (ISO sensitivity) to be set. Setting to a higher value enables pictures to be taken even in dark places without the resulting pictures coming out dark.
Setting the Light Sensitivity
- Press [ Control Ring Menu ] → [ ISO ].
- Operate the control ring to configure settings.
- Tap [▲] to set when you have selected your desired setting.

| Settings | Information |
|---|---|
| Auto | ISO sensitivity is automatically set in a range of up to [ ISO3200 ] *1 according to the brightness of the subject. |
| Intelligent ISO |
The camera detects movement of the subject and then automatically sets the optimum ISO sensitivity and shutter speed to suit the movement of the subject and brightness of the scene to minimize the jitter of the subject.
|
| [ L.100 ] *2 / [ 125 ] / [ 200 ] / [ 400 ] /[ 800 ] /[ 1600 ] /[ 3200 ] /[ 6400 ] / [ 12800 ] / [ H.25600 ] *2 |
The ISO sensitivity is fixed at the selected setting.
|
|
|
|
Notes:
- Cannot select [ Intelligent ISO ] in the following cases:
- Shutter-Priority AE Mode
- Manual Exposure Mode
- [ AUTO ] is not available in the following case:
- Manual Exposure Mode
To view more Light Sensitivity information for this model, please click here to view the Operating Manual
For model DMC-FH1
- Press [ Menu/Set ].
- Press [ ◄ ] / [ ► ] to select [ Rec ] from the menu and then press [ Menu/Set ].
- Press [ ▲ ] / [ ▼ ] to select [ Sensitivity ] and then press [ Menu/Set ].
Note: On the Menu screen, it will switch to the next page when you reach the bottom. It will also switch by pressing the zoom button.
Sensitivity
This allows the Sensitivity to light (ISO sensitivity) to be set. Setting to a higher figure enables pictures to be taken even in dark places without the resulting pictures coming out dark.
| Settings | Description of settings |
|---|---|
| [ ISO ] |
The ISO sensitivity is adjusted according to the movement of the subject and the brightness.
|
| [ 80 ] | The ISO sensitivity is fixed to various settings. |
| [ 100 ] | |
| [ 200 ] | |
| [ 400 ] | |
| [ 800 ] | |
| [ 1600 ] |
- The ISO sensitivity is automatically set under the following conditions.
- When recording motion pictures.
- When [ Burst ] in the Rec menu is set to [ Highspeed Burst ] or [ Flash Burst ]


To view more Light Sensitivity information for this model, please click here to view the Operating Manual
For model DMC-FH10
- Press [ Menu/Set ].
- Press [ ◄ ] / [ ► ] to select [ Rec ] from the menu and then press [ Menu/Set ].
- Press [ ▲ ] / [ ▼ ] to select [ Sensitivity ] and then press [ Menu/Set ].
Note: On the Menu screen, it will switch to the next page when you reach the bottom. It will also switch by pressing the zoom button.
Sensitivity
This allows the Sensitivity to light (ISO sensitivity) to be set. Setting to a higher figure enables pictures to be taken even in dark places without the resulting pictures coming out dark.
| Settings | Description of settings |
|---|---|
| [ ISO ] |
The ISO sensitivity is adjusted according to the movement of the subject and the brightness.
|
| [ 100 ] | The ISO sensitivity is fixed to various settings. |
| [ 200 ] | |
| [ 400 ] | |
| [ 800 ] | |
| [ 1600 ] |
- The ISO sensitivity is automatically set under the following conditions.
- When recording motion pictures.
- When [ Burst ] in the Rec menu is set to [ Highspeed Burst ] or [ Flash Burst ]
To view more Light Sensitivity information for this model, please click here to view the Operating Manual
For model DMC-FH20
- Press [ Menu/Set ].
- Press [ ◄ ] / [ ► ] to select [ Rec ] from the menu and then press [ Menu/Set ].
- Press [ ▲ ] / [ ▼ ] to select [ Sensitivity ] and then press [ Menu/Set ].
Note: On the Menu screen, it will switch to the next page when you reach the bottom. It will also switch by pressing the zoom button.
Sensitivity
This allows the Sensitivity to light (ISO sensitivity) to be set. Setting to a higher figure enables pictures to be taken even in dark places without the resulting pictures coming out dark.
| Settings | Description of settings |
|---|---|
| [ ISO ] |
The ISO sensitivity is adjusted according to the movement of the subject and the brightness.
|
| [ 80 ] | The ISO sensitivity is fixed to various settings. |
| [ 100 ] | |
| [ 200 ] | |
| [ 400 ] | |
| [ 800 ] | |
| [ 1600 ] |
- The ISO sensitivity is automatically set under the following conditions.
- When recording motion pictures.
- When [ Burst ] in the Rec menu is set to [ Highspeed Burst ] or [ Flash Burst ]
To view more Light Sensitivity information for this model, please click here to view the Operating Manual
For model DMC-FH22
Applicable Shooting Mode:
This allows the sensitivity to light (ISO sensitivity) to be set. Setting to a higher number enables pictures to be taken even in dark places without the resulting pictures coming out dark.
- Turn the camera on.
- Slide the [ REC ] / [ PLAYBACK ] selector to switch to [ Normal Picture ].
- Touch [ MODE ].
- Touch [ NORMAL PICTURE ].
- Press [ MENU ] to display the menu.
- Touch [ SENSITIVITY ].
- Settings:
- [ Intelligent ISO ]
- [ 80 ]
- [ 100 ]
- [ 200 ]
- [ 400 ]
- [ 800 ]
- [ 1600 ]
- Settings:
Note:
- When setting to [ Intelligent ISO ], the camera detects movement of the subject (motion detection) and then sets the optimal ISO sensitivity and shutter speed according to the movement and brightness of the subject.
- ISO sensitivity is automatically adjusted to a maximum of [ ISO800 ] according to the brightness. (It can be adjusted to a maximum of [ ISO1600 ] when using the flash.)
- To avoid picture noise, we recommend that you either reduce the maximum ISO sensitivity level or set [ COLOR MODE ] to [ NATURAL ], and then take pictures.
To view more Light Sensitivity information for this model, please click here to view the Operating Manual
For model DMC-FH27
Applicable Shooting Mode:
Raising the value of the ISO setting allows the sensitivity to light (ISO sensitivity) to be set. Setting to a higher value enables pictures to be taken even in dark places without the resulting pictures coming out dark.
| Settings | Information |
|---|---|
| Intelligent ISO |
The camera detects movement of the subject and then automatically sets the optimum ISO sensitivity and shutter speed to suit the movement of the subject and brightness of the scene to minimize the jitter of the subject.
|
| [ 100 ] / [ 200 ] / [ 400 ] /[ 800 ] /[ 1600 ] | The ISO sensitivity is fixed at the selected setting. |
To view more Light Sensitivity information for this model, please click here to view the Operating Manual
For model DMC-FH3
- Press [ Menu/Set ].
- Press [ ◄ ] / [ ► ] to select [ Rec ] from the menu and then press [ Menu/Set ].
- Press [ ▲ ] / [ ▼ ] to select [ Sensitivity ] and then press [ Menu/Set ].
Note: On the Menu screen, it will switch to the next page when you reach the bottom. It will also switch by pressing the zoom button.
Sensitivity
This allows the Sensitivity to light (ISO sensitivity) to be set. Setting to a higher figure enables pictures to be taken even in dark places without the resulting pictures coming out dark.
| Settings | Description of settings |
|---|---|
| [ ISO ] |
The ISO sensitivity is adjusted according to the movement of the subject and the brightness.
|
| [ 80 ] | The ISO sensitivity is fixed to various settings. |
| [ 100 ] | |
| [ 200 ] | |
| [ 400 ] | |
| [ 800 ] | |
| [ 1600 ] |
- The ISO sensitivity is automatically set under the following conditions.
- When recording motion pictures.
- When [ Burst ] in the Rec menu is set to [ Highspeed Burst ] or [ Flash Burst ]
To view more Light Sensitivity information for this model, please click here to view the Operating Manual
For model DMC-FH8
- Press [ Menu/Set ].
- Press [ ◄ ] / [ ► ] to select [ Rec ] from the menu and then press [ Menu/Set ].
- Press [ ▲ ] / [ ▼ ] to select [ Sensitivity ] and then press [ Menu/Set ].
Note: On the Menu screen, it will switch to the next page when you reach the bottom. It will also switch by pressing the zoom button.
Sensitivity
This allows the Sensitivity to light (ISO sensitivity) to be set. Setting to a higher figure enables pictures to be taken even in dark places without the resulting pictures coming out dark.
| Settings | Description of settings |
|---|---|
| [ ISO ] |
The ISO sensitivity is adjusted according to the movement of the subject and the brightness.
|
| [ 100 ] | The ISO sensitivity is fixed to various settings. |
| [ 200 ] | |
| [ 400 ] | |
| [ 800 ] | |
| [ 1600 ] |
- The ISO sensitivity is automatically set under the following conditions.
- When recording motion pictures.
- When [ Burst ] in the Rec menu is set to [ Highspeed Burst ] or [ Flash Burst ]
To view more Light Sensitivity information for this model, please click here to view the Operating Manual
For model DMC-FP5
Applicable Shooting Mode:
Raising the value of the ISO setting allows the sensitivity to light (ISO sensitivity) to be set. Setting to a higher value enables pictures to be taken even in dark places without the resulting pictures coming out dark.
| Settings | Information |
|---|---|
| Intelligent ISO |
The camera detects movement of the subject and then automatically sets the optimum ISO sensitivity and shutter speed to suit the movement of the subject and brightness of the scene to minimize the jitter of the subject.
|
| [ 100 ] / [ 200 ] / [ 400 ] /[ 800 ] /[ 1600 ] | The ISO sensitivity is fixed at the selected setting. |
To view more Light Sensitivity information for this model, please click here to view the Operating Manual
For model DMC-FP7
Applicable Shooting Mode:
Raising the value of the ISO setting allows the sensitivity to light (ISO sensitivity) to be set. Setting to a higher value enables pictures to be taken even in dark places without the resulting pictures coming out dark.
| Settings | Information |
|---|---|
| Intelligent ISO |
The camera detects movement of the subject and then automatically sets the optimum ISO sensitivity and shutter speed to suit the movement of the subject and brightness of the scene to minimize the jitter of the subject.
|
| [ 100 ] / [ 200 ] / [ 400 ] /[ 800 ] /[ 1600 ] | The ISO sensitivity is fixed at the selected setting. |
To view more Light Sensitivity information for this model, please click here to view the Operating Manual
For model DMC-FX700
Applicable Shooting Modes
Raising the value of the ISO setting allows the sensitivity to light (ISO sensitivity) to be set. Setting to a higher value enables pictures to be taken even in dark places without the resulting pictures coming out dark.
| Settings | Information |
|---|---|
| Auto | The ISO sensitivity is automatically adjusted according to the brightness. |
| Intelligent ISO |
The camera detects movement of the subject and then automatically sets the optimum ISO sensitivity and shutter speed to suit the movement of the subject and brightness of the scene to minimize the jitter of the subject.
|
| [ 100 ] / [ 200 ] / [ 400 ] /[ 800 ] /[ 1600 ] | The ISO sensitivity is fixed at the selected setting. |
To view more Light Sensitivity information for this model, please click here to view the Operating Manual
For model DMC-FZ1000
Applicable Shooting Modes
Raising the value of the ISO setting allows the sensitivity to light (ISO sensitivity) to be set. Setting to a higher value enables pictures to be taken even in dark places without the resulting pictures coming out dark.
Setting the Light Sensitivity
- Press [ ISO ] (▲).
- Select the ISO sensitivity by rotating the rear dial.
- Press the rear dial to set when you have selected your desired setting.
| Settings | Information |
|---|---|
| Auto | ISO sensitivity is automatically set in a range of up to [ ISO3200 ] *1 according to the brightness of the subject. |
| Intelligent ISO |
The camera detects movement of the subject and then automatically sets the optimum ISO sensitivity and shutter speed to suit the movement of the subject and brightness of the scene to minimize the jitter of the subject.
|
| [ 80 ] *2 / [ 100 ] *2 / [ 125 ] / [ 200 ] / [ 400 ] /[ 800 ] /[ 1600 ] /[ 3200 ] /[ 6400 ] / [ 12800 ] / [ H.25600 ] *2 | The ISO sensitivity is fixed at the selected setting. |
|
|
Notes:
- When [ Multi Exp. ] is set, the maximum setting is [ 3200 ].
- Cannot select [ Intelligent ISO ] in the following cases:
- Shutter-Priority AE Mode
- Manual Exposure Mode
- When [ Direct Focus Area ]is set to [ ON ], the operations on the cursor buttons translate to movements of the AF area. Set using the Quick Menu.
- You can use the following settings in the Creative Video Mode.
- [ AUTO ], [ 125 ] to [ 6400 ].
To view more Light Sensitivity information for this model, please click here to view the Operating Manual
For model DMC-FZ2500
Applicable Shooting Modes
Raising the value of the ISO setting allows the sensitivity to light (ISO sensitivity) to be set. Setting to a higher value enables pictures to be taken even in dark places without the resulting pictures coming out dark.
Setting the Light Sensitivity
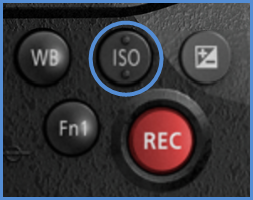
- Press ▲ ( ISO ) on the control dial of your unit.
- Select the ISO sensitivity by rotating the rear dial.
- You can switch the functions between the rear dial and the front dial by pressing [ DISP. ]
- Rotate the front dial to set the upper limit of ISO sensitivity.
- It will work when the [ Sensitivity ] is set to [ AUTO ] or [ Intelligent ISO ].
- Press the rear dial to set.
- You can also press the shutter button halfway to set.
| Auto |
The ISO sensitivity is automatically adjusted according to the brightness.
|
| Intelligent ISO |
The camera detects movement of the subject and then automatically sets the optimum ISO sensitivity and shutter speed to suit the movement of the subject and brightness of the scene to minimize the jitter of the subject.
|
| 180 *2 / L100 *2 / from 125 to 12800 / H.25600 *2 | The ISO sensitivity is fixed to various settings. |
|
|
Notes:
- Cannot select [ Intelligent ISO ] in the following cases:
- Shutter-Priority AE Mode
- Manual Exposure Mode
- When [ Multi Exp. ] is set, the maximum setting is [ ISO 3200 ].
To view more Light Sensitivity information for this model, please click here to view the Operating Manual
For model DMC-FZ300
Applicable Shooting modes
Set the ISO sensitivity (sensitivity to lighting) manually. We recommend higher settings to take clear pictures in darker locations.
Setting the Light Sensitivity
- Press [ ISO ] (▲).
- Select the ISO sensitivity by rotating the rear dial.
- You can switch the functions between the rear dial and the side dial by pressing the [ DISP. ] button.
- Rotate the side dial to set the upper limit of ISO sensitivity.
- t will work when the ISO sensitivity is set to [ AUTO ] or [ Intelligent ISO ]
- Press [ MENU / SET ].
- You can also press the shutter button halfway to set.
| Settings | Information |
|---|---|
| Auto | ISO sensitivity is automatically set in a range up to 3200 (with the flash on: 1600)* depending on the brightness of a subject. |
| Intelligent ISO |
ISO sensitivity is automatically set in a range up to 3200 (with the flash on: 1600)* depending on the movement and brightness of a subject.
|
| [ 100 ] / [ 200 ] / [ 400 ] / [ 800 ] / [ 1600 ] / [ 3200 ] / [ 6400 ] |
The ISO sensitivity is fixed at the selected setting.
|
| * When the [ ISO Limit Set ] of the [ Rec ] menu is set to anything except [ OFF ], it is set automatically within the value set in [ ISO Limit Set ]. | |
Notes:
- When [ Multi Exp. ] is set, the maximum setting is [ 3200 ].
- Cannot select [ Intelligent ISO ] in the following cases:
- Shutter-Priority AE Mode
- Manual Exposure Mode
- [ AUTO ] and [ Intelligent ISO ] are not available when taking pictures with the shutter speed set to [ B ] (Bulb) in Manual Exposure Mode.
- You can use the following settings in the Creative Video Mode or when recording 4K Photos.
- [ AUTO ], [ 100 ] to [ 6400 ].
- Depending on the setting of ISO sensitivity, the shutter speed is restricted as shown below:
| ISO sensitivity (When [ISO Increments] is set to [1/3EV]) | Shutter speed (seconds) |
|---|---|
| [ AUTO ] / [ Intelligent ISO ] | Automatically changes depending on the ISO sensitivity setting. |
| 100 / 125 / 160 / 200 / 250 / 320 / 400 / 500 / 640 / 800 / 1000 / 1250 / 1600 |
|
| 2000 / 2500 / 3200 |
|
| 4000 / 5000 / 6400 |
|
|
|
Setting the upper limit of ISO Sensitivity
Applicable Shooting modes
You can set the upper limit of ISO sensitivity when ISO sensitivity is set to [ AUTO ] or [ Intelligent ISO ]
Press [ MENU ] → [ Rec ] → [ ISO Limit Set ]
Settings:
- [ 200 ]
- [ 400 ]
- [ 800 ]
- [ 1600 ]
- [ 3200 ]
- [ 6400 ]
- [ OFF ]
Notes:
- This function is not available in the following cases:
- [ Clear Nightscape ], [ Cool Night Sky ], [ Warm Glowing Nightscape ], [ Handheld Night Shot ] (Scene Guide Mode)
- During motion picture recording.
Setting the incremental value of ISO Sensitivity
Applicable Shooting modes
You can change the setting to increase ISO sensitivity by 1 EV or 1/3 EV.
Press [ MENU ] → [ Rec ] → [ ISO Increments ]
| Increment Setting | Available ISO Settings |
|---|---|
| [ 1/3 EV ] | [ 100 ] / [ 125 ] / [ 160 ] / [ 200 ] / [ 250 ] / [ 320 ] / [ 400 ] / [ 500 ] / [ 640 ] / [ 800 ] / [ 1000 ] / [ 1250 ] / [ 1600 ] / [ 2000 ] / [ 2500 ] / [ 3200 ] / [ 4000 ] / [ 5000 ] / [ 6400 ] |
| [ 1 EV ] | [ 100 ] / [ 200 ] / [ 400 ] / [ 800 ] / [ 1600 ] / [ 3200 ] / [ 6400 ] |
| When this setting is changed from [ 1/3EV ] to [ 1 EV ], the setting for ISO sensitivity may be changed. (The closest ISO sensitivity that can be set for [ 1 EV ] will be used.) | |
To view more Light Sensitivity information for this model, please click here to view the Operating Manual
For model DMC-G7
Applicable Shooting modes
Raising the value of the ISO setting allows the sensitivity to light (ISO sensitivity) to be set. Setting to a higher value enables pictures to be taken even in dark places without the resulting pictures coming out dark.
Setting the Light Sensitivity
- Press [ ISO ] (▲)
- Select the ISO sensitivity by rotating the rear dial.
- Rotate the front dial to set the [ ISO Auto Upper Limit Setting ].
- It will work when the [ Sensitivity ] is set to [ AUTO ] or [ Intelligent ISO ]
- You can switch the functions between the rear dial and the front dial by pressing [ DISP. ] button.
- Press [ MENU / SET ] when you have selected your desired setting.
- You can also press the shutter button halfway to set.
| Settings | Information |
|---|---|
| Auto | The ISO sensitivity is automatically set in a range up to 3200 *1 according to the brightness of the subject. |
| Intelligent ISO |
ISO Sensitivity is automatically set in a range up to 3200 *1 depending on the movement and brightness of a subject.
|
| L.100 *2 , from 200 to 25600 | The ISO sensitivity is fixed at the selected setting. |
|
|
Notes:
- When [ Multi Exp. ] is set, the maximum setting is [ ISO3200 ].
- Cannot select [ Intelligent ISO ] in the following cases:
- Shutter-Priority AE Mode
- Manual Exposure Mode
- ISO sensitivity is set to [ AUTO ] (for motion pictures) while a motion picture is being recorded. (When not in Creative Video Mode).
- You can use the following settings in the Creative Video Mode, when recording 4K photos, or when recording with [ Post Focus ].
- [ AUTO ] / [ 200 ] to [ 6400 ] ([ L.100 ] to [ 6400 ] when [ Extended ISO ] is [ ON ])
Setting the [ISO Increments] and [Extended ISO]
[ISO Increments]
Press [ MENU ] → [ Rec ] → [ ISO Increments ]
You can change the setting to increase ISO sensitivity by 1 EV or 1/3 EV.
[Extended ISO]
Press [ MENU ] → [ Rec ] → [ Extended ISO ]
You can extend the numeric values that can be set for ISO Sensitivity.
ISO: Increments: Extended
Watch this video for more information on ISO increments and Extended ISO.
Model shown in video is DC-G9. Settings may vary.
To view more Light Sensitivity information for this model, please click here to view the Operating Manual
For model DMC-G85
Applicable Shooting Modes
Raising the value of the ISO setting allows the sensitivity to light (ISO sensitivity) to be set. Setting to a higher value enables pictures to be taken even in dark places without the resulting pictures coming out dark.
Setting the Light Sensitivity
- Press ▲ ( ISO ) on the control dial of your unit.
- Select the ISO sensitivity by rotating the rear dial.
- You can switch the functions between the rear dial and the front dial by pressing [ DISP. ]
- Rotate the front dial to set the upper limit of ISO sensitivity.
- It will work when the [ Sensitivity ] is set to [ AUTO ] or [ Intelligent ISO ].
- Press the rear dial to set.
- You can also press the shutter button halfway to set.
| Auto |
The ISO sensitivity is automatically adjusted according to the brightness.
|
| Intelligent ISO |
The camera detects movement of the subject and then automatically sets the optimum ISO sensitivity and shutter speed to suit the movement of the subject and brightness of the scene to minimize the jitter of the subject.
|
| 100/200 to 25600 | The ISO sensitivity is fixed to various settings. |
|
|
Notes:
- Cannot select [ Intelligent ISO ] in the following cases:
- Shutter-Priority AE Mode
- Manual Exposure Mode
- When [ Multi Exp. ] is set, the maximum setting is [ ISO 3200 ].
- You can set the ISO sensitivity in Scene Guide Mode only when using [ Panorama Shot ].
To view more Light Sensitivity information for this model, please click here to view the Operating Manual
For model DMC-GF7
Setting the Light Sensitivity
Applicable Shooting Modes
Raising the value of the ISO setting allows the sensitivity to light (ISO sensitivity) to be set. Setting to a higher value enables pictures to be taken even in dark places without the resulting pictures coming out dark.
- Select [ MENU ] → [ Rec ] → [ Sensitivity ].
- Select the ISO sensitivity by rotating the control dial.
- Press [ MENU / SET ] to set.
- Exit the menu after it is set.
| Auto |
The ISO sensitivity is automatically adjusted according to the brightness.
|
| Intelligent ISO |
The camera detects movement of the subject and then automatically sets the optimum ISO sensitivity and shutter speed to suit the movement of the subject and brightness of the scene to minimize the jitter of the subject.
|
| 100 *2 / 200 to 25600 |
The ISO sensitivity is fixed to various settings.
|
|
|
Notes:
- Cannot select [ Intelligent ISO ] in the following cases:
- Manual Exposure Mode
- Shutter-Priority AE Mode
- When [ Multi Exp. ] is set, the maximum setting is [ ISO3200 ].
Setting the upper limit on ISO sensitivity
Applicable Shooting Modes
Setting the upper limit on ISO sensitivity will select optimal ISO sensitivity with set value as limit depending on the brightness of the subject. It will work when the [ Sensitivity ] is set to [ AUTO ] or [ Intelligent ISO ].
How do I set the ISO limit?
- Select [ MENU ] → [ Rec ] → [ ISO Limit Set ].
- Possible Settings:
- [ 400 ]
- [ 800 ]
- [ 1600 ]
- [ 3200 ]
- [ 6400 ]
- [ 12800 ]
- [ 25600 ]
- [ OFF ]
Setting the ISO limit is not available in these cases:
- This function is not available in the following cases
- [ Clear Nightscape ]/[ Cool Night Sky ]/[ Warm Glowing Nightscape ]/[ Handheld Night Shot ] (Scene Guide Mode)
- When recording motion pictures.
Setting the step increment of ISO sensitivity
Applicable Shooting Modes
You can adjust the ISO sensitivity settings for every 1/3 EV.
How do I set the ISO limit?
- Select [ MENU ] → [ Rec ] → [ ISO Increments ].
- Possible Settings:
- [ 1/3 EV ] (*Only available when [ Extended ISO ] is set.)
- [ L.100 ]*/[ L.125 ]*/[ L.160 ]*/[ 200 ]/[ 250 ]/[ 320 ]/[ 400 ]/[ 500 ]/[ 640 ]/[ 800 ]/[ 1000 ]/[ 1250 ]/[ 1600 ]/[ 2000 ]/[ 2500 ]/[ 3200 ]/[ 4000 ]/[ 5000 ]/[ 6400 ]/[ 8000 ]/[ 10000 ]/[ 12800 ]/[ 16000 ]/[ 20000 ]/[ 25600 ]
- [ 1 EV ] (*Only available when Extended ISO ] is set.)
- [ L.100 ]*/[ 200 ]/[ 400 ]/[ 800 ]/[ 1600 ]/[ 3200 ]/[ 6400 ]/[ 12800 ]/[ 25600 ]
- When the setting is changed from [ 1/3 EV ] to [ 1 EV ], [ Sensitivity ] will be set to value closest to the value set during the [ 1/3 EV ].
- [ 1/3 EV ] (*Only available when [ Extended ISO ] is set.)
Extending ISO sensitivity
Applicable Shooting Modes
ISO sensitivity can be set up to minimum [ ISO100 ].
How do I set the ISO limit?
- Select [ MENU ] → [ Rec ] → [ Extended ISO ].
- Possible Settings:
- [ ON ] / [ OFF ]
To view more Light Sensitivity information for this model, please click here to view the Operating Manual
For model DMC-GH4
Applicable Shooting modes
Raising the value of the ISO setting allows the sensitivity to light (ISO sensitivity) to be set. Setting to a higher value enables pictures to be taken even in dark places without the resulting pictures coming out dark.
Setting the Light Sensitivity
- Press [ ISO ].
- Select the ISO sensitivity by rotating the rear dial or the front dial.
- For model DC-G95 , you can also use the control dial to select the ISO sensitivity.
- Press [ ISO ] to set.
- You can also press the shutter button halfway to set.
| Auto |
The ISO sensitivity is automatically adjusted according to the brightness.
|
| Intelligent ISO |
The camera detects movement of the subject and then automatically sets the optimum ISO sensitivity and shutter speed to suit the movement of the subject and brightness of the scene to minimize the jitter of the subject.
|
| L.100 *2 / from 200 to 25600 |
The ISO sensitivity is fixed to various settings.
|
|
|
Notes:
- Cannot select [ Intelligent ISO ] in the following cases:
- Shutter-Priority AE Mode
- Manual Exposure Mode
- When [ Multi Exp. ] is set, the maximum setting is [ ISO 3200 ].
- ISO values below will be selectable in Creative Video Mode:
- [ AUTO ]
- [ 200 ]
- [ 6400 ]
- For model DMC-GH4 : When [ Electronic Shutter ] is set to [ ON ], the lSO sensitivity can be set up to [ ISO3200 ].
- For model DC-G95 : When the following functions are being used, the ISO sensitivity that can be set is restricted:
- Creative Video Mode / 4K Photo recording / Post-Focus Recording:
- [ AUTO ], [ 200 ] to [ 6400 ] ([ L.100 ] to [ 6400 ] if [ Extended ISO ] is set to [ ON ])
- LiveView Composite recording:
- [ 200 ] to [ 1600 ] ([ L.100 ] to [ 1600 ] if [ Extended ISO ] is set to [ ON ])
- Creative Video Mode / 4K Photo recording / Post-Focus Recording:
To view more Light Sensitivity information for this model, please click here to view the Operating Manual
For model DMC-GX85
Applicable Shooting Modes
Raising the value of the ISO setting allows the sensitivity to light (ISO sensitivity) to be set. Setting to a higher value enables pictures to be taken even in dark places without the resulting pictures coming out dark.
Setting the Light Sensitivity
- Press ▲ ( ISO ) on the control dial of your unit.
- Select the ISO sensitivity by rotating the rear dial.
- You can switch the functions between the rear dial and the front dial by pressing [ DISP. ]
- Rotate the front dial to set the upper limit of ISO sensitivity.
- It will work when the [ Sensitivity ] is set to [ AUTO ] or [ Intelligent ISO ].
- Press the rear dial to set.
- You can also press the shutter button halfway to set.
| Auto |
The ISO sensitivity is automatically adjusted according to the brightness.
|
| Intelligent ISO |
The camera detects movement of the subject and then automatically sets the optimum ISO sensitivity and shutter speed to suit the movement of the subject and brightness of the scene to minimize the jitter of the subject.
|
| L.100 *2 / from 200 to 25600 | The ISO sensitivity is fixed to various settings. |
|
|
Notes:
- Cannot select [ Intelligent ISO ] in the following cases:
- Shutter-Priority AE Mode
- Manual Exposure Mode
- When [ Multi Exp. ] is set, the maximum setting is [ ISO 3200 ].
To view more Light Sensitivity information for this model, please click here to view the Operating Manual
For model DMC-LX10
Applicable Shooting Modes
Raising the value of the ISO setting allows the sensitivity to light (ISO sensitivity) to be set. Setting to a higher value enables pictures to be taken even in dark places without the resulting pictures coming out dark.
Setting the Light Sensitivity
- Press [ MENU ] → [ Motion Picture ] / [ Rec ] → [ Sensitivity ].
- Select the ISO sensitivity by rotating the rear dial.
- Press [ MENU / SET ] when you have selected your desired setting.
- You can also press the shutter button halfway to set.
| Settings | Information |
|---|---|
| Auto | The ISO sensitivity is automatically set in a range up to 3200 *1 according to the brightness of the subject. |
| Intelligent ISO |
ISO Sensitivity is automatically set in a range up to 3200 *1 depending on the movement and brightness of a subject.
|
| 80 *2 / 100 *2 / from 125 to 12800 / 25600 *2 | The ISO sensitivity is fixed at the selected setting. |
|
|
Notes:
- When [ Multi Exp. ] is set, the maximum setting is [ 3200 ].
- Cannot select [ Intelligent ISO ] in the following cases:
- Shutter-Priority AE Mode
- Manual Exposure Mode
- You can use the following settings in the Creative Video Mode, when recording 4K photos, or when recording with [ Post Focus ].
- [ AUTO ] / [ 125 ] to [ 6400 ]
To view more Light Sensitivity information for this model, please click here to view the Operating Manual
For model DMC-LX100
Applicable Shooting Modes
Setting the ISO Sensitivity
We recommend higher settings to take clear pictures in darker locations.
- Press [ ISO ] button (▲).
- Turn the control dial to select ISO Sensitivity and press [ MENU / SET ]
| Settings | Information |
|---|---|
| AUTO | ISO Sensitivity is automatically set in a range up to 3200*1 depending on the brightness of a Subject. |
|
|
ISO Sensitivity is automatically set in a range up to 3200*1 depending on the movement and brightness of a subject. |
| 100*2/200/400/800/1600/3200/6400/12800/25600 |
ISO Sensitivity is fixed at the selected setting.
|
|
|
Notes:
- When [ High Dynamic ] is selected for the picture effect (Filter), [ Sensitivity ] is fixed to [ AUTO ].
- When a picture effect (Filter) other than [ High Dynamic ] is selected or when [ Multi Exp. ] is set, ISO Sensitivity can be set in a range up to [ 3200 ].
- For details on the available flash range used when the [ Sensitivity ] is set to [ AUTO ]
- Cannot select [
 ] in the following cases:
 - When using [ Shutter-Priority ]
- When using [ Manual Exposure ]
- When [ Direct Focus Area ] is set to [ ON ], the cursor button functions as an operation for moving the AF area. In that case, use the Quick menu to set the ISO Sensitivity.
- You can use the following settings when recording motion pictures:
- [ AUTO ]
- [ 200 ]
- [ 6400 ]
To view more Light Sensitivity information for this model, please click here to view the Operating Manual
For model DMC-SZ1
- Press [ Menu/Set ].
- Press [ ◄ ] / [ ► ] to select [ Rec ] from the menu and then press [ Menu/Set ].
- Press [ ▲ ] / [ ▼ ] to select [ Sensitivity ] and then press [ Menu/Set ].
Note: On the Menu screen, it will switch to the next page when you reach the bottom. It will also switch by pressing the zoom button.
Sensitivity
This allows the Sensitivity to light (ISO sensitivity) to be set. Setting to a higher figure enables pictures to be taken even in dark places without the resulting pictures coming out dark.
| Settings | Description of settings |
|---|---|
| [ ISO ] |
The ISO sensitivity is adjusted according to the movement of the subject and the brightness.
|
| [ 100 ] | The ISO sensitivity is fixed to various settings. |
| [ 200 ] | |
| [ 400 ] | |
| [ 800 ] | |
| [ 1600 ] |
- The ISO sensitivity is automatically set under the following conditions.
- When recording motion pictures.
- When [ Burst ] in the Rec menu is set to [ Highspeed Burst ] or [ Flash Burst ]
To view more Light Sensitivity information for this model, please click here to view the Operating Manual
For model DMC-SZ10
- Press [ Menu/Set ].
- Press [ ◄ ] / [ ► ] to select [ Rec ] from the menu and then press [ Menu/Set ].
- Press [ ▲ ] / [ ▼ ] to select [ Sensitivity ] and then press [ Menu/Set ].
Note: On the Menu screen, it will switch to the next page when you reach the bottom. It will also switch by pressing the zoom button.
Sensitivity
This allows the Sensitivity to light (ISO sensitivity) to be set. Setting to a higher figure enables pictures to be taken even in dark places without the resulting pictures coming out dark.
| Settings | Description of settings |
|---|---|
| [ ISO ] |
The ISO sensitivity is adjusted according to the movement of the subject and the brightness.
|
| [ 100 ] | The ISO sensitivity is fixed to various settings. |
| [ 200 ] | |
| [ 400 ] | |
| [ 800 ] | |
| [ 1600 ] |
- The ISO sensitivity is automatically set under the following conditions.
- When recording motion pictures.
- When [ Burst ] in the Rec menu is set to [ Highspeed Burst ] or [ Flash Burst ]
To view more Light Sensitivity information for this model, please click here to view the Operating Manual
For model DMC-TS30
- Press [ Menu/Set ].
- Press [ ◄ ] / [ ► ] to select [ Rec ] from the menu and then press [ Menu/Set ].
- Press [ ▲ ] / [ ▼ ] to select [ Sensitivity ] and then press [ Menu/Set ].
Note: On the Menu screen, it will switch to the next page when you reach the bottom. It will also switch by pressing the zoom button.
Sensitivity
This allows the Sensitivity to light (ISO sensitivity) to be set. Setting to a higher figure enables pictures to be taken even in dark places without the resulting pictures coming out dark.
| Settings | Description of settings |
|---|---|
| [ ISO ] |
The ISO sensitivity is adjusted according to the movement of the subject and the brightness.
|
| [ 100 ] | The ISO sensitivity is fixed to various settings. |
| [ 200 ] | |
| [ 400 ] | |
| [ 800 ] | |
| [ 1600 ] |
- The ISO sensitivity is automatically set under the following conditions.
- When recording motion pictures.
- When [ Burst ] in the Rec menu is set to [ Highspeed Burst ] or [ Flash Burst ]
To view more Light Sensitivity information for this model, please click here to view the Operating Manual
For model DMC-XS1
- Press [ Menu/Set ].
- Press [ ◄ ] / [ ► ] to select [ Rec ] from the menu and then press [ Menu/Set ].
- Press [ ▲ ] / [ ▼ ] to select [ Sensitivity ] and then press [ Menu/Set ].
Note: On the Menu screen, it will switch to the next page when you reach the bottom. It will also switch by pressing the zoom button.
Sensitivity
This allows the Sensitivity to light (ISO sensitivity) to be set. Setting to a higher figure enables pictures to be taken even in dark places without the resulting pictures coming out dark.
| Settings | Description of settings |
|---|---|
| [ ISO ] |
The ISO sensitivity is adjusted according to the movement of the subject and the brightness.
|
| [ 100 ] | The ISO sensitivity is fixed to various settings. |
| [ 200 ] | |
| [ 400 ] | |
| [ 800 ] | |
| [ 1600 ] |
- The ISO sensitivity is automatically set under the following conditions.
- When recording motion pictures.
- When [ Burst ] in the Rec menu is set to [ Highspeed Burst ] or [ Flash Burst ]
To view more Light Sensitivity information for this model, please click here to view the Operating Manual
For model DMC-ZS100
Applicable Shooting Modes
Raising the value of the ISO setting allows the sensitivity to light (ISO sensitivity) to be set. Setting to a higher value enables pictures to be taken even in dark places without the resulting pictures coming out dark.
Setting the Light Sensitivity
- Press [ MENU ] → [ Rec ] → [ Sensitivity ].
- Select the ISO sensitivity by rotating the rear dial.
- Press [ MENU / SET ] when you have selected your desired setting.
- You can also press the shutter button halfway to set.
| Settings | Information |
|---|---|
| Auto | The ISO sensitivity is automatically set in a range up to 3200 *1 according to the brightness of the subject. |
| Intelligent ISO |
ISO Sensitivity is automatically set in a range up to 3200 *1 depending on the movement and brightness of a subject.
|
| 80 *2 / 100 *2 / from 125 to 12800 / 25600 *2 |
The ISO sensitivity is fixed at the selected setting.
|
|
|
Notes:
- When [ Multi Exp. ] is set, the maximum setting is [ 3200 ].
- You can use the following settings in the Creative Video Mode, when recording 4K photos.
- [ AUTO ] / [ 125 ] to [ 6400 ]
- Cannot select [ Intelligent ISO ] in the following cases:
- Shutter-Priority AE Mode
- Manual Exposure Mode
- When recording [ Post Focus ]
To view more Light Sensitivity information for this model, please click here to view the Operating Manual
For model DMC-ZS45
Applicable Modes
Raising the value of the ISO setting allows the sensitivity to light (ISO sensitivity) to be set. Setting to a higher value enables pictures to be taken even in dark places without the resulting pictures coming out dark.
| Settings | Information |
|---|---|
| Auto |
The ISO sensitivity is automatically adjusted according to the brightness.
|
| Intelligent ISO |
The camera detects movement of the subject and then automatically sets the optimum ISO sensitivity and shutter speed to suit the movement of the subject and brightness of the scene to minimize the jitter of the subject.
|
| [ 100 ]/[ 200 ]/[ 400 ]/[ 800 ]/[ 1600 ]/[ 3200 ] | The ISO sensitivity is fixed to various settings. |
Notes:
- Cannot select [ Intelligent ISO ] in the following cases:
- Manual Exposure Mode
- Shutter-Priority AE Mode
- When you take pictures with the flash, the maximum ISO sensitivity will be set to [ 2000 ].
- The ISO sensitivity is automatically set under the following conditions:
- When recording motion pictures
- When [ Burst Shooting ] is set to [ Highspeed Burst ]/[ Flash Burst ]
To view more Light Sensitivity information for this model, please click here to view the Operating Manual
For model DMC-ZS60
Applicable Shooting Modes
Raising the value of the ISO setting allows the sensitivity to light (ISO sensitivity) to be set. Setting to a higher value enables pictures to be taken even in dark places without the resulting pictures coming out dark.
Setting the Light Sensitivity
- Press [ MENU ] → [ Rec ] → [ Sensitivity ].
- Select the ISO sensitivity by rotating the control dial.
- Press [ MENU / SET ] when you have selected your desired setting.
- You can also press the shutter button halfway to set.
| Settings | Information |
|---|---|
| Auto | The ISO sensitivity is automatically set in a range up to 3200(For model DMC-ZS60 with the flash on: 1600) *1 according to the brightness of the subject. |
| Intelligent ISO |
ISO Sensitivity is automatically set in a range up to 3200(For model DMC-ZS60 with the flash on: 1600) *1 depending on the movement and brightness of a subject.
|
| 80/ 100 / 200 / 400 / 800 / 1600 / 3200 / 6400 *2 |
The ISO sensitivity is fixed at the selected setting.
|
|
|
Notes:
- You can use the following settings in the Creative Video Mode, when recording 4K photos.
- [ AUTO ] / [ 80 ] to [ 3200 ]
- Cannot select [ Intelligent ISO ] in the following cases:
- Shutter-Priority AE Mode
- Manual Exposure Mode
- When recording [ Post Focus ]
To view more Light Sensitivity information for this model, please click here to view the Operating Manual